2024-07-12
한어Русский языкEnglishFrançaisIndonesianSanskrit日本語DeutschPortuguêsΕλληνικάespañolItalianoSuomalainenLatina
Prepare the environment:
- VMware17
- Ubuntu18.04(LTS):https://releases.ubuntu.com/18.04/ubuntu-18.04.6-desktop-amd64.iso
Docker related documents:
- Docker official website address: https://www.docker.com/
- Docker documentation address: https://docs.docker.com/
- Docker image repository: https://hub.docker.com/

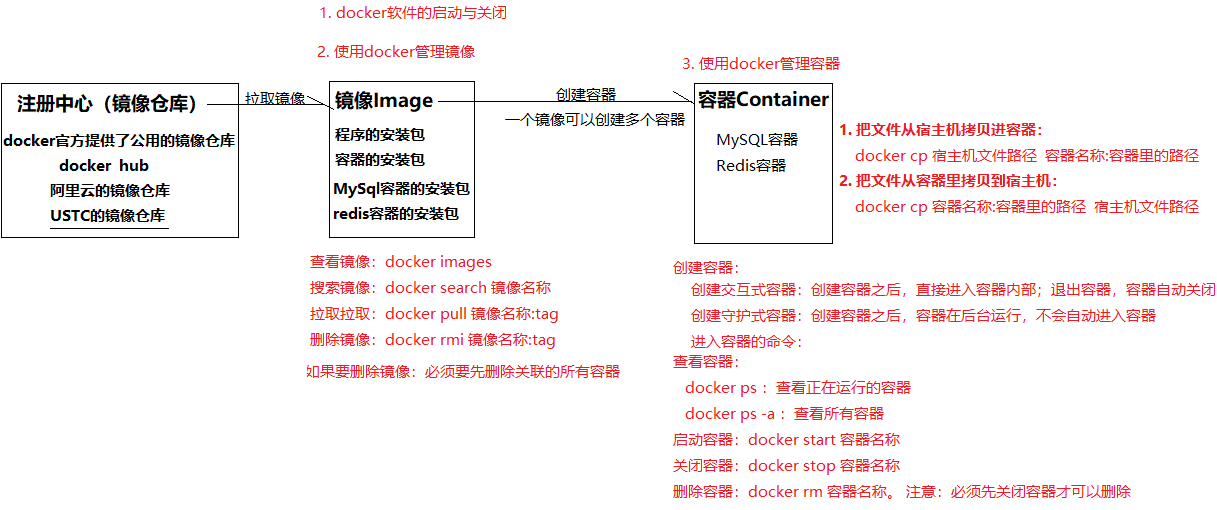
1. What is Docker: It is an open source container engine that can easily manage containers, and the containers are isolated from each other using a sandbox mechanism.
2. What problem does docker solve: Solve the problem of software environment migration.
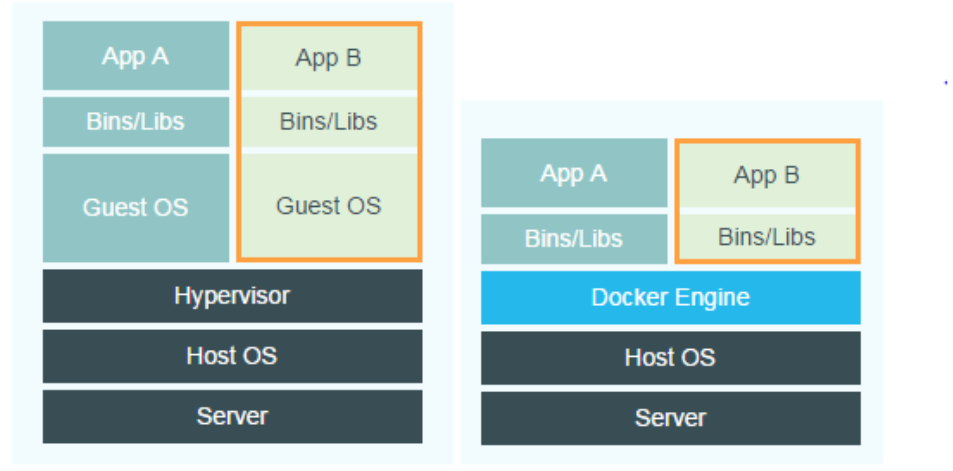
3. The difference between containers and virtual machines:
4. Docker storage:
-v /宿主机目录:容器目录数据卷:容器目录5. Docker network: Create a custom network to access the host name as a stable domain name. (It allows containers on the same network to communicate with each other)
#示例
#自定义网络
docker network create mynet
#主节点
docker run -d -p 6379:6379
-v /app/rd1:/bitnami/redis/data
-e REDIS_REPLICATION_MODE=master
-e REDIS_PASSWORD=123456
--network mynet --name redis01
bitnami/redis

#从节点
docker run -d -p 6380:6379
-v /app/rd2:/bitnami/redis/data
-e REDIS_REPLICATION_MODE=slave
-e REDIS_MASTER_HOST=redis01
-e REDIS_MASTER_PORT_NUMBER=6379
-e REDIS_MASTER_PASSWORD=123456
-e REDIS_PASSWORD=123456
--network mynet --name redis02
bitnami/redis
This article is based on the Ubuntu environment installation. If you lack permissions, just add sudo in front.
1. Turn off the firewall (you don’t need to manually expose the port for subsequent external access, which is convenient for testing)
sudo ufw disable

#关闭防火墙:sudo ufw disable
#查看防火墙状态:sudo ufw status
#开启防火墙:sudo ufw enable
2. Install Docker
#卸载旧版docker
sudo apt-get remove docker docker-engine docker.io containerd runc

#更新软件包
sudo apt-get update

#安装一些工具
sudo apt-get install
    apt-transport-https
    ca-certificates
    curl
    gnupg-agent
    software-properties-common

#安装docker
sudo apt install docker.io

#验证dokcer是否安装成功
docker --version

#启动& 开机启动docker; enable + start 二合一
sudo systemctl enable docker --now

#配置阿里云镜像加速
sudo mkdir -p /etc/docker
sudo tee /etc/docker/daemon.json <<-'EOF'
{
  "registry-mirrors": ["https://82m9ar63.mirror.aliyuncs.com"]
}
EOF

#重新加载配置
sudo systemctl daemon-reload
#重启docker服务
sudo systemctl restart docker
1. Status management of docker service:
2. Docker image management:
3. Docker container management:
4. Docker data volume:
Data volume: a folder managed by Docker.
Uses of data volumes: You can bind a data volume to a path in a container to achieve two-way automatic transfer of files between the container and the host.
Put the file in the host's data volume: Docker will automatically synchronize the file to the container
If there are changes in the files in the container, Docker will automatically synchronize them to the data volume of the host machine.
Data volume operation commands:
List data volumes: docker volume ls
Create a data volume: docker volume create data volume name
View data volume details (actual path): docker volume inspect data volume name
Delete the data volume: docker volume rm volume name
Create a container and bind the data volume:
docker run -di --name=container name -v data volume name: path in container image name: tag
docker run -di --name=container name -v path in the host: path in the container image name: tag
Note: All paths in the -v parameter must be absolute paths
5. Image backup:
Documentation: https://docs.docker.com/reference/dockerfile/
Dockerfile function: create a custom image.
Dockerfile is based on a basic image and writes a series of docker instructions. Each instruction builds a layer of image, and finally a target image is built through these instructions layer by layer.
| Common instructions | effect |
|---|---|
| FROM | Specify the image base environment |
| RUN | Run custom commands |
| CMD | Container startup command or parameters |
| LABEL | Custom labels |
| EXPOSE | Specifying exposed ports |
| ENV | Environment variables |
| ADD | Add files to the image |
| COPY | Copy files to the image |
| ENTRYPOINT | Fixed container startup command |
| VOLUME | Data Volume |
| USER | Specifying Users and Groups |
| WORKDIR | Specifying a default working directory |
| ARG | Specifying build parameters |
Example:
#编写dockerfile文件
vim Dockerfile
FROM openjdk:17
LABEL author=aopmin
COPY app.jar /app.jar   #把jar包复制到容器的根目录下
EXPOSE 8080
ENTRYPOINT ["java","-jar","app.jar"]  #运行命令

# 构建镜像
docker bulid -f Dockerfile -t 镜像名:tag .
Service orchestration or container orchestration: managing containers in batches according to certain business rules.
Docker Compose is an orchestration tool for defining and running multiple Docker containers.
Multiple containers can be started with one command. This mainly solves the problem of how to manage and orchestrate containers.
There are three steps to using Docker Compose:
docker-compose.ymlDefine the services that make up your applicationdocker-compose up -dStart the applicationInstall docker-compose:
# 下载docker compose
curl -L https://github.com/docker/compose/releases/download/1.22.0/docker-compose-`uname -s`-`uname -m` -o /usr/local/bin/docker-compose

# 设置权限
chmod +x /usr/local/bin/docker-compose

# 查看版本
docker-compose -version
If you want to uninstall docker-compose, execute the following command:
# docker compose是二进制包方式安装的,删除二进制文件即可
rm /usr/local/bin/docker-compose
Common commands for docker-compose:
# !!!注意:必须先切换到`docker-compose.yaml`文件所在的目录后,才可以执行以下命令!!!

#创建容器并后台启动
docker-compose up -d

#直接启动容器
docker-compose start

#其它命令:
docker-compose help # 查看帮助
docker-compose stop  # 停止容器
docker-compose start # 启动容器
docker-compose restart # 重启容器
docker-compose rm # 删除已停止的容器
docker-compose down # 停止并删除容器
Example:
1. Create a docker-compose directory
mkdir ~/docker-compose
cd ~/docker-compose
2. Writedocker-compose.yamldocument
version: "3.0"
services:
  redis:
    container_name: redis
    image: redis:5.0
    ports:
      - 6379:6379
  nginx:
    container_name: nginx
    image: nginx:1.14.2
    ports:
      - 80:80
    volumes:
      - /root/volumes/nginx/html:/usr/share/nginx/html
  tomcat:
    container_name: tomcat
    image: tomcat:8.5.88
    ports:
      - 8080:8080
    volumes:
      - /root/volumes/tomcat/webapps:/usr/local/tomcat/webapps
3. Start
# !!!注意:必须先切换到有`docker-compose.yaml`文件所在的目录后,才可以执行以下命令!!!
cd ~/docker-compose

# docker-compose up -d 以守护进程方式创建并启动容器
docker-compose up -d

I have devoted myself to the research of technology for more than 30 years. I am proficient in various languages such as Java, Linux, JavaScript, PHP, CSS, etc. I have made many contributions in the field of open source. I have established a developer documentation site to share some problems in technology development for everyone to read.

