2024-07-12
한어Русский языкEnglishFrançaisIndonesianSanskrit日本語DeutschPortuguêsΕλληνικάespañolItalianoSuomalainenLatina
Compose is a tool software launched by Docker that can manage multiple Docker containers to form an application. You need to define a YAML-formatted configuration file docker-compose.yml and write the call relationship between multiple containers. Then, you can start/stop these containers at the same time with just one command.
Docker recommends that we only run one service in each container, because the Docker container itself takes up very few resources, so it is best to separate each service separately. But then we face another problem?
If I need to deploy multiple services at the same time, do I have to write a separate Dockerfile for each service and then build an image and a container? This is exhausting, so Docker officially provides us with the docker-compose multi-service deployment tool
For example, to implement a Web microservice project, in addition to the Web service container itself, it is often necessary to add the backend database MySQL service container, redis server, registration center Eureka, and even a load balancing container, etc. . . . . .
Compose allows users to define a group of related application containers as a project through a single docker-compose.yml template file (YAML format).
It is easy to define a multi-container application with a configuration file, and then use a single instruction to install all the dependencies of the application to complete the build. Docker-Compose solves the problem of how to manage and orchestrate containers.
Accelerated download address
sudo curl -L https://get.daocloud.io/docker/compose/releases/download/1.29.2/docker-compose-`uname -s`-`uname -m` -o /usr/local/bin/docker-compose
Add executable permissions
chmod +x /usr/local/bin/docker-compose
Check whether the installation is successful
docker-compose --version
uninstall
sudo rm / usr/ local/ bin/docker-compose
Three steps to use Compose
Write Dockerfile to define each microservice application and build the corresponding image file
Use docker-compose.yml to define a complete business unit and arrange the various container services in the overall application.
Finally, execute the docker-compose up command to start and run the entire application, completing the one-click deployment and launch.
Compose common commands
docker-compose -h # View help
docker-compose up # Start all docker-compose services
docker-compose up -d # Start all docker-compose services and run them in the background
docker-compose down # Stop and delete containers, networks, volumes, and images.
docker-compose exec service id in yml # Enter the container instance
docker-compose exec service id written in docker-compose.yml file /bin/bash
docker-compose ps # Displays all running containers currently orchestrated by docker-compose
docker-compose top # Displays the container processes currently orchestrated by docker-compose
docker-compose logs yml in the service id # View the container output log
docker-compose config # Check configuration
docker-compose config -q # Check the configuration. Output will be displayed only if there is a problem.
docker-compose restart # Restart the service
docker-compose start # Start the service
docker-compose stop #Stop the service
docker-machine command installation
 base=https://get.daocloud.io/docker/machine/releases/download/v0.14.0 &&
  curl -L $base/docker-machine-$(uname -s)-$(uname -m) >/tmp/docker-machine &&
  sudo install /tmp/docker-machine /usr/local/bin/docker-machine
1) In the Linux virtual machine, configure the IP address to 192.168.90.215 (x is the last 3 digits of your student ID, y is specified by you), and the virtual machine can access the Internet normally;
2) Configure the DNS server with the domain cr.com (abc is the initials of your name). After the configuration is complete, use nslookup to verify the forward and reverse resolution.
3) Configure LEMP (Nginx + MySQL (MariaDB) + PHP), and access the built LEMP through the real host www.cr.com (abc is your initials). (You cannot modify the hosts file for local resolution, but must use the DNS configured by yourself)
First, configure a static IP for Linux http://alleniverrui.top/archives/linux-pei-zhi-jing-tai-ip (If it doesn’t work, change the address below)
//to do
Edit /etc/named.conf file
vim /etc/named.conf
Change the listen on and query values to any
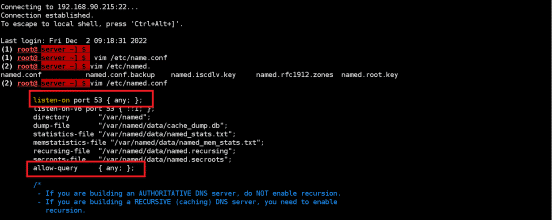
Configure DNS to resolve cr.com to 192.168.90.215
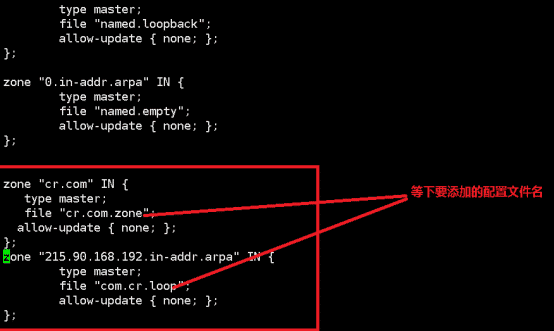
vim /etc/named.rfc1912.zones
Add at the end of the file
zone "cr.com" IN {
   type master;
   file "cr.com.zone";
  allow-update { none; };
};
zone "215.90.168.192.in-addr.arpa" IN {
        type master;
        file "com.cr.loop";
        allow-update { none; };
};
:wq to save
Edit the corresponding configuration file vim /var/named/com.cr.loop
Add the following content
$TTL 1D
@       IN SOA  cr.com. rname.invalid. (
                                        0       ; serial
                                        1D      ; refresh
                                        1H      ; retry
                                        1W      ; expire
                                        3H )    ; minimum
        NS      @
        A       127.0.0.1
        AAAA    ::1
        PTR     cr.com.
        NS      ns.cr.com.
ns      A       192.168.90.215
201     PTR     www.cr.com.
201     PTR     email.cr.com.
Edit vim /var/named/cr.com.zone
Add the following content
$TTL 1D
@       IN SOA  cr.com. rname.invalid. (
                                        0       ; serial
                                        1D      ; refresh
                                        1H      ; retry
                                        1W      ; expire
                                        3H )    ; minimum
        NS      @
        A       192.168.90.215
        AAAA    ::1
        NS      ns.server.com.
ns      IN A    192.168.90.215
www     IN A    192.168.90.215
email   IN A    192.168.90.215
Restart DNS
systemctl restart named
Check DNS status
systemctl status named
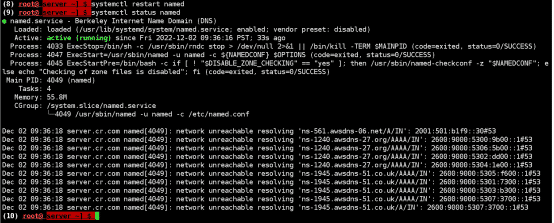
Startup Success
Forward resolution nslookup cr.com
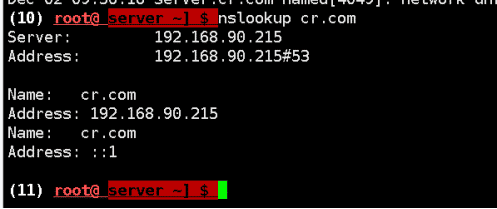
Reverse analysis nslookup 192.168.90.215

Write the docker-compose.yml file to /mydocker/lemp
vim /mydocker/lemp/docker-compose.yml Fill in the following content
nginx:
    build: ./nginx/
    ports:
        - 80:80
    links:
        - php
    volumes_from:
        - app

php:
    build: ./php/
    expose:
        - 9000
    links:
        - mysql
    volumes_from:
        - app

app:
    image: php:7.0-fpm
    volumes:
        - .:/var/www/html
    command: "true"

mysql:
    image: mysql:latest
    volumes_from:
        - data
    environment:
        MYSQL_ROOT_PASSWORD: secret
        MYSQL_DATABASE: bookmarks
        MYSQL_USER: cr
        MYSQL_PASSWORD: cr123

data:
    image: mysql:latest
    volumes:
        - /var/lib/mysql
    command: "true"

phpmyadmin:
    image: phpmyadmin/phpmyadmin
    ports:
        - 8080:80
    links:
        - mysql
    environment:
        PMA_HOST: mysql
Create nginx/Dockerfile in /mydocker/lemp/
Fill in
FROM nginx:latest

COPY ./default.conf /etc/nginx/conf.d/default.conf
Create default.conf
Fill in the following content
server {

  listen 80 default_server;

  root /var/www/html;

  index index.html index.php;


  charset utf-8;


  location / {

try_files $uri $uri/ /index.php?$query_string;

  }


  location = /favicon.ico { access_log off; log_not_found off; }

  location = /robots.txt  { access_log off; log_not_found off; }


  access_log off;

  error_log  /var/log/nginx/error.log error;


  sendfile off;


  client_max_body_size 100m;


  location ~ .php$ {

  fastcgi_split_path_info ^(.+.php)(/.+)$;

  fastcgi_pass php:9000;

 fastcgi_index index.php;

 include fastcgi_params;

 fastcgi_param SCRIPT_FILENAME $document_root$fastcgi_script_name;

fastcgi_intercept_errors off;

fastcgi_buffer_size 16k;

 fastcgi_buffers 4 16k;

  }


  location ~ /.ht {

 deny all;

  }

}
Create php/Dockerfile in /mydocker/lemp/
Fill in
FROM php:7.0-fpm

RUN docker-php-ext-install mysqli
Orchestrate Docker containers
docker-compose up -d
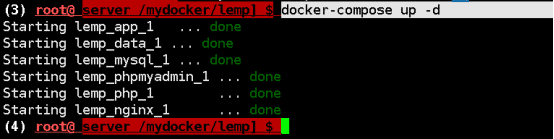
Docker ps View container running status
Successful startup
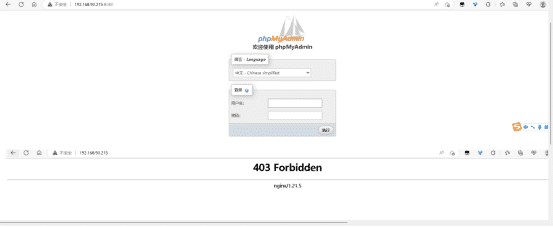
The local machine accesses the php environment and nginx environment through ip
Access successful
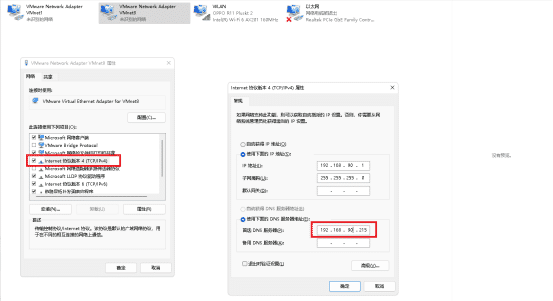
Configure the DNS server of this machine as a virtual machine, that is, 192.168.90.215
Open a cmd window and ping cr.com
Ping successfully
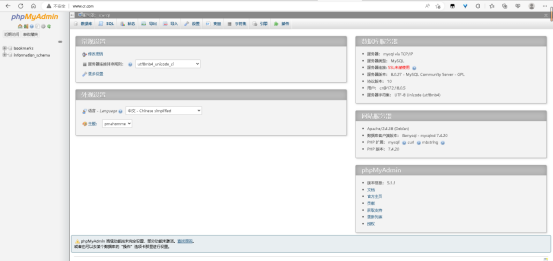
Access the PHP environment built through the domain name
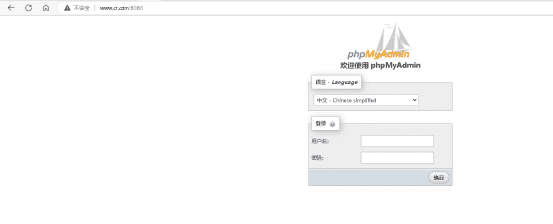
Modify the nginx configuration file
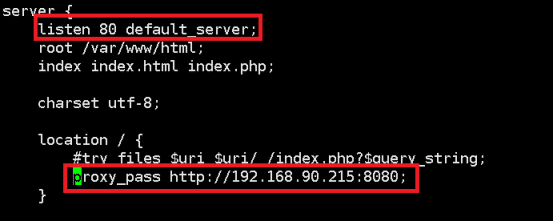
The final domain name directly accesses the website

I have devoted myself to the research of technology for more than 30 years. I am proficient in various languages such as Java, Linux, JavaScript, PHP, CSS, etc. I have made many contributions in the field of open source. I have established a developer documentation site to share some problems in technology development for everyone to read.
