2024-07-12
한어Русский языкEnglishFrançaisIndonesianSanskrit日本語DeutschPortuguêsΕλληνικάespañolItalianoSuomalainenLatina
A few days ago, I found a great artificial intelligence learning website. It is easy to understand and humorous. I couldn't help but share it with you.Click to jump to the website】
This article mainly introduces how to quickly deploy MongoDB on Linux Ubuntu system, and use ngrok intranet penetration tool to achieve remote access to local database from public network.
The MongoDB server can run on Linux, Windows, and MacOS platforms. It can store relatively complex data types and supports a very powerful query language that can implement almost all functions of single-table queries in relational databases. It can also index data.
It is more complicated to install MongoDB directly using the package manager. It is relatively simple and fast to install and deploy MongoDB using Docker. The following is a detailed operation process.
The operating environment of this tutorial is Linux Ubuntu system. Before starting, we need to install Docker.
Execute the following command in the terminal:
Add Docker source
# Add Docker's official GPG key:
sudo apt-get update
sudo apt-get install ca-certificates curl gnupg
sudo install -m 0755 -d /etc/apt/keyrings
curl -fsSL https://download.docker.com/linux/ubuntu/gpg | sudo gpg --dearmor -o /etc/apt/keyrings/docker.gpg
sudo chmod a+r /etc/apt/keyrings/docker.gpg

# Add the repository to Apt sources:
echo
  "deb [arch=$(dpkg --print-architecture) signed-by=/etc/apt/keyrings/docker.gpg] https://download.docker.com/linux/ubuntu
  $(. /etc/os-release && echo "$VERSION_CODENAME") stable" |
  sudo tee /etc/apt/sources.list.d/docker.list > /dev/null
sudo apt-get update
Install Docker package
sudo apt-get install docker-ce docker-ce-cli containerd.io docker-buildx-plugin docker-compose-plugin
Verify that the Docker Engine installation was successful by running the image
sudo docker run hello-world
sudo docker pull mongo
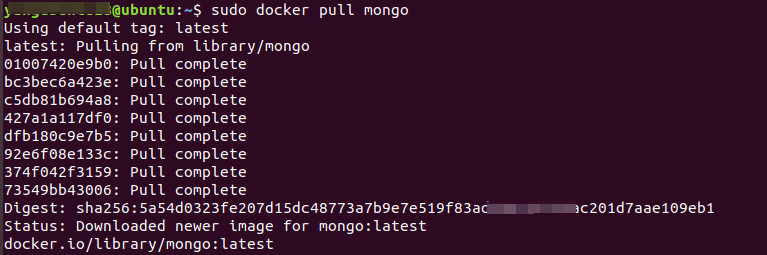
Then execute the command to view the image:
sudo docker images
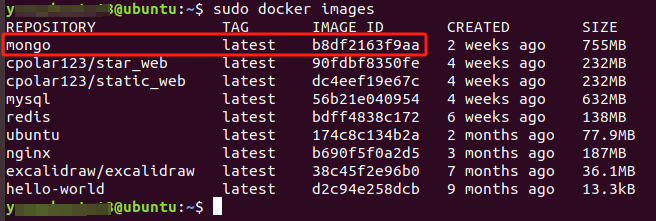
You can see that the MongoDB image has been successfully pulled.
After successfully pulling the MongoDB image, we can use the image to create and run a MongoDB container.
First, create a storage directory /docker_mount/mongodb/data on the host to persist MongoDB data.
You can create it using the following command:
sudo mkdir -p /docker_mount/mongodb/data
Then execute the following command in the terminal to run the container:
sudo docker run -d -p 27017:27017 --name mongodb -v /docker_mount/mongodb/data:/data/db -e MONGO_INITDB_ROOT_USERNAME=root -e MONGO_INITDB_ROOT_PASSWORD=password mongo

Parameter Description:
Then execute the following command to check whether the container is running:
sudo docker ps

You can see that the MongoDB container you just created is running.
OK, after the above process, the docker deployment of mongodb is completed. Now we can test the connection through Navicat.
The version of Navicat I use is 16. Create a new mongodb connection as shown below:
The host fills in the host ip, you can enter it in the terminal ip addrcommand to view it.
Port number: 27017
Verification fill in: admin
Fill in the username and password you set when starting the container: root and password
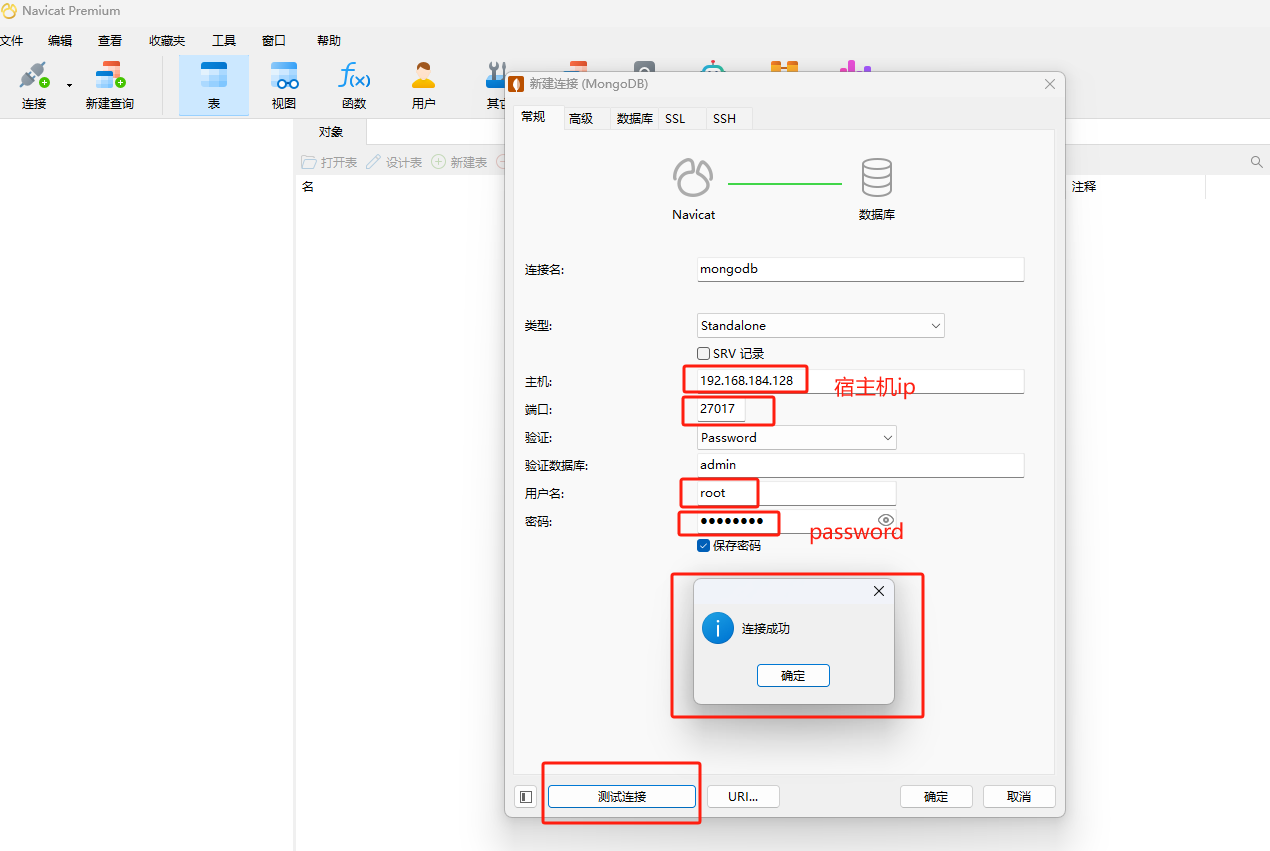
Then click Test Connection, and you can see that the connection is successful!
However, we can only connect locally to the MongoDB service that we have just deployed using Docker. What if we are in a different location and want to remotely access the MongoDB container deployed locally but do not have a public IP?
We can use ngrok intranet penetration tool to achieve remote access requirements in an environment without public IP.
Here are the steps to install ngrok:
ngrok official website address: https://www.cpolar.com
curl -L https://www.cpolar.com/static/downloads/install-release-cpolar.sh | sudo bash
sudo systemctl enable cpolar
sudo systemctl start cpolar
After ngrok is successfully installed, access Linux port 9200 on an external browser, that is, [http://server's LAN IP:9200], log in with your ngrok account, and you will see the ngrok web configuration interface after logging in. Then you can configure it in the web management interface.
After logging into the ngrok web UI, click Tunnel Management on the left dashboard - Create Tunnel:
Click创建
Then open the online tunnel list, check and copy the public network address of the TCP protocol,注意tcp://无需复制
Open Navicat or other connection tools, enter the public network address created in ngrok above in the host option, and the port number corresponds to the public network port number generated after the colon in the address.
Then click Test Connection, and you can see that the connection is successful!
summary
For the sake of demonstration, we used the TCP public network address tunnel generated by ngrok in the above operation, and its public network address was randomly generated.
The advantage of this random address is that it is quickly established and can be used immediately. However, its disadvantage is that the URL is randomly generated and this address will change randomly within 24 hours, making it more suitable for temporary use.
If you need to remotely access the local MongoDB service for a long time, but don't want to reconfigure the public network address every day, and you want the address to be nice and easy to remember, then I recommend that you use a fixed TCP address for remote access.
Log inngrok official website background, click Reserve on the left and find the reserved TCP address. Let's reserve a fixed TCP address for remote connection to the MongoDB database.
Click保留
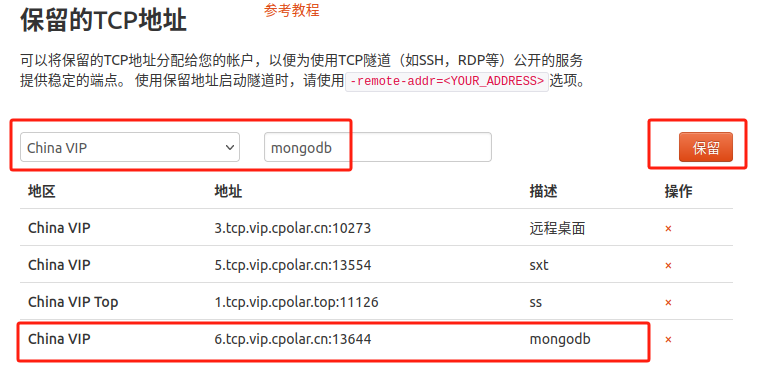
After the address is successfully reserved, the system will generate a corresponding fixed public network address and copy it.
In this example, the address is: 6.tcp.vip.npolar.cn:13644
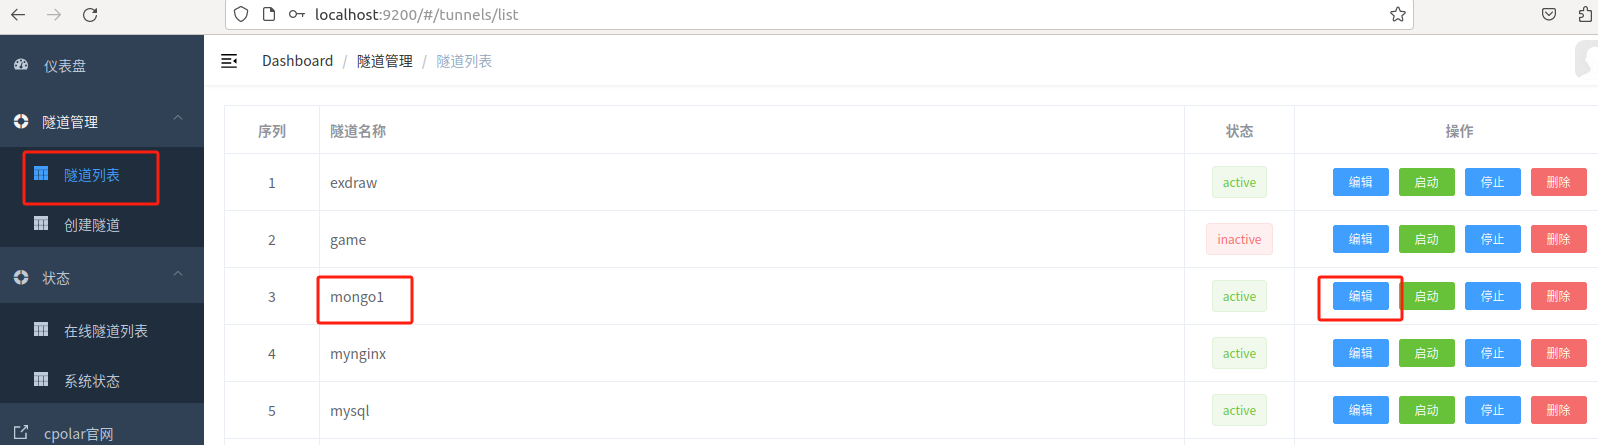
Then visit on your browserLinux局域网ip地址+:9200端口, log in to the ngrok web ui management interface.
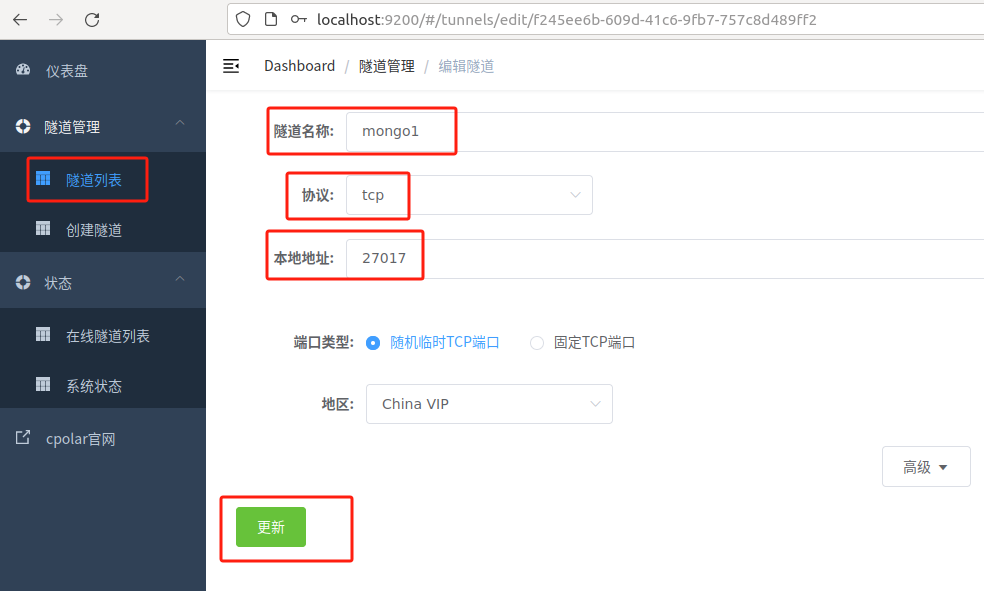
Click Tunnel Management - Tunnel List on the left dashboard, find the remote database tunnel we created above, and click编辑
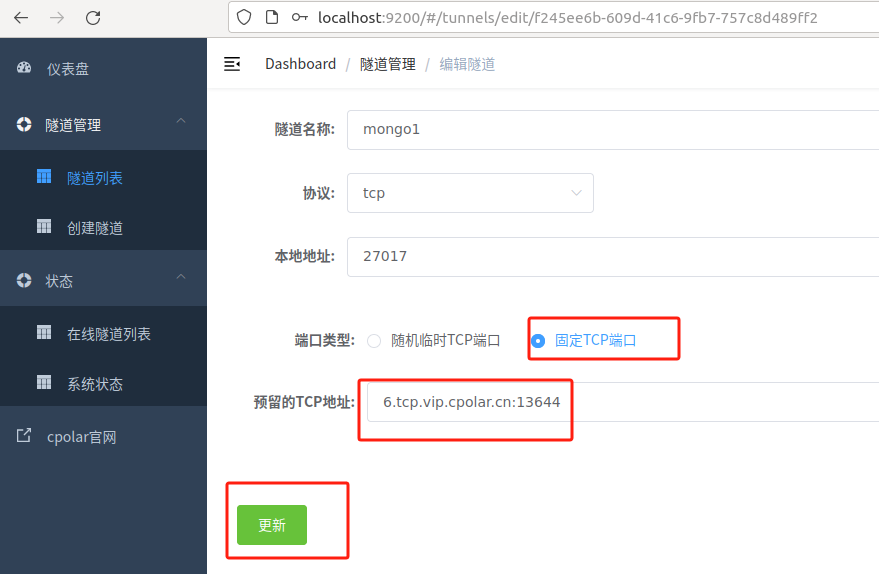
Modify the tunnel information and configure the successfully retained fixed TCP address into the tunnel
Click更新
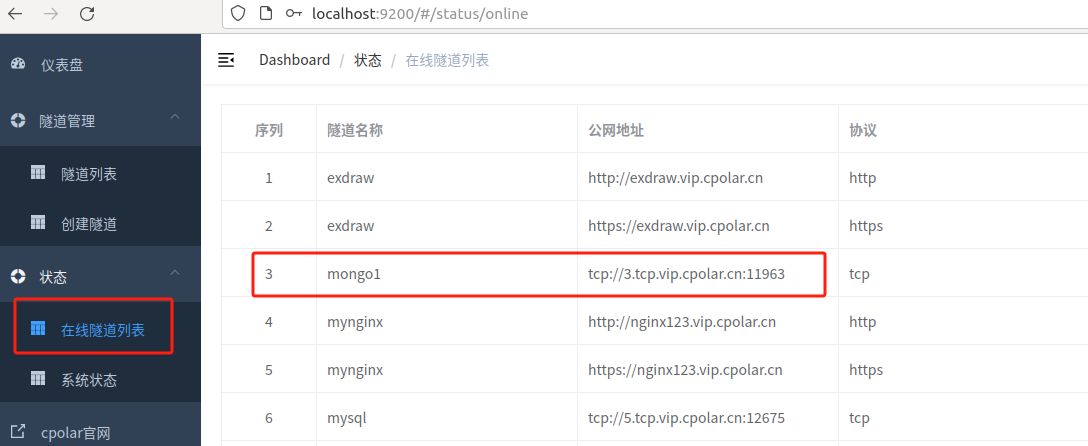
After the tunnel is updated successfully, click the status of the dashboard on the left - online tunnel list, and you can see that the public network address has been updated to a fixed TCP address.

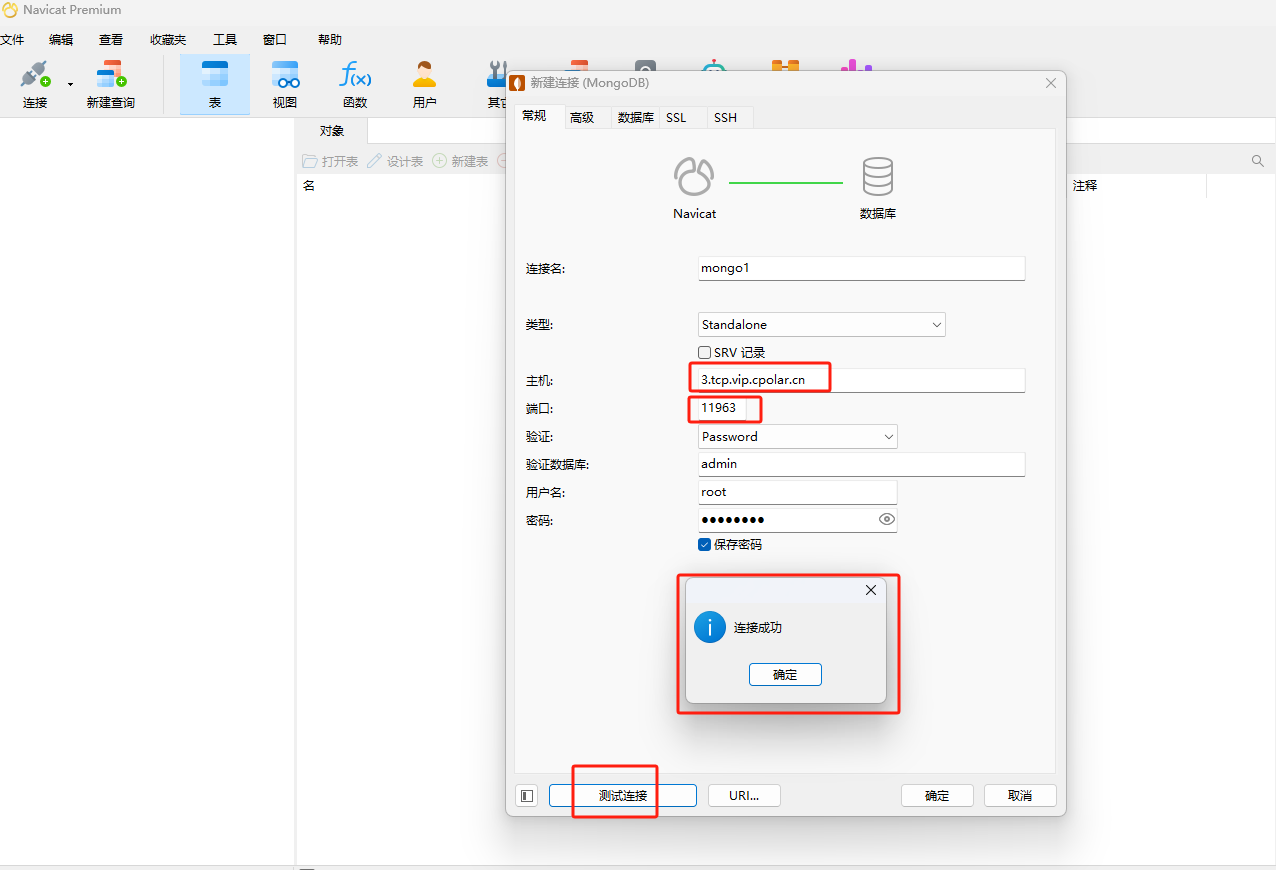
Open the connection tool, enter the fixed TCP address reserved by the official website, the port is the public network port number corresponding to the address, and click Test Connection.
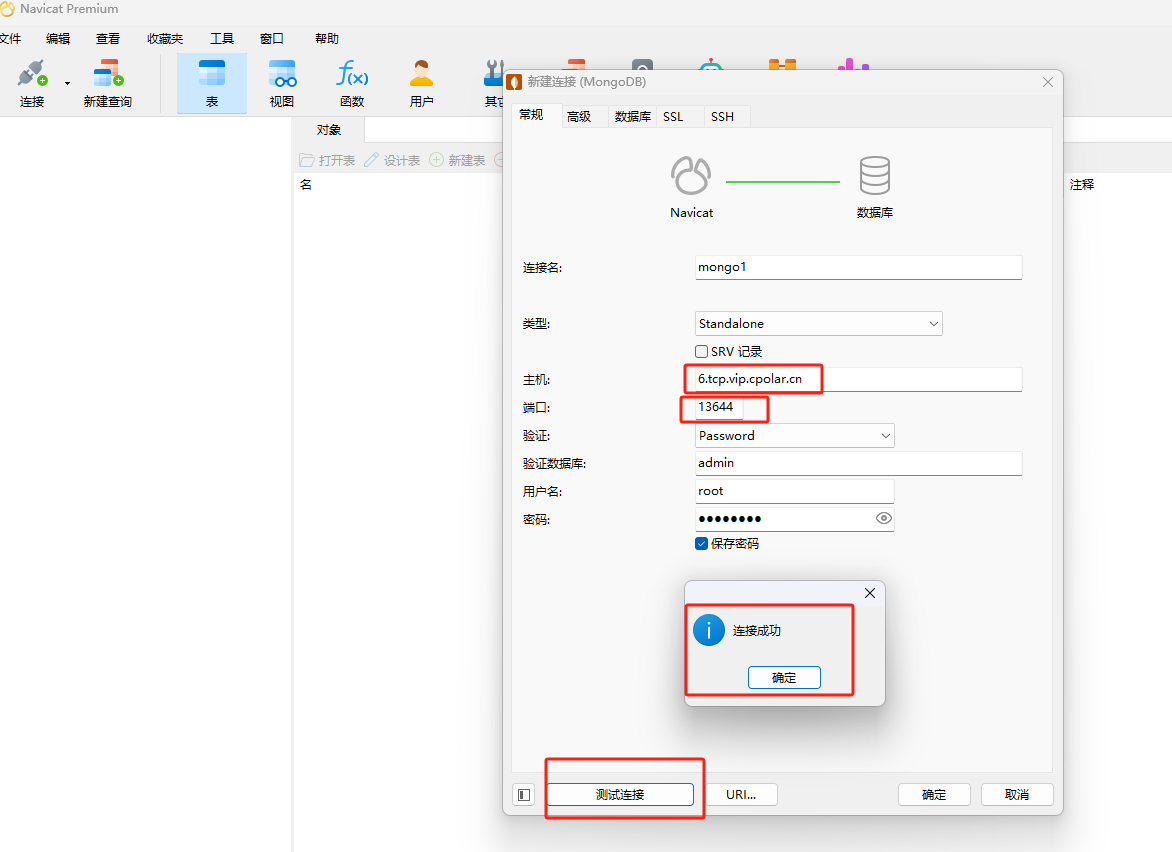
The connection success message indicates success. Now the public network address will no longer change randomly. As long as the tunnel is kept online, we can remotely connect to the MongoDB database in the local area network through this public network address.
The above is the complete process of how to use Docker to deploy MongoDB container in Ubuntu system and combine it with ngrok intranet penetration tool to achieve remote access to local services in intranet from public network. Thank you for watching.

I have devoted myself to the research of technology for more than 30 years. I am proficient in various languages such as Java, Linux, JavaScript, PHP, CSS, etc. I have made many contributions in the field of open source. I have established a developer documentation site to share some problems in technology development for everyone to read.
