2024-07-12
한어Русский языкEnglishFrançaisIndonesianSanskrit日本語DeutschPortuguêsΕλληνικάespañolItalianoSuomalainenLatina
Recently, many netizens have asked, "I can't find the driver when I install the original win10 or win11 on my new computer. I can't find the hard disk when I enter the third-party PE. After I find the hard disk and install it, a blue screen appears during installation. What's wrong with the new machine?" This netizen was a little upset and didn't know the reason. In fact, these are all because the vmd mode or raid mode with vmd function is enabled by default in the bios. Since the original win10 or win11 system lacks the vmd driver, the vmd mode in the bios needs to be changed to ahci. Here are the detailed steps to change the computer vmd to ahci mode.

WhyHow to change the hard disk mode vmd to ahci in bios?
For processors of 11th generation and above (Intel Tiger Lake), the default BIOS has RAID mode or VMD mode with VMD function. When it is enabled, some PEs that do not support VMD function will fail to recognize the hard disk.You can also go to BIOS, go to Advanced and change the interface mode of your hard disk from vmd to AHCI. After entering PE, you can see your various hard disks.You only need to download the latest version of PE. It is recommended to boot it with a USB flash drive, and then install it to the USB flash drive. Generally, the problem can be solved.
Detailed steps to change the computer hard disk mode from vmd to ahci mode: (with various brands of machines and motherboards vmd to ahci methods)
Dell computer vmd to ahci method: 2019 new bios (10th generation, 11th generation, 12th generation cpu, 13th generation cpu) raid to ahci method
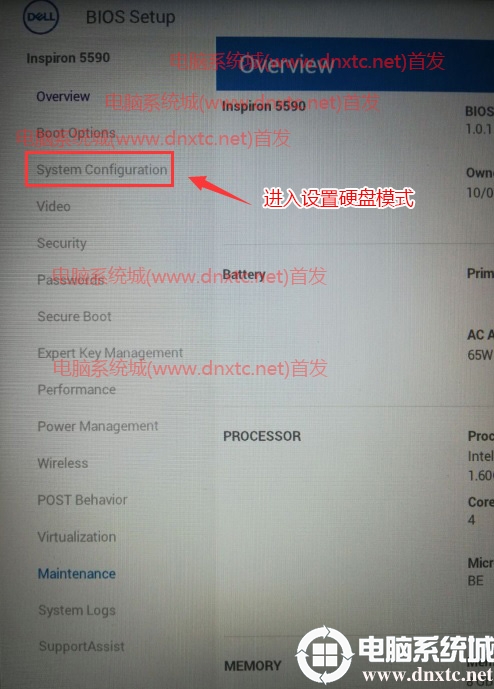
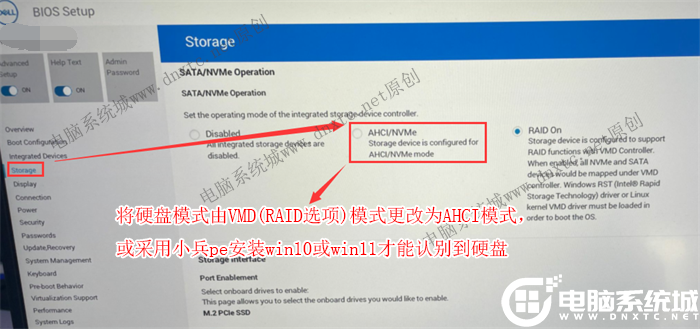
Note: Remember to apply each BIOS change on your Dell computer.
Lenovo laptop vmd to ahci method: 2019 new bios (10th, 11th, 12th cpu, 13th cpu) raid to ahci method
1. Press F1 or (FN+F1) to enter BIOS, and press the → arrow key to switch to the configuration option, as shown in the figure below;
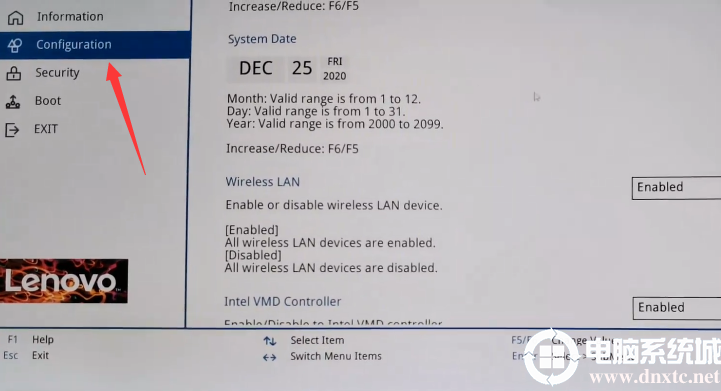
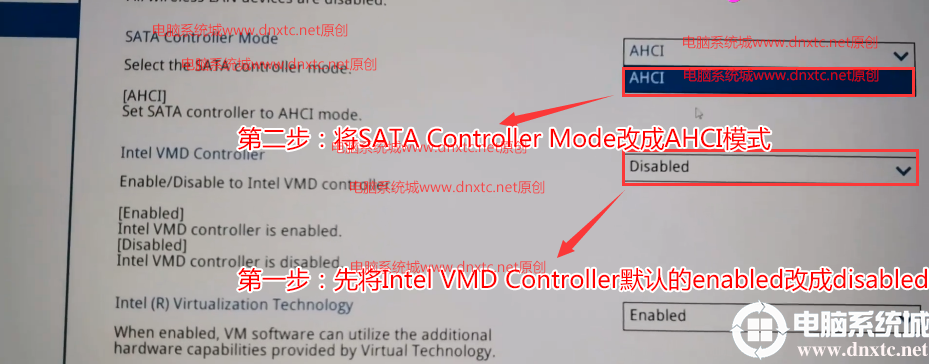
2. Then in the first step, change the default enabled of Intel VMD Controller on the right side of the configuration option to disabled, and close VMD. After closing vmd, you can change the SATA Controller Mode to AHCI mode in the second step. Otherwise, the hard disk may not be seen in PE or when installing the system. At the same time, the blue screen problem is solved after closing Intel vmd, as shown in the figure below;
How to change VMD to AHCI on ASUS laptops: How to change RAID to AHCI for new BIOS after 2019 (10th, 11th, 12th, 13th generation CPUs)
1. Press F2 or del to enter BIOS, then press F7 to enter advanced mode, as shown below;

2. Go to the Advanced page, then click VMD setup menu to enter the VMD menu, as shown below;
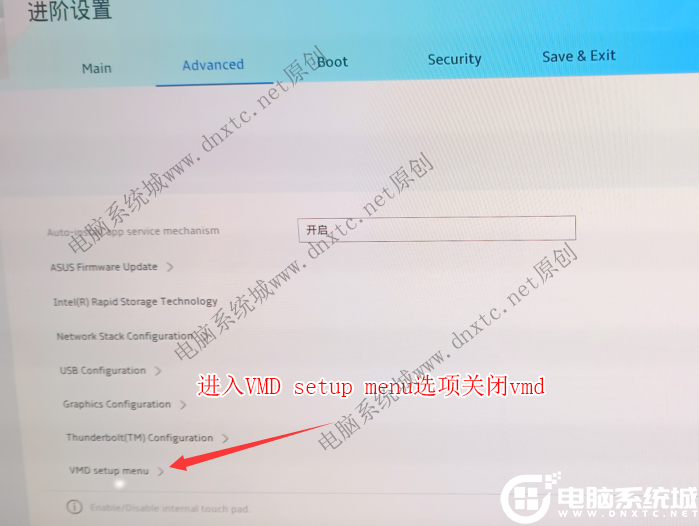
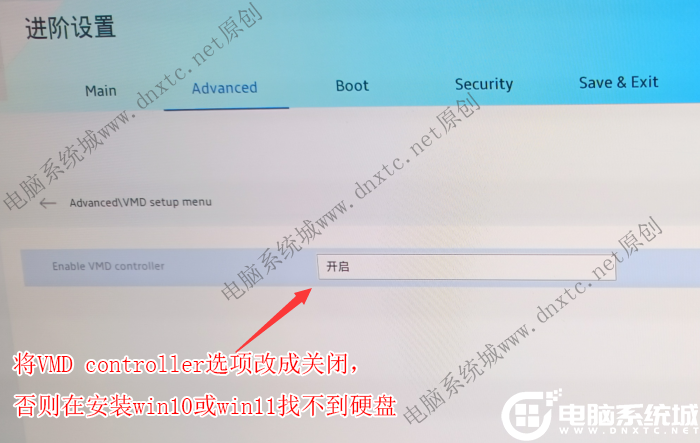
3. Select Enable VMD controller, and then select Close to close VMD. Be sure to close VDM. If you do not close it, the hard disk cannot be found during installation and an error message will be displayed (or use Xiaobing PE to identify the hard disk), as shown in the figure below;
How to change the hard disk mode vmd to ahci in the BIOS of ASUS motherboard: How to change raid to ahci in new BIOS after 2019 (10th, 11th, 12th cpu, 13th cpu)
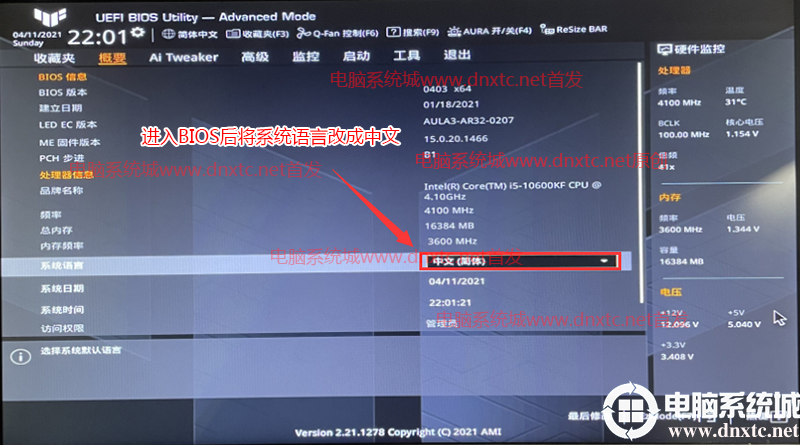
1. Restart the ASUS computer and press esc or f8 to enter the BIOS settings, and change the BIOS to Simplified Chinese, as shown in the figure below;
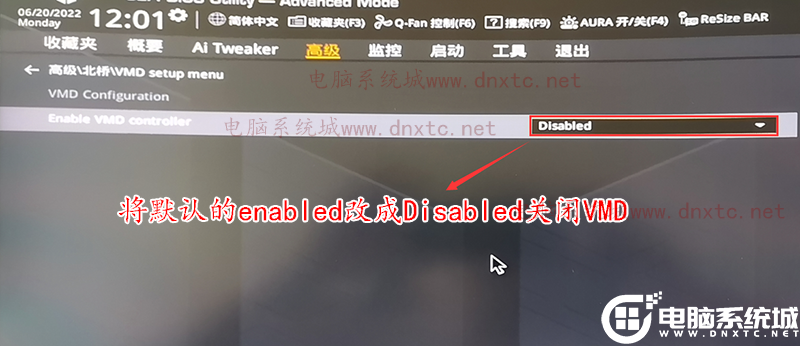
2. Press the → arrow key to move to Advanced, find the VMD setup menu in the North Bridge, and change the default enabled in the enabled VMD controller to disabled to turn off Intel vmd, as shown in the figure below;
FAQs on changing computer vmd to ahci mode:
ask:Is there any way to solve the problem of hard disk not being recognized in PE system in vmd mode without changing the ahci hard disk mode?
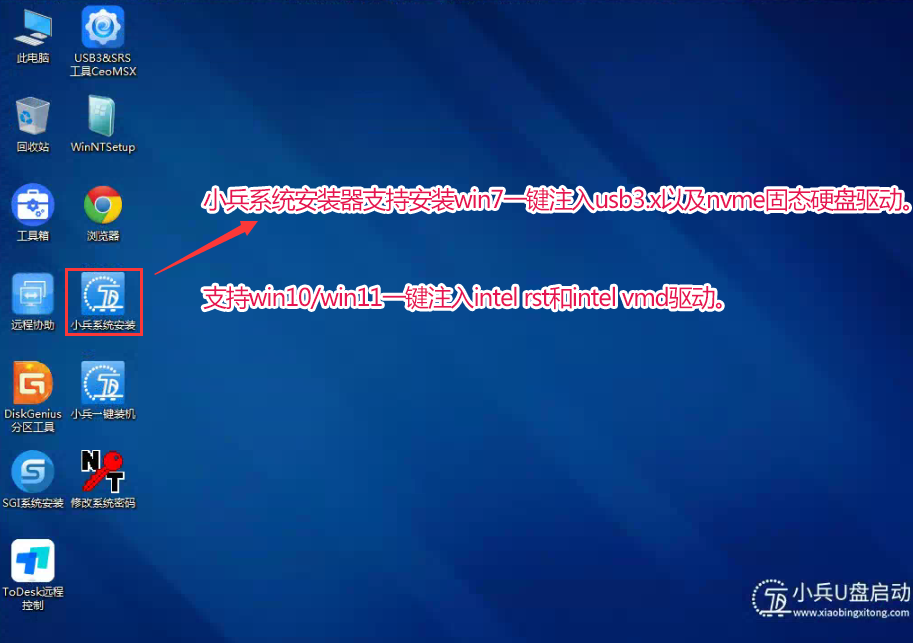
A: Branded machines or new models of major motherboard manufacturers have the RAlD function or vmd option of the storage device with VMD controller enabled by default. The Windows RST (Intel Rapid Storage Technology) driver must be loaded to start the operating system. When installing, you must load the vmd driver or useSoldier peInstall the injected vmd driver.
Detailed description:Using Xiaobing PE, you can automatically identify the hard disk in raid mode and automatically inject the Intel vmd driver when installing win10 and win11.
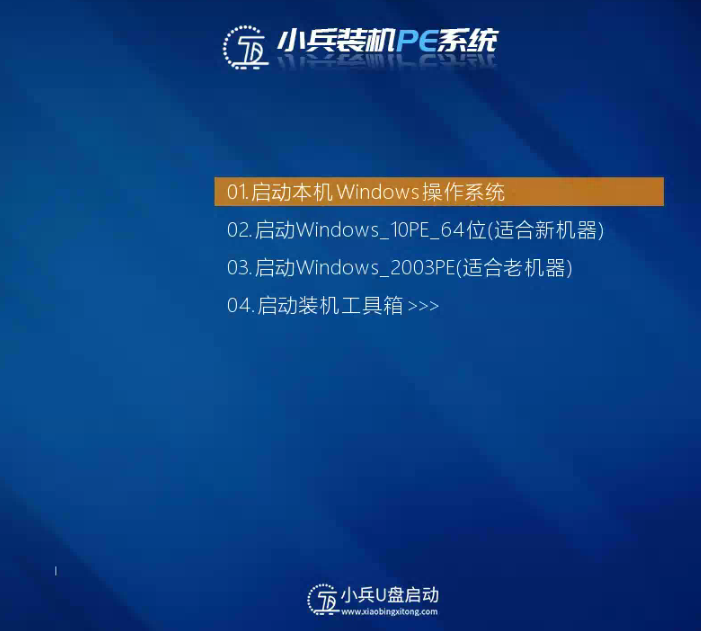
Using the Xiaobing system installation tool in Xiaobing PE, you can inject the Intel vmd driver with one click when installing win10 and win11, solving the blue screen problem after installing win10 and win11 systems.
The above are the detailed steps to change the hard disk mode vmd to ahci in BIOS. For more tutorials, please follow Computer System City (www.dnxtc.net)。

I have devoted myself to the research of technology for more than 30 years. I am proficient in various languages such as Java, Linux, JavaScript, PHP, CSS, etc. I have made many contributions in the field of open source. I have established a developer documentation site to share some problems in technology development for everyone to read.
