my contact information
Mailmesophia@protonmail.com
2024-07-12
한어Русский языкEnglishFrançaisIndonesianSanskrit日本語DeutschPortuguêsΕλληνικάespañolItalianoSuomalainenLatina
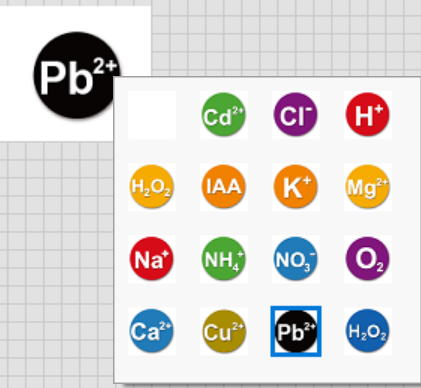
In LabVIEW, customizing the icon of the Ring control can make the user interface more intuitive and friendly. The following are detailed steps on how to customize the icon of the Ring control in LabVIEW:
First, you need to create or obtain the icon you want to use in the Ring control. You can use image editing software (such as Adobe Photoshop, GIMP, etc.) to create the icon. LabVIEW supports a variety of image formats, including BMP, PNG, JPG, etc. Make sure the icon is the right size for the Ring control.
Open LabVIEW.
Create a new VI (Virtual Instrument).
On the front panel, find the Controls Palette.
Select an appropriate Ring control (such as Numeric Ring or Text Ring) from the Ring & Enum submenu and place it on the front panel.
Right-click the placed Ring control and select "Properties".
In the properties dialog box that pops up, select the "Items" tab.
In the "Items" tab, click the "Edit Items..." button.
In the "Edit Items" dialog box, click the "Import Picture..." button.
In the file browsing dialog box that pops up, select the icon file you created or obtained earlier.
After importing the icon, you can see the icon displayed in the corresponding Item.
Repeat the above steps to add other items and their corresponding icons.
In the "Edit Items" dialog box, you can use the Up and Down buttons to adjust the order of the items.
You can also edit the text label of each Item to make it easier to identify.
After completing the settings of all icons and items, click the "OK" button to close the "Edit Items" dialog box.
In the properties dialog box, click the "OK" button again to apply the changes and close the dialog box.
On the front panel, run the VI.
Click the customized Ring control to check whether all customized icons and items are displayed correctly.
Make sure that the icon file is the correct size and format for the LabVIEW control.
Use appropriate image editing tools to adjust the size and quality of the icon to ensure that it is legible when displayed in the control.
If you need to change or delete the icon, repeat the above steps.
By following the above steps, you can customize the icon for the Ring control in LabVIEW to make the user interface more beautiful and intuitive, thus improving the user experience.

I have devoted myself to the research of technology for more than 30 years. I am proficient in various languages such as Java, Linux, JavaScript, PHP, CSS, etc. I have made many contributions in the field of open source. I have established a developer documentation site to share some problems in technology development for everyone to read.

Mailmesophia@protonmail.com