プライベートな連絡先の最初の情報
送料メール:
2024-07-12
한어Русский языкEnglishFrançaisIndonesianSanskrit日本語DeutschPortuguêsΕλληνικάespañolItalianoSuomalainenLatina
1.egg-amqplib: RabbitMQ メッセージ キューのカプセル化に基づくライブラリ
インストール:
npm i egg-amqplib --save導入
- // {app_root}/config/plugin.js
- exports.amqplib = {
- enable: true,
- package: 'egg-amqplib',
- };
設定
- // {app_root}/config/config.default.js
- exports.amqplib = {
- client: {
- // url: 'amqp://localhost',
- connectOptions: {
- protocol: 'amqp',
- hostname: 'localhost',
- port: 5672,
- username: 'guest',
- password: 'guest',
- locale: 'en_US',
- frameMax: 0,
- heartbeat: 0,
- vhost: '/',
- },
- // socketOptions: {
- // cert: certificateAsBuffer, // client cert
- // key: privateKeyAsBuffer, // client key
- // passphrase: 'MySecretPassword', // passphrase for key
- // ca: [caCertAsBuffer], // array of trusted CA certs
- // },
- },
- };
github を表示:https://github.com/zubinzhang/egg-amqplib
制御層:
- 'use strict';
-
- const Controller = require('egg').Controller;
- const queueName = 'test';
-
- class HomeController extends Controller {
- async publish() {
- const { msg } = this.ctx.query;
-
- const ch = await this.app.amqplib.createChannel();
- await ch.assertQueue(queueName, { durable: false });
- const ok = await ch.sendToQueue(queueName, Buffer.from(msg));
- await ch.close();
-
- this.ctx.body = ok;
- this.ctx.status = 200;
- }
-
- async consume() {
- const ch = await this.app.amqplib.createChannel();
- await ch.assertQueue(queueName, { durable: false });
- const msg = await new Promise(resolve => ch.consume(queueName, msg => resolve(msg)));
-
- if (msg !== null) {
- ch.ack(msg);
- await ch.close();
-
- this.ctx.status = 200;
- this.ctx.body = { msg: msg.content.toString() };
- } else {
- this.ctx.status = 500;
- }
- }
- }
-
- module.exports = HomeController;
ルーティング:
- 'use strict';
-
- module.exports = app => {
- const { router, controller } = app;
-
- router.get('/publish', controller.home.publish);
- router.get('/consume', controller.home.consume);
- };
2. Rabbitmq のインストール docker を使用して RabbitMQ をインストールできます。
docker run --name rabbitmq -p 5672:567. -p 15672:15672 rabbitmq:3-managementアクセスアドレス:http://localhost:15672
デフォルトのアカウントパスワードは次のとおりです: guest : guest
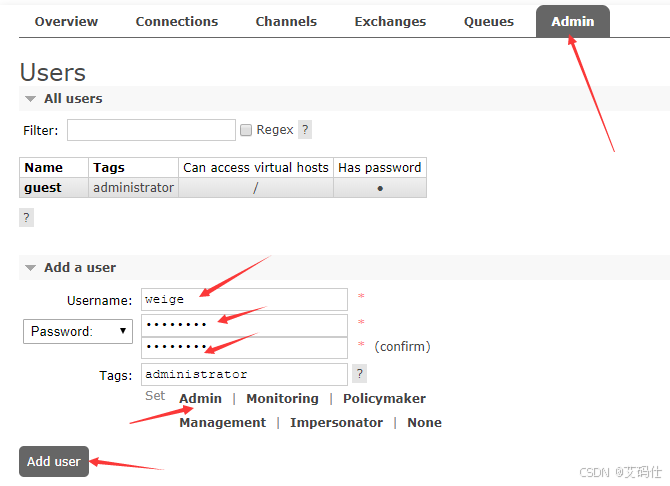
管理者の作成:
3. キュー: 1 対 1
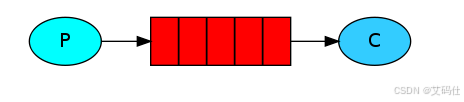
P はプロデューサーです > 中央のボックスはキューで、コンシューマーが保持するメッセージ バッファを表します > C はコンシューマーです
- 'use strict';
- const Controller = require('egg').Controller;
- /**
- * 一对一队列演示
- */
-
- // 频道名称
- const queueName = 'hasone'
-
- class UserController extends Controller {
-
- // 生成者
- async send() {
- // 1. 获取要发送的消息
- const { msg } = this.ctx.query
- // 2. 创建频道
- const ch = await this.app.amqplib.createChannel();
- // 3. 创建队列 durable 关闭持久化存储
- await ch.assertQueue(queueName, { durable: false } );
- // 4. 发送消息
- const ok = await ch.sendToQueue(queueName, Buffer.from(msg));
- // 5. 关闭连接
- await ch.close();
-
- this.ctx.body = ok;
- this.ctx.status = 200;
- }
-
- // 消费者
- async work() {
- // 1. 创建频道
- const ch = await this.app.amqplib.createChannel();
- // 2. 选择队列
- await ch.assertQueue(queueName, { durable: false });
- //3. 接收队列的消息
- const resultMsg = await new Promise(resolve => ch.consume(queueName, msg => resolve(msg), { noAck: true }));
-
- // 4. 显示消息内容
- if (resultMsg !== null) {
- ch.ack(resultMsg);
- await ch.close();
-
- const { content } = resultMsg;
- this.status = 200;
- this.ctx.body = { msg: content.toString() }
-
- } else {
- this.ctx.body = '队列消费失败'
- this.ctx.status = 500;
- }
- }
- }
-
- module.exports = UserController;
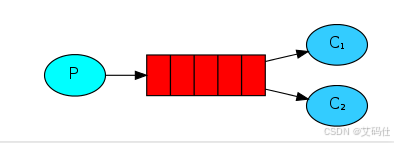
4. キュー: 1 対多
- 'use strict';
- const Controller = require('egg').Controller;
- /**
- * 队列一对多演示
- * 生产者 ----> 队列 ----> 消费者
- * ----> 消费者
- ----> 消费者
- */
-
- // 频道名称
- const queueName = 'hasMany'
-
- class UserController extends Controller {
-
- // 生成者
- async send() {
- const { msg } = this.ctx.query;
- //1. 创建频道
- const ch = await this.app.amqplib.createChannel();
- // 2. 创建队列 开启持久化存储
- await ch.assertQueue(queueName, { durable: true });
- // 3. 发送消息
- let ok = null;
- for(let i=0; i<50; i++) {
- // 此时我们确信即使RabbitMQ重新启动,task_queue队列也不会丢失。现在我们需要将消息标记为持久性 - 通过使用持久性选项Channel.sendToQueue。
- ok = await ch.sendToQueue(queueName, Buffer.from(msg+i), { persistent: true });
- }
- //4. 关闭连接
- await ch.close();
-
- this.ctx.body = ok;
- this.ctx.status = 200;
- }
-
- // 消费者
- async work1() {
- // 1. 创建频道
- const ch = await this.app.amqplib.createChannel();
- //2. 选择队列
- await ch.assertQueue(queueName, { durable: true });
- // 3. 接收消息 noAck 关闭消息自动确认模式,需要手动 ack
- const resultMsg = await new Promise(resolve => ch.consume(queueName, msg => {
-
- setTimeout(() => {
- resolve(msg)
- }, 500)
-
- }, { noAck: false }) );
-
- if (resultMsg !== null) {
- const { content } = resultMsg;
- //消费者发回ack(nowledgement)告诉RabbitMQ已收到,处理了特定消息,RabbitMQ可以自由删除它
- ch.ack(resultMsg);
- await ch.close();
-
- this.ctx.body = { work1: content.toString() };
- this.ctx.status = 200;
- } else {
- this.ctx.body = '消费者1号失败'
- this.ctx.status = 500
- }
-
- }
-
- async work2() {
- // 1. 创建频道
- const ch = await this.app.amqplib.createChannel();
- //2. 选择队列 RabbitMQ永远不会丢失我们的队列。为此,我们需要声明它是持久的
- await ch.assertQueue(queueName, { durable: true });
- // 3. 接收消息 noAck 开启自动确认模式
- const resultMsg = await new Promise(resolve => ch.consume(queueName, msg => {
- setTimeout(() => {
- resolve(msg)
- }, 1000)
-
- }, { noAck: false }) );
-
- if (resultMsg !== null) {
- const { content } = resultMsg;
- ch.ack(resultMsg);
- await ch.close();
-
- this.ctx.body = { work2: content.toString() };
- this.ctx.status = 200;
- } else {
- this.ctx.body = '消费者2号失败'
- this.ctx.status = 500
- }
- }
-
- async work3() {
- // 1. 创建频道
- const ch = await this.app.amqplib.createChannel();
- //2. 选择队列
- await ch.assertQueue(queueName, { durable: true });
- // 3. 接收消息 noAck 开启自动确认模式
- const resultMsg = await new Promise(resolve => ch.consume(queueName, msg => {
-
- setTimeout(() => {
- resolve(msg)
- }, 1500)
-
-
- }, { noAck: false }) );
-
-
- if (resultMsg !== null) {
- const { content } = resultMsg;
- //消费者发回ack(nowledgement)告诉RabbitMQ已收到,处理了特定消息,RabbitMQ可以自由删除它
- ch.ack(resultMsg);
- await ch.close();
-
- this.ctx.body = { work3: content.toString() };
- this.ctx.status = 200;
- } else {
- this.ctx.body = '消费者3号失败'
- this.ctx.status = 500
- }
-
- }
- }
-
- module.exports = UserController;

彼は 30 年以上テクノロジーの研究に専念しており、java、linux、javascript、php、css などのさまざまな言語に堪能であり、オープンソース分野で多くの貢献を行っています。将来の参考のために技術開発におけるいくつかの問題を共有する開発者ドキュメント ステーション。

送料メール: