내 연락처 정보
우편메소피아@프로톤메일.com
2024-07-12
한어Русский языкEnglishFrançaisIndonesianSanskrit日本語DeutschPortuguêsΕλληνικάespañolItalianoSuomalainenLatina
구성 요소(구성 요소)는 SAPUI5 애플리케이션에서 독립적이고 재사용 가능한 구성 요소입니다.
SAPUI5는 다음 두 가지 유형의 구성 요소를 제공합니다.
얼굴없는 구성 요소 (수업:sap.ui.core.Component): 인터페이스 구성 요소가 없다는 것은 인터페이스 구성 요소가 없음을 의미합니다.사용자 인터페이스UI 요소 코딩이 필요하지 않은 시나리오에 사용되는 관련 요소입니다.
UI 구성요소 (수업:sap.ui.core.UICcomponent): UI 구성요소는 버튼과 해당 설정 및 메타데이터와 같은 애플리케이션 인터페이스의 UI 요소를 나타내는 데 사용됩니다.
참고: "헤드리스 구성 요소"는 구성 요소 컨테이너에 추가할 수 없습니다.
Component Container가운데;
sap.ui.core.UICcomComponent는 sap.ui.core.Component를 확장하고 sap.ui.core.Component를 기반으로 화면 렌더링 기능을 추가합니다.
일반적으로 애플리케이션에서 완전한 구성 요소는 두 부분으로 구성되어야 합니다.제어 장치문서(component .js) 및 애플리케이션 설명 설명자 파일(manifest.json)。
구성 요소 사용의 가장 큰 장점은 캡슐화된 구성 요소를 유연하게 내장할 수 있다는 것입니다.다른组件容器(Component Container) 가운데. 예를 들어 Fiori Launchpad는 애플리케이션 테스트 중에 구성 요소 컨테이너를 수동으로 생성하는 경우도 있습니다.
참고: 구성 요소 컨테이너를 인스턴스화할 때 애플리케이션의 네임스페이스가 지정되고 구성 요소 컨테이너는 이 경로를 사용하여 구성 요소 컨트롤러 파일을 찾습니다.
다음은 구성 요소 컨트롤러 파일 Component.js의 예입니다.
sap.ui.define([
    "sap/ui/core/UIComponent",
    "sap/ui/model/json/JSONModel"
], function (UIComponent, JSONModel) {
    "use strict";

    return UIComponent.extend("my.namespace.demo.Component", {

        metadata : {
            manifest: "json"
        },

        init : function () {
            // call the init function of the parent
            UIComponent.prototype.init.apply(this, arguments);

            // set data model
            var oData = {
                recipient : {
                    name : "World"
                }
            };
            var oModel = new JSONModel(oData);
            this.setModel(oModel);
        }
    });
});
이 예에서는 먼저 새 UI 구성 요소를 정의한 다음 메타데이터 속성에서 매니페스트를 json으로 설정합니다. 즉, JSON 형식의 매니페스트 파일을 사용하여 구성 요소의 구성을 정의합니다.
그런 다음 init 함수에서 먼저 상위 클래스의 init 함수를 호출한 다음 JSON 모델을 설정하고 이를 구성 요소의 모델로 설정했습니다. 이 모델에는 World 값을 가진 name 속성이 있는 수신자 개체가 포함되어 있습니다.
구성 요소 파일을 정의한 후 이를 응용 프로그램의 파일에 추가합니다.index.js파일을 만들고 구성 요소 컨테이너를 인스턴스화하고 생성된 구성 요소를 로드한 다음 페이지에 로드합니다.
다음은 index.js 파일 로딩 구성 요소의 예입니다.
sap.ui.define([
    "sap/ui/core/ComponentContainer"
], function (ComponentContainer) {
    "use strict";
    new ComponentContainer({
        name: "my.namespace.demo",
        settings : {
            id : "demo"
        },
        async: true
    }).placeAt("content");
});
이 블로그 연습에서는 모든 UI 요소를 index.html 파일과 독립적인 구성 요소로 캡슐화해 보겠습니다.
이렇게 하면 리소스에 액세스할 때마다 (index.html이 아닌) 구성 요소를 기준으로 액세스하게 됩니다.
이러한 아키텍처 변경으로 인해 이전 정적 index.html 페이지보다 애플리케이션 로딩이 더 유연해졌습니다. 예를 들어 SAP Fiori 런치패드와 같은 컨테이너에 직접 포함될 수 있습니다.
먼저,webapp이니셜Component.js 애플리케이션 설정을 저장하는 파일입니다.구성 요소가 인스턴스화되면 SAPUI5는 자동으로 구성 요소의init 기능.우리 구성 요소는 기본 클래스에서 상속됩니다.sap/ui/core/UICcomponent, 재작성된 내용에서init메서드는 먼저 기본 클래스의 init 함수를 호출해야 합니다.
생성된 프로젝트 파일 구조는 다음과 같습니다.

Component.js의 코드는 다음과 같습니다.
sap.ui.define([
    "sap/ui/core/UIComponent"
], function (UIComponent) {
"use strict";

    return UIComponent.extend("zsapui5.test.Component", {
        init() {
            // call the init function of the parent
            UIComponent.prototype.init.apply(this, arguments);
        }
    });
});
다음으로 Component.js 파일에 애플리케이션 구성을 추가해 보겠습니다.
수정된 Component.js 코드는 다음과 같습니다.
sap.ui.define([
    "sap/ui/core/UIComponent",
    "sap/ui/model/json/JSONModel",
    "sap/ui/model/resource/ResourceModel"
], function (UIComponent,JSONModel,ResourceModel) {
    "use strict";

    return UIComponent.extend("zsapui5.test.Component", {
        metadata: {
            "interfaces": ["sap.ui.core.IAsyncContentCreation"],
            "rootView": {
                "viewName": "zsapui5.test.view.App",
                "type": "XML",
                "id": "app"
            }
        },

        init() {
            //call  the init function of the parent
            UIComponent.prototype.init.apply(this, arguments);

            //set data model
            const oData = {
                recipient : {
                    name: "World"
                }
            };
            const oModel = new JSONModel(oData);
            this.setModel(oModel);

            //set i18n model
            const i18nModel = new ResourceModel({
                bundleName: "zsapui5.test.i18n.i18n"
            });
            this.setModel(i18nModel, "i18n");
        }
    });
});
수정된 구성요소 .js 파일은 다음 두 부분으로 구성됩니다.元数据部分구성 요소가 초기화될 때 호출됩니다.init函数部分。
메타데이터 섹션은 루트 보기를 정의합니다.App.view.xml구성요소가 애플리케이션 보기에서 직접 표시하는 대신 애플리케이션 보기의 표시를 관리할 수 있도록 파일 참조index.js 파일에서 직접 루트 뷰를 생성하고 표시합니다.메타데이터 정의 부분도 구현합니다.sap.ui.core.IAsyncContentCreation구성 요소를 완전히 비동기식으로 생성할 수 있는 인터페이스입니다.
...
        metadata: {
            "interfaces": ["sap.ui.core.IAsyncContentCreation"],
            "rootView": {
                "viewName": "zsapui5.test.view.App",
                "type": "XML",
                "id": "app"
            }
...
sap.ui.core.IAsyncContentCreation 인터페이스는 구성 요소의 rootView와 해당 라우터 구성을 모두 "async"로 암시적으로 설정합니다. true입니다. 해당 역할은 "라우팅 및 탐색" 설명에 대한 후속 블로그에서 논의할 것입니다.
init 함수 섹션에서는 이전과 동일한 작업을 수행합니다.App.controller.js컨트롤러 파일에서 했던 것처럼 데이터 모델을 인스턴스화합니다.oModel그리고 i18n 모델i18nModel。
...
        init() {
            //call  the init function of the parent
            UIComponent.prototype.init.apply(this, arguments);

            //set data model
            const oData = {
                recipient : {
                    name: "World"
                }
            };
            const oModel = new JSONModel(oData);
            this.setModel(oModel);

            //set i18n model
            const i18nModel = new ResourceModel({
                bundleName: "zsapui5.test.i18n.i18n"
            });
            this.setModel(i18nModel, "i18n");
        }
...
참고로 모델은구성 요소에 직접 바인딩 , 구성 요소의 루트 보기에는 없습니다. 그러나 중첩된 컨트롤은 상위 컨트롤의 모델을 자동으로 상속하므로 해당 모델은 뷰에서도 사용할 수 있습니다.
Component.js 파일에 데이터 객체와 i18n 모델 객체의 바인딩을 이미 구현했으므로 먼저 작성해 보겠습니다.App.controller.js컨트롤러 파일의 논리적 제거(예: 삭제) onInit 函数그리고所需的模块引用。

수정된 코드의 효과는 다음과 같습니다.
sap.ui.define([
    "sap/ui/core/mvc/Controller",
    "sap/m/MessageToast"
], function (Controller, MessageToast) {
    "use strict";

    return Controller.extend("zsapui5.test.controller.App", {

        onShowHello: function () {
            // read msg from i18n model
            const oBundle = this.getView().getModel("i18n").getResourceBundle();
            const sRecipient = this.getView().getModel().getProperty("/recipient/name");
            const sMsg = oBundle.getText("helloMsg", [sRecipient]);

            // show message
            MessageToast.show(sMsg);
        }
    });
});
이전 index.js 파일에서는 애플리케이션의 뷰 객체를 직접 인스턴스화했습니다.XMLView . 이제 구성 요소 컨테이너를 통해 뷰를 인스턴스화해 보겠습니다.
이를 위해 이전에 추가된 뷰 종속성을 새 뷰 종속성으로 대체합니다.sap/ui/core/ComponentContainer 의존성. 구성 요소 컨테이너는 애플리케이션 구성 요소의 상위 구성 요소 역할을 하며 해당 속성 및 탐색 이벤트를 처리합니다.
구성 요소 컨테이너의 인스턴스를 생성할 때 애플리케이션의 네임스페이스를 지정해야 합니다.zsapui5.test(구성 요소 .js 파일이 있는 프로젝트의 webapp 폴더를 가리킵니다).
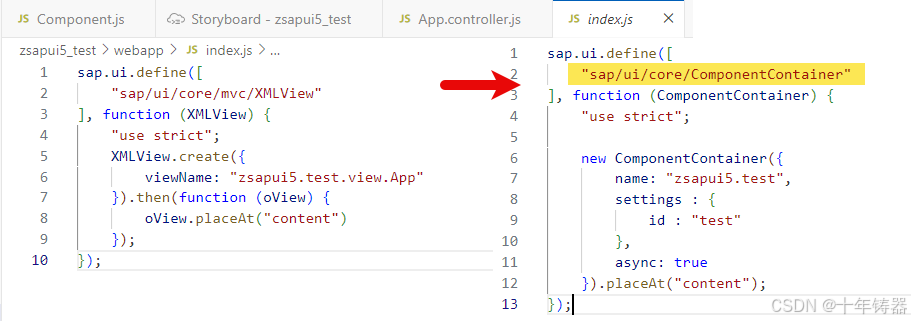
조정된 index.js 파일의 효과는 다음과 같습니다.
sap.ui.define([
    "sap/ui/core/ComponentContainer"
], function (ComponentContainer) {
    "use strict";

    new ComponentContainer({
        name: "zsapui5.test",
        settings : {
            id : "test"
        },
        async: true
    }).placeAt("content");
});
애플리케이션의 구성 요소를 캡슐화할 때 다음 규칙을 따라야 합니다.
Component .jswebapp폴더webapp폴더에조정된 프로그램을 실행하면 효과는 다음과 같습니다.
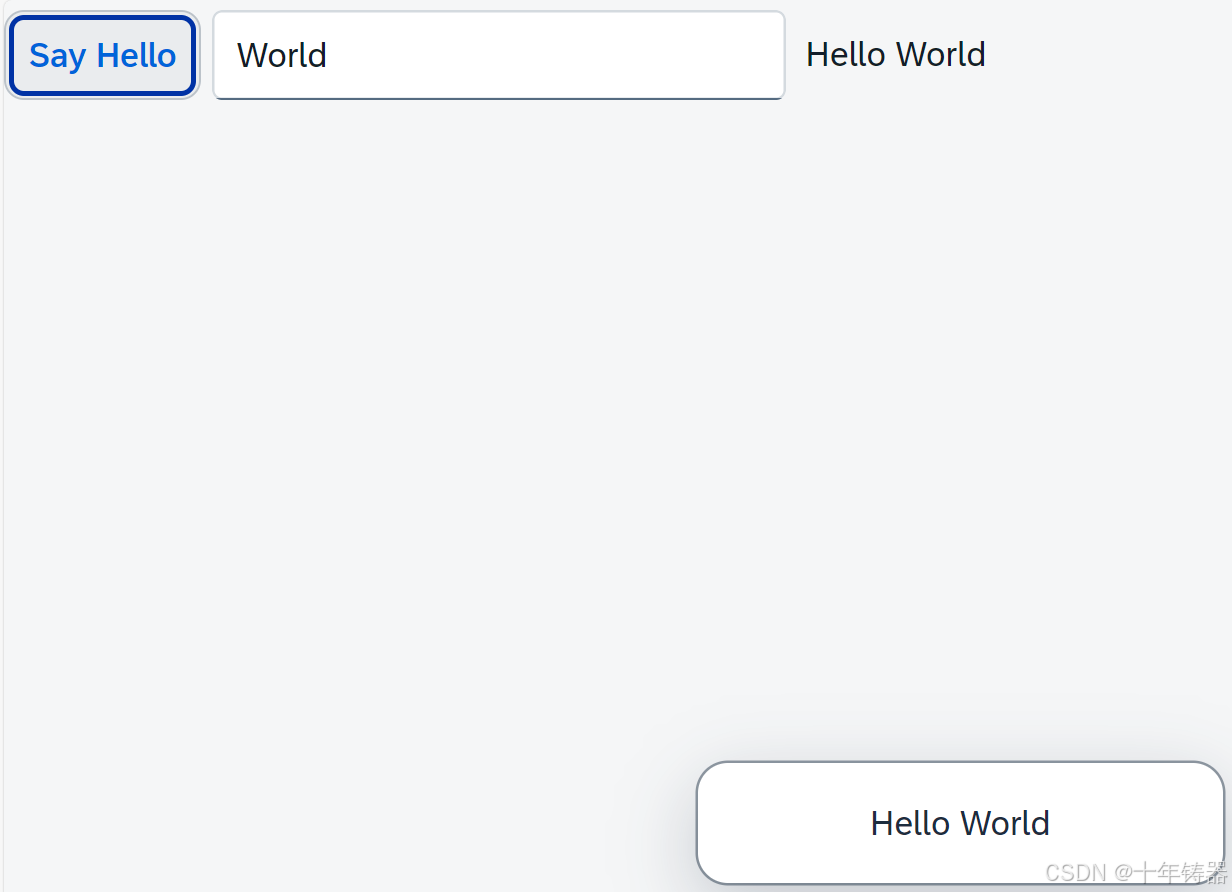
응용 프로그램은 조정 전과 동일하게 실행됩니다.하지만 만약 통과한다면ctrl + shift + alt + s진단 창을 열어 컨트롤 레이아웃을 보면 다음과 같은 차이점을 찾을 수 있습니다.

새로 추가된 ComponentContainer는 XMLView의 상위 컨트롤입니다.

본 글에서는 SAPUI5의 컴포넌트 개념과 캡슐화 방법을 소개하고, 예제를 통해 사용법을 보여줍니다.

그는 30년 이상 기술 연구에 전념해 왔으며, java, linux, javascript, php, css 등 다양한 언어에 능숙하며, 오픈 소스 분야에 많은 공헌을 했습니다. 나중에 참조할 수 있도록 기술 개발의 일부 문제를 공유하는 개발자 문서 스테이션입니다.

우편메소피아@프로톤메일.com