
내 연락처 정보
우편메소피아@프로톤메일.com
2024-07-12
한어Русский языкEnglishFrançaisIndonesianSanskrit日本語DeutschPortuguêsΕλληνικάespañolItalianoSuomalainenLatina
그 이유는 다음 글을 참고하세요: sa-token의 프론트엔드와 백엔드를 분리하여 크로스 도메인 문제를 해결하는 올바른 방법
https://mp.weixin.qq.com/s/96WbWL28T5_-xzyCfJ7Stg
https://blog.csdn.net/qq_34905631/article/details/140233780?spm=1001.2014.3001.5501
이 글은 여러 번의 시도 끝에 올바른 자세를 찾았지만 문제의 근본 원인을 찾지 못했습니다. 그러다가 몇 가지 고민과 탐색 끝에 이 크로스 도메인을 로컬에서 시뮬레이션할 수 있는지 궁금해서 라오어를 찾기 시작했습니다. 프로젝트의 프런트엔드 직원인 Wang은 실제로 로컬 크로스 도메인을 시뮬레이션했습니다. 프로젝트에서 그는 이전의 sa-token 프런트엔드와 백엔드를 분리하여 크로스 도메인의 올바른 자세를 해결하고 문제를 재현했습니다. 기사에서 SimpleCORSFilter에 대해 언급한 후.
spring5.2.15.RELEASE 공식 mvc의 도메인 간 구성은 다음과 같습니다.
https://docs.spring.io/spring-framework/docs/5.2.15.RELEASE/spring-framework-reference/web.html#mvc-cors-intro
위에 링크된 공식 메서드를 따르고 다음과 같이 CustomCorsFilter 클래스를 추가합니다.
package xxxx.config;

import org.springframework.core.Ordered;
import org.springframework.core.annotation.Order;
import org.springframework.stereotype.Component;
import org.springframework.web.cors.CorsConfiguration;
import org.springframework.web.cors.CorsConfigurationSource;
import org.springframework.web.cors.UrlBasedCorsConfigurationSource;
import org.springframework.web.filter.CorsFilter;


@Component
@Order(Ordered.HIGHEST_PRECEDENCE)
public class CustomCorsFilter extends CorsFilter {

    public CustomCorsFilter() {
        super(corsConfigurationSource());
    }

    private static CorsConfigurationSource corsConfigurationSource() {
        CorsConfiguration configuration = new CorsConfiguration();
        configuration.addAllowedOrigin("*"); // 允许访问的域名,例如 http://localhost:8080
        configuration.addAllowedHeader("*"); // 允许所有请求头
        configuration.addAllowedMethod("*"); // 允许所有请求方法
        configuration.setAllowCredentials(true);
        UrlBasedCorsConfigurationSource source = new UrlBasedCorsConfigurationSource();
        source.registerCorsConfiguration("/**", configuration);
        return source;
    }

}
제가 작업한 프로젝트에서는 CustomCorsFilter 구성이 유효한 것으로 확인되었습니다. 그런데 최근 프로젝트에서는 도메인 간 문제를 해결하기 위해 이 CustomCorsFilter 클래스 구성을 사용하는 것이 소용이 없습니다. sa-token 프런트엔드와 백엔드를 분리하여 도메인 간 문제를 해결하는 올바른 방법에 대한 위 기사에서 CustomCorsFilter 클래스 확인은 실제로 유효하지 않았습니다. 프로젝트에서 CustomCorsFilter 클래스를 재구성했을 때 이 문제는 정말 혼란스러웠습니다. , (이 SimpleCORSFilter는 확인 후 사용할 수 있으므로 SimpleCORSFilter에 주석을 달아야 합니다.) 프로젝트를 로컬로 실행한 후 프런트 엔드에서 CorsFilter 클래스의 다음 코드에 중단점을 설정합니다.
   @Override
	protected void doFilterInternal(HttpServletRequest request, HttpServletResponse response,
			FilterChain filterChain) throws ServletException, IOException {

		CorsConfiguration corsConfiguration = this.configSource.getCorsConfiguration(request);
		boolean isValid = this.processor.processRequest(corsConfiguration, request, response);
        //关键就是这里,在这里打上断点
		if (!isValid || CorsUtils.isPreFlightRequest(request)) {
			return;
		}
		filterChain.doFilter(request, response);
	}
또한 CorsUtils.isPreFlightRequest 메서드에 중단점을 설정합니다.
	public static boolean isPreFlightRequest(HttpServletRequest request) {
		return (HttpMethod.OPTIONS.matches(request.getMethod()) &&
				request.getHeader(HttpHeaders.ORIGIN) != null &&
				request.getHeader(HttpHeaders.ACCESS_CONTROL_REQUEST_METHOD) != null);
	}
그러면 중단점 스크린샷은 다음과 같습니다.
로그인 인터페이스는 http와 도메인 이름이 포함된 복잡한 도메인 간 요청이며 사전 감지 요청(OPTIONS 요청)이 전송됩니다.

sa-token과 통합된 프로젝트에서 OncePerRequestFilter의 doFilterInternal 메서드에 중단점을 설정하고 다음 필터를 찾았습니다.
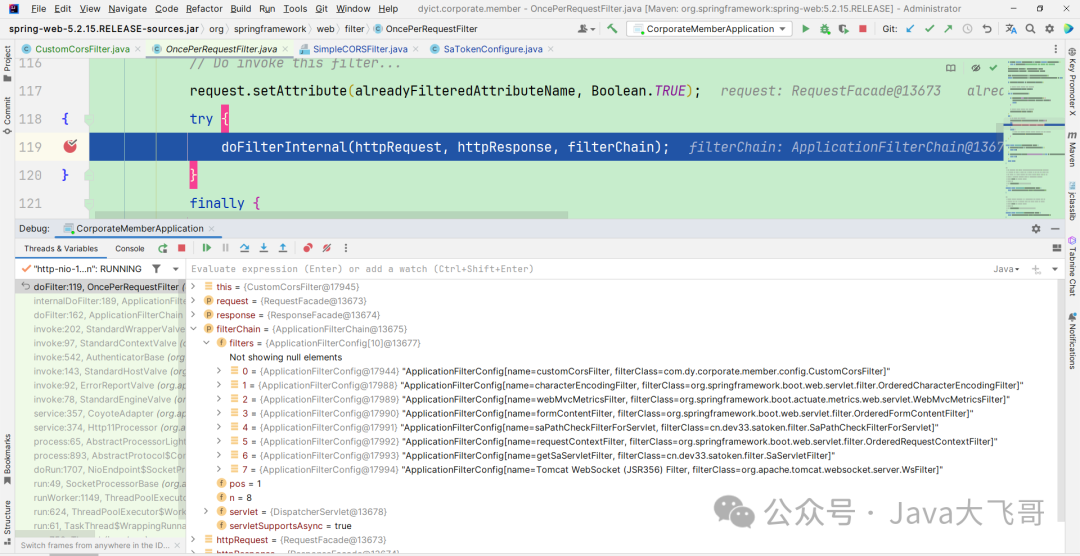
위에서 커스터마이즈한 CustomCorsFilter가 먼저 실행되고 sa-token과 관련된 두 개의 필터 saPathCheckFilterForServlet 및 SaServletFilter가 나중에 실행되는 것을 볼 수 있으므로 이전의 다른 추측도 잘 확인되었습니다. 중단점은 아래 CorsFilter의 doFilterInternal 메서드로 이동합니다. :
       //关键就是这里,在这里打上断点
		if (!isValid || CorsUtils.isPreFlightRequest(request)) {
			return;
		}
문제는 다음 코드에 있습니다.
CorsUtils.isPreFlightRequest(request)
이 코드 줄은 true를 반환하므로 모든 후속 필터가 실행되지 않아 요청이 인터페이스에 도달할 수 없습니다. 그런 다음 CorsUtils.isPreFlightRequest(request) 코드 줄을 디버깅했습니다. . 복잡한 요청이 도메인 전체에 걸쳐 사전 감지 요청(OPTIONS 요청)을 보낸 후 Origin이 설명할 수 없는 방식으로 설정되는 것으로 나타났습니다.
http://localhost:3000
이것은 매우 이상해서 프런트엔드 동료인 Lao Wang에게 이 값이 어디에 설정되어 있는지 확인해달라고 요청한 결과 다음과 같은 내용을 발견했습니다.
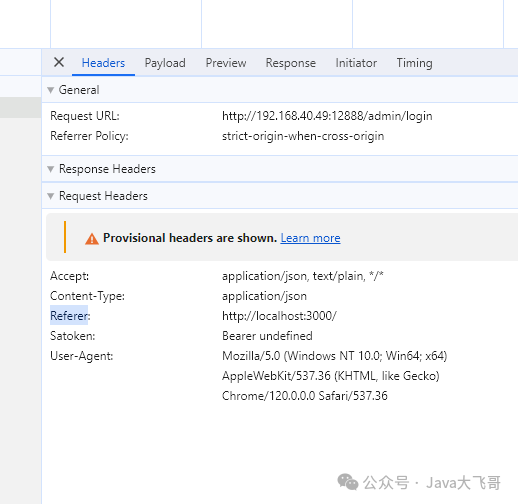
프런트엔드는 Origin을 설정하지 않고 다음 매개변수만 설정합니다.
//设置axios跨域访问
axios.defaults.withcredentials = true // 设置cross跨域 并设置访问权限 允许跨域携带cookie信息axios.defaults.crossDomain=true //设置axios跨域的配置
위 그림에는 Origin 값과 일치하는 Referer 값이 하나만 있는데, 이게 정말 우연일까 싶어서 다음 글을 읽어봤습니다.
https://blog.csdn.net/qq_55316925/article/details/128571809
많은 생각을 하게 되어서 곰곰이 생각해보니 백엔드에 설정한 CustomCorsFilter가 효과적이었던 것 같습니다. CorsFilter 소스코드를 변경할 수 있을까요? 그래서 제가 확인한 다음 두 가지 방법을 시도해 보았습니다. 프런트엔드 Lao Wang에서는 두 가지 방법 모두 실행 가능하며 어느 쪽이든 크로스 도메인 문제를 해결할 수 있습니다.
백엔드에서 CorsFilter 소스 코드 수정
프로젝트 아래 src.main.java 아래에 새 org.springframework.web.filter 패키지를 추가합니다.
그런 다음 CorsFilter의 소스 코드를 복사하여 위에서 새로 생성된 org.springframework.web.filter 패키지 아래에 배치하면 CorsFilter의 소스 코드를 수정할 수 있습니다.
/*
 * Copyright 2002-2019 the original author or authors.
 *
 * Licensed under the Apache License, Version 2.0 (the "License");
 * you may not use this file except in compliance with the License.
 * You may obtain a copy of the License at
 *
 *      https://www.apache.org/licenses/LICENSE-2.0
 *
 * Unless required by applicable law or agreed to in writing, software
 * distributed under the License is distributed on an "AS IS" BASIS,
 * WITHOUT WARRANTIES OR CONDITIONS OF ANY KIND, either express or implied.
 * See the License for the specific language governing permissions and
 * limitations under the License.
 */

package org.springframework.web.filter;

import java.io.IOException;

import javax.servlet.FilterChain;
import javax.servlet.ServletException;
import javax.servlet.http.HttpServletRequest;
import javax.servlet.http.HttpServletResponse;

import org.springframework.util.Assert;
import org.springframework.web.cors.CorsConfiguration;
import org.springframework.web.cors.CorsConfigurationSource;
import org.springframework.web.cors.CorsProcessor;
import org.springframework.web.cors.CorsUtils;
import org.springframework.web.cors.DefaultCorsProcessor;
import org.springframework.web.cors.UrlBasedCorsConfigurationSource;

/**
 * {@link javax.servlet.Filter} that handles CORS preflight requests and intercepts
 * CORS simple and actual requests thanks to a {@link CorsProcessor} implementation
 * ({@link DefaultCorsProcessor} by default) in order to add the relevant CORS
 * response headers (like {@code Access-Control-Allow-Origin}) using the provided
 * {@link CorsConfigurationSource} (for example an {@link UrlBasedCorsConfigurationSource}
 * instance.
 *
 * <p>This is an alternative to Spring MVC Java config and XML namespace CORS configuration,
 * useful for applications depending only on spring-web (not on spring-webmvc) or for
 * security constraints requiring CORS checks to be performed at {@link javax.servlet.Filter}
 * level.
 *
 * <p>This filter could be used in conjunction with {@link DelegatingFilterProxy} in order
 * to help with its initialization.
 *
 * @author Sebastien Deleuze
 * @since 4.2
 * @see <a href="https://www.w3.org/TR/cors/">CORS W3C recommendation</a>
 */
public class CorsFilter extends OncePerRequestFilter {

	private final CorsConfigurationSource configSource;

	private CorsProcessor processor = new DefaultCorsProcessor();


	/**
	 * Constructor accepting a {@link CorsConfigurationSource} used by the filter
	 * to find the {@link CorsConfiguration} to use for each incoming request.
	 * @see UrlBasedCorsConfigurationSource
	 */
	public CorsFilter(CorsConfigurationSource configSource) {
		Assert.notNull(configSource, "CorsConfigurationSource must not be null");
		this.configSource = configSource;
	}


	/**
	 * Configure a custom {@link CorsProcessor} to use to apply the matched
	 * {@link CorsConfiguration} for a request.
	 * <p>By default {@link DefaultCorsProcessor} is used.
	 */
	public void setCorsProcessor(CorsProcessor processor) {
		Assert.notNull(processor, "CorsProcessor must not be null");
		this.processor = processor;
	}


	@Override
	protected void doFilterInternal(HttpServletRequest request, HttpServletResponse response,
			FilterChain filterChain) throws ServletException, IOException {

		CorsConfiguration corsConfiguration = this.configSource.getCorsConfiguration(request);
		boolean isValid = this.processor.processRequest(corsConfiguration, request, response);
		//修改的源码是将CorsUtils.isPreFlightRequest(request)这行代码移除,就是因为复杂请求跨域发了预检测请求,浏览器的referrer-policy引用者策略会携带一个值,后端处理之后会将这个值赋值给请求头的Orgin属性上,移除这行代码之后就可以正常访问到登录接口了,前端也没有报跨域了。
        if (!isValid) {
			return;
		}
		filterChain.doFilter(request, response);
	}

}
프런트 엔드에 다음 코드를 추가합니다. Referrer-policy` 리퍼러 정책을 비활성화하거나 제거합니다.
https://blog.csdn.net/qq_49810363/article/details/111036180
새로운 코드는 다음과 같습니다:
<meta name="referrer" content="never">

브라우저의 리퍼러 정책 리퍼러 정책도 보안상의 이유로 사용하는 브라우저입니다.
끊임없는 시도와 탐색 끝에 sa-token을 프로젝트에 통합한 후 cors 크로스 도메인 배포 문제가 발생했습니다. 일반적으로 cors 크로스 도메인 프로토콜의 사양은 이 작업을 허용하지 않습니다. -end 솔루션 라이브러리는 cors 크로스 도메인 프로토콜의 사양을 따르지 않는 요청 작업을 허용하지 않으므로 sa-token을 사용하여 프런트 엔드 및 백엔드 솔루션을 크로스 도메인 솔루션의 올바른 자세로 분리할 수 있습니다. SimpleCORSFilter를 구성하고 특정 매개변수를 작성하고 사전 감지 요청을 처리하면 200 상태 코드가 반환됩니다. 또는 이 문서의 두 가지 방법 중 하나를 사용하여 cors 교차 도메인 문제를 해결할 수 있습니다. 중단점에서 도메인 간 요청을 재현한 후 디버깅합니다. 해결 방법, 이 문서의 방법을 따를 수 있다고 생각되면 로컬에서 도메인 간 요청을 재현한 다음 중단점을 디버깅하여 문제가 있는지 확인하세요. corsFilter의 CorsUtils.isPreFlightRequest(request) 라인은 일반적으로 corsFilter에 대한 간단한 요청은 사전 감지 요청(OPTIONS 요청)을 보내는 데 큰 문제입니다. 브라우저의 리퍼러 정책 리퍼러 정책은 백엔드 처리 후 값을 전달하므로 이 값은 요청 헤더의 Origin 속성에 할당되어 corsFilter의 CorsUtils.isPreFlightRequest(request) 코드 줄이 true를 반환하게 됩니다. 결과적으로 후속 필터 시리즈의 doFilter가 실행되지 않고 백엔드 인터페이스에 액세스할 수 없으며 프런트엔드 브라우저 페이지에서 여전히 도메인 간 문제를 보고합니다. , 이 문제는 정말 짜증나네요. https 방법은 포트 443을 수신하고 인증서가 필요하기 때문에 도메인 간 작동하지 않습니다. 이 문서에서는 sa-token을 통합하면 corsFilter 구성이 유효하지 않게 된다는 비난을 해소합니다. 이 글의 어떤 글도 이 상황에 대한 해결책을 갖고 있지 않습니다. 창작이 쉽지는 않습니다. 원본을 다시 인쇄하여 추가해 주세요. 제 공유가 여러분에게 영감을 주고 도움이 되기를 바랍니다. 연결하려면 클릭하세요.

그는 30년 이상 기술 연구에 전념해 왔으며, java, linux, javascript, php, css 등 다양한 언어에 능숙하며, 오픈 소스 분야에 많은 공헌을 했습니다. 나중에 참조할 수 있도록 기술 개발의 일부 문제를 공유하는 개발자 문서 스테이션입니다.

우편메소피아@프로톤메일.com