2024-07-12
한어Русский языкEnglishFrançaisIndonesianSanskrit日本語DeutschPortuguêsΕλληνικάespañolItalianoSuomalainenLatina
This article is a note from the third Scholar Model Practice Camp hosted by the Shanghai Artificial Intelligence Laboratory. It is for reference only by individuals and teaching assistants for grading homework.Tutorial original link。
To register, please search “The 3rd Scholar Large Model Practical Camp” on WeChat.
This note is a personal annotated note modified based on the original tutorial
😀Hello大家好,欢迎来到Scholar ModelThis is a basic course for students who are attending the camp for the first time and students from various industries who have no basic knowledge of Linux. Here we will teach you how to useInternStudio Development Machine, and master some basicLinux knowledge, so that you will not be at a loss in the following courses, I hope it will be helpful to you. Here, we have prepared some level tasks for you. When you complete the required level tasks and check in, you will get the computing power reward of the current level.let's start!
InternStudio 是大模型时代下的云端算力平台。基于 InternLM 组织下的诸多算法库支持,为开发者提供开箱即用的大语言模型微调环境、工具、数据集,并完美兼容 🤗 HugginFace 开源生态。
If you want to know more about InternStduio, you can check the following documents: InternStudio
https://studio.intern-ai.org.cn/
First, open the link above to enter InternStudio. After logging in, you will automatically jump to the console interface, as shown below:
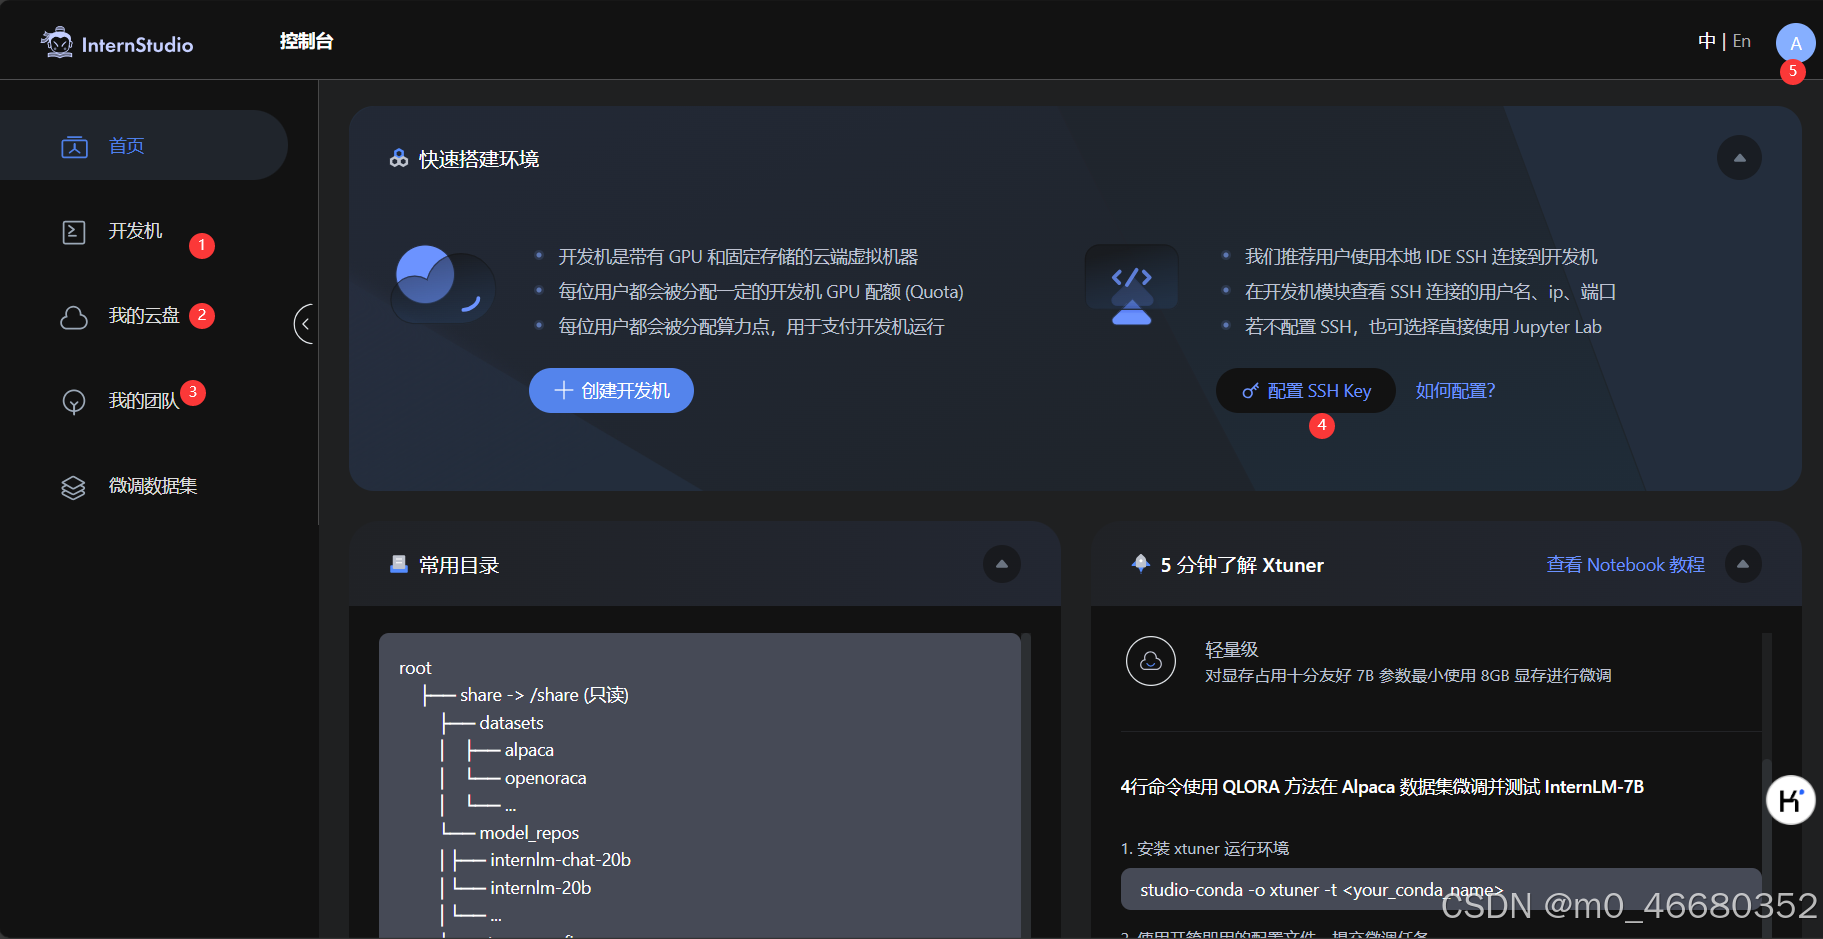
Here I will tell you the function of each page corresponding to the serial number:
The above is a brief introduction to the InternStudio platform. Now let's take a look at how to create a development machine. We go to the homepage and click "Creating a Development Machine”
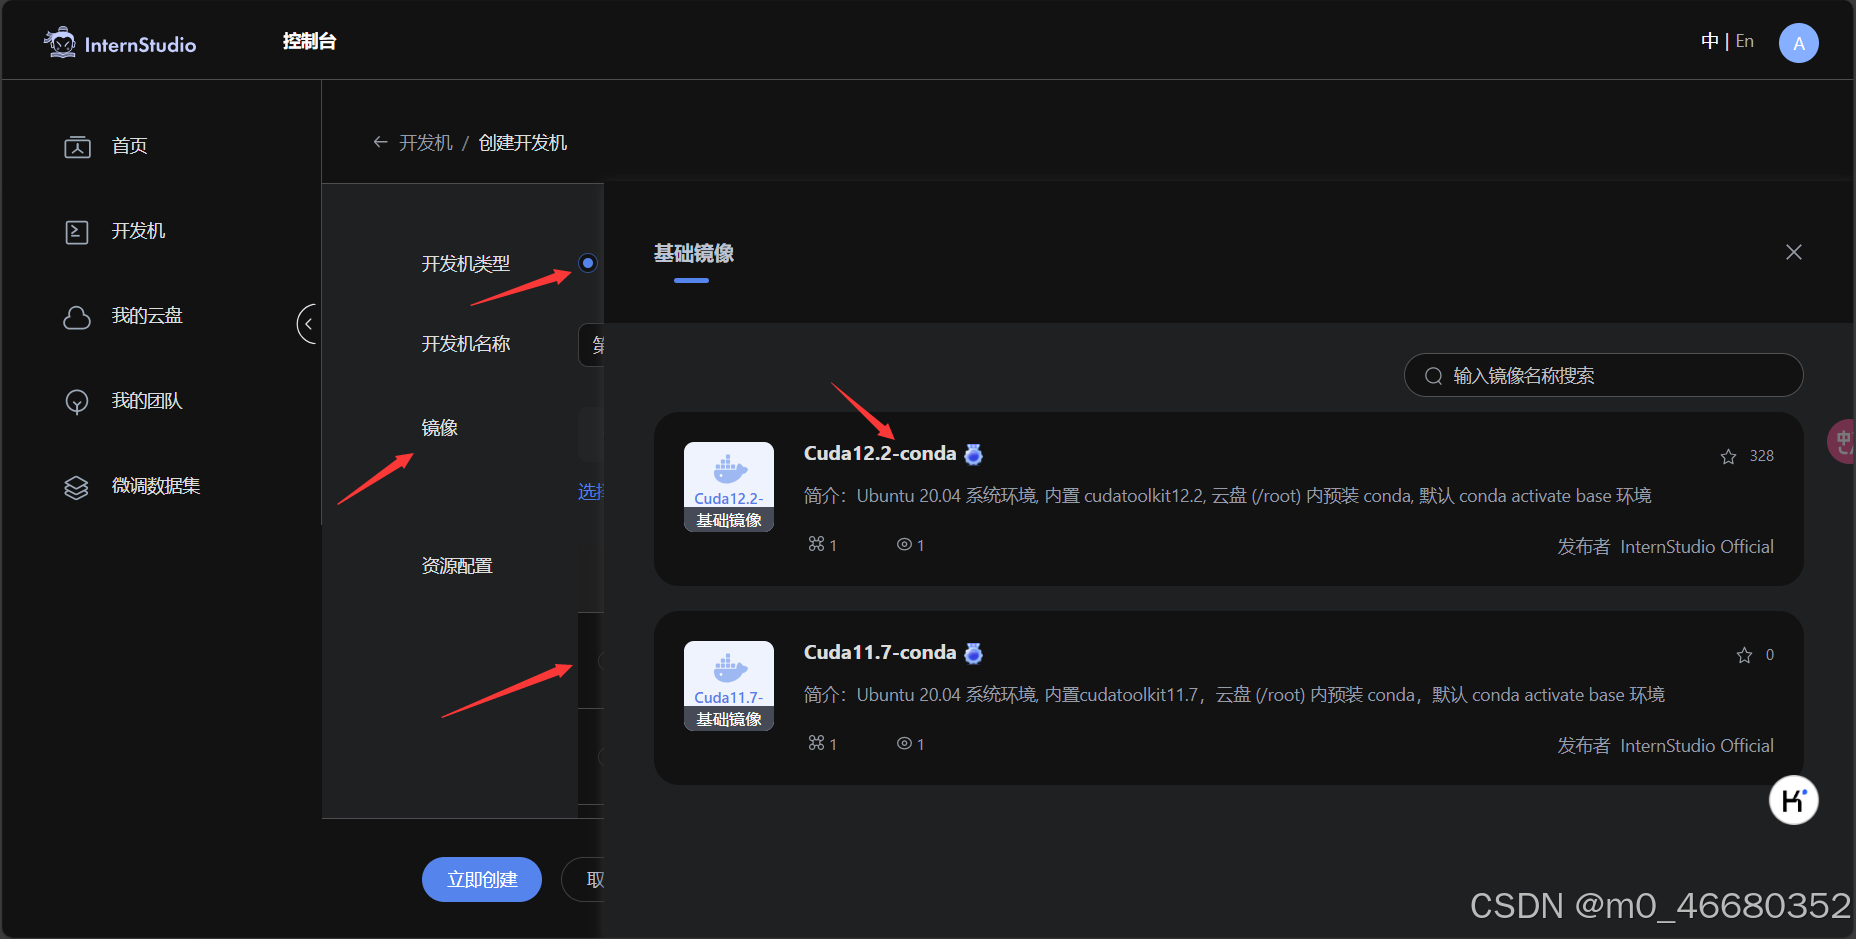
Here we choose to createPersonal development machine, namedtest,CudaThe version is 12.2,Resource ConfigurationSelect 10% and leave the duration as default.
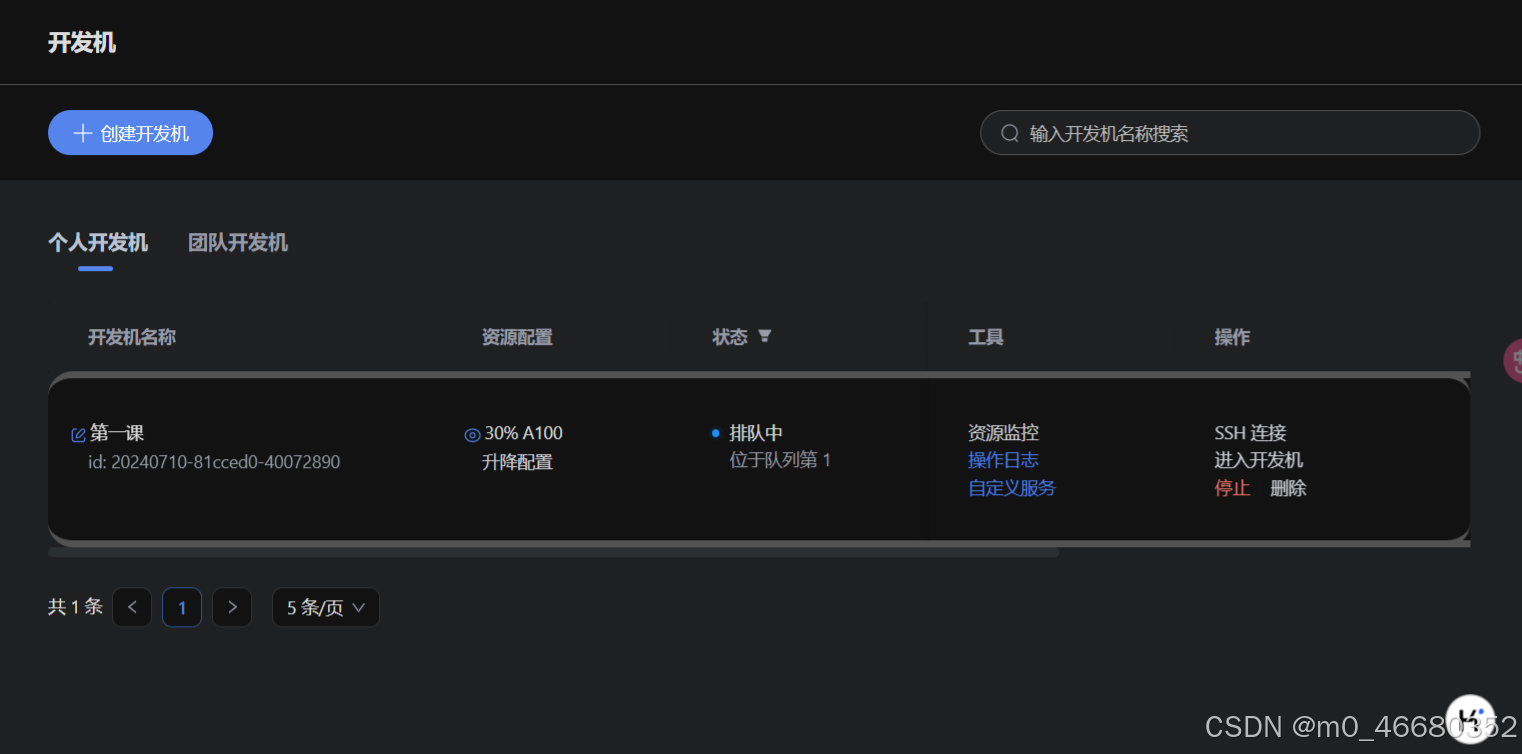
After creation is completedDevelopment MachineYou can see the development machine you just created on the interface. Click to enter the development machine.

After entering the development machine, you can see the main page of the development machine. The development machine has three modes to choose from:JupyterLab, Terminal, and VScode
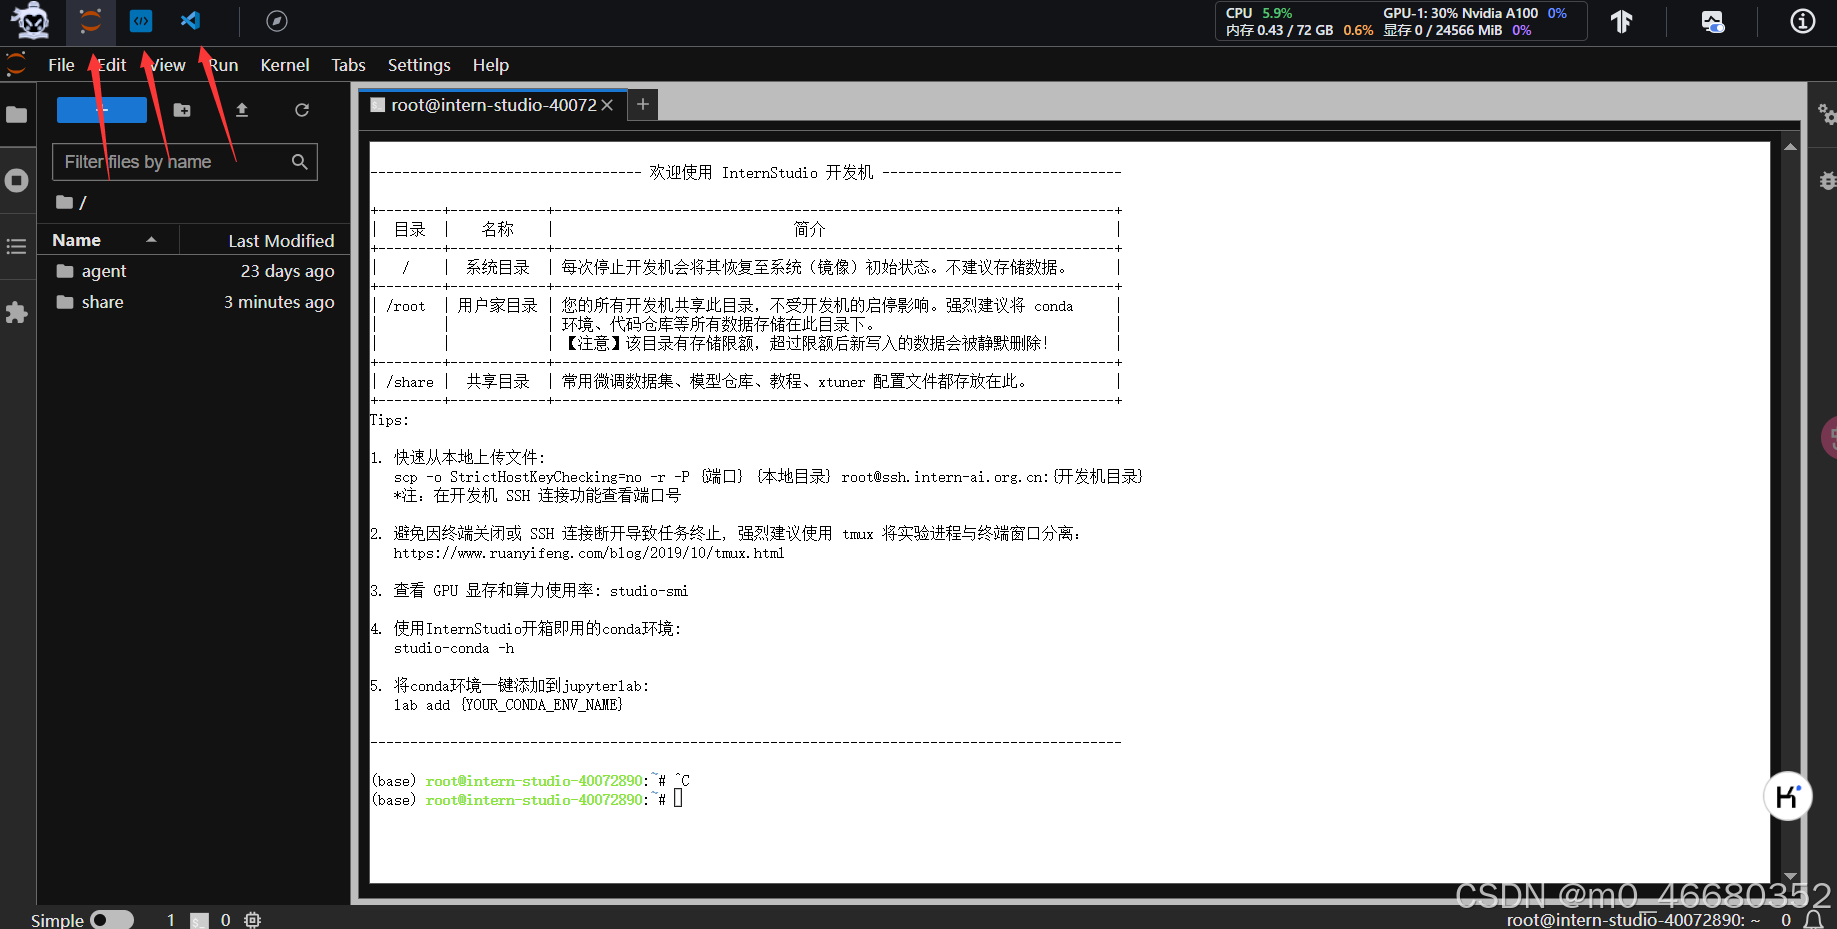
in:
We introduced aboveInternStudio Platform, and how to create a development machine. In this section, we need to understand what isSSH、Why use remote connectionHow to use SSHremote connectionDevelopment Machine, What isPort MappingHow to proceedPort Mapping。
SSHThe full name is Secure Shell, which is translated into Chinese as secure shell.Network Security Protocols, through encryption and authentication mechanisms to achieve secure access and file transfer services. The SSH protocol provides secure network services in an insecure network environment by encrypting and verifying network data.
SSH is (C/S architecture) composed ofserverandClientTo establish a secure SSH channel, both parties need to first establish a TCP connection, then negotiate the version number and various algorithms to be used, and generate the sameSession KeyUsed for subsequent symmetric encryption. After completing user authentication, both parties can establish a session for data exchange.
Then in the following practice we willConfigure SSH KeysThe purpose of configuring the key is to avoid having to repeatedly enter the password when we remotely connect to the development machine.Why remote connection??
The advantage of remote connection is that if you are using remote office, you can remotely connect to the development machine through SSH, so that you can develop locally. And if you need to run some local code and don’t have an environment, then remote connection is very necessary.
First, we use the password to enter the SSH remote connection. Later we will talk about how to configure password-free login.
After completing the creation of the development machine, we need to open the powerShell terminal of our computer and useWin+RUse the shortcut key to open the run box, enter powerShell, and open the powerShell terminal. (If you are using Linux or Mac operating system, the following steps are the same)
We return to the development machine platform and enterDevelopment MachineFind the development machine we created on the page and clickSSH Connection。

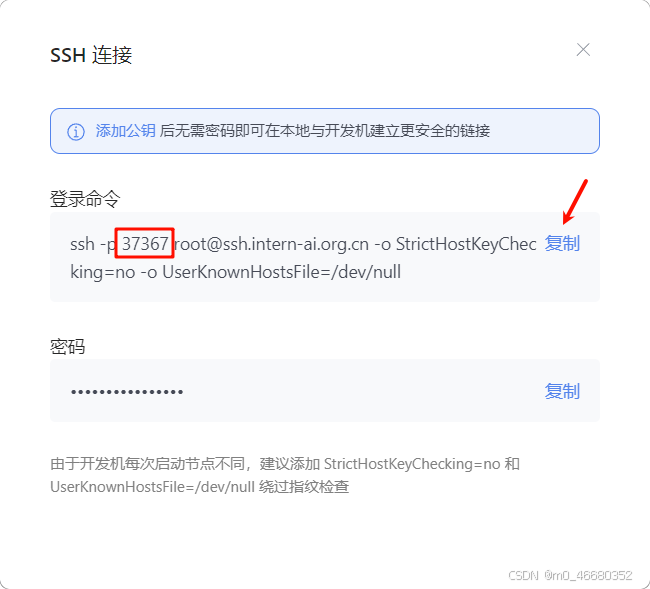
Then copyLogin CommandHere, 37367 is the SSH port used by the development machine. Generally, port 22 is used. Without this port number, you cannot connect to SSH, and everyone’s port is different. So if you cannot connect to the development machine, you need to check whether the port is wrong.
Paste the copied command into PowerShell and press Enter. Here we need to enter the password. Copy the password below the login command and paste it into the terminal.Note that after copying the password, right-click to paste it. The shell's paste shortcut key is on some computers:shift+ins, the password is not displayed here, which is normal.
Finally, the following content appears when you press Enter, which means it is successful:
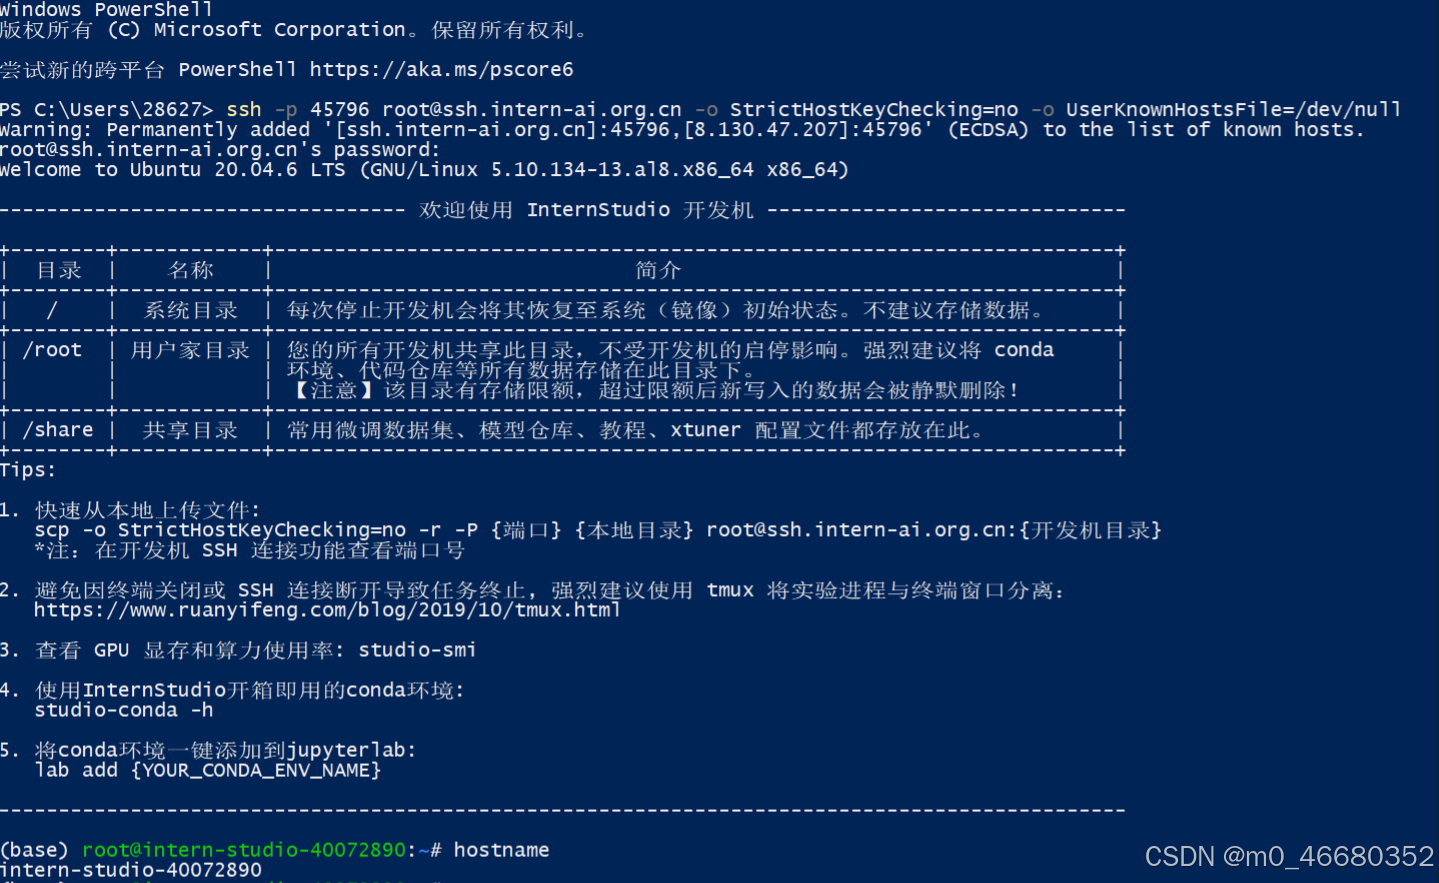
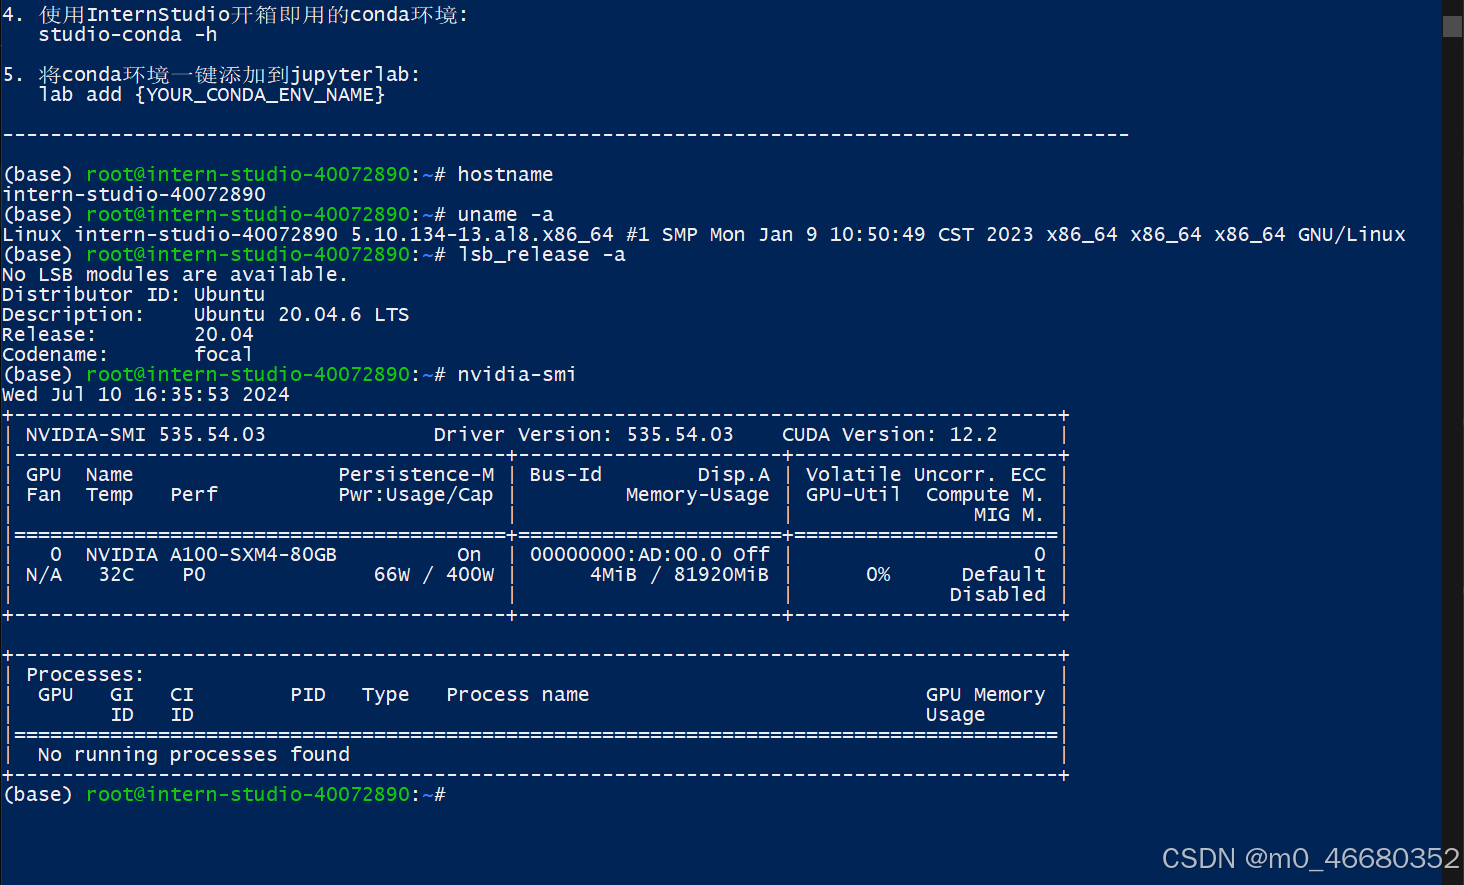
After we connect to the development machine, we can usehostnameView the name of the development machine, useuname -aView the kernel information of the development machine, uselsb_release -aView the development machine version information, usenvidia-smiCheck the GPU information. We will talk about these commands later. If you want to exit the remote connection, enter it twice.exitThat's it.
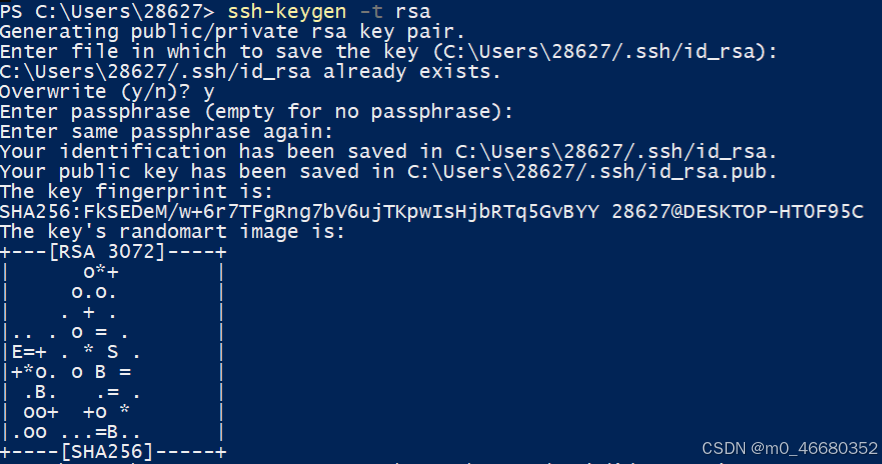
However, when we are developing and learning, it is troublesome to enter the password every time remotely. We can set up SSH key to skip the step of entering the password. In the ssh command, we can usessh-keygenCommand to generate the key
SSH keys are a secure and convenient login authentication method used for identity authentication and encrypted communication in the SSH protocol.
ssh-keygenSupports both RSA and DSA authentication keys.
Common parameters include:
Here we use the RSA algorithm to generate a key. The command is:
ssh-keygen -t rsa
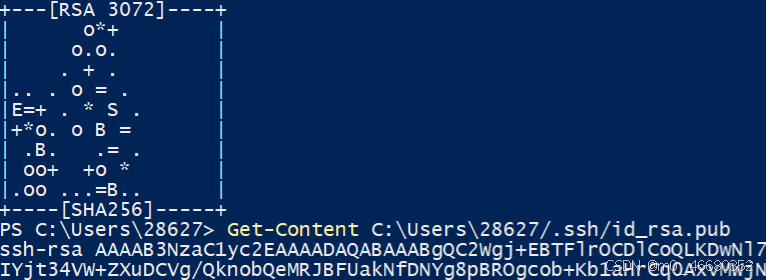
After entering the commandCarry onThat's it. The key here is generated by default in~/.ssh/Under the directory,~It means the home directory. If it is Windows, it isC:Users{your_username}In PowerShell, you can useGet-ContentCommand to view the generated key. If it is a Linux operating system, you can usecatOrder.
Then we go back to the development machine platform and click Configuration on the home page.SSH Key, then clickAdd SSH Public Key,
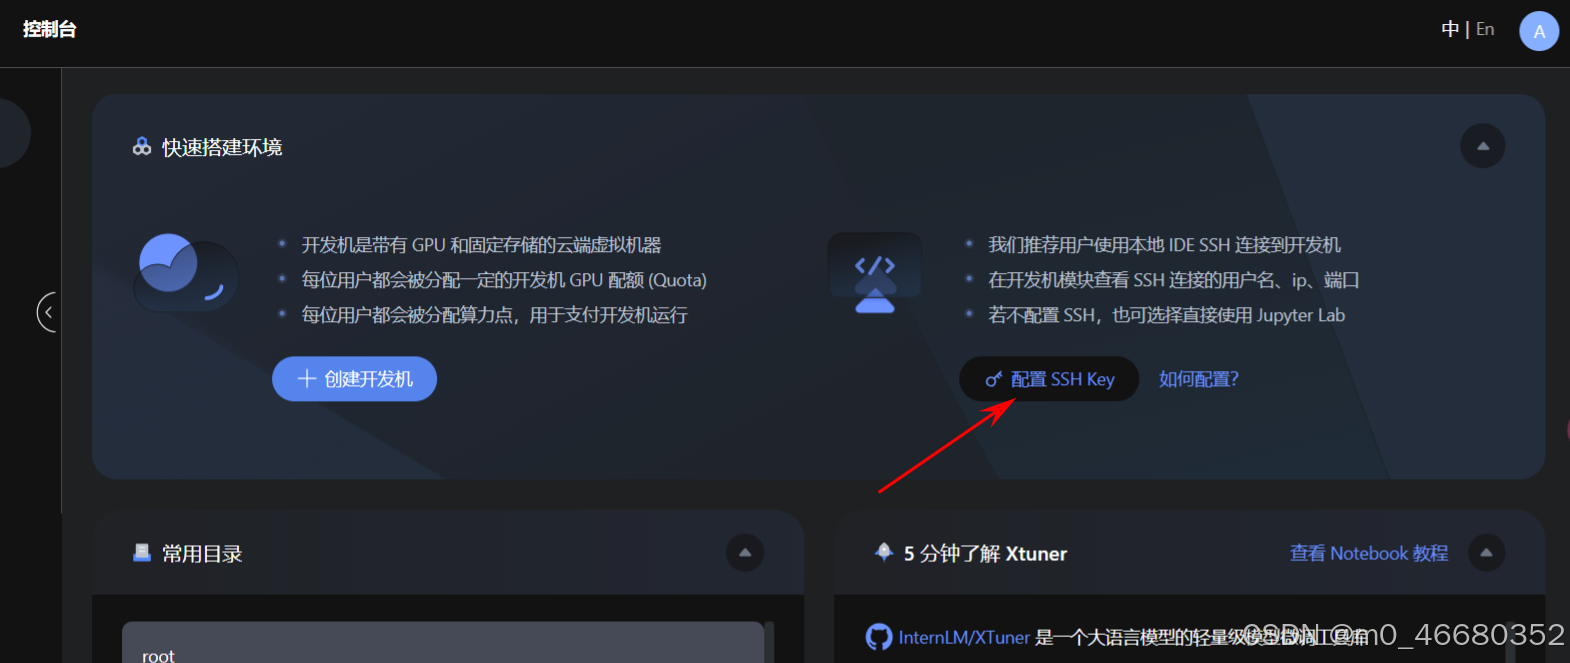
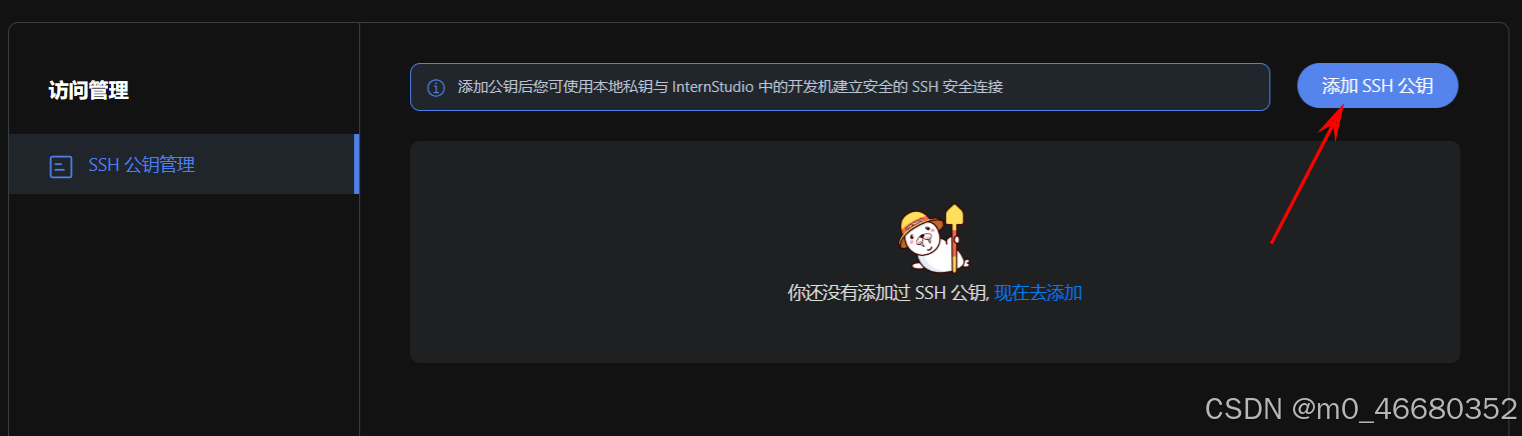
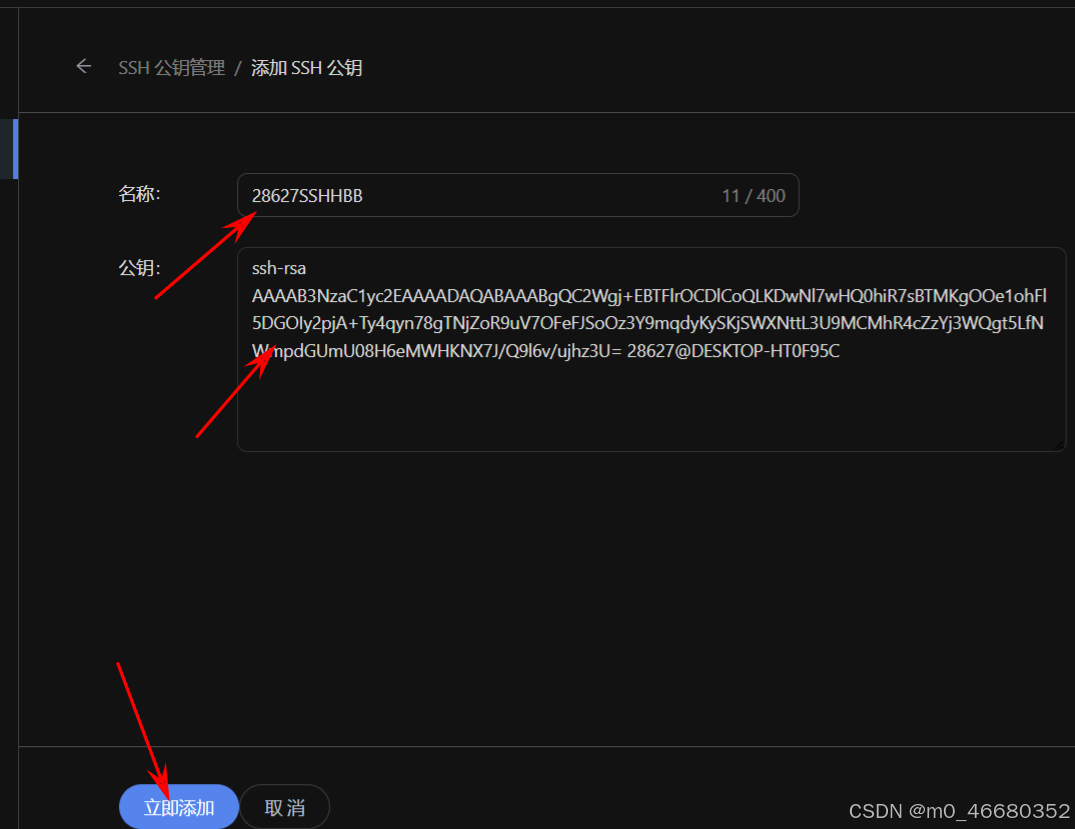
Copy the key you just generated and paste it into the public key box. The name will be automatically recognized. Finally, click Add Now and the SSH Key configuration is complete.
After completing the SSH Key creation, restartterminalWhen you connect remotely, you will skip the password input step.
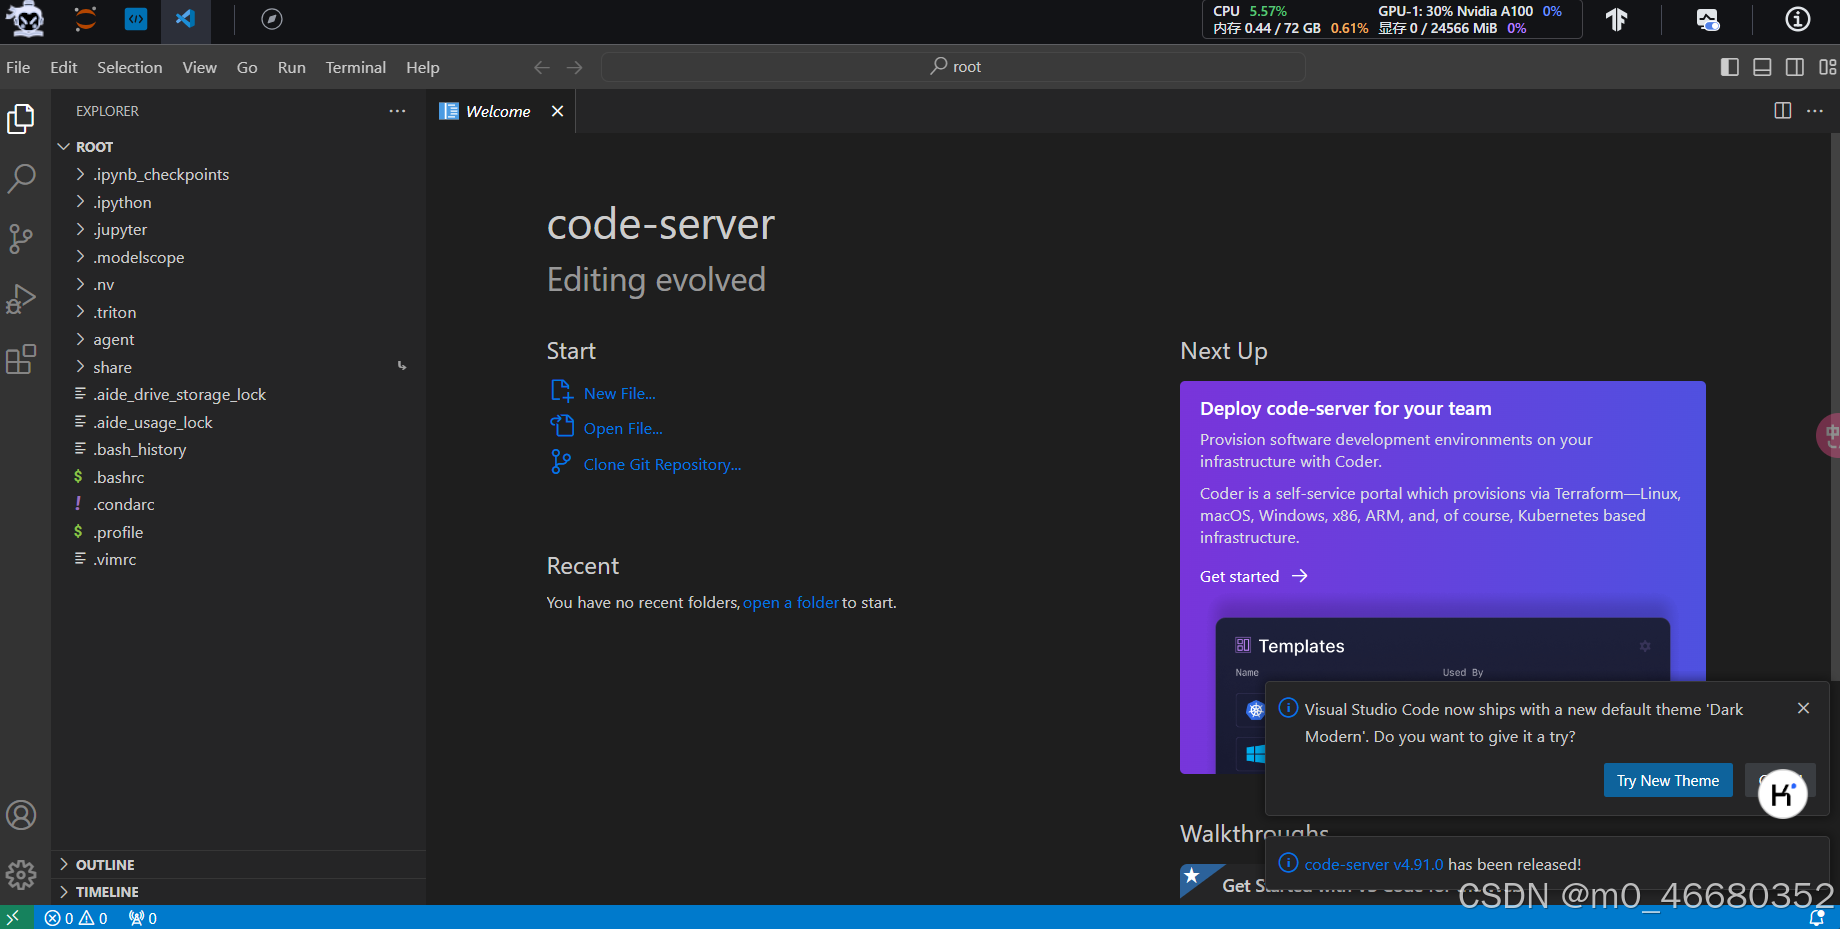
Of course, you can also use SSH remote connection software, such as:Windterm、XterminalEtc. Here we use VScode for remote connection. The advantage of using VScode is that it is a code editor, which is very convenient for code modification and other operations.
If you want to connect remotely in VScode, you also need to install a set of plug-ins. You can search online for how to install VScode. It is very simple. (The VScode in the development machine cannot search for this plug-in, but the local VScode can)
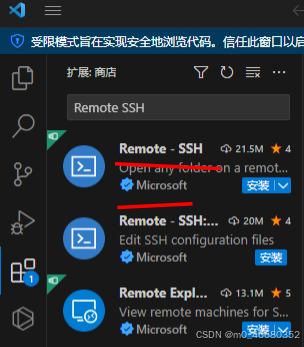
If you have already installed VScode, you can click on the extension page on the left and enter "SSH" in the search box. The first one is the plug-in we want to install. Just click on it and click "Install".
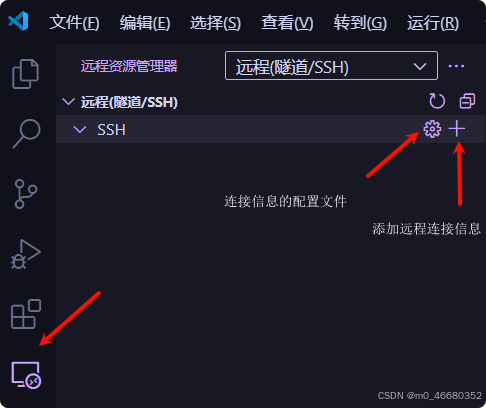
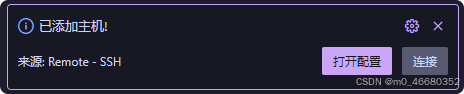
After installing the plug-in, click the remote connection icon in the sidebar, click the "+" button in SSH, and add the login command for the development machine SSH connection.

We copy the login command, then paste the command into the pop-up window and press Enter:


The default configuration file is fine, but you can also customize it. Here is the specific content of the configuration file: (This includes all your remote connection information)
Host ssh.intern-ai.org.cn #主机ip也可以是域名
  HostName ssh.intern-ai.org.cn #主机名
  Port 37367 #主机的SSH端口
  User root #登录SSH使用的用户
  StrictHostKeyChecking no
  UserKnownHostsFile /dev/null
For some of the following configuration options, if you want to add them manually, you need to modify the corresponding parts according to the above format.
If you change *
StrictHostKeyCheckingnoandUserKnownHostsFile*/dev/nullDelete the pop-up window that pops up for fingerprint verification:
StrictHostKeyChecking noIndicates that strict host key checking is disabled. This means that when connecting to a new SSH server, the server's host key will not be strictly verified, which may bring certain security risks.
UserKnownHostsFile /dev/nullThe host key file known to the user is set to /dev/null, which essentially ignores the recording and use of known host keys.However, in general security practice, it is not recommended to arbitrarily disable strict host key checking.
Then click "Connect" in the prompt window that pops up in the lower right corner to remotely connect to the development machine.
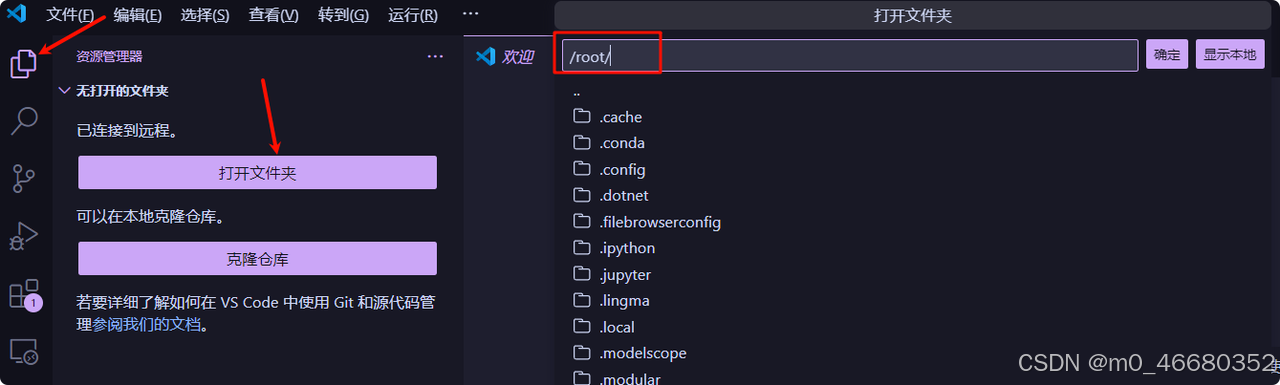
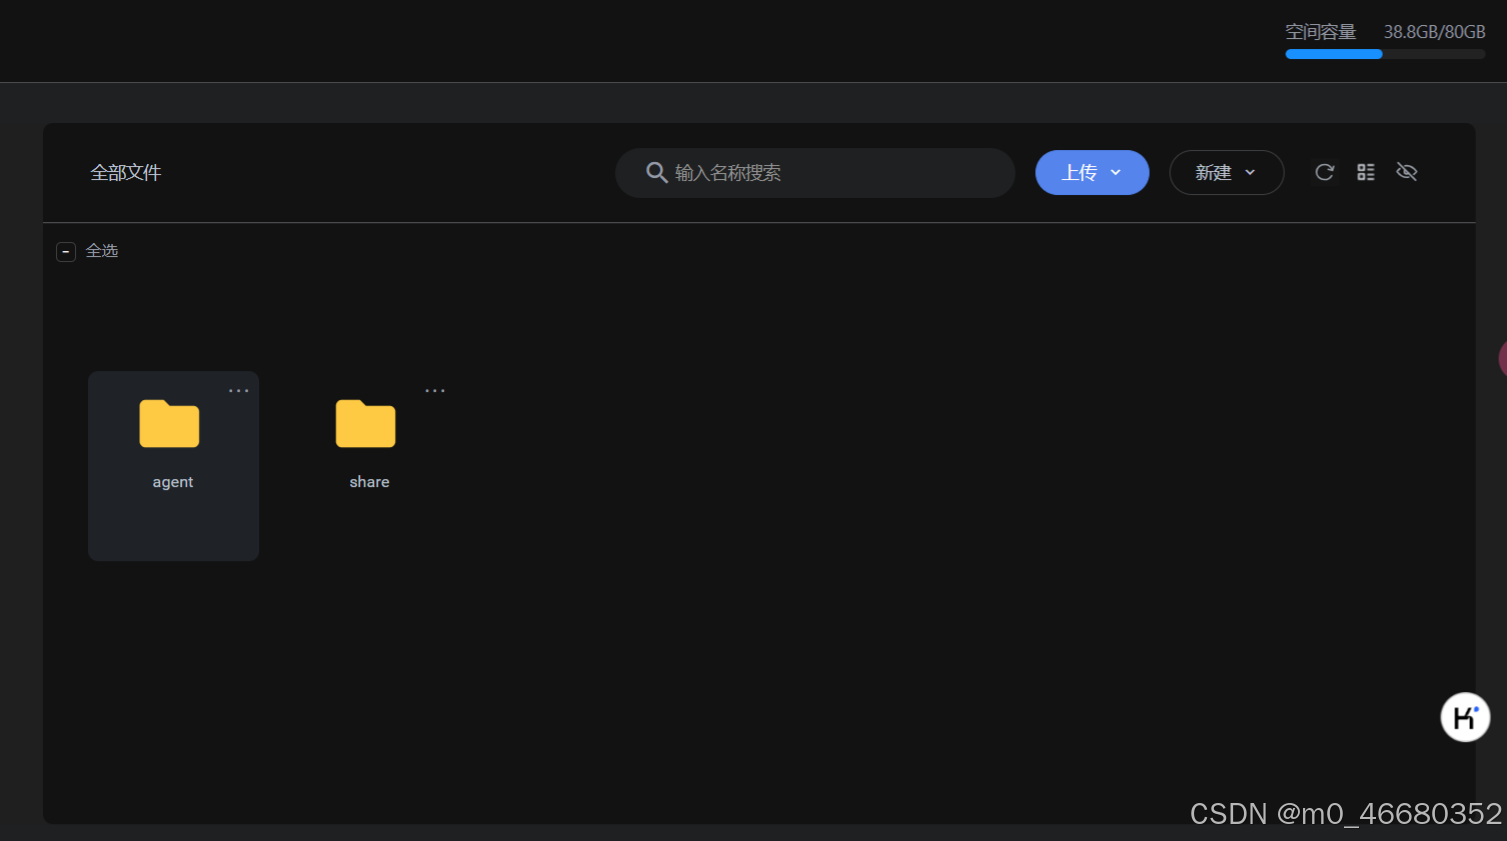
After the remote connection is completed, you can select the folder to open, which can also be called the working directory. You can choose the folder in the development machine or the local folder. The folder in the development machine is what we mentioned earlier.Cloud Disk。
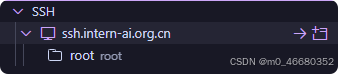
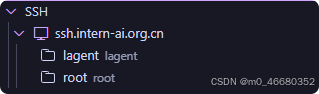
The next time you connect remotely, you don't need to enter the login command and other information. You only need to open the remote connection of vscode to see the development machine information of the first connection.rootThis represents the first connection we made to the development machine./rootWork list.

And the following figure->Indicates that you need to reselect the working directory after entering the development machine:
In the figure below->Indicates entering the working directory selected by the last development machine:
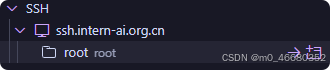
Each selected working directory will be displayed below the development machine information: (here there is an additional lagent working directory)
Now let us introduce whatPort Mapping。
Port MappingIt is a network technology that can map any port in the external network to the corresponding port in the internal network to achieve communication between the internal network and the external network. Through port mapping, you can access the services or applications in the internal network from the external network, achieving convenient communication across networks.
So why do we need to perform port mapping when using the development machine?
Because in subsequent courses we will conduct modelweb_demoIf you are doing deployment practice, you may encounter the problem of incomplete web ui loading during this process. This is because when running web_demo in the Web IDE of the development machine, directly accessing the http/https service in the development machine may encounter proxy problems, and the external network linkUI resourcesNot fully loaded.
So in order to solve this problem, we need to map the port of the connection running web_demo.The external network link is mapped to our local host, we use local connection access to solve this proxy problem. Let's practice it.

Let's first understand how the development machine port mapping works based on a diagram:
There will be practical steps below. First understand how to map ports.
ssh -p 37367 [email protected] -CNg -L 7860:127.0.0.1:7860 -o StrictHostKeyChecking=no
The above is a port mapping command. You can perform port mapping by running this command on the host. The following is a flowchart to understand the process of port mapping:
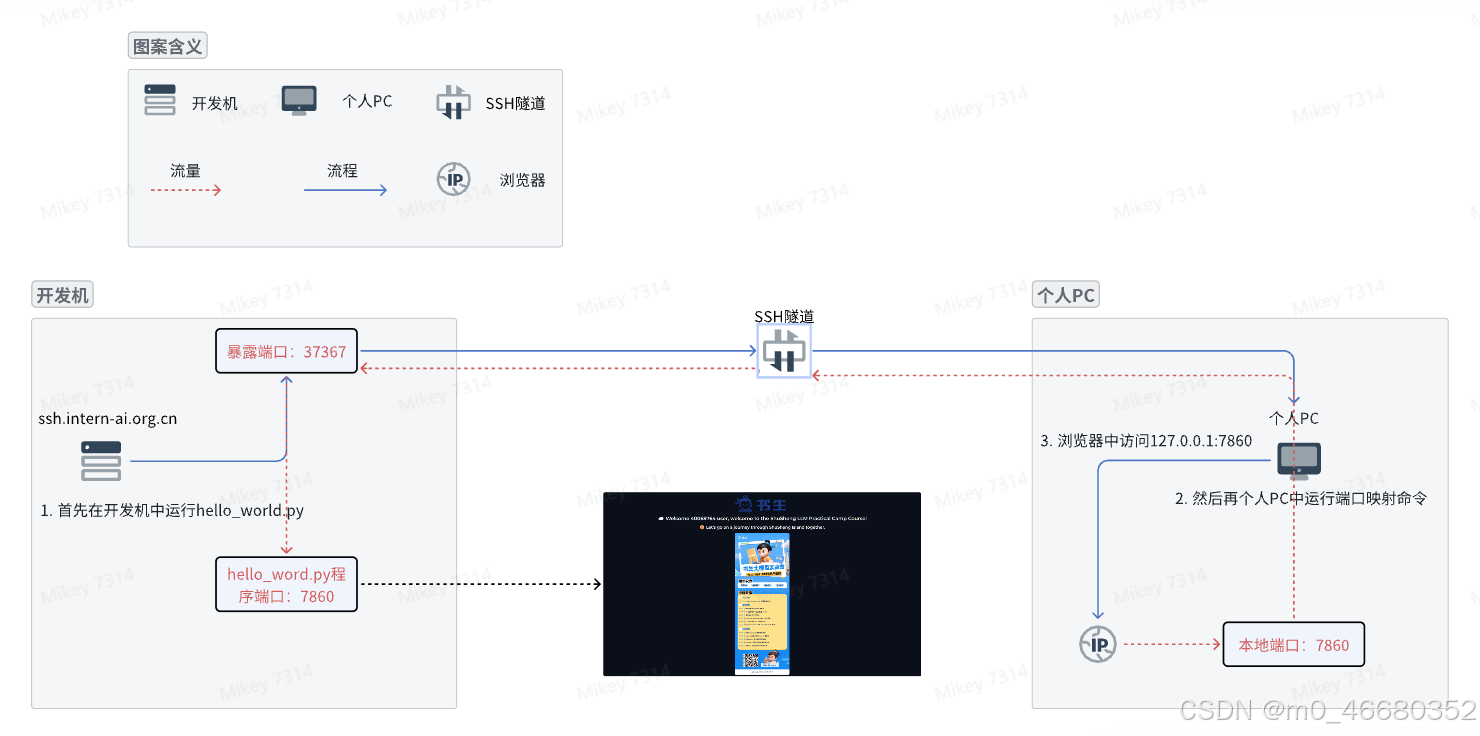
The personal PC will remotely connect to the only exposed port 37367 of the development machine (this was mentioned in SSH that the exposed port of each person's development machine is different), and set the tunnel option. The exposed port is used as a transit station to forward traffic.
-C: Enable compression to reduce the amount of transmitted data.-N: Do not execute remote commands, just establish a tunnel.-g: Allow remote hosts to connect to locally forwarded ports.When this SSH command is executed on a personal PC, the SSH client will listen on port 7860 of the local machine.
Any traffic sent to the local port 7860 will be forwarded by the SSH tunnel to the remote server's port 7860 on the 127.0.0.1 address.
This means that even if this port of the development machine is not directly exposed to the external network, we can securely access the services on the remote server through this tunnel.
We still come to the development machine interface, find our development machine, clickCustom services, copy the first command,

ssh -p 37367 [email protected] -CNg -L {本地机器_PORT}:127.0.0.1:{开发机_PORT} -o StrictHostKeyChecking=no
Here is an introduction to the meaning of each part of the command:
-p 37367: Specifies the port number for the SSH connection to be 37367, as mentioned earlier.[email protected]:Indicates to root User identity connected tossh.intern-ai.org.cn This host.-CNg:
-C Typically used to enable compression.-N Indicates that no remote command is executed, and only a connection is established for port forwarding, etc.-g Allows remote hosts to connect to locally forwarded ports.-L {本地机器_PORT}:127.0.0.1:{开发机_PORT}: This is to set up local port forwarding, which will forward the specified port on the local machine (by {本地机器_PORT} indicates) is forwarded to the remote host (heressh.intern-ai.org.cn)of 127.0.0.1 (i.e. the local loopback address) and the development machine port specified by{开发机_PORT} express).-o StrictHostKeyChecking=no: Turn off strict host key checking, which can avoid prompts or errors caused by unknown host keys when connecting for the first time.When you run a web demo, you can use this command to map the port. For example:
We create a hello_world.py file (right-click on the development machine interface to create a file and change the name to hello_world.py), and fill in the following content in the file:
import socket
import re
import gradio as gr
# 获取主机名
def get_hostname():
hostname = socket.gethostname()
match = re.search(r'-(d+)$', hostname)
name = match.group(1)
return name
# 创建 Gradio 界面
with gr.Blocks(gr.themes.Soft()) as demo:
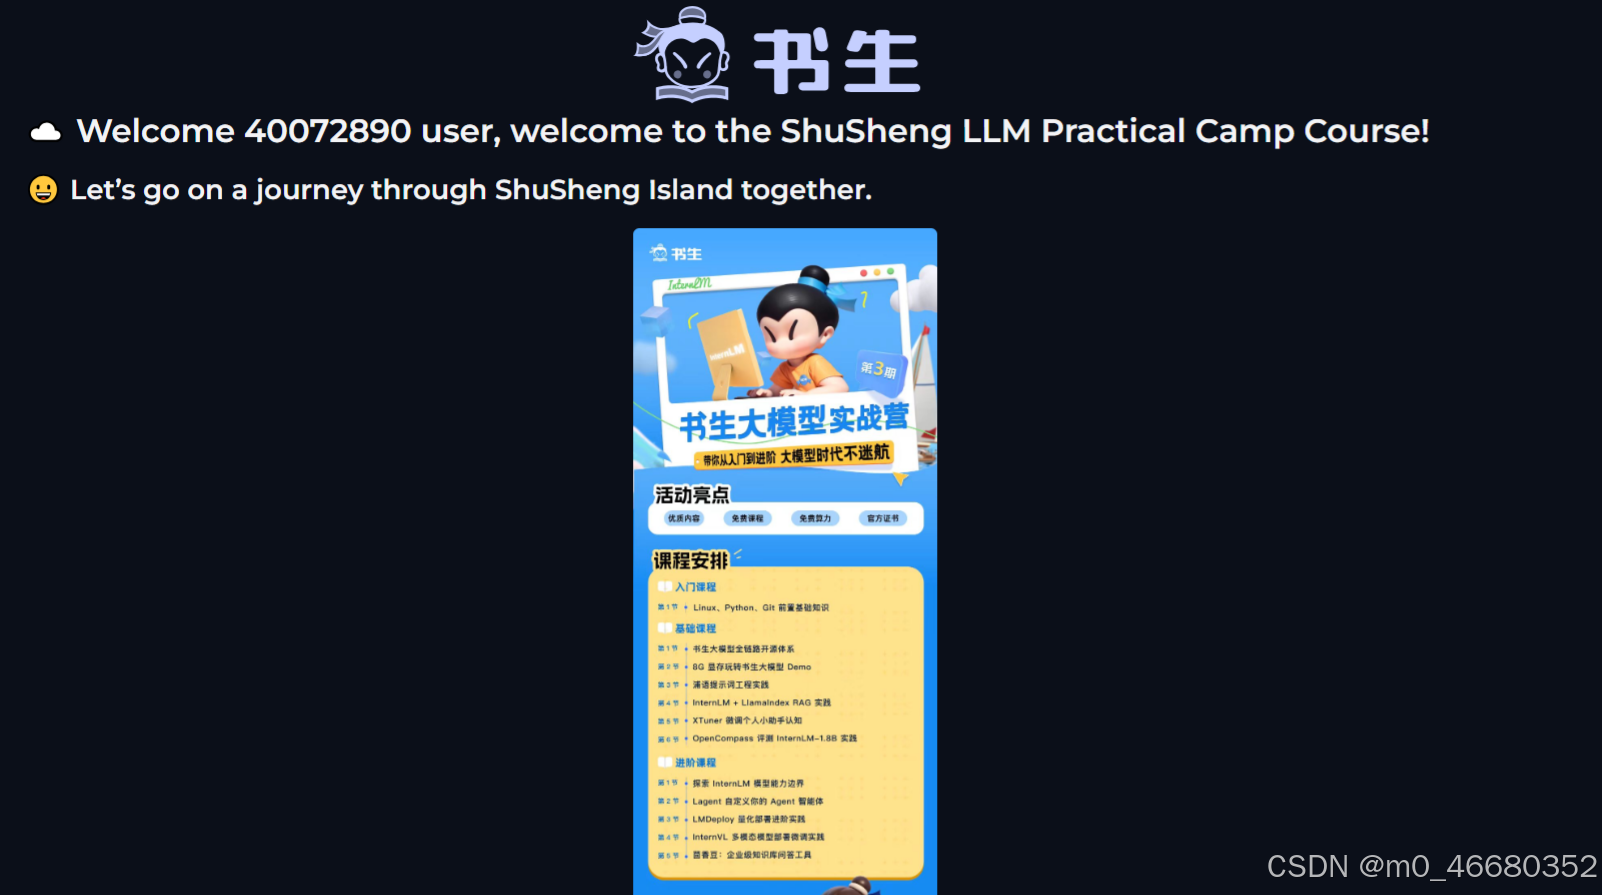
html_code = f"""
<p align="center">
<a href="https://intern-ai.org.cn/home">
<img src="https://intern-ai.org.cn/assets/headerLogo-4ea34f23.svg" alt="Logo" width="20%" style="border-radius: 5px;">
</a>
</p>
<h1 style="text-align: center;">☁️ Welcome {get_hostname()} user, welcome to the ShuSheng LLM Practical Camp Course!</h1>
<h2 style="text-align: center;">😀 Let’s go on a journey through ShuSheng Island together.</h2>
<p align="center">
<a href="https://github.com/InternLM/Tutorial/blob/camp3">
<img src="https://oss.lingkongstudy.com.cn/blog/202406301604074.jpg" alt="Logo" width="20%" style="border-radius: 5px;">
</a>
</p>
"""
gr.Markdown(html_code)
demo.launch()
After editing, rememberctrl+ssave
Before running the code, you need to usepip install gradio==4.29.0The following dependency packages are installed by command (copy and paste the command into the terminal), and then a command is run in the terminal of Web IDEpython hello_world.pyOrder

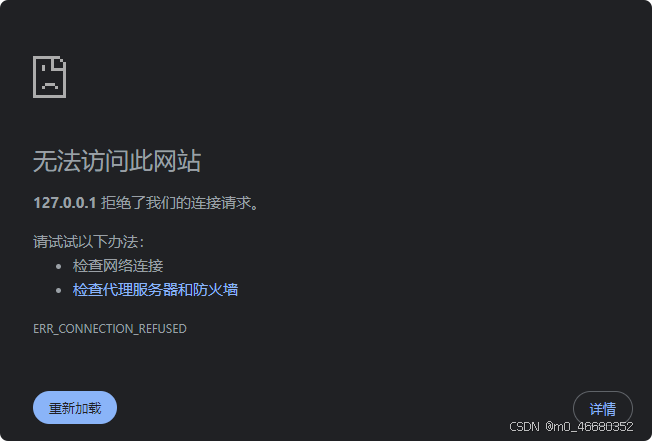
If port mapping is not performed, it cannot be accessed using the local IP
I can use the following command, entered into powershell:
ssh -p 37367 [email protected] -CNg -L 7860:127.0.0.1:7860 -o StrictHostKeyChecking=no

This means success.Notice: This command does not return any content, which means that the port mapping is running. Then open the connection in the web page to see the web ui interface)
Of course, if we run different web UIs, we need to enter commands repeatedly, which is very troublesome. This is where VScode comes in handy. We have already connected to the development machine remotely through SSH. VScode provides the function of automatic port mapping. We do not need to configure it manually. We can use the shortcut key "Ctrl+Shift+~"Wake up the terminal, you can find the port option on the right side of the terminal:

You can view the port mapping information here. If you need to modify the port, you can modify the port number in the port column.
In this part, I will take you to understand some of LinuxBasic Operations, and use some tools. So that everyone can solve problems by themselves when they encounter them. If you encounter any problems, you can also comment here and I will answer you in time.
Because we useDevelopment MachineRarely usedauthority management, so we won't introduce it. (All subsequent operations are performed in the VScode terminal)
In Linux, common file management operations include:
touch command creates an empty file.mkdir Order.cdOrder.pwdOrder.cat Directly display the entire content of the file.more andless Can be viewed in pages.vi orvim etc. editor.cp Order.lnOrder.mv Order.rm Order.rmdir(only empty directories can be deleted) or rm -r(Non-empty directories can be deleted).find Order.lsCommands, such as using ls -lView detailed information about the files in the directory.sedOrder.Here are some commands we will use in the course:
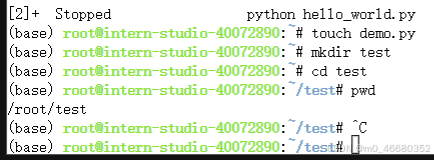
We can use touch to quickly create files, so we don't have to click manually to create. For example, we want to create ademo.pydocument:
In the same way, if you want to create atestDirectory:

This command will be the most used one. Before using it, you need to explain the directory structure to students who have no computer knowledge and draw a picture for everyone to understand:
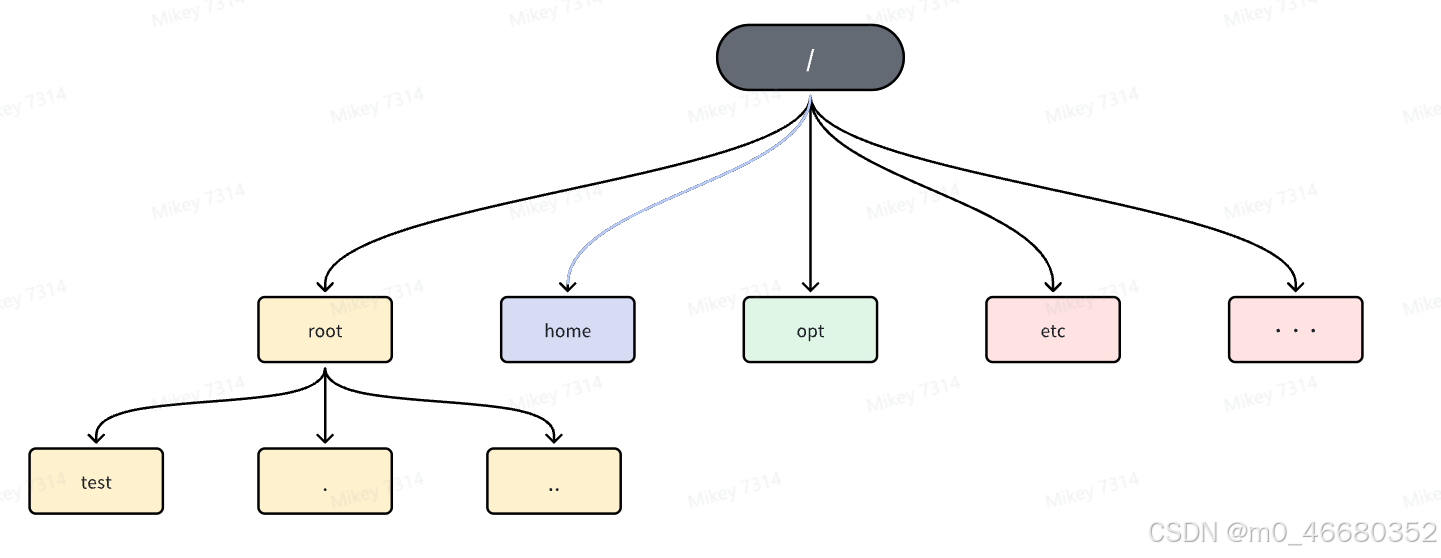
We are currently usingrootDirectory, which is also the home directory of the root user~, in the Linux operating system/Indicates the root directory. There are many directories and files required by the system under the root directory. The directory we just created exists inrootDirectory, where.Indicates the current directory...Indicates the parent directory. If I now want to entertestdirectory, then return torootDirectory, we can do this:
We can usepwdCommand to view the current directory: This makes it easy for us to determine which directory we are currently in.
catThe command can view the contents of the file, and more commands can be used--helpCommand to view:
When we need to edit a file, we can useviorvimCommand, when you enter the file editing, there are three modes:
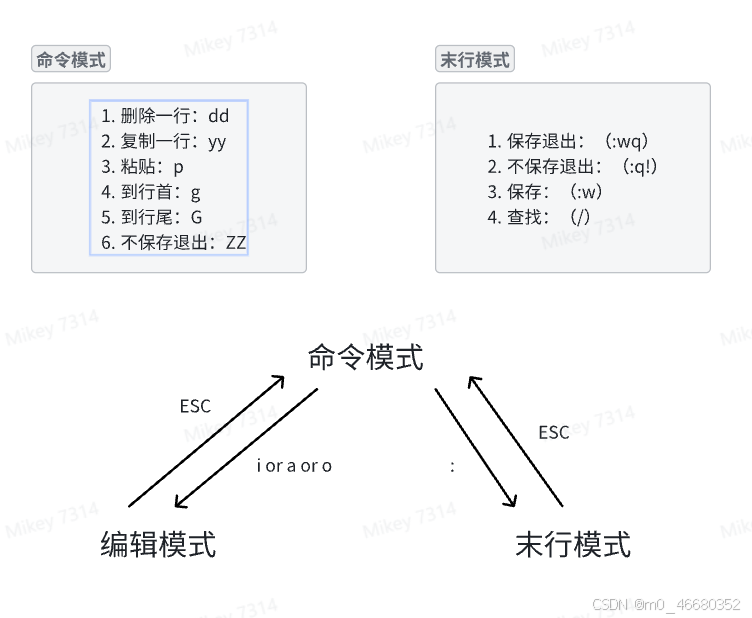
Enter edit mode and useiThe convenience of vim is that you can make simple file modifications in the terminal.
**cp**The command will be used frequently in the following courses. It is used to copy a file or directory to another directory. Common uses are:
cp 源文件 目标文件cp -r 源目录 目标目录But if we want to use the model, this operation will take up a lot of disk space, so we usually uselnCommand, this is the same as the shortcut in Windows. There are two types of links in Linux: Hard Links(hard link) andSoft Link(symbolic link), a hard link means that a file can have multiple names, while a soft link generates a special file whose content points to the location of another file. Hard links exist in the same file system, while soft links can span different file systems.
So we generally use soft connections, and its common usage is as follows:
ln [参数][源文件或目录][目标文件或目录]
The parameters are as follows:
mvCommand andrmThe commands are used in a similar way, butmvIt is used to move files or directories and can also rename them.rmThe command is used to delete files or directories.
The commonly used methods are as follows:
Common parameters:
-i: Interactive mode, ask before overwriting.-f: Force overwrite.-u: Move only if the source file is newer than the destination file.Example of use:
mv file1.txt dir1/: File file1.txt Move to directorydir1 middle.
mv file1.txt file2.txt: File file1.txt Rename tofile2.txt。
rm command:
Common parameters:
-i: Interactive mode, ask before deleting.-f: Force deletion, ignore non-existent files, and do not prompt for confirmation.-r: Recursively delete a directory and its contents.Example of use:
rm file.txt:Delete Files file.txt。rm -r dir1/: Recursively delete directories dir1 and all its contents.The command to delete the directory can also be usedrmdir。
findThe command is a powerful file search tool in the Linux system. It can search for qualified files or directories in the specified directory and its subdirectories and perform corresponding operations.
The following arefindSome common uses of the command:
-nameoption to find files by file name. For example,find /path/to/directory -name "file.txt"The specified directory and its subdirectories will be searched for files namedfile.txtdocument.-typeoption to find files by file type. For example,find /path/to/directory -type fWill find all normal files in the specified directory and its subdirectories.-sizeoption to find files by size. For example,find /path/to/directory -size +100Mwill find files larger than 100MB in the specified directory and its subdirectories.-mtime、-atimeor-ctimeOptions to find files by their modification time, access time, or status change time. For example,find /path/to/directory -mtime -7Will find files in the specified directory and its subdirectories that have been modified within 7 days.-permoption to find files by their permissions. For example,find /path/to/directory -perm 755Will search for files with permissions 755 in the specified directory and its subdirectories.-useror-groupoption to find files by their owner or group. For example,find /path/to/directory -user usernameWill search the specified directory and its subdirectories for usersusernamedocument.-execOptions can be used to perform actions on the found files. For example,find /path/to/directory -name "*.txt" -exec rm {} ;All found.txtEnd of file.lscommand can be used to list the contents of a directory as well asdetails。
Common parameters and usage methods are as follows:
-a: Display all files and directories, including hidden files (with.).-l: Display detailed information in long format, including file permissions, owner, size, modification time, etc.-h:and-lUsed in conjunction with to display file sizes in a human-readable format (such asK、M、Gwait).-R: Recursively list the contents of subdirectories.-t:Sorted by file modification time.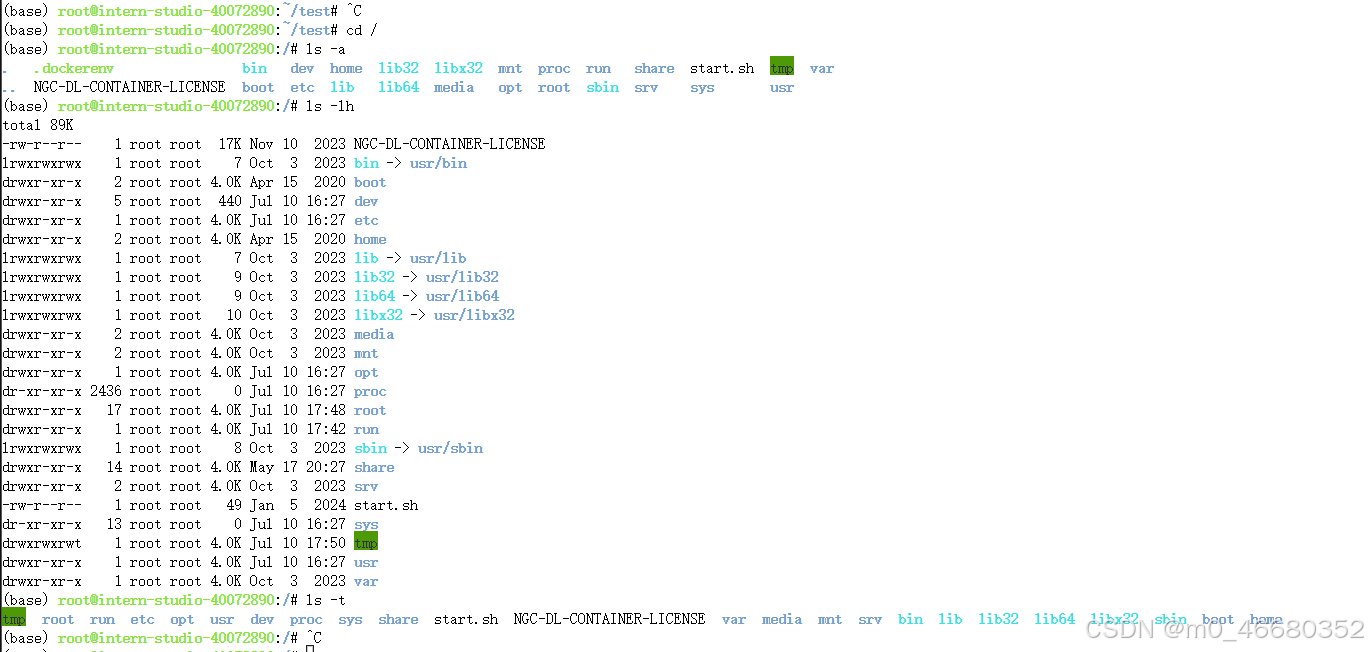
sedThe command is a stream editor, mainly used for text processing. It is often used when dealing with complex file operations and will be used in subsequent courses.sedCommon command parameters and usage examples are as follows:
-e<script> or--expression=<script>: Specify the script directly in the command line for text processing.-f<script文件> or--file=<script文件>: Read the script from the specified script file for text processing.-n or--quiet or--silent: Print only the output after being processed by the script, and do not print the unmatched lines.a: Add the specified text string to the line below the current line.c: Replaces the lines in the specified range with the specified text string.d: Delete the specified row.i: Add the specified text string to the line above the current line.p: Print selected lines. Usually with -n Parameters to print only matching lines.s: Use regular expressions to perform text replacement. For example,s/old/new/g Replace all occurrences of "InternLM" with "InternLM yyds".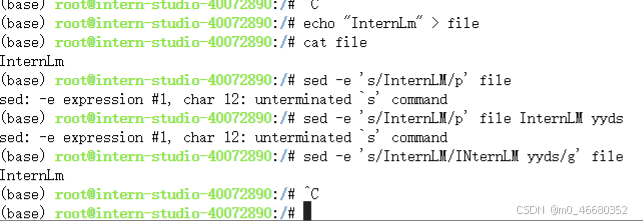
In the example,echocommand, which is similar to theprintSame, used to print content, here use the pipe character>Print InternLM to file. Commonly used pipe characters include<and|, for example, we can usegrepCommand to view the included installed in PythonosFields of the package:
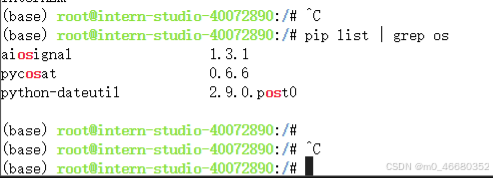
grepIt is a powerful text search tool. Common parameters are as follows:
-i: Search regardless of case.-v: Invert the match, that is, display the unmatched lines.-n: Display line numbers.-c: Count the number of matching rows.Process ManagementCommands are important tools for system monitoring and process management. Commonly used process management commands are as follows:
There is also a special command in the development machinenvidia-smi, which is a command-line tool for the NVIDIA System Management Interface, is used to monitor and manage NVIDIA GPU devices. It provides a quick way to view information such as GPU status, usage, temperature, memory usage, power usage, and processes running on the GPU.
The following are examples of using each command:
ps: List the processes in the current system. Use different options to display different process information, for example: ps aux # 显示系统所有进程的详细信息
top: Dynamically displays the status of processes in the system. It updates the process list in real time and displays the processes with the highest CPU and memory usage. top # 启动top命令,动态显示进程信息
pstree: Displays the currently running processes and their parent-child relationships in a tree diagram. pstree # 显示进程树
pgrep: Search for processes that match the conditions. You can search for processes based on conditions such as process name and user. pgrep -u username # 查找特定用户的所有进程
nice: Change the priority of a process.nice The lower the value, the higher the process priority.nice -n 10 long-running-command # 以较低优先级运行一个长时间运行的命令
jobs: Displays a list of jobs in the current terminal session, including processes running in the background. jobs # 列出当前会话的后台作业
bg andfg:bg Put the suspended process into the background.fg Bring the background process back to the foreground.bg # 将最近一个挂起的作业放到后台运行
fg # 将后台作业调到前台运行
kill: Sends a signal to the specified process, usually used to kill the process. kill PID # 杀死指定的进程ID
Notice,kill Commands are sent by defaultSIGTERM Signal, if the process does not respond, you can use-9useSIGKILL Signal force kills the process:
kill -9 PID # 强制杀死进程
SIGTERMThe Signal Termination signal is a standard signal used in Unix and Unix-like operating systems to request process termination. This signal is usually sent when the system or user wants to shut down a process gracefully.SIGKILLThe signal is different.SIGTERMSignals can be captured and processed by the process, allowing the process to clean up before exiting. (From the Internet)
The following are nvidia-smi Some basic command usage:
nvidia-smi
nvidia-smi -l 1
This command will update the status information every 1 second.
nvidia-smi -h
nvidia-smi pmon
nvidia-smi --id=0 --ex_pid=12345
This will forcefully kill the process with PID 12345 on GPU ID 0.
nvidia-smi -pm 1
nvidia-smi -i 0 -pm 1
The first command sets all GPUs to performance mode, the second only targets GPU ID 0.
nvidia-smi --id=0 -r
This will restart GPU with ID 0.
nvidia-smi -h
The following picture introduces the GPU information:

Here is a toolTMUX,TMUX is a terminal multiplexer. It allows to easily switch between multiple terminals, detach them (this does not kill the terminals, they continue to run in the background) and reattach them to other terminals. Why introduce this tool? Because laterXtunerWhen fine-tuning the model, it will take a long time.TmuxIt can solve the problem of program being killed and interrupted. Here is how to install and use it.
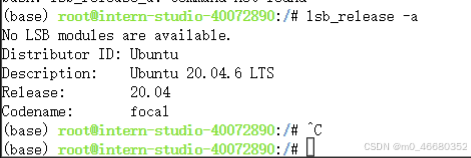
Because the development machine uses the Ubuntu operating system, you can uselsb_release -a Command to view Ubuntu system information:
Then useapt install tmuxCommand to install tmux. After installation, you can use ittmuxYou can use tmux by using command. If you want to exit tmux, you can use "Ctrl+d"shortcut key.
Only files in the /root path of the development machine are persistently stored. Software installed in other paths will be reset after restart.
For specific usage, please refer to:
https://www.ruanyifeng.com/blog/2019/10/tmux.html
Conda is an open source package management and environment management system that runs on Windows, macOS, and Linux. It quickly installs, runs, and updates software packages and their dependencies. With Conda, you can easily create, save, load, and switch different environments on your local computer.
Already installed on the development machineconda, we can use it directly, and there is also a built-incondaOrderstudio-conda, we will introducecondaBasic use, andstudio-condaHow to use and introducestudio-condaHow is it achieved.
We will introduce it from the following parts:
We can useconda --versionTo view the current development machinecondaVersion information:

When we want to usecondaThe installation of the package will be very slow. We can set a domestic mirror to increase the installation speed. The example is as follows:
#设置清华镜像
conda config --add channels https://mirrors.tuna.tsinghua.edu.cn/anaconda/pkgs/main
conda config --add channels https://mirrors.tuna.tsinghua.edu.cn/anaconda/pkgs/free
conda config --add channels https://mirrors.tuna.tsinghua.edu.cn/anaconda/pkgs/r
conda config --add channels https://mirrors.tuna.tsinghua.edu.cn/anaconda/pkgs/pro
conda config --add channels https://mirrors.tuna.tsinghua.edu.cn/anaconda/pkgs/msys2
But we usually usepipTo install the package, we will introduce it laterpipandcondaThe difference.
If we want to view conda's configuration information, we can useconda config --showCommand, if it is the default setting of the development machine, it will return: (part of the information)
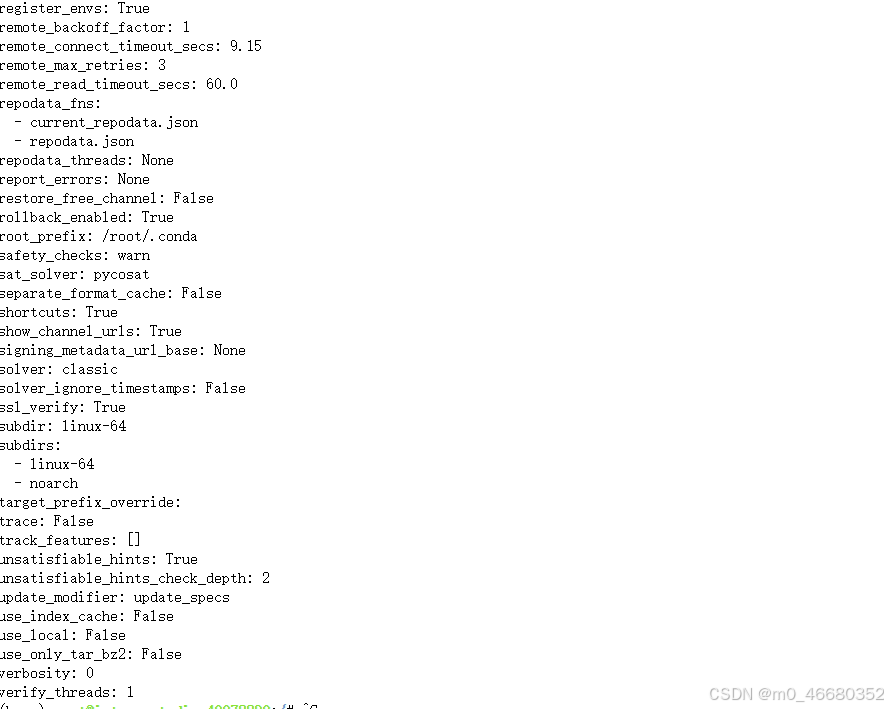
These configurations areCondaEnvironment configuration affects the methods and results of software package installation, update, environment management, and other operations.
This part isconda中非常重要的一部分,掌握了这一部分大家就可以将开发环境玩转到飞起了😀。
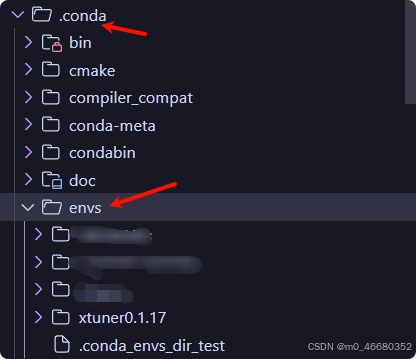
We can useconda create -n name python``=3.10Create a virtual environment. Here, a virtual environment named name with Python version 3.10 is created..condaUnder the directoryenvsFound in the directory.
If you do not specify a Python version, a virtual environment based on the latest Python version will be automatically created. At the same time, we can install the necessary packages while creating the virtual environment:conda create -n name numpy matplotlib python=3.10(But it is not recommended to use this method)
Common parameters for creating a virtual environment are as follows:
If we want to see what virtual environments are available, we can use the following command:
conda env list
conda info -e
conda info --envs
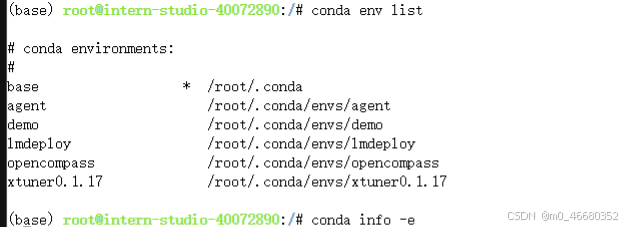
At the same time we can also see the directory where the environment is located.
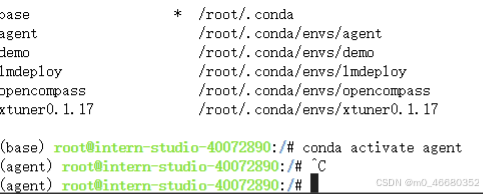
After we create the virtual environment we can useconda activate namecommand to activate the virtual environment. How to check whether the switch is successful? It's very simple. Just look at(base)Whether it becomes the name of the created virtual environment.
If you want to exit the virtual environment, you can use:
conda activate
conda deactivate
Both of these commands will returnbaseenvironment, becausebaseIt is the basic environment of conda. If you observe carefully,baseThe environment directory is at a higher level than other virtual environment directories.
If you want to delete a virtual environment, you can useconda remove --name name --allIf you only want to delete one or some packages in the virtual environment, you can useconda remove --name name package_name
Exporting the virtual environment is very necessary for a specific environment, because the dependencies of some software packages are very complex. It is very troublesome to recreate and configure them by yourself. If we export the configured environment, we can restore it next time, and we can also share the configuration with others.
#获得环境中的所有配置
conda env export --name myenv > myenv.yml
#重新还原环境
conda env create -f  myenv.yml
For example, we willxtuner0.1.17The virtual environment is exported and the configuration information is as follows:
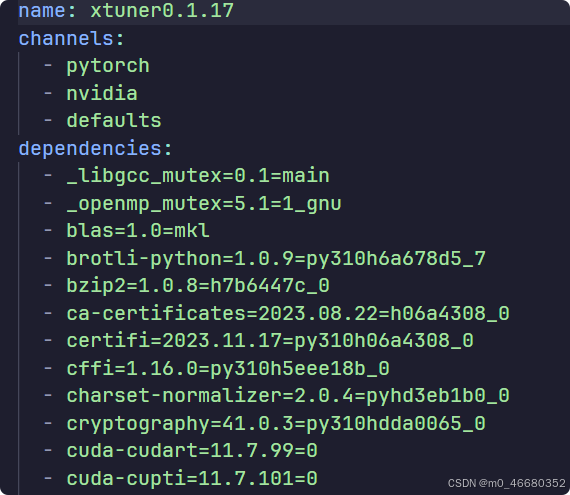
These includeEnvironment Name、The location of the online repository for virtual environment packagesandVirtual environment dependenciesLater we will use advanced methods to quickly restore the virtual environment.
In this section we introduce somecondaandpipSome differences:
Wheel It is a format for Python installation packages.
It is a precompiled binary distribution format, similar to the compiled binaries in conda.
The main advantages of the Wheel format include:
- Fast installation: Because it has been precompiled, there is no need to compile it during installation like source code installation, which saves time.
- Consistency: Ensure that installation results are consistent across different systems and environments.
For example, if you want to install a large Python library, using the Wheel format can avoid installation problems caused by differences in the compilation environment on different machines. Moreover, for systems that do not have a compilation environment or have weak compilation capabilities, the Wheel format can make the installation process smoother.
This part belongs to the extended part. I think this part is very interesting and practical, so if you are interested, you can learn it.
Let us first introducestudio-conda, which is a command built into the development machine, and is implemented through a Shell script. What is a Shell script?
Shell Script A text file containing a series of commands, arranged in a specific order, used to automate tasks in a Unix/Linux or similar operating system environment.
Shell scripts are usually written in Shell language. Common Shell languages include Bash, Sh, etc., which are the basic Linux commands we introduced earlier. They belong to Shell language.
It has the following important features:
Thatstudio-condaIt is part of the automation. The configuration file of the bash environment of the root user in our development machine is.bashrc, but the main configuration file is/share/.aide/config/bashrc, some commands are written in this file, which allows us to perform some operations more quickly, such as:
export no_proxy='localhost,127.0.0.1,0.0.0.0,172.18.47.140'
export PATH=/root/.local/bin:$PATH
export HF_ENDPOINT='https://hf-mirror.com'
alias studio-conda="/share/install_conda_env.sh"
alias studio-smi="/share/studio-smi"
exportIt is used to set environment variables.aliasis to copy a sh file as a variable, which can be executed as a command in the terminal.studio-condaThat's it.
herestudio-smiIt is used to view the virtual memory usage. When we open/share/studio-smiThe file can be seen:
#!/bin/bash

if command -v vgpu-smi &> /dev/null
then
    echo "Running studio-smi by vgpu-smi"
    vgpu-smi
else
    echo "Running studio-smi by nvidia-smi"
    nvidia-smi
fi
This script is used to check whether the system exists vgpu-smi command, if it exists, it will runvgpu-smi to display virtual GPU (vGPU) status information; if not present, it will runnvidia-smi To display the status information of NVIDIA GPU. As shown below:
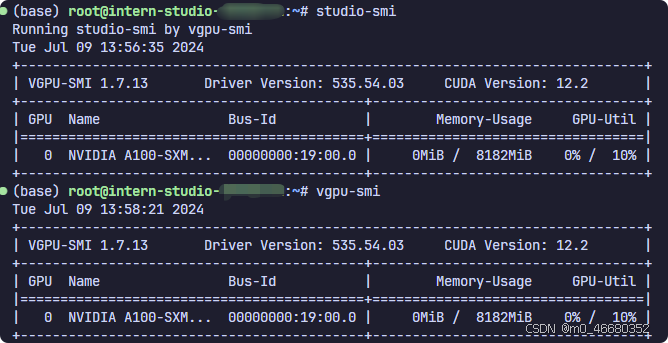
nvidia-smi is a tool for monitoring and managing physical NVIDIA GPU devices, andvgpu-smi Dedicated to monitoring and managing GPU resources virtualized through NVIDIA vGPU technology.
We check/share/install_conda_env.shThe file contents are as follows:
#!/bin/bash
# clone internlm-base conda env to user's conda env
# created by xj on 01.07.2024
# modifed by xj on 01.19.2024 to fix bug of conda env clone
# modified by ljy on 01.26.2024 to extend

XTUNER_UPDATE_DATE=`cat /share/repos/UPDATE | grep xtuner |awk -F= '{print $2}'`
HOME_DIR=/root
CONDA_HOME=$HOME_DIR/.conda
SHARE_CONDA_HOME=/share/conda_envs
SHARE_HOME=/share

list() {
    cat <<-EOF
  预设环境          描述

  internlm-base    pytorch:2.0.1, pytorch-cuda:11.7
  xtuner           Xtuner(源码安装: main $(echo -e "033[4mhttps://github.com/InternLM/xtuner/tree/main033[0m"), 更新日期:$XTUNER_UPDATE_DATE)
  pytorch-2.1.2    pytorch:2.1.2, pytorch-cuda:11.8
EOF
}

help() {
    cat <<-EOF
  说明: 用于快速clone预设的conda环境

  使用:

    1. studio-conda env -l/list 打印预设的conda环境列表

    2. studio-conda <target-conda-name> 快速clone: 默认拷贝internlm-base conda环境

    3. studio-conda -t <target-conda-name> -o <origin-conda-name> 将预设的conda环境拷贝到指定的conda环境

EOF
}

clone() {
    source=$1
    target=$2

    if [[ -z "$source" || -z "$target" ]]; then
        echo -e "033[31m 输入不符合规范 033[0m"
        help
        exit 1
    fi

    if [ ! -d "${SHARE_CONDA_HOME}/$source" ]; then
        echo -e "033[34m 指定的预设环境: $source不存在033[0m"
        list
        exit 1
    fi

    if [ -d "${CONDA_HOME}/envs/$target" ]; then
        echo -e "033[34m 指定conda环境的目录: ${CONDA_HOME}/envs/$target已存在, 将清空原目录安装 033[0m"
        wait_echo&
        wait_pid=$!
        rm -rf "${CONDA_HOME}/envs/$target"
        kill $wait_pid
    fi

    echo -e "033[34m [1/2] 开始安装conda环境: <$target>. 033[0m"
    sleep 3
    tar --skip-old-files -xzvf /share/pkgs.tar.gz -C ${CONDA_HOME}
    wait_echo&
    wait_pid=$!
    conda create -n $target --clone ${SHARE_CONDA_HOME}/${source}
    if [ $? -ne 0 ]; then
        echo -e "033[31m 初始化conda环境: ${target}失败 033[0m"
        exit 10
    fi

    kill $wait_pid

    # for xtuner, re-install dependencies
    case "$source" in
    xtuner)
        source_install_xtuner $target
        ;;
    esac

    echo -e "033[34m [2/2] 同步当前conda环境至jupyterlab kernel 033[0m"
    lab add $target
    source $CONDA_HOME/bin/activate $target
    cd $HOME_DIR

    echo -e "033[32m conda环境: $target安装成功! 033[0m"

    echo """
    ============================================
                    ALL DONE!
    ============================================
    """
}

······
dispatch $@
one of them*list*()Wait, allstudio-condaFunctions can perform certain operations, such asstudio-conda env listTo view the preset environment:

in*clone*()The main function of the function is to copy the environment, but it can only be copied from the preset environment. The main code is actually:
tar --skip-old-files -xzvf /share/pkgs.tar.gz -C ${CONDA_HOME}

conda create -n $target --clone ${SHARE_CONDA_HOME}/${source}
Unzip the compressed package of the preset environment, and then create a virtual environment through clone. However, some logic is also set in the Shell script, but they are all some judgments. If you are familiar with any programming language, you should be able to understand it. If you don’t understand it, it’s not a big problem.
So how do we add our own created environment tostudio-condaWhat about in the middle?
The first step is to create a new conda environment under /share/conda_envs
conda create -p /share/conda_envs/xxx python=3.1x
The second step is to copy the files under /root/.conda/pkgs to /share/pkgs, recompress and replace them (this step is to store the large public packages in the conda creation process to avoid repeated downloads)
cp -r -n /root/.conda/pkgs/* /share/pkgs/
cd /share && tar -zcvf pkgs.tar.gz pkgs
The third step is to update the list function in install_conda_env.sh and add a new conda environment description.
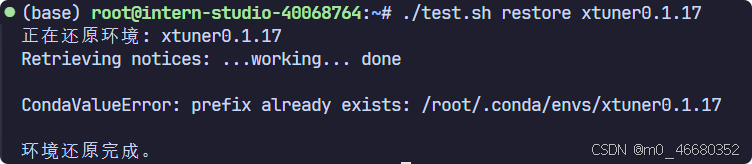
The above is the default method provided by the development machine. In fact, there is another method, which we used earliercondaExportedxtuner0.1.17For the virtual environment configuration file, we can useconda env create -f xtuner0.1.17.ymlcommand to restore the virtual environment. Let's write a simple Shell script to do this: We create atest.shFile, write the following content:
#!/bin/bash

# 定义导出环境的函数
export_env() {
    local env_name=$1
    echo "正在导出环境: $env_name"
    # 导出环境到当前目录下的env_name.yml文件
    conda env export -n "$env_name" > "$env_name.yml"
    echo "环境导出完成。"
}

# 定义还原环境的函数
restore_env() {
    local env_name=$1
    echo "正在还原环境: $env_name"
    # 从当前目录下的env_name.yml文件还原环境
    conda env create -n "$env_name" -f "$env_name.yml"
    echo "环境还原完成。"
}

# 检查是否有足够的参数
if [ $# -ne 2 ]; then
    echo "使用方法: $0 <操作> <环境名>"
    echo "操作可以是 'export' 或 'restore'"
    exit 1
fi

# 根据参数执行操作
case "$1" in
    export)
        export_env "$2"
        ;;
    restore)
        restore_env "$2"
        ;;
    *)
        echo "未知操作: $1"
        exit 1
        ;;
esac
After we have created the Shell script, we need to grant permissions to the script. You can use the command:chmod +x test.sh , then enter./test.sh restore xtuner0.1.17And press Enter to restore the virtual environment.
However, this is not much different from direct use. If this operation is compared with the development machinestudio-condaIt is very convenient to combine the commands, but the methods of copying the environment are different. So if you want to achieve this, you need to/share/install_conda_env.shModify the logic of the file.
Well, the above is all the content of this level. I hope the above content will be helpful for your later learning. If you want to learn more about Linux, you can read my blog. Although not knowing Linux does not have much impact on our learning of large models, if you learn Linux well, it will make your learning of large models very smooth. Finally, don't forget to complete the level we set up earlier!
Blog Link:linux
Execute with caution! All data will be lost. This is only applicable to the InternStudio platform. Do not do this on your own machine.
rm -rf /rootYou will probably wait for 10 minutes.ln -s /share /root/shareThe level-breaking task requires screenshots at key steps:
| mission details | Time required to complete | |
|---|---|---|
| Mission | Complete SSH connection and port mapping and runhello_world.py | 10min |
| Optional Task 1 | Complete the basic Linux commands on the development machine | 10min |
| Optional Task 2 | Use VSCODE to remotely connect to the development machine and create a conda environment | 10min |
| Optional Task 3 | Build and runtest.shdocument | 10min |

I have devoted myself to the research of technology for more than 30 years. I am proficient in various languages such as Java, Linux, JavaScript, PHP, CSS, etc. I have made many contributions in the field of open source. I have established a developer documentation site to share some problems in technology development for everyone to read.


