2024-07-12
한어Русский языкEnglishFrançaisIndonesianSanskrit日本語DeutschPortuguêsΕλληνικάespañolItalianoSuomalainenLatina
Camera calibration is a fundamental concept in 3D computer graphics that involves setting up a virtual camera to simulate the perspective and behavior of a real-world camera. In Three.js, a popular JavaScript library for 3D rendering, understanding camera calibration is essential for creating realistic and immersive 3D scenes. In this article, we'll explore the basics of camera calibration in Three.js for beginners looking to improve their 3D graphics skills.
Prerequisites: Before diving into camera calibration, a basic understanding of JavaScript, HTML, and Three.js is necessary. Familiarity with 3D coordinates, transformations, and rendering is also helpful.

NSDT tool recommendation: Three.js AI Texture Development Kit - YOLO Synthetic Data Generator - GLTF/GLB Online Editor - 3D model format online conversion - Programmable 3D scene editor - REVIT export 3D model plug-in - 3D Model Semantic Search Engine - Three.js Virtual Axis Development Kit - 3D model online reduction - STL model online cutting
First, create an HTML file that contains the necessary boilerplate code, including the Three.js library:
- <!DOCTYPE html>
- <html>
- <head>
- <title>Camera Calibration in Three.js</title>
- <script src="https://cdnjs.cloudflare.com/ajax/libs/three.js/r128/three.min.js"></script>
- </head>
- <body>
- <script>
- // Your Three.js code will go here
- </script>
- </body>
- </html>
To initialize Three.js, create a scene, camera, and renderer:
- // Set up the scene, camera, and renderer
- const scene = new THREE.Scene();
- const camera = new THREE.PerspectiveCamera(75, window.innerWidth / window.innerHeight, 0.1, 1000);
- const renderer = new THREE.WebGLRenderer();
- renderer.setSize(window.innerWidth, window.innerHeight);
- document.body.appendChild(renderer.domElement);
The position of a camera determines the viewpoint of the rendered scene. You can position the camera in 3D space using its position property:
camera.position.set(0, 5, 10);This code sets the camera's position to (0, 5, 10), which means it is at x=0, y=5, and z=10 in the 3D world.
CameralookAtMethod allows you to define the point it should look at:
- const target = new THREE.Vector3(0, 0, 0);
- camera.lookAt(target);
In this example, the camera is looking at the point (0, 0, 0), the origin of the scene.
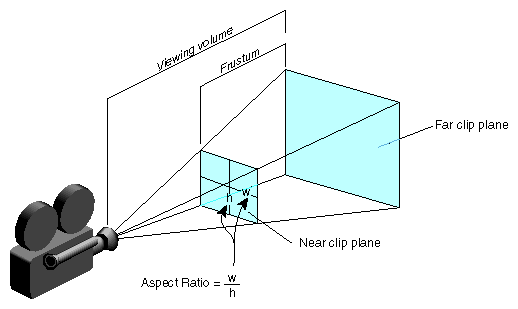
The camera's field of view (FOV) determines how much of the scene is visible through the camera. Higher FOV values give a wider field of view, while lower values give a more magnified field of view. You can usefovProperties to adjust FOV:
camera.fov = 60; // Example FOV value in degrees
The camera's aspect ratio determines the shape of the rendered scene. It is usually set to the width of the viewport divided by its height:
- const aspectRatio = window.innerWidth / window.innerHeight;
- camera.aspect = aspectRatio;

The near and far clipping planes define the visible distance of the camera. Objects closer than the near plane or farther than the far plane will be clipped and not rendered. You can usenearandfarThe properties set these values:
- camera.near = 0.1;
- camera.far = 1000;
Aperture, also known as the "camera's aperture" or "lens aperture", is a key factor in camera calibration that affects depth of field and the amount of light entering the camera. In Three.js, we can simulate the aperture effect by adjusting the camera's aperture property.
- // Aperture (Camera's f-stop) - Controls depth of field and light gathering
- const aperture = 0.1; // Increase this value for a shallower depth of field
- camera.aperture = aperture;
Before rendering the scene, let's add some 3D objects to make the calibration more obvious:
- const geometry = new THREE.BoxGeometry();
- const material = new THREE.MeshBasicMaterial({ color: 0x00ff00 });
- const cube = new THREE.Mesh(geometry, material);
- scene.add(cube);
Now that we have our scene, camera, and objects set up, we can render the scene:
- function animate() {
- requestAnimationFrame(animate);
- renderer.render(scene, camera);
- }
- animate();
Congratulations! You have taken your first step into the world of Three.js camera calibration. By understanding camera properties and how they affect the rendered scene, you can create visually engaging and immersive 3D experiences. Experiment with different camera positions, FOV values, and objects in the scene to realize the full potential of Three.js and camera calibration.
Original link:Three.js Camera Tutorial - BimAnt

I have devoted myself to the research of technology for more than 30 years. I am proficient in various languages such as Java, Linux, JavaScript, PHP, CSS, etc. I have made many contributions in the field of open source. I have established a developer documentation site to share some problems in technology development for everyone to read.
