2024-07-12
한어Русский языкEnglishFrançaisIndonesianSanskrit日本語DeutschPortuguêsΕλληνικάespañolItalianoSuomalainenLatina
Introduction to Helm
Helm is a package management tool for Kubernetes that simplifies the deployment and management of Kubernetes applications. Helm can be compared to the yum tool of CentOS. Helm has the following basic concepts:
Chart: It is an installation package managed by Helm, which contains the installation package resources that need to be deployed. Chart can be compared to the rpm file used by CentOS yum.
Release: is a deployment instance of a chart. A chart can have multiple releases on a Kubernetes cluster, which means that the chart can be installed multiple times.
Repository: chart warehouse, used to publish and store charts
download:https://github.com/helm/helm/releases
View pods status
- kubectl get pods --namespace=kube-system
- kubectl get pods --all-namespaces
If you want to delete it, find the deployment first and then delete it.
- kangming@ubuntu26:~$ kubectl get deployment --namespace=kube-system
- NAMEREADY UP-TO-DATE AVAILABLE AGE
- calico-kube-controllers 1/1 11 4h23m
- coredns 2/2 22 4h22m
- coredns-autoscaler1/1 11 4h22m
- metrics-server1/1 11 4h18m
- tiller-deploy 0/1 10 4h15m
-
- kangming@ubuntu26:~$ kubectl delete deployment tiller-deploy --namespace=kube-system
- deployment.apps "tiller-deploy" deleted
If you want to view a pod in detail, you can describe
kubectl describe pod rke-coredns-addon-deploy-job-qz8v6--namespace=kube-systemLatest stable version: v3.9.2
download
https://get.helm.sh/helm-v3.9.2-linux-amd64.tar.gz
Install
- tar -zxvf helm-v3.9.2-linux-amd64.tar.gz
- sudo mv linux-amd64/helm /usr/local/bin/helm
- sudo chmod +x /usr/local/bin/helm
Check out the official documentation:
Add a chart repository
helm repo add bitnami https://charts.bitnami.com/bitnami
View the list of installable charts
- kangming@ubuntu26:~/rancher$ helm search repo bitnami
- NAMECHART VERSION APP VERSION DESCRIPTION
- bitnami/airflow 13.0.22.3.3 Apache Airflow is a tool to express and execute...
- bitnami/apache9.1.162.4.54Apache HTTP Server is an open-source HTTP serve...
- bitnami/argo-cd 4.0.6 2.4.8 Argo CD is a continuous delivery tool for Kuber...
- bitnami/argo-workflows2.3.8 3.3.8 Argo Workflows is meant to orchestrate Kubernet...
Installing the chart example
- ##确定我们可以拿到最新的charts列表
- helm repo update
-
- #安装一个mysql的chat示例
- helm install bitnami/mysql --generate-name
- NAME: mysql-1659686641
- LAST DEPLOYED: Fri Aug5 16:04:04 2022
- NAMESPACE: default
- STATUS: deployed
- REVISION: 1
- TEST SUITE: None
- NOTES:
- CHART NAME: mysql
- CHART VERSION: 9.2.5
- APP VERSION: 8.0.30
-
- ** Please be patient while the chart is being deployed **
-
- Tip:
-
- Watch the deployment status using the command: kubectl get pods -w --namespace default
-
- Services:
-
- echo Primary: mysql-1659686641.default.svc.cluster.local:3306
-
- Execute the following to get the administrator credentials:
-
- echo Username: root
- MYSQL_ROOT_PASSWORD=$(kubectl get secret --namespace default mysql-1659686641 -o jsonpath="{.data.mysql-root-password}" | base64 -d)
-
- To connect to your database:
-
- 1. Run a pod that you can use as a client:
-
- kubectl run mysql-1659686641-client --rm --tty -i --restart='Never' --imagedocker.io/bitnami/mysql:8.0.30-debian-11-r4 --namespace default --env MYSQL_ROOT_PASSWORD=$MYSQL_ROOT_PASSWORD --command -- bash
-
- 2. To connect to primary service (read/write):
-
- mysql -h mysql-1659686641.default.svc.cluster.local -uroot -p"$MYSQL_ROOT_PASSWORD"
In the above example, the bitnami/mysql chart is published with the name mysql-1659686641. When we list all pods, we will find that there is an additional mysql pod.
You can get basic information about the chart by executing the command helm show chart bitnami/mysql. Or you can execute helm show all bitnami/mysql to get all information about the chart.
Every time you run helm install, a new release is created, so a chart can be installed multiple times in the same cluster, and each one can be managed and updated independently.
For more information on how to use helm, see:https://helm.sh/zh/docs/intro/using_helm/
With Helm you can easily see which charts have been released
- kangming@ubuntu26:~/rancher$ helm list
- NAMENAMESPACE REVISIONUPDATED STATUSCHART APP VERSION
- mysql-1659686641default 1 2022-08-05 16:04:04.411386078 +0800 CST deployedmysql-9.2.5 8.0.30
Uninstall a version
- kangming@ubuntu26:~/rancher$ helm uninstall mysql-1659686641
- release "mysql-1659686641" uninstalled
This command will uninstall mysql-1659686641 from Kubernetes. It will delete all related resources (service, deployment, pod, etc.) and even version history related to this version.
If you provide the --keep-history option when executing helm uninstall, Helm will save the version history. You can view the version information with the command
helm status mysql-1659686641
helm Help Documentation
helm get -h
helm search
helm search hub from Artifact Hub Find and list helm charts in the Artifact Hub. There are a lot of different repositories stored in the Artifact Hub.
helm search repo searches for repositories that you have added (using helm repo add) to your local helm client. This command searches based on local data and does not require an internet connection.
Use the helm install command to install a new helm package. The simplest way to use it is to pass in two parameters: the name of the release you named and the name of the chart you want to install.
helm install happy-panda bitnami/wordpress
1. Add the Chart warehouse address
helm repo add rancher-latest
https://releases.rancher.com/server-charts/latest
2. Generate a definition certificate
For reference:Generate a Self-Signed SSL Certificate
Generate a certificate script with one click, rancher official, save as key.sh
- #!/bin/bash -e
-
- help ()
- {
- echo' ================================================================ '
- echo' --ssl-domain: 生成ssl证书需要的主域名,如不指定则默认为www.rancher.local,如果是ip访问服务,则可忽略;'
- echo' --ssl-trusted-ip: 一般ssl证书只信任域名的访问请求,有时候需要使用ip去访问server,那么需要给ssl证书添加扩展IP,多个IP用逗号隔开;'
- echo' --ssl-trusted-domain: 如果想多个域名访问,则添加扩展域名(SSL_TRUSTED_DOMAIN),多个扩展域名用逗号隔开;'
- echo' --ssl-size: ssl加密位数,默认2048;'
- echo' --ssl-cn: 国家代码(2个字母的代号),默认CN;'
- echo' 使用示例:'
- echo' ./create_self-signed-cert.sh --ssl-domain=www.test.com --ssl-trusted-domain=www.test2.com '
- echo' --ssl-trusted-ip=1.1.1.1,2.2.2.2,3.3.3.3 --ssl-size=2048 --ssl-date=3650'
- echo' ================================================================'
- }
-
- case "$1" in
- -h|--help) help; exit;;
- esac
-
- if [[ $1 == '' ]];then
- help;
- exit;
- fi
-
- CMDOPTS="$*"
- for OPTS in $CMDOPTS;
- do
- key=$(echo ${OPTS} | awk -F"=" '{print $1}' )
- value=$(echo ${OPTS} | awk -F"=" '{print $2}' )
- case "$key" in
- --ssl-domain) SSL_DOMAIN=$value ;;
- --ssl-trusted-ip) SSL_TRUSTED_IP=$value ;;
- --ssl-trusted-domain) SSL_TRUSTED_DOMAIN=$value ;;
- --ssl-size) SSL_SIZE=$value ;;
- --ssl-date) SSL_DATE=$value ;;
- --ca-date) CA_DATE=$value ;;
- --ssl-cn) CN=$value ;;
- esac
- done
-
- # CA相关配置
- CA_DATE=${CA_DATE:-3650}
- CA_KEY=${CA_KEY:-cakey.pem}
- CA_CERT=${CA_CERT:-cacerts.pem}
- CA_DOMAIN=cattle-ca
-
- # ssl相关配置
- SSL_CONFIG=${SSL_CONFIG:-$PWD/openssl.cnf}
- SSL_DOMAIN=${SSL_DOMAIN:-'www.rancher.local'}
- SSL_DATE=${SSL_DATE:-3650}
- SSL_SIZE=${SSL_SIZE:-2048}
-
- ## 国家代码(2个字母的代号),默认CN;
- CN=${CN:-CN}
-
- SSL_KEY=$SSL_DOMAIN.key
- SSL_CSR=$SSL_DOMAIN.csr
- SSL_CERT=$SSL_DOMAIN.crt
-
- echo -e "033[32m ---------------------------- 033[0m"
- echo -e "033[32m | 生成 SSL Cert | 033[0m"
- echo -e "033[32m ---------------------------- 033[0m"
-
- if [[ -e ./${CA_KEY} ]]; then
- echo -e "033[32m ====> 1. 发现已存在CA私钥,备份"${CA_KEY}"为"${CA_KEY}"-bak,然后重新创建 033[0m"
- mv ${CA_KEY} "${CA_KEY}"-bak
- openssl genrsa -out ${CA_KEY} ${SSL_SIZE}
- else
- echo -e "033[32m ====> 1. 生成新的CA私钥 ${CA_KEY} 033[0m"
- openssl genrsa -out ${CA_KEY} ${SSL_SIZE}
- fi
-
- if [[ -e ./${CA_CERT} ]]; then
- echo -e "033[32m ====> 2. 发现已存在CA证书,先备份"${CA_CERT}"为"${CA_CERT}"-bak,然后重新创建 033[0m"
- mv ${CA_CERT} "${CA_CERT}"-bak
- openssl req -x509 -sha256 -new -nodes -key ${CA_KEY} -days ${CA_DATE} -out ${CA_CERT} -subj "/C=${CN}/CN=${CA_DOMAIN}"
- else
- echo -e "033[32m ====> 2. 生成新的CA证书 ${CA_CERT} 033[0m"
- openssl req -x509 -sha256 -new -nodes -key ${CA_KEY} -days ${CA_DATE} -out ${CA_CERT} -subj "/C=${CN}/CN=${CA_DOMAIN}"
- fi
-
- echo -e "033[32m ====> 3. 生成Openssl配置文件 ${SSL_CONFIG} 033[0m"
- cat > ${SSL_CONFIG} <<EOM
- [req]
- req_extensions = v3_req
- distinguished_name = req_distinguished_name
- [req_distinguished_name]
- [ v3_req ]
- basicConstraints = CA:FALSE
- keyUsage = nonRepudiation, digitalSignature, keyEncipherment
- extendedKeyUsage = clientAuth, serverAuth
- EOM
-
- if [[ -n ${SSL_TRUSTED_IP} || -n ${SSL_TRUSTED_DOMAIN} || -n ${SSL_DOMAIN} ]]; then
- cat >> ${SSL_CONFIG} <<EOM
- subjectAltName = @alt_names
- [alt_names]
- EOM
- IFS=","
- dns=(${SSL_TRUSTED_DOMAIN})
- dns+=(${SSL_DOMAIN})
- for i in "${!dns[@]}"; do
- echo DNS.$((i+1)) = ${dns[$i]} >> ${SSL_CONFIG}
- done
-
- if [[ -n ${SSL_TRUSTED_IP} ]]; then
- ip=(${SSL_TRUSTED_IP})
- for i in "${!ip[@]}"; do
- echo IP.$((i+1)) = ${ip[$i]} >> ${SSL_CONFIG}
- done
- fi
- fi
-
- echo -e "033[32m ====> 4. 生成服务SSL KEY ${SSL_KEY} 033[0m"
- openssl genrsa -out ${SSL_KEY} ${SSL_SIZE}
-
- echo -e "033[32m ====> 5. 生成服务SSL CSR ${SSL_CSR} 033[0m"
- openssl req -sha256 -new -key ${SSL_KEY} -out ${SSL_CSR} -subj "/C=${CN}/CN=${SSL_DOMAIN}" -config ${SSL_CONFIG}
-
- echo -e "033[32m ====> 6. 生成服务SSL CERT ${SSL_CERT} 033[0m"
- openssl x509 -sha256 -req -in ${SSL_CSR} -CA ${CA_CERT}
- -CAkey ${CA_KEY} -CAcreateserial -out ${SSL_CERT}
- -days ${SSL_DATE} -extensions v3_req
- -extfile ${SSL_CONFIG}
-
- echo -e "033[32m ====> 7. 证书制作完成 033[0m"
- echo
- echo -e "033[32m ====> 8. 以YAML格式输出结果 033[0m"
- echo "----------------------------------------------------------"
- echo "ca_key: |"
- cat $CA_KEY | sed 's/^//'
- echo
- echo "ca_cert: |"
- cat $CA_CERT | sed 's/^//'
- echo
- echo "ssl_key: |"
- cat $SSL_KEY | sed 's/^//'
- echo
- echo "ssl_csr: |"
- cat $SSL_CSR | sed 's/^//'
- echo
- echo "ssl_cert: |"
- cat $SSL_CERT | sed 's/^//'
- echo
-
- echo -e "033[32m ====> 9. 附加CA证书到Cert文件 033[0m"
- cat ${CA_CERT} >> ${SSL_CERT}
- echo "ssl_cert: |"
- cat $SSL_CERT | sed 's/^//'
- echo
-
- echo -e "033[32m ====> 10. 重命名服务证书 033[0m"
- echo "cp ${SSL_DOMAIN}.key tls.key"
- cp ${SSL_DOMAIN}.key tls.key
- echo "cp ${SSL_DOMAIN}.crt tls.crt"
- cp ${SSL_DOMAIN}.crt tls.crt
implement
bash ./key.sh --ssl-domain=rancher.k8s-test.com--ssl-size=2048 --ssl-date=3650The generated file is as follows
3. Create a secret namespace
kubectl create namespace cattle-system4. Service certificate and private key ciphertext
- kubectl -n cattle-system create secret tls tls-rancher-ingress
- --cert=tls.crt
- --key=tls.key
If you need to replace the certificate, you can usekubectl -n cattle-system delete secret tls-rancher-ingressTo deletetls-rancher-ingressCiphertext, then use the above command to create a new ciphertext. If you are using a certificate issued by a private CA, you can only replace the new certificate if it is issued by the same CA as the current certificate.
5, ca certificate ciphertext
- kubectl -n cattle-system create secret generic tls-ca
- --from-file=cacerts.pem=./cacerts.pem
6. Install rancher
- helm install rancher rancher-latest/rancher
- --namespace cattle-system
- --set hostname=rancher.k8s-test.com
- --set bootstrapPassword=admin
- --set ingress.tls.source=secret
- --set privateCA=true
7. Check the status and wait for the rollout to succeed and all nodes to be ready
- kangming@ubuntu26:~$ kubectl -n cattle-system rollout status deploy/rancher
- deployment "rancher" successfully rolled out
- kangming@ubuntu26:~$ kubectl -n cattle-system get deploy rancher
- NAMEREADY UP-TO-DATE AVAILABLE AGE
- rancher 3/3 33 40m
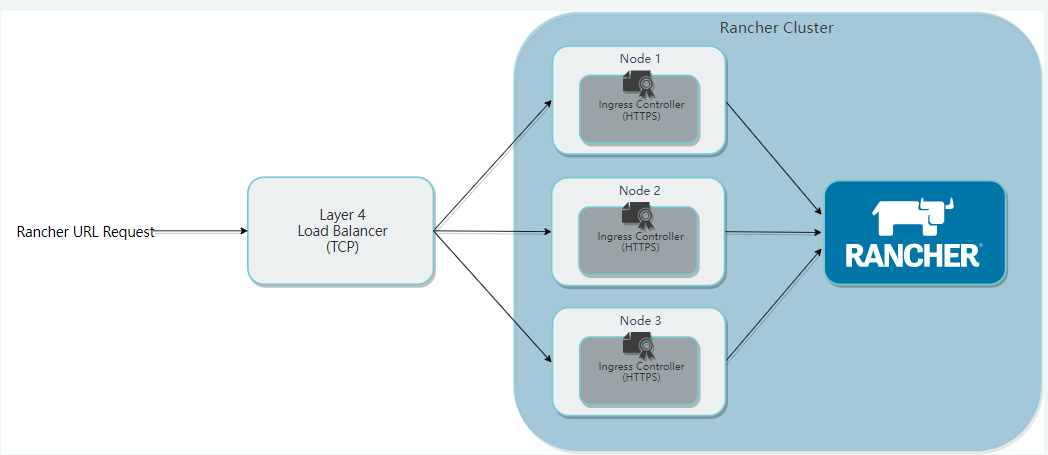
Check the pod status. When the rancher pod is ready, you can access it through the browser: rancher.k8s-test.com. This domain name can be mapped to the load balancing node. Because the above installation starts a pod on all working nodes by default, so the following nginx configures ports 80 and 443 of the three nodes.
- kubectl get pods --all-namespaces
- 或者
- kubectl get pods -n cattle-system
-
- #查看rancher pod状态
- kubectl describe podrancher-ff955865-29ljr --namespace=cattle-system
- #一次看所有rancher pod
- kubectl -n cattle-system describe pods -l app=rancher
The hostname above can be resolved to the load balancing node, which is usually the VIP virtualized by keepalived. For convenience, only one LB node is used here, which is directly resolved to 24, and then load balancing is performed through 24's nginx.
View the logs of the Rancher pod
- kubectl get pods -n cattle-system
-
- kubectl -n cattle-system logs -f rancher-5d9699f4cf-72wgp
Configure it on the 24 load balancing node and copy the certificate generated by the script to 24
sudo vi /etc/nginx/nignx.conf
- stream {
- upstream rancher_servers_http {
- least_conn;
- server 192.168.43.26:80 max_fails=3 fail_timeout=5s;
- server 192.168.43.27:80 max_fails=3 fail_timeout=5s;
- server 192.168.43.28:80 max_fails=3 fail_timeout=5s;
- }
- server {
- listen 80;
- proxy_pass rancher_servers_http;
- }
-
- upstream rancher_servers_https {
- least_conn;
- server 192.168.43.26:443 max_fails=3 fail_timeout=5s;
- server 192.168.43.27:443 max_fails=3 fail_timeout=5s;
- server 192.168.43.28:443 max_fails=3 fail_timeout=5s;
- }
- server {
- listen 443;
- proxy_pass rancher_servers_https;
- }
- }
access:https://rancher.k8s-test.com
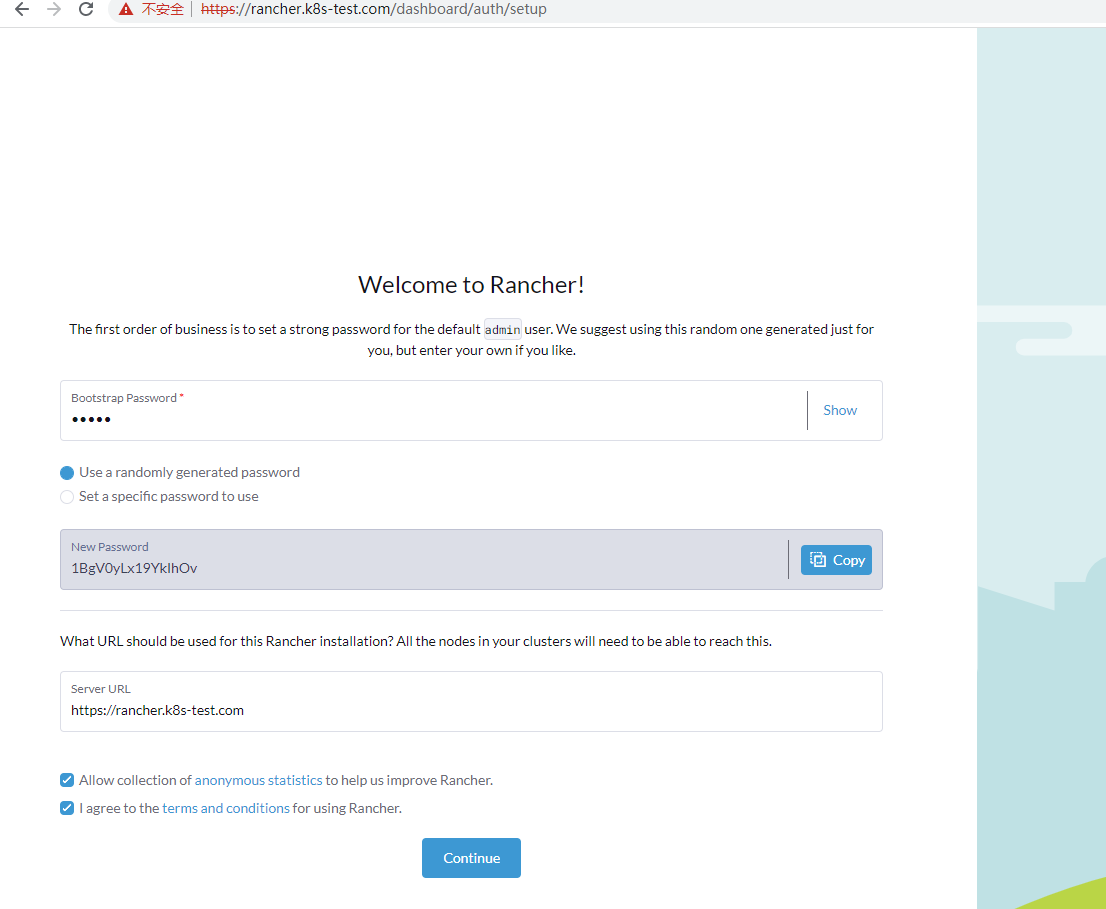
Bootstrap password is admin, login account is admin, password uses random code: 1BgV0yLx19YkIhOv
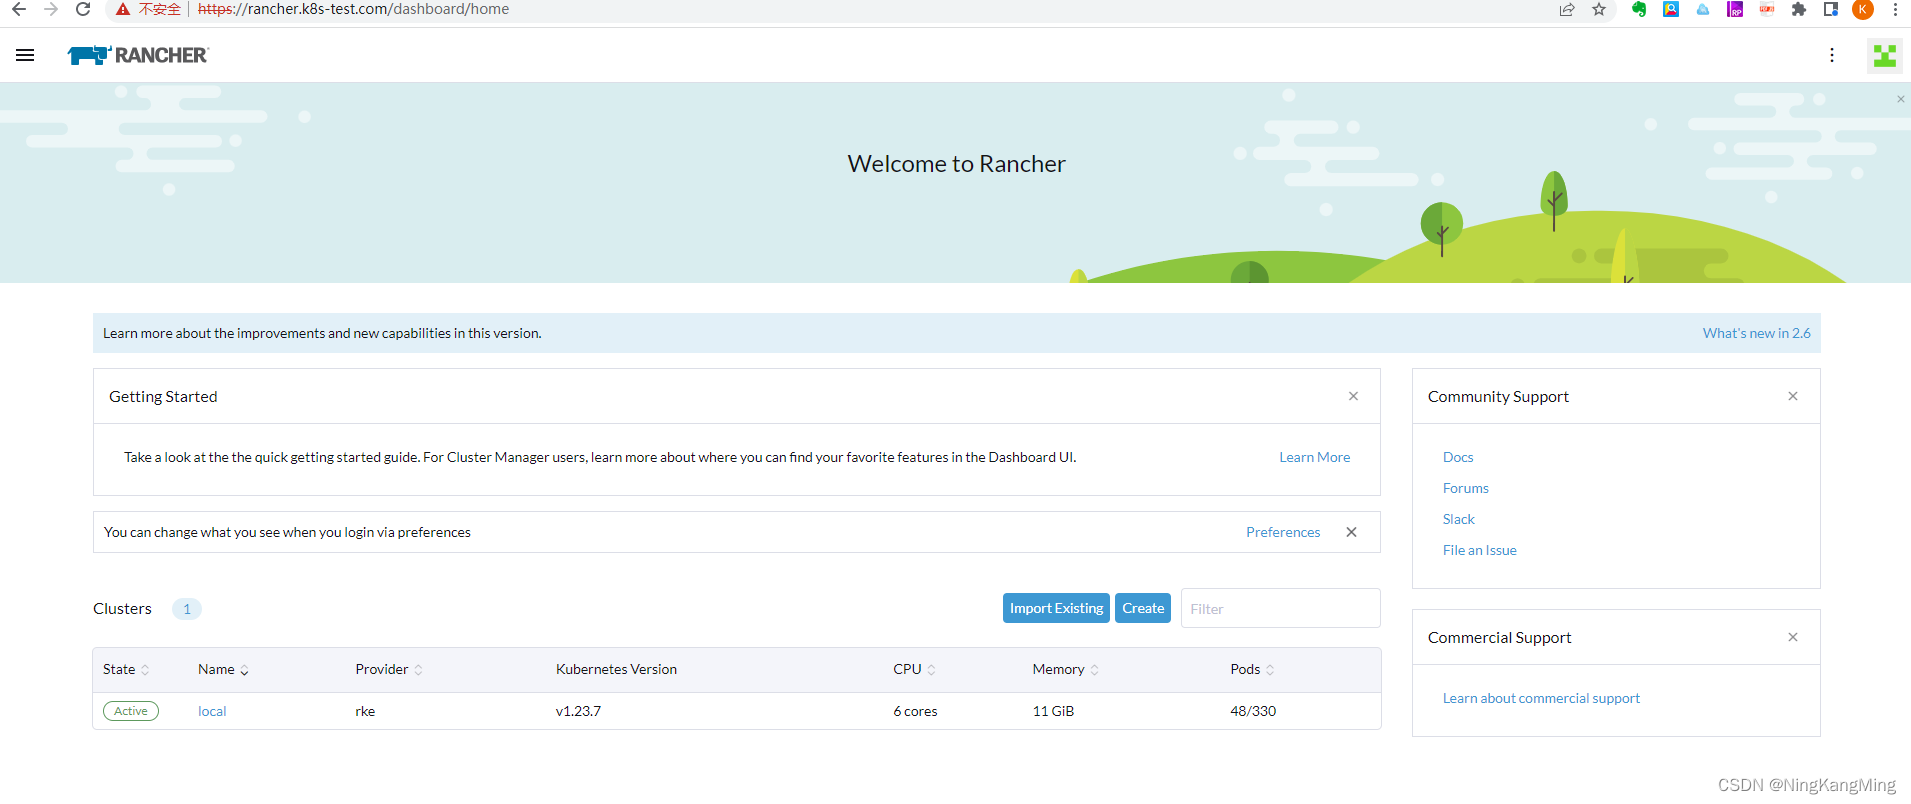
Click continue to enter the management page.
For the prerequisites, refer to the previous section, install the k8s cluster through rke, and prepare the helm environment.
1. Add helm repository
- helm repo add rancher-latest
- https://releases.rancher.com/server-charts/latest
2. Create a namespace
kubectl create namespace cattle-system3. Select Rancher-generated TLS certificate for certificate management
4. Install cert-manager. This is only required if you choose the Rancher-generated TLS certificate method.
- # If you have installed the CRDs manually instead of with the `--set installCRDs=true` option added to your Helm install command, you should upgrade your CRD resources before upgrading the Helm chart:
-
- kubectl apply -f https://github.com/cert-manager/cert-manager/releases/download/v1.7.1/cert-manager.crds.yaml
-
- # Add the Jetstack Helm repository
- helm repo add jetstack https://charts.jetstack.io
-
- # Update your local Helm chart repository cache
- helm repo update
-
- # Install the cert-manager Helm chart
- helm install cert-manager jetstack/cert-manager
- --namespace cert-manager
- --create-namespace
- --version v1.7.1
Verify that cert-manager is installed correctly
kubectl get pods --namespace cert-manager5. Install rancher and use a fake domain name for hostname so that rancher will expose its IP.
- helm install rancher rancher-latest/rancher
- --namespace cattle-system
- --set hostname=rancher.my.org
- --set bootstrapPassword=admin
6. Wait for rollout to succeed
- kangming@ubuntu26:~$ kubectl -n cattle-system rollout status deploy/rancher
- deployment "rancher" successfully rolled out
- kangming@ubuntu26:~$ kubectl -n cattle-system get deploy rancher
- NAMEREADY UP-TO-DATE AVAILABLE AGE
- rancher 3/3 33 40m
After success, randomly map the domain name rancher.my.org to three nodes for testing. After successfully seeing the page, it means that the installation is fine. Later, you only need to configure the load balancing unified entrance. After seeing the following page, it proves that the current installation is fine. Note that you can only use the domain name to access, and the IP access cannot see the page normally.
After manually testing that all nodes can access Rancher, you need to configure nginx load balancing. You can directly configure the four-layer forwarding, so there is no need to configure a certificate.
sudo vi /etc/nginx/nignx.conf
- stream {
- upstream rancher_servers_http {
- least_conn;
- server 192.168.43.26:80 max_fails=3 fail_timeout=5s;
- server 192.168.43.27:80 max_fails=3 fail_timeout=5s;
- server 192.168.43.28:80 max_fails=3 fail_timeout=5s;
- }
- server {
- listen 80;
- proxy_pass rancher_servers_http;
- }
-
- upstream rancher_servers_https {
- least_conn;
- server 192.168.43.26:443 max_fails=3 fail_timeout=5s;
- server 192.168.43.27:443 max_fails=3 fail_timeout=5s;
- server 192.168.43.28:443 max_fails=3 fail_timeout=5s;
- }
- server {
- listen 443;
- proxy_pass rancher_servers_https;
- }
- }
Configure the client's hosts file, test it, and access the nginx LB entry to access rancher normally.

I have devoted myself to the research of technology for more than 30 years. I am proficient in various languages such as Java, Linux, JavaScript, PHP, CSS, etc. I have made many contributions in the field of open source. I have established a developer documentation site to share some problems in technology development for everyone to read.
