2024-07-12
한어Русский языкEnglishFrançaisIndonesianSanskrit日本語DeutschPortuguêsΕλληνικάespañolItalianoSuomalainenLatina
K8s offline deployment

k8s offline deployment
For details, see the article: Offline installation of docker and offline packaging of backend projects
https://blog.csdn.net/qq_45371023/article/details/140279746?spm=1001.2014.3001.5501
All the files used are in:
Link: https://pan.baidu.com/s/10cb-dXkgdShdjPEBCyvTrw?pwd=fpuy
Extraction code: fpuy
1. Install cri_dockerd
rpm -ivh cri-dockerd-0.3.9-3.el8.x86_64.rpm

2. Reload the system daemon → Set cri-dockerd to start automatically → Start cri-dockerd
Reload system daemons
sudo systemctl daemon-reload
Set up cri-dockerd to start automatically
sudo systemctl enable cri-docker.socket cri-docker
Start cri-dockerd
sudo systemctl start cri-docker.socket cri-docker
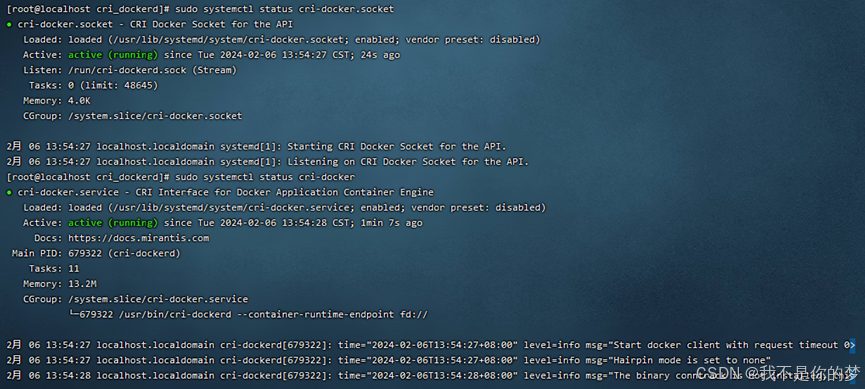
sudo systemctl status cri-docker.socket
sudo systemctl status cri-docker
Problem: Failed to start cri-docker
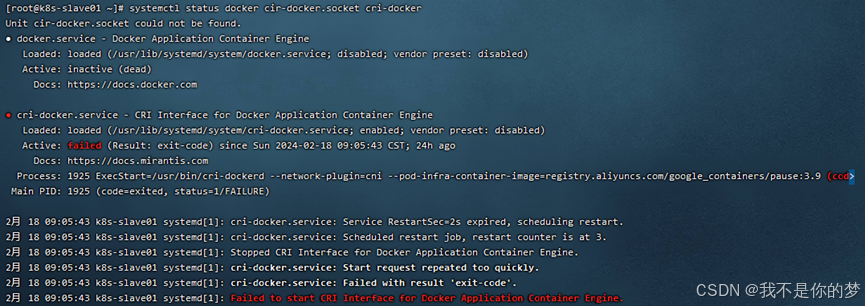
measure:
Method 1: systemctl restart docker # Restart docker
Method 2: Uninstall Docker and reinstall it, and execute the above steps again
1. Install kubectl
sudo install -o root -g root -m 0755 kubectl /usr/local/bin/kubectl
2. Check whether the installation is complete
kubectl version --client

3. Open ports or close firewall (to ensure smooth installation process)
Open ports (cloud server)
Open port 6443
sudo firewall-cmd --zone=public --add-port=6443/tcp --permanent
Reload the firewall
sudo firewall-cmd --reload
View all open ports
sudo firewall-cmd --zone=public --list-ports
Or turn off the firewall (virtual machine)
Turn off firewall
sudo systemctl stop firewalld
Disable automatic firewall startup
sudo systemctl disable firewalld
4. Disable SELinux (to ensure that the container can access system resources)
sudo setenforce 0
sudo sed -i 's/^SELINUX=enforcing$/SELINUX=permissive/' /etc/selinux/config
5. Install kubeadm, kubelet and kubectl
Related offline installation packages - download rpm format, exist in 3_yum_package, use the command to install all rpm installation packages in the directory
cd 3_yum_package && rpm -ivh *.rpm
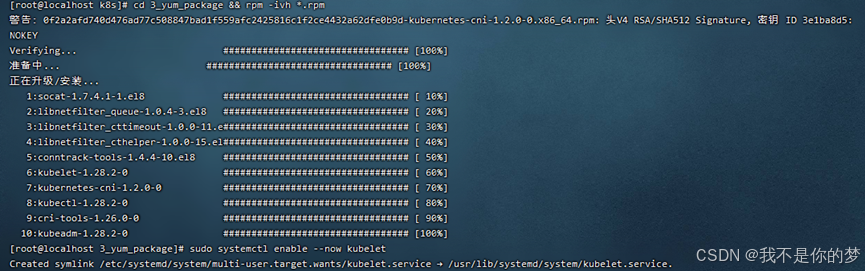
6. Set kubelet to start automatically
sudo systemctl enable --now kubelet

After completing the above steps, you will have the following environment
Two servers or virtual machines with different IP addresses can communicate with each other and maintain LAN status. The IP address is set to 192.168..34 and 192.168..35
The container runtime (Docker+cri_dockerd) is installed on both servers, and the Kubernetes components kubectl, kubeadm, and kubelet are installed.
7. Close the swap partition. This can be divided into temporary and permanent closing. Permanent closing is recommended for virtual machine environments because the machine will be turned on and off frequently. Temporary closing is recommended for cloud environments.
Temporarily close the swap partition
swapoff -a
To permanently close the swap partition, just comment out the line containing swap in fstab.
vi /etc/fstab
# /dev/mapper/centos-swap swap swap defaults 0 0
Restart to make it effective. Restart may cause the status of cri-dockerd to change. In actual deployment, I did not choose to restart. I guess the reason is that the version or configuration is not configured properly. You can reinstall docker and cri-dockerd and then start cri-dockerd to make cri-dockerd status normal.
reboot
8. Install runc as the k8s operating environment
Install runc
sudo install -m 755 runc.amd64 /usr/local/bin/runc
# Check if the installation is successful
runc -v

9. Docker and cri-dockerd set up domestic image acceleration (Since the software package names to be used in this folder contain mirror addresses, it is recommended to configure corresponding mirror acceleration even in the local area network to prevent kubectl from requiring the Internet to pull the software package after the installation is completed and ignoring the local mirror)
sudo tee /etc/docker/daemon.json <<-'EOF'

{

 "registry-mirrors": ["https://tsvqojsz.mirror.aliyuncs.com"]

}

EOF

# 找到第10行

vi /usr/lib/systemd/system/cri-docker.service

# 修改为ExecStart=/usr/bin/cri-dockerd --network-plugin=cni --pod-infra-container-image=registry.aliyuncs.com/google_containers/pause:3.9
Restart Docker components
systemctl daemon-reload && systemctl restart docker cri-docker.socket cri-docker
# Check the status of Docker components
systemctl status docker cir-docker.socket cri-docker
10. Check hostname and hosts
Master Node
hostname is k8s-master
vi /etc/hostname
Add domain name mapping
echo "192.168.**.35 k8s-slave01">> /etc/hosts
Other nodes
hostname为k8s-slave01
vi /etc/hostname
Add domain name mapping
echo "192.168.**.34 k8s-master" >> /etc/hosts
11. Forward IPv4 and let iptables see the bridge flow
cat <<EOF | sudo tee /etc/modules-load.d/k8s.conf

overlay

br_netfilter

EOF


sudo modprobe overlay

sudo modprobe br_netfilter
Set the required sysctl parameters, which persist across reboots
cat <<EOF | sudo tee /etc/sysctl.d/k8s.conf

net.bridge.bridge-nf-call-iptables = 1

net.bridge.bridge-nf-call-ip6tables = 1

net.ipv4.ip_forward          = 1

EOF
# Apply sysctl parameters without rebooting
sudo sysctl --system


lsmod | grep br_netfilter

lsmod | grep overlay


sysctl net.bridge.bridge-nf-call-iptables net.bridge.bridge-nf-call-ip6tables net.ipv4.ip_forward
# If the iptables error message is still displayed during init, execute
echo "1">/proc/sys/net/bridge/bridge-nf-call-iptables

echo "1">/proc/sys/net/ipv4/ip_forward
12. Initialize the master node
Before initialization, you need to obtain the docker image required for initialization through kubeadm config images:

Install the image docker load -i **.tar
The relevant image files are stored in 5_kubeadm-images.
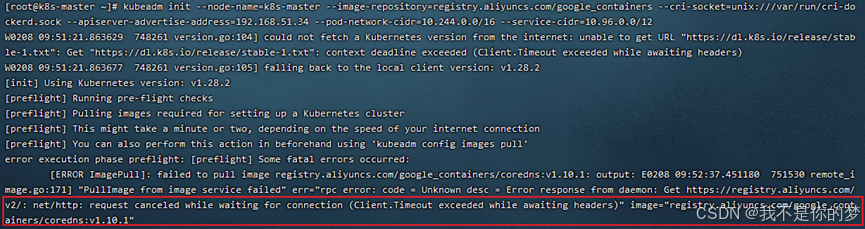
Perform initialization:
kubeadm init --node-name=k8s-master list--image-repository=registry.aliyuncs.com/google_containers --cri-socket=unix:///var/run/cri-dockerd.sock --apiserver-advertise-address=192.168.**.34 --pod-network-cidr=10.244.0.0/16 --service-cidr=10.96.0.0/12
–image-repository=registry.aliyuncs.com/google_containers # Replace the downloaded container image source with Alibaba Cloud. Otherwise, the image cannot be pulled down due to network reasons and the execution will fail.
–cri-socket=unix:///var/run/cri-dockerd.sock # This specifies the container runtime, because containerd is also a component of Docker. When you download Docker, containerd will be downloaded together. When Kubernetes detects multiple container runtime environments during initialization, you must manually select one. It can also be seen here that containerd is actually much lighter than Docker.
–apiserver-advertise-address=192.168.56.50 # Set the broadcast address for the API server. Select the local IPv4 address here. If you do not want the API SERVER to be set on other nodes, do not change it to other addresses.
–pod-network-cidr=10.244.0.0/16 # Indicates the IP address segment that can be used by the pod network. If you are not sure about it for now, you can just use this value.
–service-cidr=10.96.0.0/12 #Specify another IP address segment for the service’s virtual IP address. If you are not sure about it for now, you can just use this value.
Problem: cordns:v1.10.1 check does not exist, in fact cordns:v1.10.1 already exists, but it is cordns:1.10.1.
Measures: Modify the tag of cordns.
docker tag registry.aliyuncs.com/google_containers/coredns:1.10.1 registry.aliyuncs.com/google_containers/coredns:v1.10.1
Re-execute the initialization command
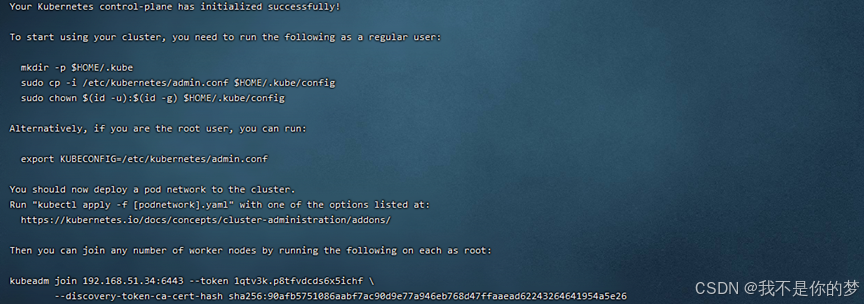
Record the following information of kubeadm join, which is required for node join. The relevant information of the above example is:
kubeadm join 192.168.51.34:6443 --token 1qtv3k.p8tfvdcds6x5ichf
--discovery-token-ca-cert-hash sha256:90afb5751086aabf7ac90d9e77a946eb768d47ffaaead62243264641954a5e26
If you forget, you can use kubeadm token list to query. The token exists for 24 hours. Recreate it with kubeadm token create --print-join-command. Delete it with kubeadm token delete tokenid.
Non-root users please execute
mkdir -p $HOME/.kube

sudo cp -i /etc/kubernetes/admin.conf $HOME/.kube/config

sudo chown $(id -u):$(id -g) $HOME/.kube/config
Execute directly as root user
This function takes effect temporarily and becomes invalid after reboot. It is not recommended.
export KUBECONFIG=/etc/kubernetes/admin.conf
This command is effective permanently. You do not need to execute this command again after executing kubeadm reset and init again.
echo "export KUBECONFIG=/etc/kubernetes/admin.conf" >> ~/.bash_profile
After executing the permanent command, you need to source it to make it effective
source ~/.bash_profile
Check whether the configuration is effective
echo $KUBECONFIG

/etc/kubernetes/admin.conf
13. Install and configure network plug-ins
Here, flannel is used to download and upload the kube-flannel.yml file to the server.
Upload the relevant image to the server for installation. The kube-flannel.yml and image files are located in 6_kube-flannel.
Query network card
ifconfig
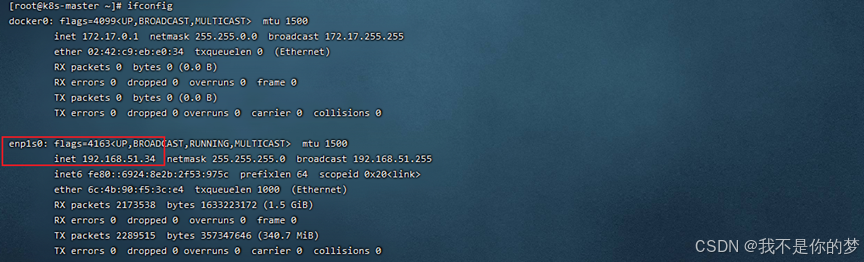
By default, kube-flannel.yml will look for the enp1s0 network card. In this example, the network card for 34 is enp1s0 and does not need to be modified. The network card for 35 is enp4s0.
//Modify kube-flannel.yml in 35, add –iface=enp0s3 to specify (enp0s3 here is the network card corresponding to the IP, such as the part in the box above). The parameter positions are as follows:
container:

  ......

  command:

  - /opt/bin/flanneld

  arg:

  - --ip-masq

  - --kube-subnet-mgr

  - --iface=enp4s0
Configure flannel network plugin for Kubernetes
kubectl apply -f /data/k8s/6_kube-flannel/kube-flannel.yml

cat /run/flannel/subnet.env
# If this file or folder does not exist, you need to create it manually. The content is as follows
FLANNEL_NETWORK=10.244.0.0/16

FLANNEL_SUBNET=10.244.0.1/24

FLANNEL_MTU=1450

FLANNEL_IPMASQ=true
14. Node joins Master
14.1. Copy /etc/kubernetes/admin.conf from the master node machine to the slave node machine
scp /etc/kubernetes/admin.conf 192.168.56.51:/etc/kubernetes/
# Don't forget to add admin.conf to the environment variables. Use it directly here to make it permanent.
echo "export KUBECONFIG=/etc/kubernetes/admin.conf" >> ~/.bash_profile

source ~/.bash_profile
If there is a problem when copying:
ECDSA host key for 192.168.55.187 has changed and you have requestd strict checking.Host key verification failed.
Execute the following statement to repair
ssh-keygen -R 192.168.55.187
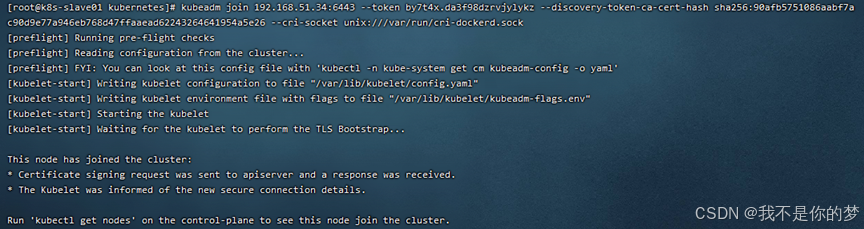
14.2. Execute the join command (after the master node is initialized successfully, the join command will be given)
For example:
kubeadm join 192.168.51.34:6443 --token by7t4x.da3f98dzrvjylykz --discovery-token-ca-cert-hash sha256:90afb5751086aabf7ac90d9e77a946eb768d47ffaaead62243264641954a5e26 --cri-socket unix:///var/run/cri-dockerd.sock
14.3. Execute kubectl get nodes

The k8s cluster was deployed successfully!!!
kubectl get nodes
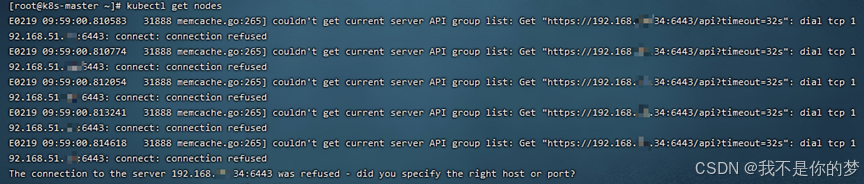
Measures: Check whether swap is closed; check whether port 6443 is enabled on the firewall
Disable swap

Temporarily disable the firewall

success

kubectl get nodes
After adding a k8s node to the cluster, check that the node status is NotReady

measure:
systemctl restart kubelet.service

systemctl restart docker.service
Restart kubelet and docker

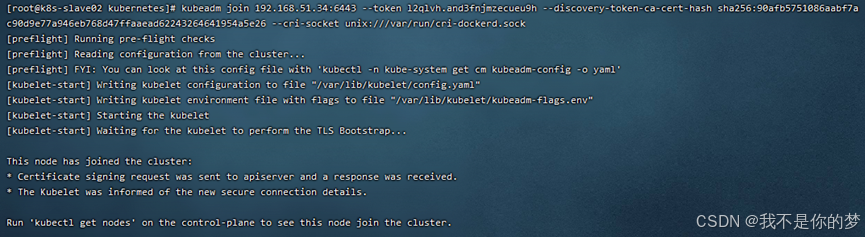
kubeadm join 192.168.51.34:6443 --token l2qlvh.and3fnjmzecueu9h --discovery-token-ca-cert-hash sha256:90afb5751086aabf7ac90d9e77a946eb768d47ffaaead62243264641954a5e26 --cri-socket unix:///var/run/cri-dockerd.sock
Initialization timeout occurs when adding a child node to a k8s cluster

measure:
kubeadm reset -f --cri-socket unix:///var/run/cri-dockerd.sock
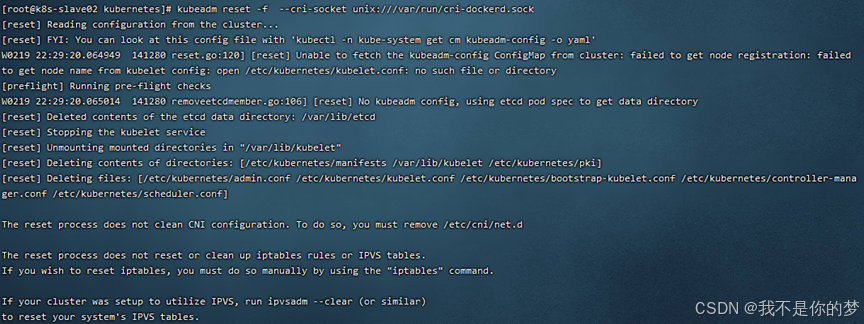
success

Copy /etc/kubernetes/admin.conf from the master node machine to the slave node machine
scp /etc/kubernetes/admin.conf 192.168.55.187:/etc/kubernetes/
If the file copy fails, the error is as follows:
ECDSA host key for 192.168.55.187 has changed and you have requestd strict cheching.
Host key verification failed.
Execute the following statement to repair
ssh-keygen -R 192.168.55.187
kubectl delete node k8s-slave01
kubectl delete node k8s-slave02
kubectl delete node k8s-master
Slave Node
rm -rf /etc/kubernetes/*
kubeadm reset --cri-socket unix:///var/run/cri-dockerd.sock
Master Node
rm -rf /etc/kubernetes/*
rm -rf ~/.kube/*
rm -rf /var/lib/etcd/*
kubeadm reset -f --cri-socket unix:///var/run/cri-dockerd.sock
If necessary, reinitialize the k8s cluster
kubeadm init --node-name=k8s-master --image-repository=registry.aliyuncs.com/google_containers --cri-socket=unix:///var/run/cri-dockerd.sock --apiserver-advertise-address=192.168.51.34 --pod-network-cidr=10.244.0.0/16 --service-cidr=10.96.0.0/12
Master Node
kubectl apply -f /data/k8s/6_kube-flannel/kube-flannel.yml
kubectl get pod -A
Master Node
scp /etc/kubernetes/admin.conf 192.168.51.35:/etc/kubernetes/
scp /etc/kubernetes/admin.conf 192.168.51.36:/etc/kubernetes/
Slave Node
kubeadm join 192.168.51.34:6443 --token 1k9kdy.dvn2qbtd7rjar1ly
       --discovery-token-ca-cert-hash sha256:ff90d8ed41ae1902a839194f179a1c3ba8374a5197ea3111e10e5ca1c09fa442 --cri-socket unix:///var/run/cri-dockerd.sock
kubectl get pod -A
kubectl get nodes

I have devoted myself to the research of technology for more than 30 years. I am proficient in various languages such as Java, Linux, JavaScript, PHP, CSS, etc. I have made many contributions in the field of open source. I have established a developer documentation site to share some problems in technology development for everyone to read.
