2024-07-12
한어Русский языкEnglishFrançaisIndonesianSanskrit日本語DeutschPortuguêsΕλληνικάespañolItalianoSuomalainenLatina
(Mainly front-end development, not back-end. I will first introduce a project that implements the front-end and back-end)
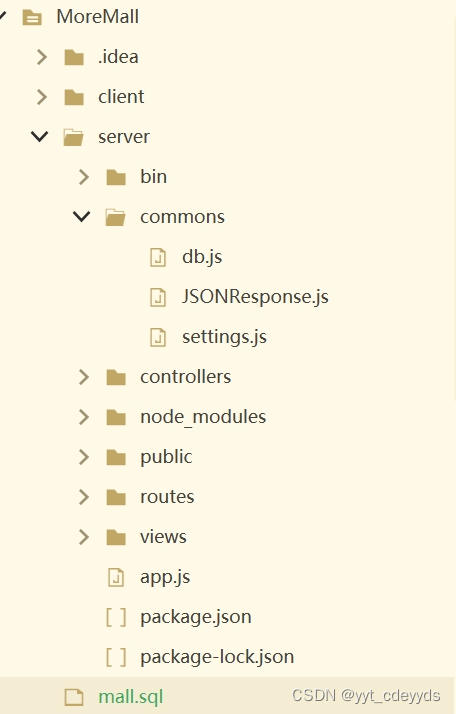
The front-end and back-end can interact with each other. Front-end: client, back-end: server; database can be written in mall.sql.
1) Install Node.js: Node.js is aJavaScript runtime environment, used to build server-side applications. Download and install the appropriate version of Node.js from the official website [Node.js](https://nodejs.org/). The environment configuration of Node.js is relatively complex.
2) Install MySQL
3) Install dependencies: Run `npm install` in the root directory of the project. This willThe `package.json` file installs all the dependencies required by the project.
(MySQL):https://blog.csdn.net/chuci0910/article/details/138770174
(NodeJs):https://zhuanlan.zhihu.com/p/686043568
1) Install and create a Vue project: Create a new folder to put the project files - cmd in the file directory - `vue create my-project`
2) Project directory structure: The `src` directory contains subdirectories such as `components` and `views`, which are used to store components and pages.
3) In<template>Writing data in script
- **Define data**: In the Vue component's ` <script>`部分定义数据,通过`data`函数返回数据对象。
- **Display data**: In the Vue component's `<template> `Partial use of interpolation expression`{{ }}` or directive `v-bind` to display data.
Example: component — foo.vue
- <template>
- <div>{{msg}}</div>
- </template>
-
- <script>
- export default{
- name:'foo',
- data(){
- return{
- msg:'foo page'
- }
- }
- }
- </script>
-
- <style>
- </style>
Here we show the project routetest
1) Installation: In the project directory where you want to add this thing, cmd - `npm install vue-router`
2) Configure routing: Configure routing rules in `src/router/index.js` to map different paths to different components.
Example:

Code in src/router/index.js file:
- import { createRouter, createWebHistory } from 'vue-router';
- import Home from '../components/Home.vue'; // 示例组件路径,请根据实际情况调整
- import Bar from '../components/Bar.vue'; // 示例组件路径,请根据实际情况调整
- import Foo from '../components/Foo.vue'; // 示例组件路径,请根据实际情况调整
-
- const routes = [
- {
- path: '/',
- name: 'Home',
- component: Home
- },
- {
- path: '/bar',
- name: 'Bar',
- component: Bar
- },
- {
- path: '/foo',
- name: 'Foo',
- component: Foo
- }
- // 其他路由配置
- ];
-
- const router = createRouter({
- history: createWebHistory(process.env.BASE_URL),
- routes
- });
-
- export default router;
3) Use<router-link>and<router-view>
<router-link>: Used to create navigation links, which can switch to the corresponding routing page after clicking.
<router-view>: Used to display the matched routing components.
Example: App.vue:
- <template>
- <div id="app">
- <router-link to="/bar">Bar</router-link>|
- <router-link to="/foo">Foo</router-link>
- <router-view></router-view> <!-- 确保包含这个标签 -->
- </div>
- </template>
Page display: (pay attention to the port number)
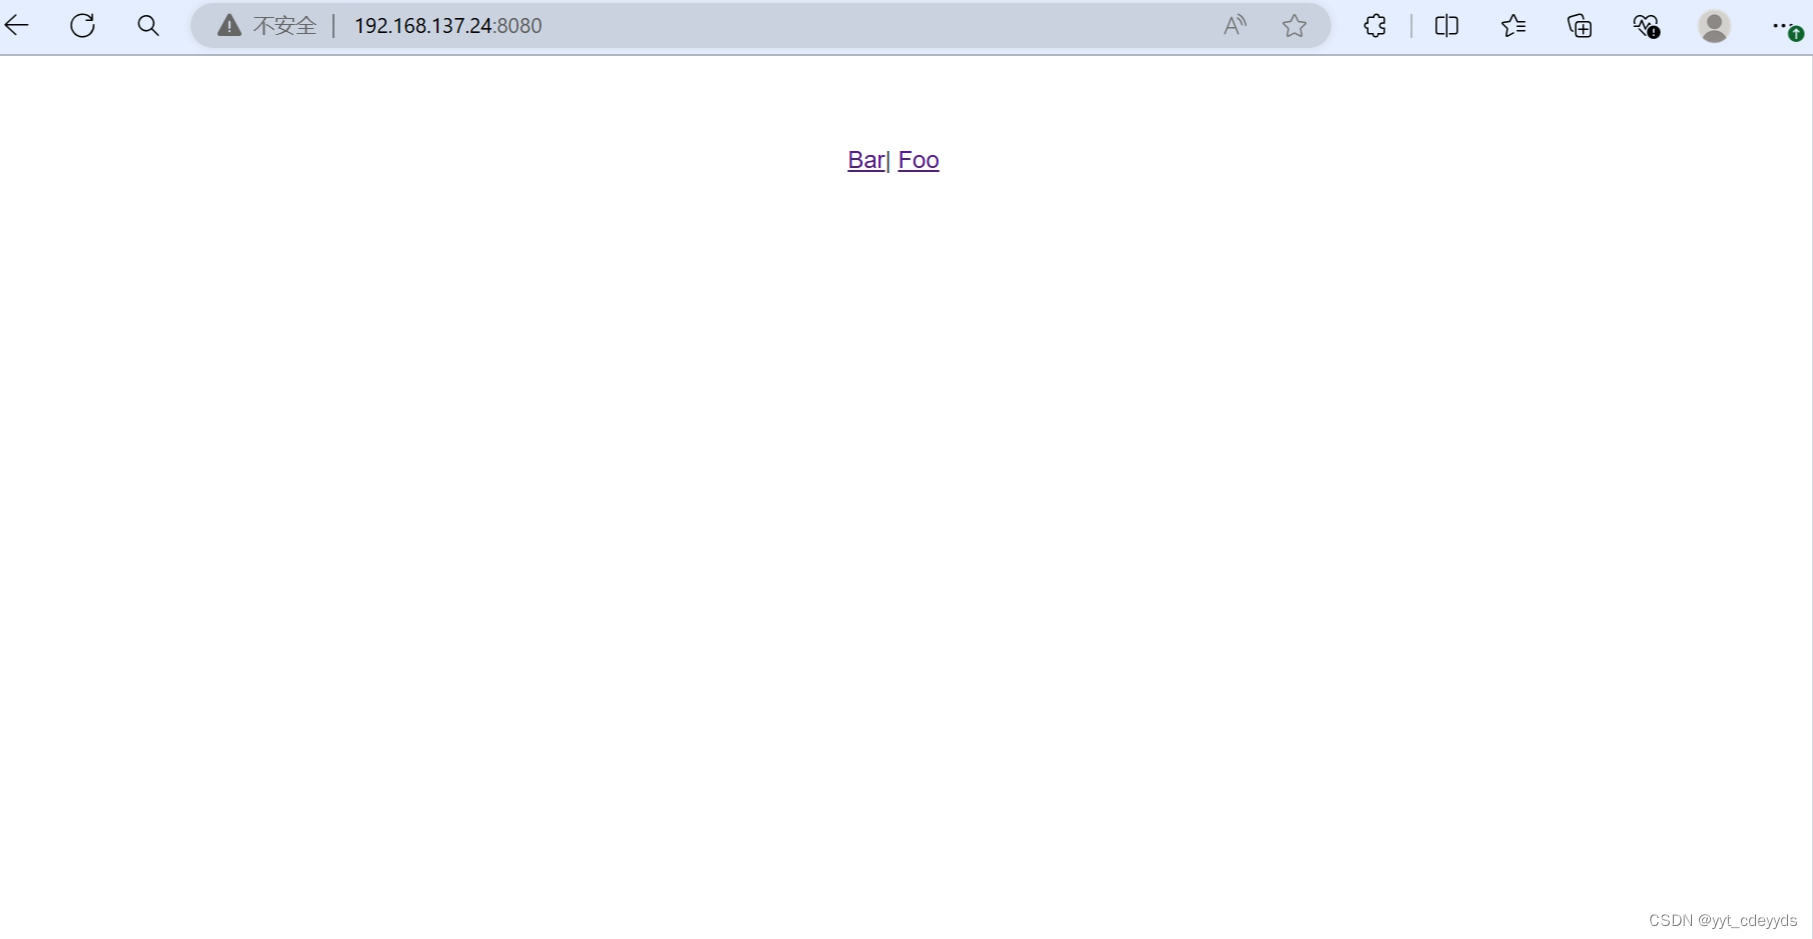
Click bar: Why is my port number called '/bar'?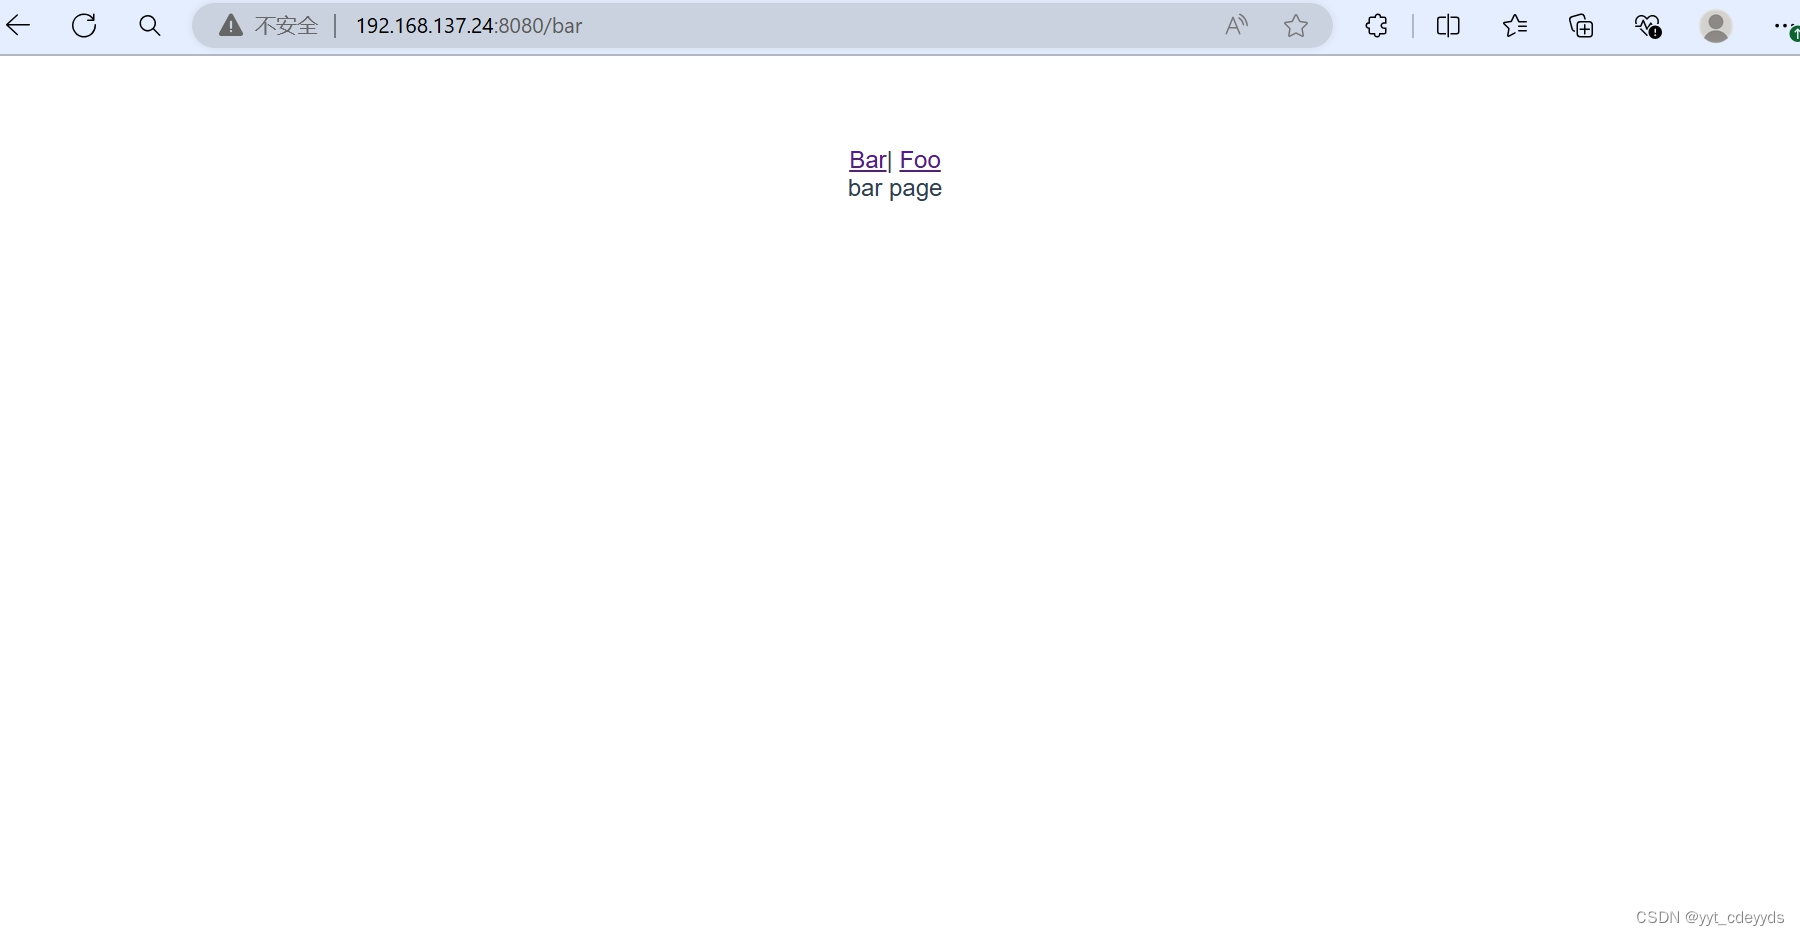

Because you remember the router configuration, that is the path. The name here can be anything you want, but it is generally consistent with the component name, and the component name cannot be changed. The corresponding one is component-xx.vue.
Why can click jump——because that<router-link> ,and<router-view> What specific function it has on the page will be discussed later.
Element-plus can be understood as a packaged series of packages for front-end page rendering (the universal package can be understood in this way, programmers are not programmers, we are just package porters)
Click to enter the official websiteOverview | Element Plus (element-plus.org)

1) Installation: cmd—`npm install element-plus` in the project file you want to use.
2) Import element-plus: Import Element Plus and style files in `main.js`
- import ElementPlus from 'element-plus'//引入elementplus
- import 'element-plus/dist/index.css'//引入elementplus样式文件
3) Use components: Use Element Plus's UI components in Vue components, such as `<el-button> `、`<el-input> `Wait.
Example: In App.vue,<el->The beginning is
- <template>
- <el-container class="layout-container-demo" style="height: 500px">
- <el-aside width="200px">
- <el-scrollbar>
- <el-menu :default-openeds="['1', '3']">
- <el-sub-menu index="1">
- <template #title>
- <el-icon><Message /></el-icon>Navigator One
- </template>
- <el-menu-item-group>
- <template #title>Group 1</template>
- <el-menu-item index="1-1">
- <router-link to="/optionOne">Option 1</router-link>
- </el-menu-item>
- <el-menu-item index="1-2">
- <router-link to="/optionTwo">Option 2</router-link>
- </el-menu-item>
- </el-menu-item-group>
- <el-menu-item-group title="Group 2">
- <el-menu-item index="1-3">
- <router-link to="/optionThree">Option 3</router-link>
- </el-menu-item>
- </el-menu-item-group>
- <el-sub-menu index="1-4">
- <template #title>Option4</template>
- <el-menu-item index="1-4-1">Option 4-1
- <router-link to="/optionFour">Option4</router-link>
- </el-menu-item>
- </el-sub-menu>
- </el-sub-menu>
- <el-sub-menu index="2">
- <template #title>
- <el-icon><icon-menu /></el-icon>Navigator Two
- </template>
- <el-menu-item-group>
- <template #title>Group 1</template>
- <el-menu-item index="2-1">Option 1</el-menu-item>
- <el-menu-item index="2-2">Option 2</el-menu-item>
- </el-menu-item-group>
- <el-menu-item-group title="Group 2">
- <el-menu-item index="2-3">Option 3</el-menu-item>
- </el-menu-item-group>
- <el-sub-menu index="2-4">
- <template #title>Option 4</template>
- <el-menu-item index="2-4-1">Option 4-1</el-menu-item>
- </el-sub-menu>
- </el-sub-menu>
- <el-sub-menu index="3">
- <template #title>
- <el-icon><setting /></el-icon>Navigator Three
- </template>
- <el-menu-item-group>
- <template #title>Group 1</template>
- <el-menu-item index="3-1">Option 1</el-menu-item>
- <el-menu-item index="3-2">Option 2</el-menu-item>
- </el-menu-item-group>
- <el-menu-item-group title="Group 2">
- <el-menu-item index="3-3">Option 3</el-menu-item>
- </el-menu-item-group>
- <el-sub-menu index="3-4">
- <template #title>Option 4</template>
- <el-menu-item index="3-4-1">Option 4-1</el-menu-item>
- </el-sub-menu>
- </el-sub-menu>
- </el-menu>
- </el-scrollbar>
- </el-aside>
-
- <el-container>
- <el-header style="text-align: right; font-size: 12px">
- <div class="toolbar">
- <el-dropdown>
- <el-icon style="margin-right: 8px; margin-top: 1px">
- <setting />
- </el-icon>
- <template #dropdown>
- <el-dropdown-menu>
- <el-dropdown-item>View</el-dropdown-item>
- <el-dropdown-item>Add</el-dropdown-item>
- <el-dropdown-item>Delete</el-dropdown-item>
- </el-dropdown-menu>
- </template>
- </el-dropdown>
- <span>Tom</span>
- </div>
- </el-header>
-
- <el-main>
- <el-scrollbar>
- <router-view></router-view>
- </el-scrollbar>
- </el-main>
-
- </el-container>
- </el-container>
- </template>
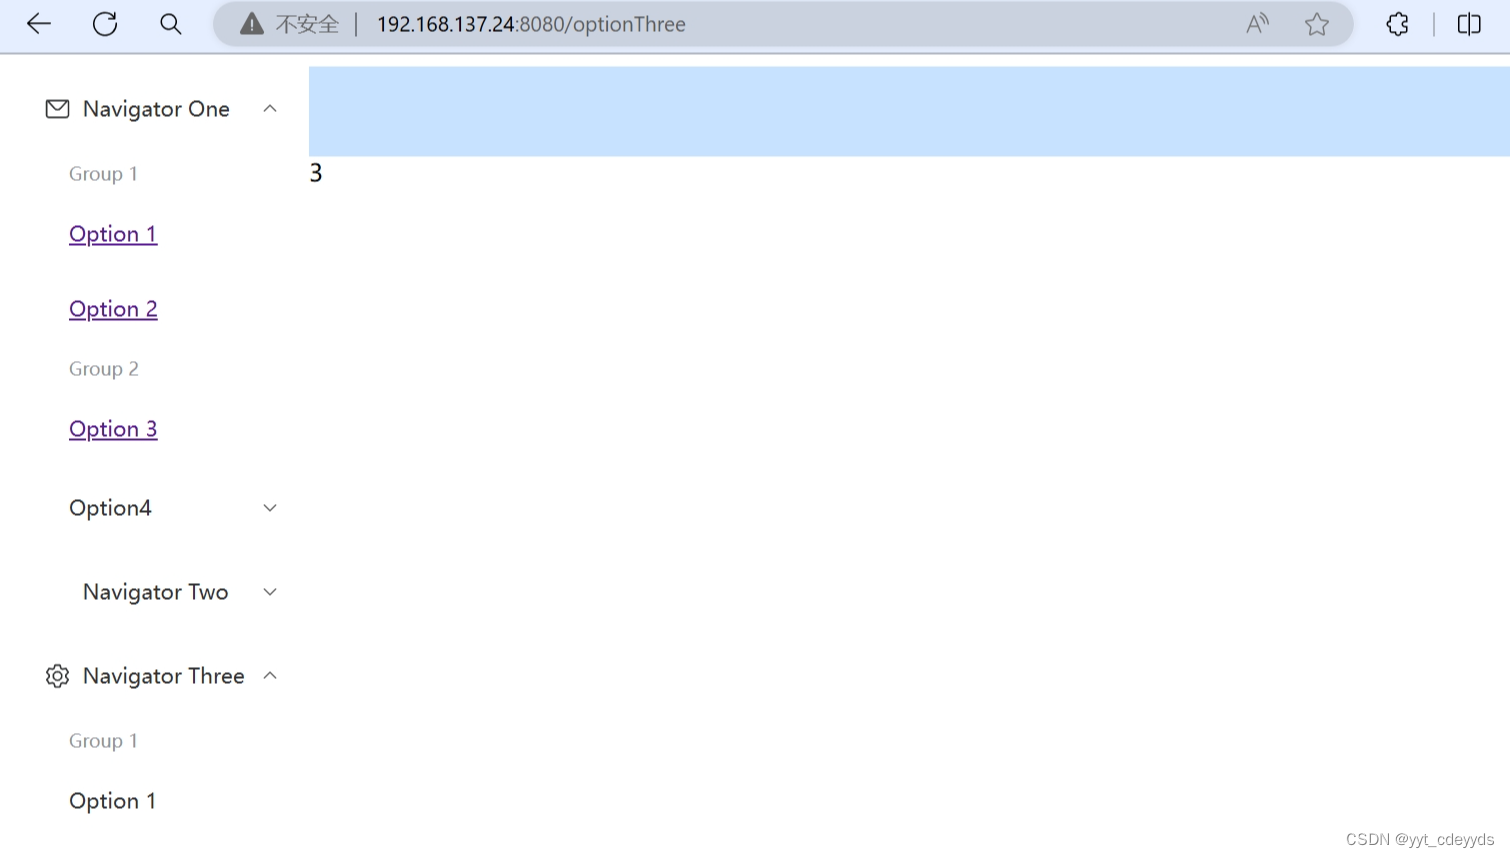
4) Here is the description<router-view> effect:
Look at where the '3' in the picture above has gone after I adjusted its position. It is considered a placeholder.
- <el-main>
- <el-scrollbar>
-
- </el-scrollbar>
- </el-main>
-
- </el-container>
- </el-container>
- <router-view></router-view>
- </template>

1) Routing configuration: Configure routing in `src/router/index.js`, each route corresponds to a component.
Example: By the way, if path is '/', it means that the first page that comes in is this one.
It doesn't seem to say how to run the project: cmd in the project file directory—npm run serve
- import{createRouter,createWebHistory} from 'vue-router';//导入外部组件,声明vue路由
- import HelloWorld from '../components/HelloWorld.vue';
- import OptionOne from '../components/OptionOne.vue';
- import OptionTwo from '../components/OptionTwo.vue';
- import OptionThree from '../components/OptionThree.vue';
- import OptionFour from '../components/OptionFour.vue';
-
- const routes=[//路由器配置
- {
- path:'/',//这样的话就最先进入的是helloworld页面了
- name:'HelloWorld',
- component:HelloWorld
- },
- {
- path:'/optionOne',
- name:'OptionOne',
- component:OptionOne
- },
- {
- path:'/optionTwo',
- name:'OptionTwo',
- component:OptionTwo
- },
- {
- path:'/optionThree',
- name:'OptionThree',
- component:OptionThree
- },
- {
- path:'/optionFour',
- name:'OptionFour',
- component:OptionFour
- }
- ];
-
- const router=createRouter({
- history: createWebHistory(process.env.Base_URL),
- routes
- });
-
- export default router;
2) Navigation links: Use `<router-link> `Create a navigation link, click it to jump to the corresponding page, use`<router-view> `Show the routing component.
- <el-menu-item index="1-3">
- <router-link to="/optionThree">Option 3</router-link>
- </el-menu-item>
1) Same as above, installation command: `npm install axios`
2) Configure axios: Configure the axios instance in `main.js`, set the default baseURL and other global configurations.
- **Define interface**: Define the API interface on the server side, process the front-end request, and return data.
- **Front-end request data**: Use axios in the front-end component to send a request, obtain data and display it on the page.
- **Dynamic data switching**: Combine Element Plus components with Vue Router to achieve dynamic data switching of the menu, such as displaying different content according to different menu items.
Specific steps:
1) Create an axios instance and configure it:
- import axios from 'axios';
- // 创建一个 axios 实例
- const http = axios.create({
- baseURL: 'http://localhost:3000/',
- // 其他配置...
- });
-
- // 创建一个 Vue 应用
- const app = createApp(App);
-
- // 将 axios 实例添加到 Vue 应用的原型上
- app.config.globalProperties.$http = http;
-
- // 挂载 Vue 应用
- app.mount('#app');
2) Use axios to send a request in the Vue component:
- <script>
- const tableData = [];
- export default {
- name: 'HelloWorld',
- created() {
- this.getUserList();
- },
- data() {
- return {
- // 假设我们从API获取的是一个用户列表
- tableData
- };
- },
- methods: {
- getUserList() {
- this.$http.get('/').then(response => {
- console.log(response.data)
- this.tableData = response.data;
- })
- .catch(error => {
- console.log(error)
- });
- }
- }
-
- }
- </script>
3) Combine Element Plus and Vue Router to implement a dynamic menu: As explained above.
Axios is a Promise-based HTTP client for HTTP requests in browsers and Node.js environments. It allows you to send asynchronous requests more conveniently and process response data. In Vue.js projects, you can use Axios to communicate with backend APIs, such as getting data, sending form data, processing file uploads, and other operations. Axios provides a concise API that supports request and response interceptors, request cancellation, global configuration, and other functions, making the data interaction between the frontend and backend more efficient and controllable.
1) First, add a src/server/index.js based on the previous project as follows
- const express = require('express');
- const app = express();
- const port = 3000; // 你可以选择任何未被占用的端口
-
- // 设置中间件以允许跨域请求(可选,根据你的需求)
- app.use((req, res, next) => {
- res.header("Access-Control-Allow-Origin", "*");
- res.header("Access-Control-Allow-Headers", "Origin, X-Requested-With, Content-Type, Accept");
- next();
- });
-
- // 设置路由和响应
- app.get('/', (req, res) => {
- // 创建一个对象,其中包含你想要返回的数据
- const data = [
- // ...更多用户
- ];
-
- // 使用res.json()方法发送JSON响应
- res.json(data);
- });
-
- // 启动服务器
- app.listen(port, () => {
- console.log(`Server is running on http://localhost:${port}`);
- });
Explanation of this code:
This code snippet uses Node.js and the Express framework to create a simple server. Here is a line-by-line explanation of the code:
1. **Import the Express module and create an application instance**:
```javascript
const express = require('express');
const app = express();
```- `express` is a framework for building web applications. Here, `require('express')` is used to import it, and an application instance is created through `express()`.
2. **Set the port that the server listens on**:
```javascript
const port = 3000; // You can choose any unused port
```- The `port` variable defines the port number that the server listens on, here it is set to `3000`.
3. **Middleware settings to allow cross-domain requests**:
```javascript
app.use((req, res, next) => {
res.header("Access-Control-Allow-Origin", "*");
res.header("Access-Control-Allow-Headers", "Origin, X-Requested-With, Content-Type, Accept");
next();
});
```- This code sets up a middleware to allow cross-origin requests (CORS). It allows requests from any origin and allows certain header fields. The `next()` function ensures that the request continues to the next middleware or route handler.
4. **Define routes and responses**:
```javascript
app.get('/', (req, res) => {
// Create an object that contains the data you want to return
const data = [
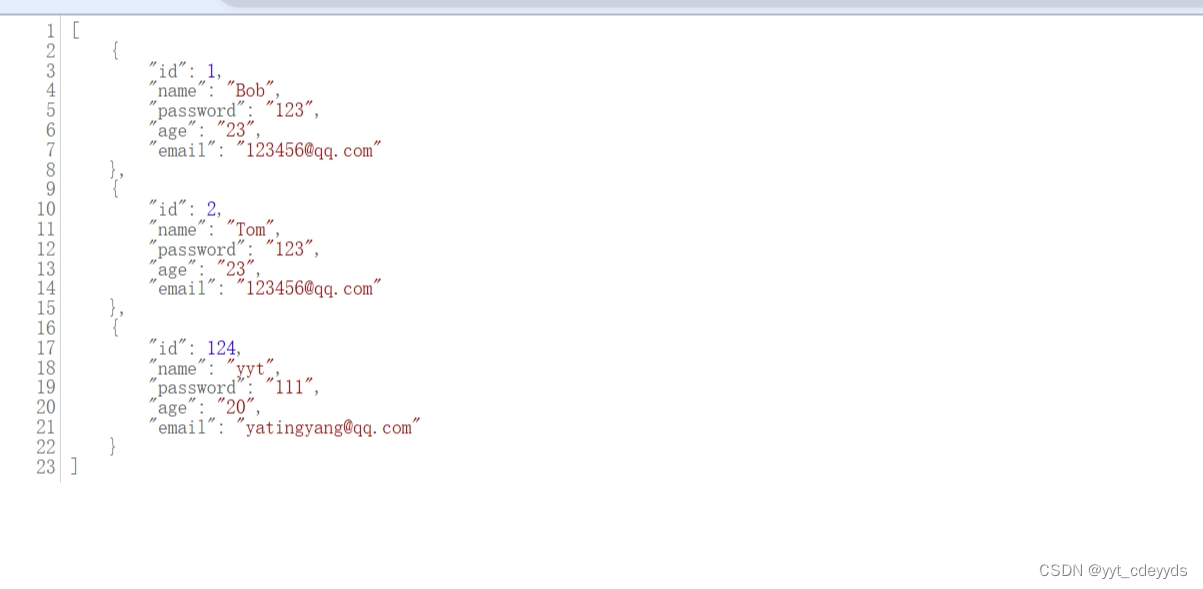
{ id: 1, name: 'Alice', age:18, email: '[email protected]' },
{ id: 2, name: 'Bob', age:19, email: '[email protected]' },
// ...more users
];
// Use the res.json() method to send a JSON response
res.json(data);
});
```- `app.get('/', ...)` defines a GET request route. When the client accesses the root path `/`, this processing function will be called.
- The handler function creates an object `data` containing the user data and returns it to the client as a JSON response using `res.json(data)`.5. **Start the server**:
```javascript
app.listen(port, () => {
console.log(`Server is running on http://localhost:${port}`);
});
```- `app.listen(port, ...)` starts the server and makes it listen on the defined port.
- When the server starts successfully, a message will be printed to the console indicating that the server is running and can be accessed at `http://localhost:3000`.Summary: This code snippet creates a simple Express server that responds to GET requests to the root path `/` and returns a JSON response containing user data. A middleware is also set up to allow cross-origin requests. By running this server on port `3000`, you can use a browser or other HTTP client to access `http://localhost:3000` and view the returned JSON data.
2) Run
In the server file directory, cmd—node index.js
You can see the background data

Then in the project file directory, cmd—npm run serve, you can see the data! !

How do I manage background data?
In the newly added server/index.js file:
- // 设置路由和响应
- app.get('/', (req, res) => {
- // 创建一个对象,其中包含你想要返回的数据
- const data = [
- // ...更多用户
- ];
How to run the five projects together with the backend of the one project MoreMall is to combine the front-end and back-end.
1)mysql.sql
- create database test;
- use test;
- CREATE TABLE user (
- id INT AUTO_INCREMENT PRIMARY KEY,
- name VARCHAR(255) NOT NULL,
- password VARCHAR(255) NOT NULL,
- age VARCHAR(255) NOT NULL,
- email VARCHAR(255) NOT NULL
- );
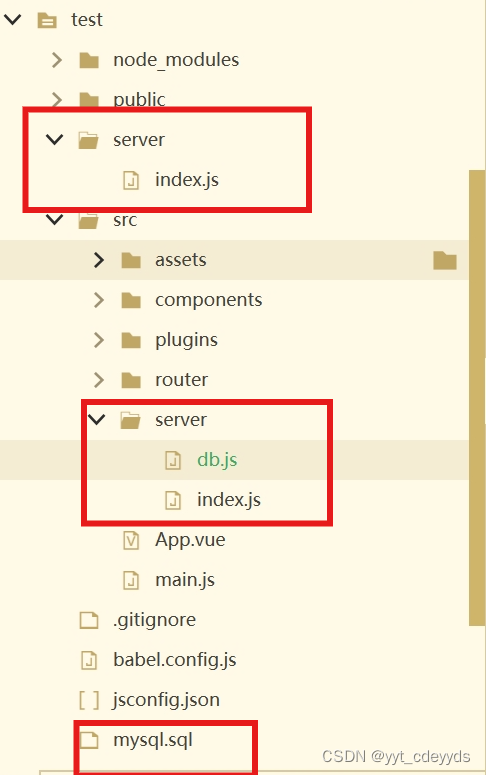
2)server
Put it in the scr file, but you can also put it in parallel. I put it before and I didn’t delete it. Anyway, npm run serve can also be done in different file directories
Two files under the server:
(1)db.js
- let mysql = require('mysql')
- //配置链接数据库的参数
- let db = mysql.createPool({
- host: '127.0.0.1',
- user: 'root',
- port:'3306',
- password: 'root',
- database: 'test'
- })
-
- module.exports = db
illustrate:
The purpose of this code is to use Node.js and the `mysql` module to create a connection pool to a MySQL database and export it for use in other modules.
The specific explanation is as follows:
1. **Import the `mysql` module**:
```javascript
let mysql = require('mysql');
```
This line of code imports the `mysql` module, which is a Node.js library for connecting to and manipulating MySQL databases.2. **Create a connection pool**:
```javascript
let db = mysql.createPool({
host: '127.0.0.1',
user: 'root',
port: '3306',
password: 'root',
database: 'test'
});
```
This code creates a connection pool using the mysql.createPool method. A connection pool is a group of database connections that can be shared and reused by multiple clients. Creating a connection pool can improve performance because it avoids reestablishing a database connection for each request.- `host: '127.0.0.1'`: The host address of the database server. This is the local server.
- `user: 'root'`: Database username.
- `port: '3306'`: Database port number. The default port for MySQL is 3306.
- `password: 'root'`: Database password.
- `database: 'test'`: The name of the database to connect to.3. **Export connection pool**:
```javascript
module.exports = db;
```
This line of code exports the connection pool object `db` so that other modules can import and use this connection pool through the `require` method.Using this connection pool, you can import it in other modules and use it to perform database queries. For example:
```javascript
//Introduce the database connection pool
const db = require('./path/to/this/module');// Execute database query
db.query('SELECT * FROM user', (err, results) => {
if (err) {
console.error('Error executing query:', err);
return;
}
console.log('Query results:', results);
});
```This method makes it easy to manage and use database connections, especially in applications that need to access the database frequently.
(2)index.js
- const express = require('express');
- const app = express();
- const port = 3000; // 你可以选择任何未被占用的端口
- const db = require('./db')
-
- // 设置中间件以允许跨域请求(可选,根据你的需求)
- app.use((req, res, next) => {
- res.header("Access-Control-Allow-Origin", "*");
- res.header("Access-Control-Allow-Headers", "Origin, X-Requested-With, Content-Type, Accept");
- next();
- });
-
- //配置对外接口
- app.get('/', (req, res) => {
- var sql = 'select * from user'
- db.query(sql, (err, data) => {
- if(err) {
- return res.send({
- status: 400,
- message: "查询失败"
- })
- } else{
- console.log('查询结果:', data)
- res.json(data);
- }
- })
- });
-
- // 设置路由和响应
- /*
- app.get('/', (req, res) => {
- // 创建一个对象,其中包含你想要返回的数据
- const data = [
- { id: 1, name: 'Alice', age:18, email: '[email protected]' },
- { id: 2, name: 'Bob', age:19, email: '[email protected]' },
- // ...更多用户
- ];
-
- // 使用res.json()方法发送JSON响应
- res.json(data);
- });
- */
- // 启动服务器
- app.listen(port, () => {
- console.log(`Server is running on http://localhost:${port}`);
- });
If you don't understand, read more:/
Service-Terminal:
- Create an Express server and set up a database connection pool.
- Set up middleware to allow cross-origin requests.
- Define a GET route to query the database and return the data.
Client:
- Use Axios to send HTTP requests to the server in Vue components.
- Get the data and display it on the page.
"Using this connection pool, you can import it in other modules and use it to perform database queries." - What are those other modules?
It is the server-side code in the server.
In this context, "other modules" usually refers to other JavaScript files in your Node.js project, not in the .vue file of your Vue component. Specifically, these other modules are usually server-side code that handles HTTP requests and database interactions.
A typical project structure might look like this:
```
project/
├── server/
│ ├── db.js // The database connection pool code you provided
│ ├── routes.js // Module that defines API routes
│ └── server.js // The file that starts the server. This is what I use here.
└── client/
├── src/
│ ├── components/
│ │ ├── YourComponent.vue // Your Vue component
│ ├── main.js // Vue project entry file
│ └── ... // Other front-end files
└── package.json
```In this structure, the `server/` folder contains the server-side code, and the `client/` folder contains the front-end Vue code.
### Example: Using a database connection pool on the server side
Assuming you already have a `server/db.js` file that defines a database connection pool, you can import and use it in the `server/routes.js` file:
```javascript
// server/routes.js
const express = require('express');
const db = require('./db'); // Introduce database connection poolconst router = express.Router(); //I didn't use this part of routers.js. The other parts were put together in index.js to achieve "introducing database connection pool - setting cross-domain access according to needs? - setting routing - (ultimate goal) starting the server"
// Define an example route
router.get('/users', (req, res) => {
db.query('SELECT * FROM user', (err, results) => {
if (err) {
return res.status(500).json({ error: err.message });
}
res.json(results);
});
});module.exports = router;
```Then, in the `server/server.js` file, we set up and start the Express server and use the defined routes:
```javascript
// server/server.js
const express = require('express');
const app = express();
const routes = require('./routes'); // Import defined routesapp.use('/api', routes); // Use routing
const port = 3000;
app.listen(port, () => {
console.log(`Server is running on http://localhost:${port}`);
});
```### Using the API in Vue components
In your Vue component, you can use Axios to send HTTP requests to the API defined above:
```vue
<template>
<div>
<h2>Users</h2>
<ul>
<li v-for="user in users" :key="user.id">
{{ user.name }} - {{ user.email }}
</li>
</ul>
</div>
</template><script>
import axios from 'axios';export default {
data() {
return {
users: []
};
},
mounted() {
axios.get('http://localhost:3000/api/users')
.then(response => {
this.users = response.data;
})
.catch(error => {
console.error('Error fetching users:', error);
});
}
};
</script>
```In this way, by separating the logic of the front-end and back-end, you can better organize and manage the code, while ensuring that the server handles database interactions, while the front-end retrieves and displays data through the API.
1) The server must be in monitoring mode! Only in monitoring mode can you run the project and see the background data. The following steps are required:
Project/src/sserver/——cmd——node index.js command, start viewing
Correct monitoring display:

Second, I found that I could usehttp://localhost:3000/api/usersYou can see the correct JSON data, but you cannot use http://localhost:3000. The solution is as follows:
Modify optionOne.vue:
- export default {
- data() {
- return {
- users: []
- };
- },
- mounted() {
- // axios.get('http://localhost:3000/api/users')//服务端的信息
- axios.get('http://localhost:3000')//服务端的信息
- .then(response => {
- this.users = response.data;
- })
- .catch(error => {
- console.error('Error fetching users:', error);
- });
- }
- };
4. How to add a login page
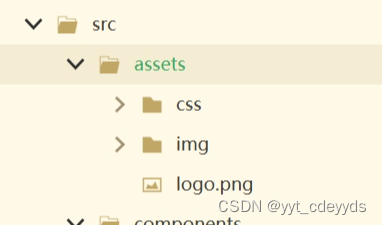
First, add the following to the assets folder: img is the page image that is logged in at the beginning, and the css folder
Then add Login.vue, Login's router
The last step is to adjust the previous page, separate App.vue (the overall one), encapsulate it, and make the left bar on the page into a separate Bar.vue. Then, if you want to see this Bar on every page, you need to add a reference to Bar.vue in each .vue file.
Example:
optionTwo.vue:
- <template>
- <el-main>
- <el-container>
- <Bar />
- {{msg}}
- <!-- 根据当前的路由显示内容 -->
- <router-view></router-view>
- </el-container>
- </el-main>
- </template>
-
- <script>
- import Bar from './Bar.vue';
-
- export default {
- name: 'optionTwo',
- components:{
- Bar
- },
- data () {
- return {
- msg: 'Option Two'
- }
- }
- }
- </script>
optionOne.vue:
- <template>
- <el-main>
- <el-container>
- <Bar />
- <el-table :data="information">
- <el-table-column prop="users" label="Users" width="140" />
- <el-table-column prop="sex" label="Sex" width="140" />
- <el-table-column prop="mood" label="mood" />
- </el-table>
- <!-- 根据当前的路由显示内容 -->
- <router-view></router-view>
- </el-container>
- </el-main>
- </template>
-
- <script>
- //import axios from 'axios';
- import Bar from './Bar.vue';
-
- export default {
- data() {
- return {
- information: []
- };
- },
- created() {
- this.getUserList();
- },
- methods: {
- getUserList() {
- this.$http.get('/optionone').then(response => {
- console.log(response.data);
- this.information = response.data;
- })
- .catch(error => {
- console.log(error);
- });
- }
- },
- // mounted() {
- // axios.get('http://localhost:3000/api/users')
- // .then(response => {
- // this.users = response.data;
- // })
- // .catch(error => {
- // console.error('Error fetching users:', error);
- // });
- // },
- name: 'OptionOneComponent',
- components: {
- Bar
- }
- };
- </script>
-
- <style>
- .layout-container-demo .el-header {
- position: relative;
- background-color: var(--el-color-primary-light-7);
- color: var(--el-text-color-primary);
- }
- .layout-container-demo .el-main {
- padding: 0;
- }
- .layout-container-demo .toolbar {
- display: inline-flex;
- align-items: center;
- justify-content: center;
- height: 100%;
- right: 20px;
- }
- </style>
Of course, I can answer these questions for you:
### 1. Understand the role of each file and how they work together
**db.js (backend database configuration file)**
- Function: Create and export a MySQL database connection pool.
How it works: Used by index.js to perform database operations.**index.js (backend server main file)**
- Purpose: Set up the Express server, configure routing and middleware, and handle API requests.
- How to work together: Use db.js to connect to the database and respond to requests from the front end.**main.js (front-end main file)**
- Function: Create a Vue application, configure Vue Router and axios, and mount the application.
- How it works together: Use Element Plus and Vue Router to enhance the UI and navigation, and axios for communicating with the backend.**index.js (Vue Router configuration file)**
- Function: Define the front-end routing and specify the Vue components corresponding to different paths.
- How it works together: Integrates with the Vue instance in main.js to implement page routing.### 2. Demonstrate how to start the backend and frontend servers
**Start the backend server**:
- Run `node index.js` to start the Express server.
- Make sure the MySQL service is running.**Start the front-end server**:
- If using Vue CLI, run `npm run serve` to start the hot-reloading development server.
- Visit the specified address in the browser (usually localhost and a port) to view the front-end application.### 3. Display the front-end page and user interaction process
- When the user opens the app, Vue Router will render the corresponding component based on the URL.
- The user performs an operation (such as filling out a login form), and the data is submitted to the backend through the form.
- The user sees the response result (login success or failure) and navigates to different pages based on the result.### 4. Explain the API request and response process
- The front end uses axios to send HTTP requests to the back end.
- The backend Express server receives the request and performs database operations.
- The backend sends the database query results or error information back to the frontend as a response.
- The front end receives the response and updates the page status or displays information based on the response.### 5. Discuss the key technologies used in the project
- **Vue Router**: Manage front-end routing and implement page navigation in single-page applications.
- **axios**: used to send HTTP requests from the front end to the back end and process responses.
- **Express**: A web application framework for Node.js, used to create backend servers and handle API requests.
- **MySQL**: A relational database management system used to store and query data.### 6. Prepare answers to some common questions
**How to handle CORS? **
- Use cors middleware to allow specific external domains to access the API.**How is user authentication implemented? **
- The backend API can check the authentication information (such as JWT tokens) in the request to verify the user's identity.**How is data security guaranteed? **
- Use HTTPS to encrypt data transmission.
- Hash the user's password before storing it.
- Validate all user input to prevent attacks such as SQL injection.With the above answers, you should be able to have a clear understanding of how the project works and how it was implemented, so that you are ready for your defense.

I have devoted myself to the research of technology for more than 30 years. I am proficient in various languages such as Java, Linux, JavaScript, PHP, CSS, etc. I have made many contributions in the field of open source. I have established a developer documentation site to share some problems in technology development for everyone to read.

