2024-07-12
한어Русский языкEnglishFrançaisIndonesianSanskrit日本語DeutschPortuguêsΕλληνικάespañolItalianoSuomalainenLatina
Recently, when I was working on a project, I needed to embed UnityWebGL into a web page, and I needed to click a button on the web page for UnityWebGL to respond. I will skip the new project part.

Data Caching andDecompression Fallback The following link is the official explanation.Data Caching Simply put, it caches data locally so that you can enter the game directly next time you open it without downloading itDecompression Fallback This option needs to be checked if the gz file cannot be parsed or the web server configuration is wrong.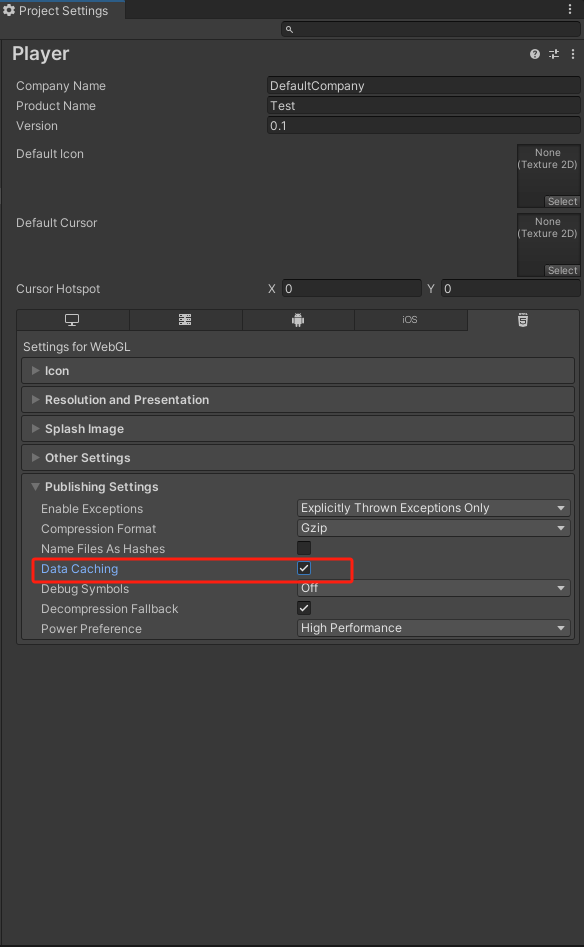
Note: The method must be public, otherwise it will not be accessible.
using System;
using System.Text;
using UnityEngine;
using UnityEngine.UI;
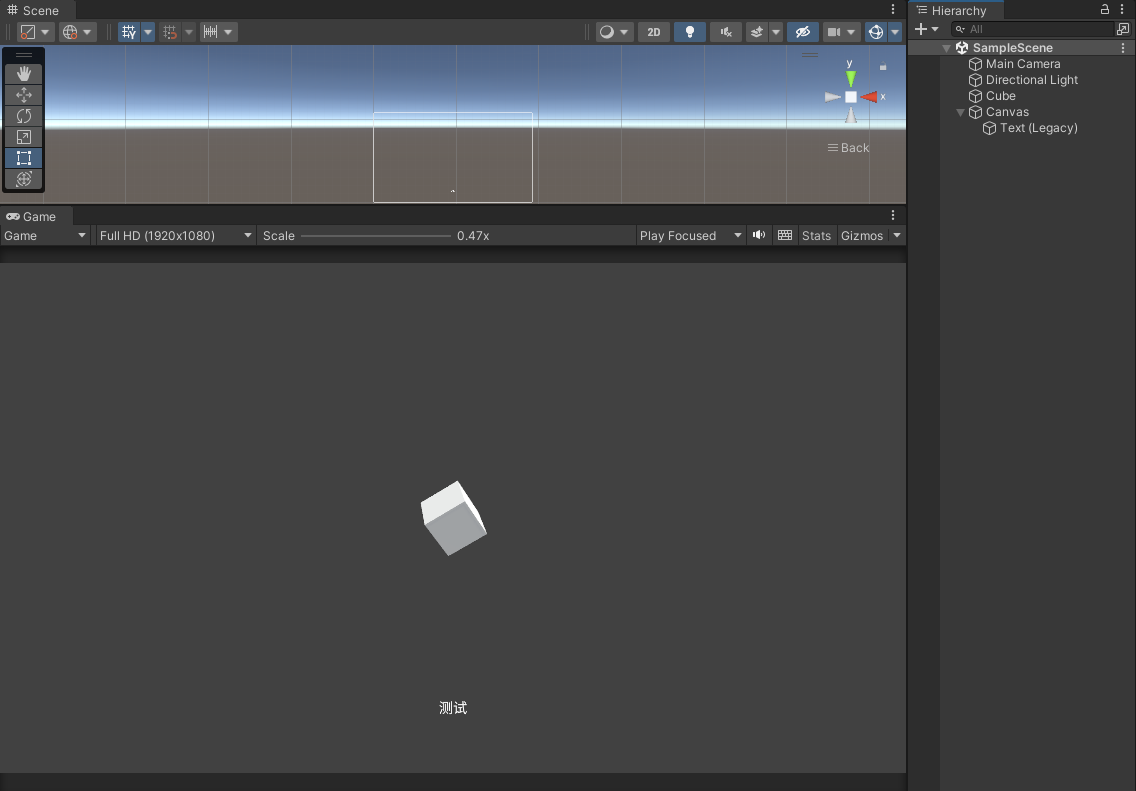
public class CubeRotate : MonoBehaviour
{
public Text tx;
void Update()
{
transform.Rotate(Vector3.up * Time.deltaTime * 30, Space.World);
}
public void SetTextInfo(string info)
{ byte[] bytes = Convert.FromBase64String(info);
var decodedMessage = Encoding.UTF8.GetString(bytes);
Debug.Log($"收到消息:{info}----{decodedMessage}");
tx.text = decodedMessage;
}
public void AddScale()
{
transform.localScale += Vector3.one * 0.1f;
}
public void SubtractScale()
{
transform.localScale -= Vector3.one * 0.1f;
}
}
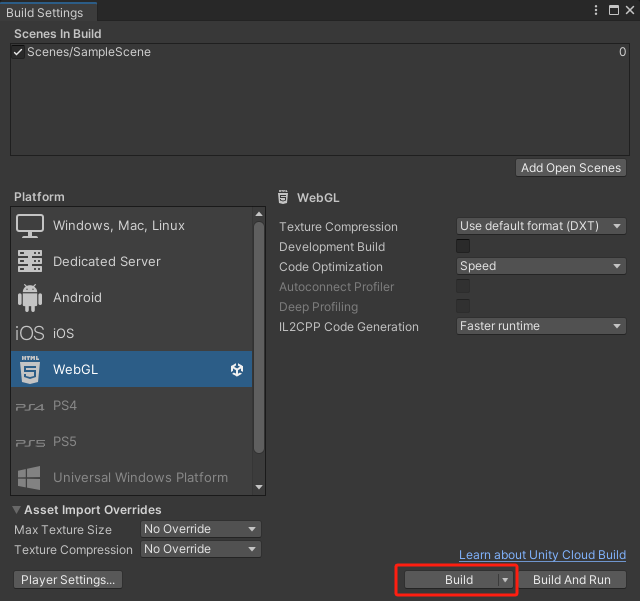
If you want to browse the packaged files locally, you need to download
Firefox浏览器, the download requires some configuration specific parametersFirefox opens webgl_Firefox opens web gl-CSDN blog
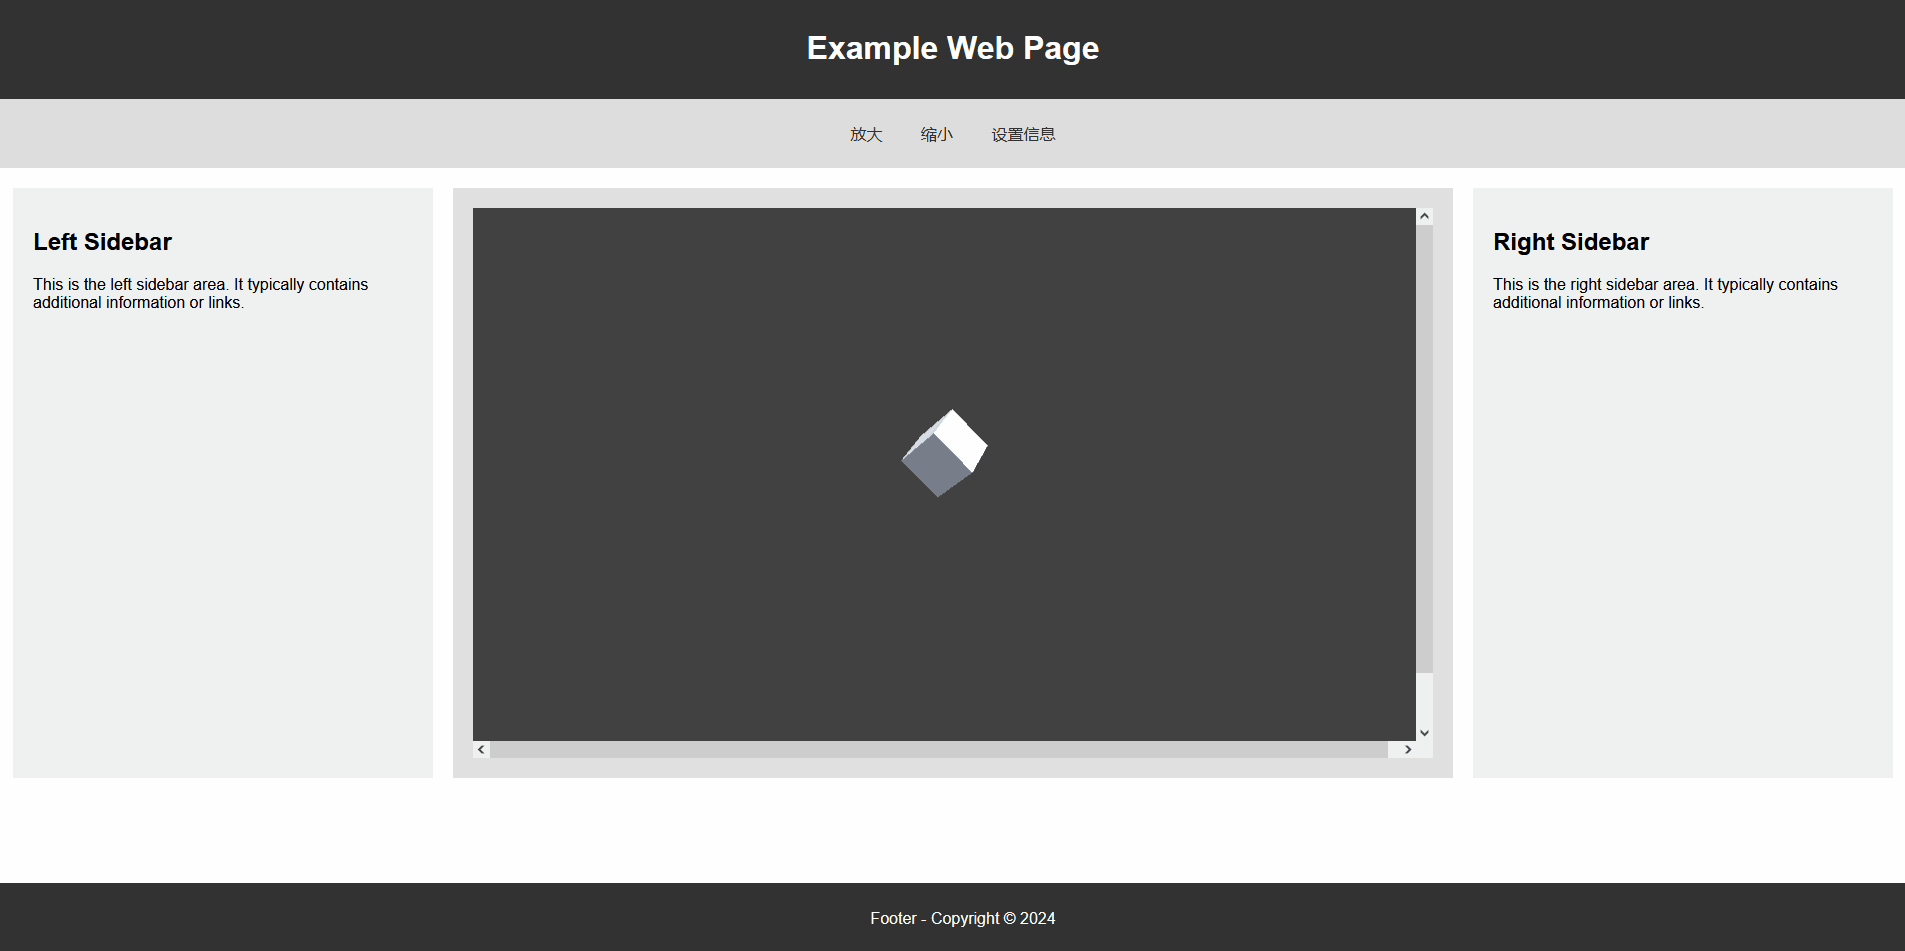
Considering that some friends may not be able to write web pages, the author provides a simple web page template for everyone to test
How to use: Create a new text file, paste the following code into it, save it and change the file suffix to
.html
<!DOCTYPE html>
<html lang="en">
<head>
<meta charset="UTF-8" />
<meta name="viewport" content="width=device-width, initial-scale=1.0" />
<title>Simple Web Page</title>
<style>
body {
margin: 0;
padding: 0;
font-family: Arial, sans-serif;
}
.header {
background-color: #333;
color: white;
padding: 10px;
text-align: center;
}
.nav {
background-color: #ddd;
padding: 10px;
text-align: center;
}
.nav-button {
background-color: #ddd;
border: none;
color: #333;
padding: 10px 15px;
text-align: center;
text-decoration: none;
display: inline-block;
font-size: 16px;
margin: 4px 2px;
cursor: pointer;
border-radius: 4px; /* 圆角边框 */
}
.nav-button:hover {
background-color: #ccc;
}
.nav a {
color: #333;
text-decoration: none;
margin-right: 10px;
}
.container {
display: flex;
justify-content: space-between;
padding: 20px;
}
.sidebar,
.main {
padding: 20px;
height: 550px;
overflow: hidden;
}
.sidebar {
background-color: #f0f0f0;
flex: 0 0 380px; /* Fixed width for sidebar */
}
.main {
background-color: #e0e0e0;
flex: 0 0 960px; /* Fixed width for main content */
}
.sidebar-left {
margin-right: 20px; /* Adjust the margin for the left sidebar */
}
.sidebar-right {
margin-left: 20px; /* Adjust the margin for the right sidebar */
}
.footer {
background-color: #333;
color: white;
text-align: center;
padding: 10px;
position: fixed;
bottom: 0;
width: 100%;
}
</style>
</head>
<body>
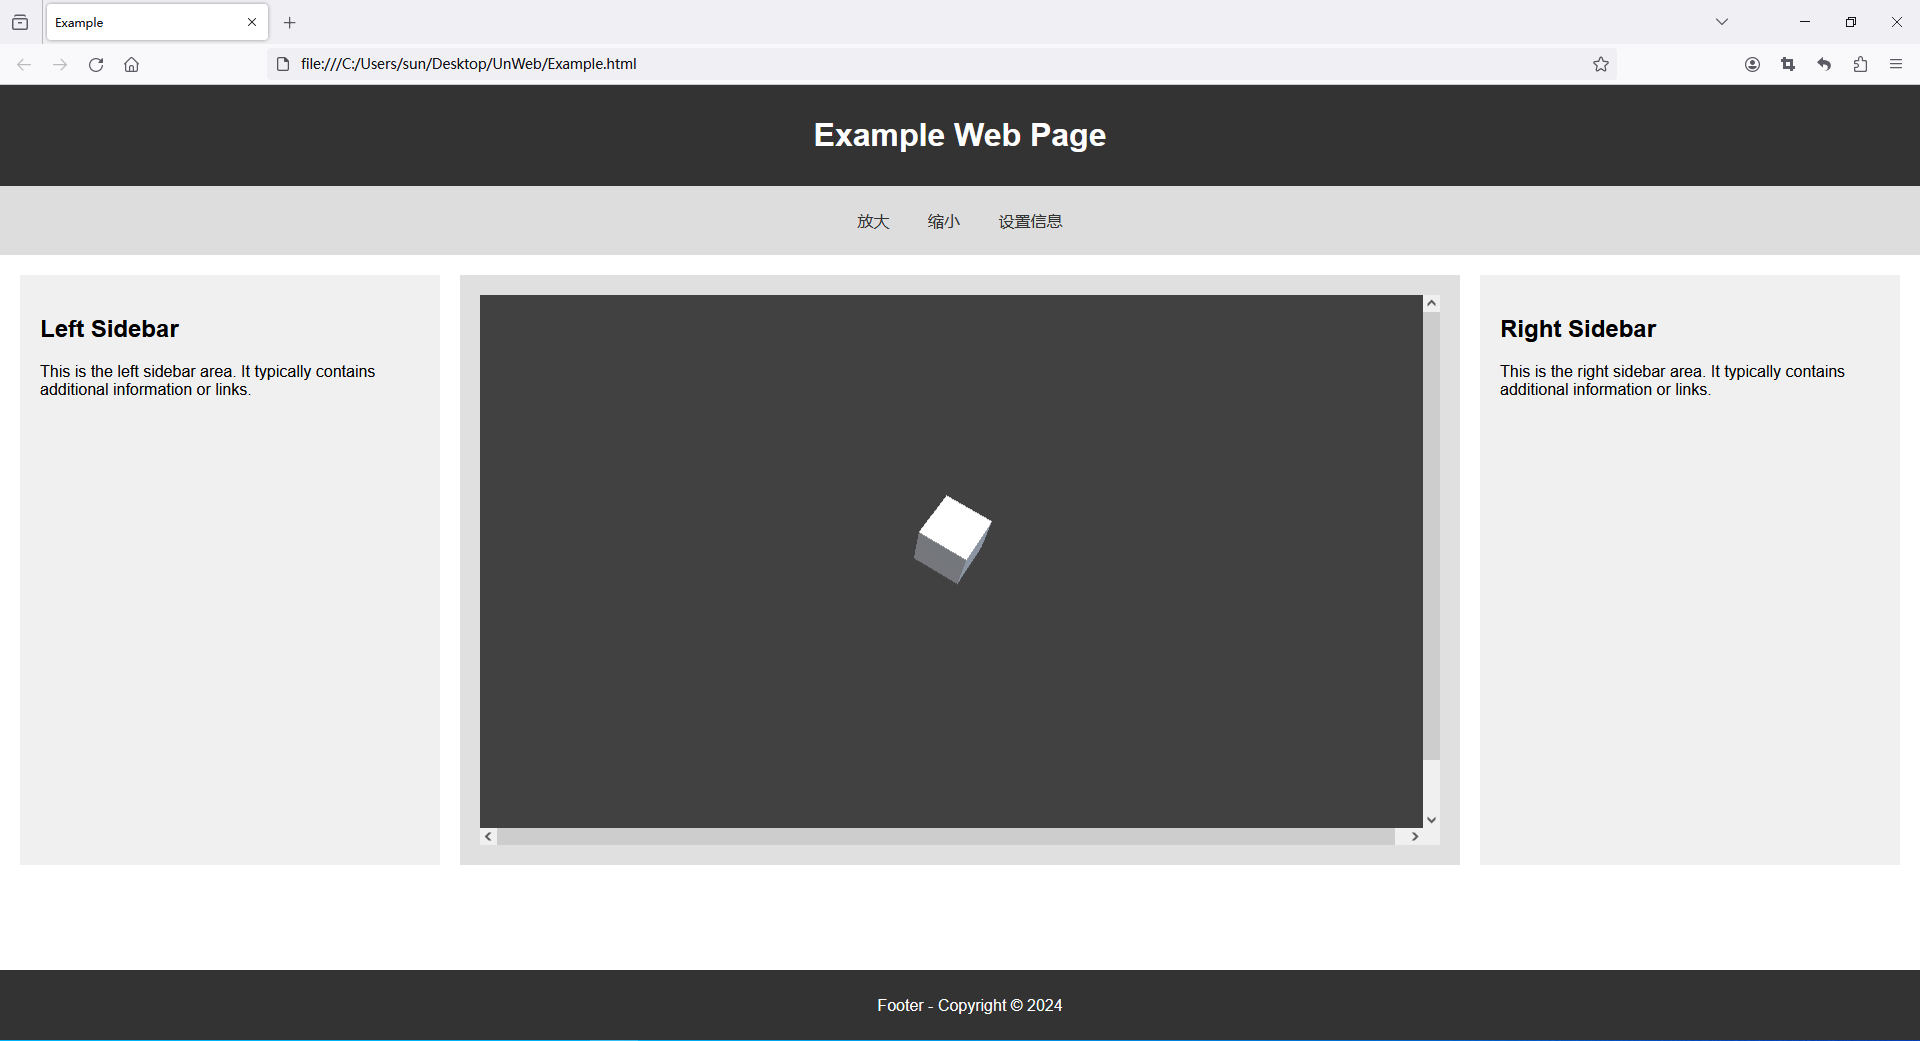
<div class="header">
<h1>My Simple Web Page</h1>
</div>
<div class="nav">
<button id="enlargeButton" class="nav-button">放大</button>
<button id="shrinkButton" class="nav-button">缩小</button>
<button id="infoButton" class="nav-button">设置信息</button>
</div>
<div class="container">
<div class="sidebar sidebar-left">
<h2>Left Sidebar</h2>
<p>
This is the left sidebar area. It typically contains additional
information or links.
</p>
</div>
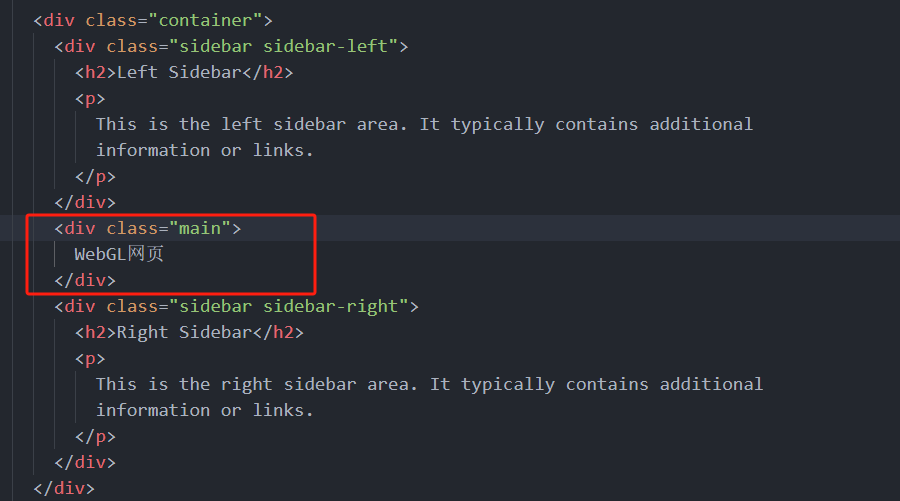
<div class="main">
WebGL网页
</div>
<div class="sidebar sidebar-right">
<h2>Right Sidebar</h2>
<p>
This is the right sidebar area. It typically contains additional
information or links.
</p>
</div>
</div>
<div class="footer">
<p>Footer - Copyright © 2024</p>
</div>
</body>
<script>
// JS 代码
</script>
</html>
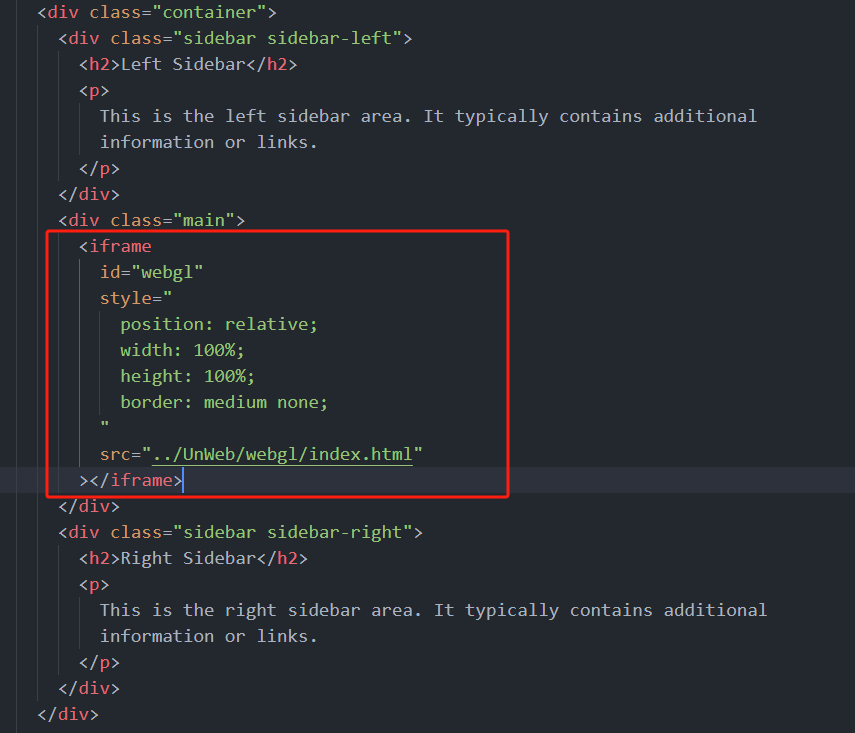
srcJust change the link to the server address. (For more information about iframe, please refer toHTML Iframe (w3school.com.cn)) Save and useFirefox浏览器Open the web page. Projects that have been deployed on the server can be opened using any browser that supports WebGL.<iframe
id="webgl"
style="
position: relative;
width: 100%;
height: 100%;
border: medium none;
"
src="../UnWeb/webgl/index.html"
></iframe>

Notice:
methodNameThe method name must be consistent with that in Unity, otherwise the method will not be found.
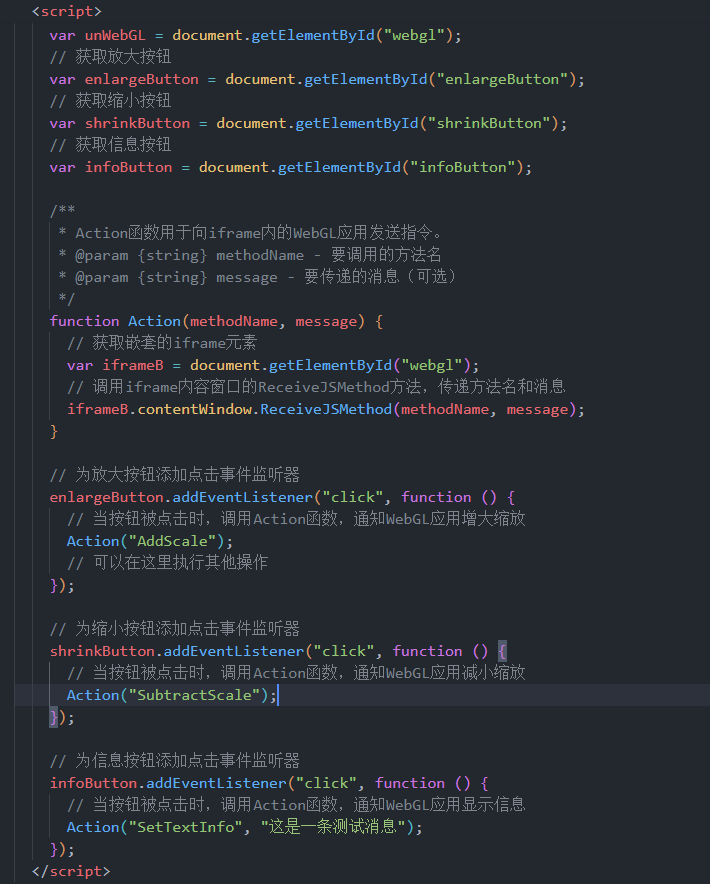
    // 获取DOM中id为"webgl"的iframe元素
    var unWebGL = document.getElementById("webgl");
    // 获取放大按钮
    var enlargeButton = document.getElementById("enlargeButton");
    // 获取缩小按钮
    var shrinkButton = document.getElementById("shrinkButton");
    // 获取信息按钮
    var infoButton = document.getElementById("infoButton");

    /**
     * Action函数用于向iframe内的WebGL应用发送指令。
     * @param {string} methodName - 要调用的方法名
     * @param {string} message - 要传递的消息(可选)
     */
    function Action(methodName, message) {
      // 获取嵌套的iframe元素
      var iframeB = document.getElementById("webgl");
      // 调用iframe内容窗口的ReceiveJSMethod方法,传递方法名和消息
      iframeB.contentWindow.ReceiveJSMethod(methodName, message);
    }

    // 为放大按钮添加点击事件监听器
    enlargeButton.addEventListener("click", function () {
      // 当按钮被点击时,调用Action函数,通知WebGL应用增大缩放
      Action("AddScale");
      // 可以在这里执行其他操作
    });

    // 为缩小按钮添加点击事件监听器
    shrinkButton.addEventListener("click", function () {
      // 当按钮被点击时,调用Action函数,通知WebGL应用减小缩放
      Action("SubtractScale");
    });

    // 为信息按钮添加点击事件监听器
    infoButton.addEventListener("click", function () {
      // 当按钮被点击时,调用Action函数,通知WebGL应用显示信息
      Action("SetTextInfo", "这是一条测试消息");
    });

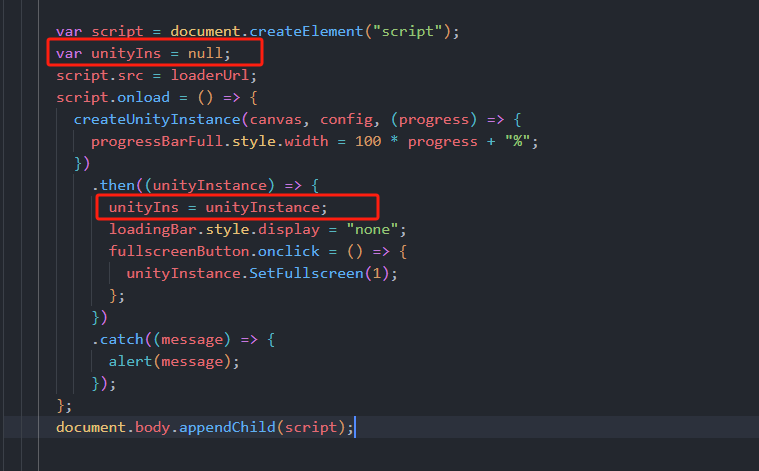
var unityIns = null;
      script.src = loaderUrl;
      script.onload = () => {
        createUnityInstance(canvas, config, (progress) => {
          progressBarFull.style.width = 100 * progress + "%";
        })
          .then((unityInstance) => {
            unityIns = unityInstance;
            loadingBar.style.display = "none";
            fullscreenButton.onclick = () => {
              unityInstance.SetFullscreen(1);
            };
          })
          .catch((message) => {
            alert(message);
          });
      };
SendMessageMethods It allows you to call specific methods of game objects in the Unity scene from JavaScript code.Notice:
SendMessageThe method has three parameters:
Target Object Name: This is the name of the GameObject in the scene on which the method you want to call is defined.
Method Name: This is the name of the method you want to call, it should be a public method in the script on the target object.
Parameters: These are the parameters you want to pass to the method. In Unity's SendMessage, this parameter can only be a string. If you need to pass more complex data, you may need to use another mechanism.
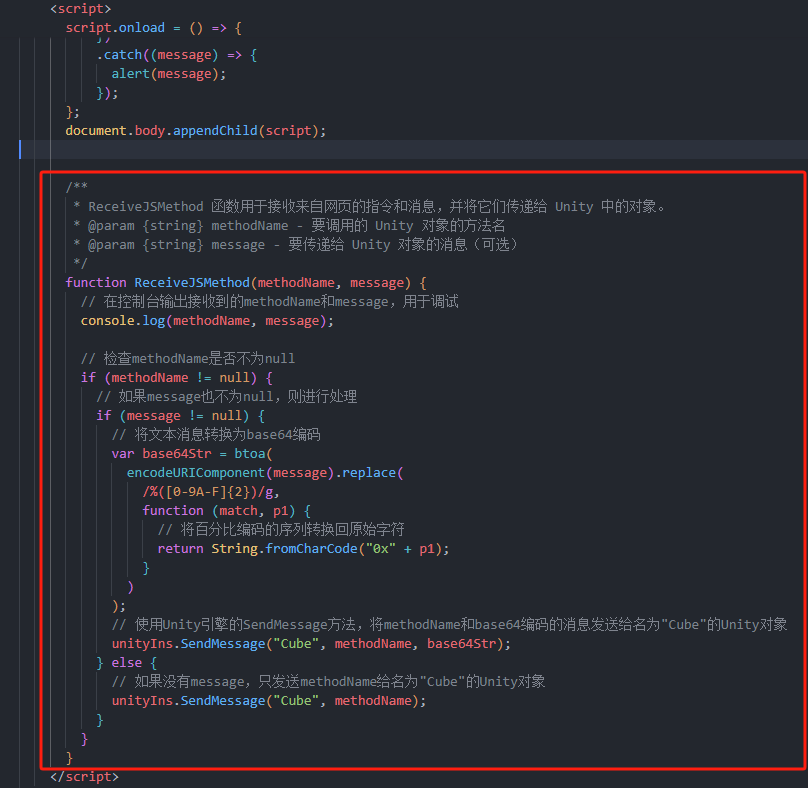
   /**
       * ReceiveJSMethod 函数用于接收来自网页的指令和消息,并将它们传递给 Unity 中的对象。
       * @param {string} methodName - 要调用的 Unity 对象的方法名
       * @param {string} message - 要传递给 Unity 对象的消息(可选)
       */
      function ReceiveJSMethod(methodName, message) {
        // 在控制台输出接收到的methodName和message,用于调试
        console.log(methodName, message);

        // 检查methodName是否不为null
        if (methodName != null) {
          // 如果message也不为null,则进行处理
          if (message != null) {
            // 将文本消息转换为base64编码
            var base64Str = btoa(
              encodeURIComponent(message).replace(
                /%([0-9A-F]{2})/g,
                function (match, p1) {
                  // 将百分比编码的序列转换回原始字符
                  return String.fromCharCode("0x" + p1);
                }
              )
            );
            // 使用Unity引擎的SendMessage方法,将methodName和base64编码的消息发送给名为"Cube"的Unity对象
            unityIns.SendMessage("Cube", methodName, base64Str);
          } else {
            // 如果没有message,只发送methodName给名为"Cube"的Unity对象
            unityIns.SendMessage("Cube", methodName);
          }
        }
      }
Okay, let’s stop here for today~
If it helps you, you can like, follow, and collect it. If you have any questions, see the comment area~
Originality is not easy, if you reprint, please indicate the source, thank you~

I have devoted myself to the research of technology for more than 30 years. I am proficient in various languages such as Java, Linux, JavaScript, PHP, CSS, etc. I have made many contributions in the field of open source. I have established a developer documentation site to share some problems in technology development for everyone to read.

