2024-07-12
한어Русский языкEnglishFrançaisIndonesianSanskrit日本語DeutschPortuguêsΕλληνικάespañolItalianoSuomalainenLatina
1. Installieren Sie Perl
Installationsadresse: https://strawberryperl.com, wählen Sie einfach das MSI-Installationsprogramm aus
2. Installieren Sie sed für Windows
Download-Adresse: https://sourceforge.net/projects/gnuwin32/files/sed/ Konfigurieren Sie nach der Ausführung des Installationsprogramms das bin-Verzeichnis des Installationspakets für die Umgebungsvariable.
3. Installieren Sie die Community-Version von Visual Studio 2022
4. Vonhttps://github.com/nginx/nginxLaden Sie den Quellcode der Version 1.26.1 herunter und erstellen Sie im Quellcode ein neues Verzeichnis objslib
Laden Sie das Nginx-http-flv-Modul herunter:https://github.com/winshining/nginx-http-flv-module(Version 1.2.10)
PCRE herunterladen:https://github.com/PCRE2Project/pcre2/tags(Version 10.2.39)
zlib herunterladen:https://github.com/madler/zlib(Version 1.3.1)
OpenSSL herunterladen:https://www.openssl.org/source/index.html(Version 3.0.13)
Kopieren Sie nginx-http-flv-module, openssl, pcre und zlib in dieses Verzeichnis und entpacken Sie es
5. Nginx-Kompilierungsparameter anzeigen
Laden Sie die kompilierte Version von nginx-1.26.1 herunter, führen Sie nginx.exe -V aus und erhalten Sie die folgenden Ergebnisse:
configure arguments: --with-cc=cl --builddir=objs.msvc8 --with-debug --prefix= --conf-path=conf/nginx.conf --pid-path=logs/nginx.pid --http-log-path=logs/access.log --error-log-path=logs/error.log --sbin-path=nginx.exe --http-client-body-temp-path=temp/client_body_temp --http-proxy-temp-path=temp/proxy_temp --http-fastcgi-temp-path=temp/fastcgi_temp --http-scgi-temp-path=temp/scgi_temp --http-uwsgi-temp-path=temp/uwsgi_temp --with-cc-opt=-DFD_SETSIZE=1024 --with-pcre=objs.msvc8/lib/pcre2-10.39 --with-zlib=objs.msvc8/lib/zlib-1.3.1 --with-http_v2_module --with-http_realip_module --with-http_addition_module --with-http_sub_module --with-http_dav_module --with-http_stub_status_module --with-http_flv_module --with-http_mp4_module --with-http_gunzip_module --with-http_gzip_static_module --with-http_auth_request_module --with-http_random_index_module --with-http_secure_link_module --with-http_slice_module --with-mail --with-stream --with-stream_realip_module --with-stream_ssl_preread_module --with-openssl=objs.msvc8/lib/openssl-3.0.13 --with-openssl-opt='no-asm no-tests -D_WIN32_WINNT=0x0501' --with-http_ssl_module --with-mail_ssl_module --with-stream_ssl_moduleÄndern Sie einige Parameter:
--with-pcre=objs/lib/pcre2-10.39 --with-zlib=objs/lib/zlib-1.3.1 --with-openssl=objs/lib/openssl-3.0.13 --add-module=objs/lib/nginx-http-flv-module-1.2.107. Konfigurieren
Führen Sie MSYS2 oder MINGW64 aus, geben Sie den Nginx-Quellcode nginx-release-1.26.1 ein und führen Sie den Befehl aus:
auto/configure --with-cc=cl --builddir=objs.msvc8 --with-debug --prefix= --conf-path=conf/nginx.conf --pid-path=logs/nginx.pid --http-log-path=logs/access.log --error-log-path=logs/error.log --sbin-path=nginx.exe --http-client-body-temp-path=temp/client_body_temp --http-proxy-temp-path=temp/proxy_temp --http-fastcgi-temp-path=temp/fastcgi_temp --http-scgi-temp-path=temp/scgi_temp --http-uwsgi-temp-path=temp/uwsgi_temp --with-cc-opt=-DFD_SETSIZE=1024 --with-http_v2_module --with-http_realip_module --with-http_addition_module --with-http_sub_module --with-http_dav_module --with-http_stub_status_module --with-http_mp4_module --with-http_gunzip_module --with-http_gzip_static_module --with-http_auth_request_module --with-http_random_index_module --with-http_secure_link_module --with-http_slice_module --with-mail --with-stream --with-stream_realip_module --with-stream_ssl_preread_module --with-openssl-opt='no-asm no-tests -D_WIN32_WINNT=0x0501' --with-http_ssl_module --with-mail_ssl_module --with-stream_ssl_module --with-pcre=objs/lib/pcre2-10.39 --with-zlib=objs/lib/zlib-1.3.1 --with-openssl=objs/lib/openssl-3.0.13 --add-module=objs/lib/nginx-http-flv-module-1.2.10Ändern Sie objs.msvc8/Makefile und ändern Sie die dritte Zeile:
CFLAGS = -O2 -W4 -WX -nologo -MT -Zi -Fdobjs.msvc8/nginx.pdb -DFD_SETSIZE=1024 -DNO_SYS_TYPES_HEntfernen Sie -WX und fügen Sie -MP hinzu
CFLAGS = -O2 -W4 -MP -nologo -MT -Zi -Fdobjs.msvc8/nginx.pdb -DFD_SETSIZE=1024 -DNO_SYS_TYPES_H8. Kompilieren
Öffnen Sie die Developer-Eingabeaufforderung für VS 2022, geben Sie das Nginx-Quellverzeichnis ein, geben Sie den Befehl nmake ein und drücken Sie die Eingabetaste
Die Kompilierungszeit beträgt 10 bis 30 Minuten. Kopieren Sie nach Abschluss nginx.exe unter objs.msvc8 in das Nginx-Quellcodeverzeichnis.
Erstellen Sie neue Verzeichnisse „logs“, „temp“ und „html“.
9. Installieren Sie ffmpeg
Laden Sie es herunter, installieren Sie es und legen Sie das Verzeichnis ffmpeg bin als Umgebungsvariable fest
Ändern Sie conf/nginx.conf
- worker_processes 1;
-
- events {
- worker_connections 1024;
- }
-
- http {
- include mime.types;
- default_type application/octet-stream;
-
- sendfile on;
- keepalive_timeout 65;
-
- server {
- listen 8553;
- server_name localhost;
-
- location / {
- root html;
- index index.html index.htm;
- }
-
- location /live {
- flv_live on;
- chunked_transfer_encoding on;
- add_header 'Access-Control-Allow-Origin' '*';
- add_header 'Access-Control-Allow-Credentials' 'true';
- add_header 'Access-Control-Allow-Methods' '*';
- }
-
- location /hls {
- add_header 'Access-Control-Allow-Origin' '*';
- types {
- application/vnd.apple.mpegurl m3u8;
- video/mp2t ts;
- }
- alias /test;
- expires -1;
- }
-
- location /stat {
- rtmp_stat all;
- rtmp_stat_stylesheet stat.xsl;
- }
-
- location /stat.xsl {
- root /usr/local/nginx/nginx-http-flv-module;
- }
- }
- }
-
- rtmp {
- server {
- listen 1938; #nginx监听的rtmp推流/拉流端口
- application myapp {
- live on; #当推流时,rtmp路径中的app(rtmp中的一个概念)匹配myapp时,开始直播
- meta off;
- gop_cache on;
- allow play all;
- record off;
- hls on;
- hls_path /test;
- hls_fragment 1s;
- }
- }
- }
ffmpeg-Push-Stream (Haikang-Kamera)
- ffmpeg -i rtsp://用户名:密码@ip:554/H.264/ch1/main/av_stream -c:v libx264 -an -f
- flv rtmp://127.0.0.1:1938/myapp/main
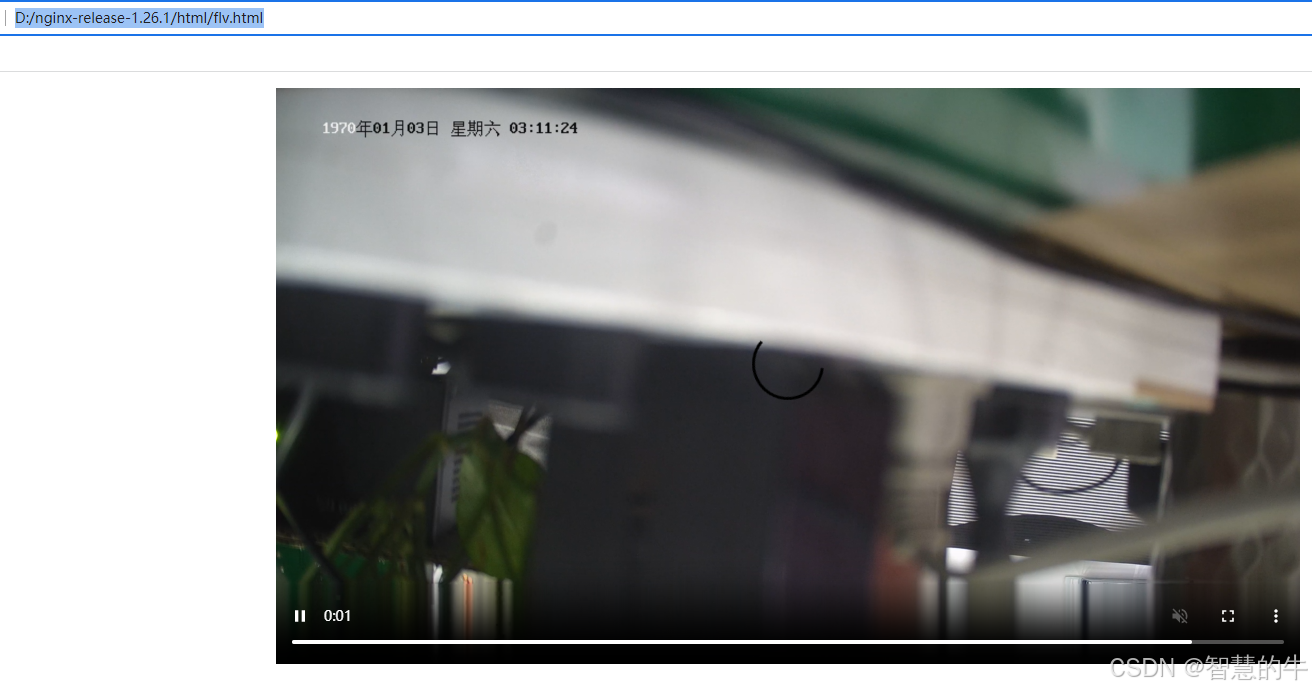
flv.html
- <html>
- <head>
- <meta content="text/html; charset=utf-8" http-equiv="Content-Type">
- <title>flv.js demo</title>
- <style>
- .mainContainer {
- display: block;
- width: 1024px;
- margin-left: auto;
- margin-right: auto;
- }
-
- .urlInput {
- display: block;
- width: 100%;
- margin-left: auto;
- margin-right: auto;
- margin-top: 8px;
- margin-bottom: 8px;
- }
-
- .centeredVideo {
- display: block;
- width: 100%;
- height: 576px;
- margin-left: auto;
- margin-right: auto;
- margin-bottom: auto;
- }
-
- .controls {
- display: block;
- width: 100%;
- text-align: center;
- margin-left: auto;
- margin-right: auto;
- }
- </style>
- </head>
-
- <body>
-
- <p class="mainContainer">
- <video name="videoElement" id="videoElement" class="centeredVideo" controls muted autoplay width="1024"
- height="576">
- Your browser is too old which doesn't support HTML5 video.
- </video>
- </p>
-
- <script src="flv.min.js"></script>
-
- <script>
-
- function start() {
- if (flvjs.isSupported()) {
- var videoElement = document.getElementById('videoElement');
- var flvPlayer = flvjs.createPlayer({
- type: 'flv',
- url: 'http://ip:8553/live?port=1938&app=myapp&stream=main'
- });
- flvPlayer.attachMediaElement(videoElement);
- flvPlayer.load();
- flvPlayer.play();
- }
- }
-
- document.addEventListener('DOMContentLoaded', function () {
- start();
- });
- </script>
- </body>
-
- </html>
Download-Adresse von flv.min.js:http://flv.jnyzh.cn/flv.min.js
Der Effekt ist wie folgt:

Er widmet sich seit mehr als 30 Jahren der Technologieforschung und beherrscht verschiedene Sprachen wie Java, Linux, Javascript, PHP, CSS usw. Er hat viele Beiträge im Open-Source-Bereich geleistet Entwicklerdokumentationsstation, um einige Themen in der Technologieentwicklung als zukünftige Referenz zu teilen

