
Mi informacion de contacto
Correo[email protected]
2024-07-12
한어Русский языкEnglishFrançaisIndonesianSanskrit日本語DeutschPortuguêsΕλληνικάespañolItalianoSuomalainenLatina
1. Instalar Perl
Dirección de instalación: https://strawberryperl.com, simplemente seleccione el instalador msi
2. Instale sed para Windows
Dirección de descarga: https://sourceforge.net/projects/gnuwin32/files/sed/ Después de ejecutar el programa de instalación, configure el directorio bin del paquete de instalación en la variable de entorno.
3. Instale la versión comunitaria de Visual Studio 2022
4. Dehttps://github.com/nginx/nginxDescargue el código fuente de la versión 1.26.1 y cree un nuevo directorio objslib en el código fuente
Descargue el módulo nginx-http-flv:https://github.com/winshining/nginx-http-flv-module(Versión 1.2.10)
Descargar pcre:https://github.com/PCRE2Project/pcre2/tags(Versión 10.2.39)
Descargar zlib:https://github.com/madler/zlib(Versión 1.3.1)
Descargar openssl:https://www.openssl.org/source/index.html(Versión 3.0.13)
Copie nginx-http-flv-module, openssl, pcre y zlib a este directorio y descomprímalo
5. Ver los parámetros de compilación de nginx
Descargue la versión compilada de nginx-1.26.1, ejecute nginx.exe -V y obtenga los siguientes resultados:
configure arguments: --with-cc=cl --builddir=objs.msvc8 --with-debug --prefix= --conf-path=conf/nginx.conf --pid-path=logs/nginx.pid --http-log-path=logs/access.log --error-log-path=logs/error.log --sbin-path=nginx.exe --http-client-body-temp-path=temp/client_body_temp --http-proxy-temp-path=temp/proxy_temp --http-fastcgi-temp-path=temp/fastcgi_temp --http-scgi-temp-path=temp/scgi_temp --http-uwsgi-temp-path=temp/uwsgi_temp --with-cc-opt=-DFD_SETSIZE=1024 --with-pcre=objs.msvc8/lib/pcre2-10.39 --with-zlib=objs.msvc8/lib/zlib-1.3.1 --with-http_v2_module --with-http_realip_module --with-http_addition_module --with-http_sub_module --with-http_dav_module --with-http_stub_status_module --with-http_flv_module --with-http_mp4_module --with-http_gunzip_module --with-http_gzip_static_module --with-http_auth_request_module --with-http_random_index_module --with-http_secure_link_module --with-http_slice_module --with-mail --with-stream --with-stream_realip_module --with-stream_ssl_preread_module --with-openssl=objs.msvc8/lib/openssl-3.0.13 --with-openssl-opt='no-asm no-tests -D_WIN32_WINNT=0x0501' --with-http_ssl_module --with-mail_ssl_module --with-stream_ssl_moduleModificar algunos parámetros:
--with-pcre=objs/lib/pcre2-10.39 --with-zlib=objs/lib/zlib-1.3.1 --with-openssl=objs/lib/openssl-3.0.13 --add-module=objs/lib/nginx-http-flv-module-1.2.107、configurar
Ejecute MSYS2 o MINGW64, ingrese el código fuente de nginx nginx-release-1.26.1 y ejecute el comando:
auto/configure --with-cc=cl --builddir=objs.msvc8 --with-debug --prefix= --conf-path=conf/nginx.conf --pid-path=logs/nginx.pid --http-log-path=logs/access.log --error-log-path=logs/error.log --sbin-path=nginx.exe --http-client-body-temp-path=temp/client_body_temp --http-proxy-temp-path=temp/proxy_temp --http-fastcgi-temp-path=temp/fastcgi_temp --http-scgi-temp-path=temp/scgi_temp --http-uwsgi-temp-path=temp/uwsgi_temp --with-cc-opt=-DFD_SETSIZE=1024 --with-http_v2_module --with-http_realip_module --with-http_addition_module --with-http_sub_module --with-http_dav_module --with-http_stub_status_module --with-http_mp4_module --with-http_gunzip_module --with-http_gzip_static_module --with-http_auth_request_module --with-http_random_index_module --with-http_secure_link_module --with-http_slice_module --with-mail --with-stream --with-stream_realip_module --with-stream_ssl_preread_module --with-openssl-opt='no-asm no-tests -D_WIN32_WINNT=0x0501' --with-http_ssl_module --with-mail_ssl_module --with-stream_ssl_module --with-pcre=objs/lib/pcre2-10.39 --with-zlib=objs/lib/zlib-1.3.1 --with-openssl=objs/lib/openssl-3.0.13 --add-module=objs/lib/nginx-http-flv-module-1.2.10Modifique objs.msvc8/Makefile y modifique la tercera línea:
CFLAGS = -O2 -W4 -WX -nologo -MT -Zi -Fdobjs.msvc8/nginx.pdb -DFD_SETSIZE=1024 -DNO_SYS_TYPES_HEliminar -WX, agregar -MP
CFLAGS = -O2 -W4 -MP -nologo -MT -Zi -Fdobjs.msvc8/nginx.pdb -DFD_SETSIZE=1024 -DNO_SYS_TYPES_H8. compilar
Abra el símbolo del sistema del desarrollador para VS 2022, ingrese el directorio de origen de nginx, ingrese el comando: nmake y presione Entrar
El tiempo de compilación demora entre 10 y 30 minutos. Una vez completado, copie nginx.exe en objs.msvc8 al directorio del código fuente de nginx.
Cree nuevos directorios logs, temp y html.
9. Instale ffmpeg
Descargue, instale y configure el directorio bin ffmpeg como una variable de entorno
Modificar conf/nginx.conf
- worker_processes 1;
-
- events {
- worker_connections 1024;
- }
-
- http {
- include mime.types;
- default_type application/octet-stream;
-
- sendfile on;
- keepalive_timeout 65;
-
- server {
- listen 8553;
- server_name localhost;
-
- location / {
- root html;
- index index.html index.htm;
- }
-
- location /live {
- flv_live on;
- chunked_transfer_encoding on;
- add_header 'Access-Control-Allow-Origin' '*';
- add_header 'Access-Control-Allow-Credentials' 'true';
- add_header 'Access-Control-Allow-Methods' '*';
- }
-
- location /hls {
- add_header 'Access-Control-Allow-Origin' '*';
- types {
- application/vnd.apple.mpegurl m3u8;
- video/mp2t ts;
- }
- alias /test;
- expires -1;
- }
-
- location /stat {
- rtmp_stat all;
- rtmp_stat_stylesheet stat.xsl;
- }
-
- location /stat.xsl {
- root /usr/local/nginx/nginx-http-flv-module;
- }
- }
- }
-
- rtmp {
- server {
- listen 1938; #nginx监听的rtmp推流/拉流端口
- application myapp {
- live on; #当推流时,rtmp路径中的app(rtmp中的一个概念)匹配myapp时,开始直播
- meta off;
- gop_cache on;
- allow play all;
- record off;
- hls on;
- hls_path /test;
- hls_fragment 1s;
- }
- }
- }
Transmisión push de ffmpeg (cámara Haikang)
- ffmpeg -i rtsp://用户名:密码@ip:554/H.264/ch1/main/av_stream -c:v libx264 -an -f
- flv rtmp://127.0.0.1:1938/myapp/main
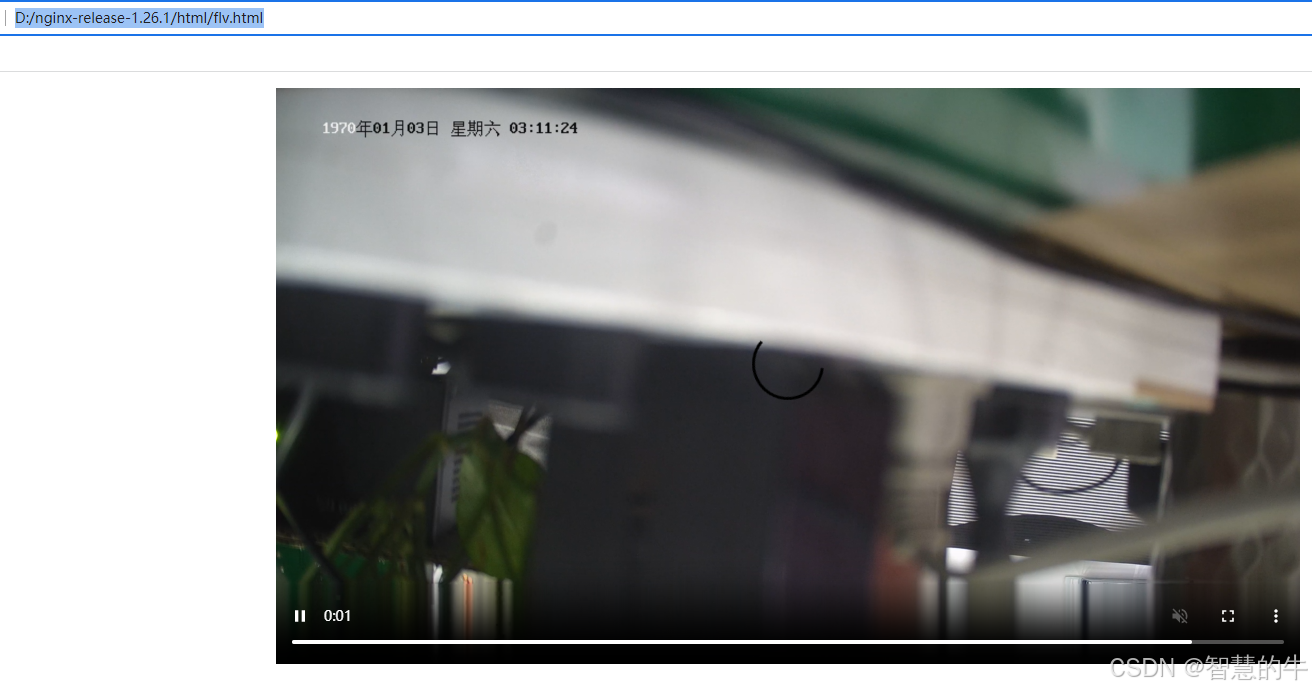
flv.html
- <html>
- <head>
- <meta content="text/html; charset=utf-8" http-equiv="Content-Type">
- <title>flv.js demo</title>
- <style>
- .mainContainer {
- display: block;
- width: 1024px;
- margin-left: auto;
- margin-right: auto;
- }
-
- .urlInput {
- display: block;
- width: 100%;
- margin-left: auto;
- margin-right: auto;
- margin-top: 8px;
- margin-bottom: 8px;
- }
-
- .centeredVideo {
- display: block;
- width: 100%;
- height: 576px;
- margin-left: auto;
- margin-right: auto;
- margin-bottom: auto;
- }
-
- .controls {
- display: block;
- width: 100%;
- text-align: center;
- margin-left: auto;
- margin-right: auto;
- }
- </style>
- </head>
-
- <body>
-
- <p class="mainContainer">
- <video name="videoElement" id="videoElement" class="centeredVideo" controls muted autoplay width="1024"
- height="576">
- Your browser is too old which doesn't support HTML5 video.
- </video>
- </p>
-
- <script src="flv.min.js"></script>
-
- <script>
-
- function start() {
- if (flvjs.isSupported()) {
- var videoElement = document.getElementById('videoElement');
- var flvPlayer = flvjs.createPlayer({
- type: 'flv',
- url: 'http://ip:8553/live?port=1938&app=myapp&stream=main'
- });
- flvPlayer.attachMediaElement(videoElement);
- flvPlayer.load();
- flvPlayer.play();
- }
- }
-
- document.addEventListener('DOMContentLoaded', function () {
- start();
- });
- </script>
- </body>
-
- </html>
Dirección de descarga de flv.min.js:http://flv.jnyzh.cn/flv.min.js
El efecto es el siguiente:

Se ha dedicado a la investigación de tecnología durante más de 30 años y domina varios lenguajes como java, linux, javascript, php, css, etc. Ha realizado muchas contribuciones en el campo del código abierto. Estación de documentación para desarrolladores para compartir algunos problemas en el desarrollo de tecnología para referencia futura.

Correo[email protected]