2024-07-12
한어Русский языкEnglishFrançaisIndonesianSanskrit日本語DeutschPortuguêsΕλληνικάespañolItalianoSuomalainenLatina
Table of contents
2.1 Login Verification Process
2.3.3.1 Database Verification User
2.3.3.2 Password Encryption Storage
2.3.3.4 Authentication Filters
Spring Security is a security management framework in the Spring family. Compared with another security framework Shiro, it provides richer functions and has richer community resources than Shiro.
Generally speaking, Spring Security is more commonly used in large projects, while Shiro is more commonly used in small projects, because compared to Spring Security, Shiro is easier to use.
Generally, Web applications need toCertificationandAuthorization。
Authentication and authorization are the core functions of Spring Security as a security framework!
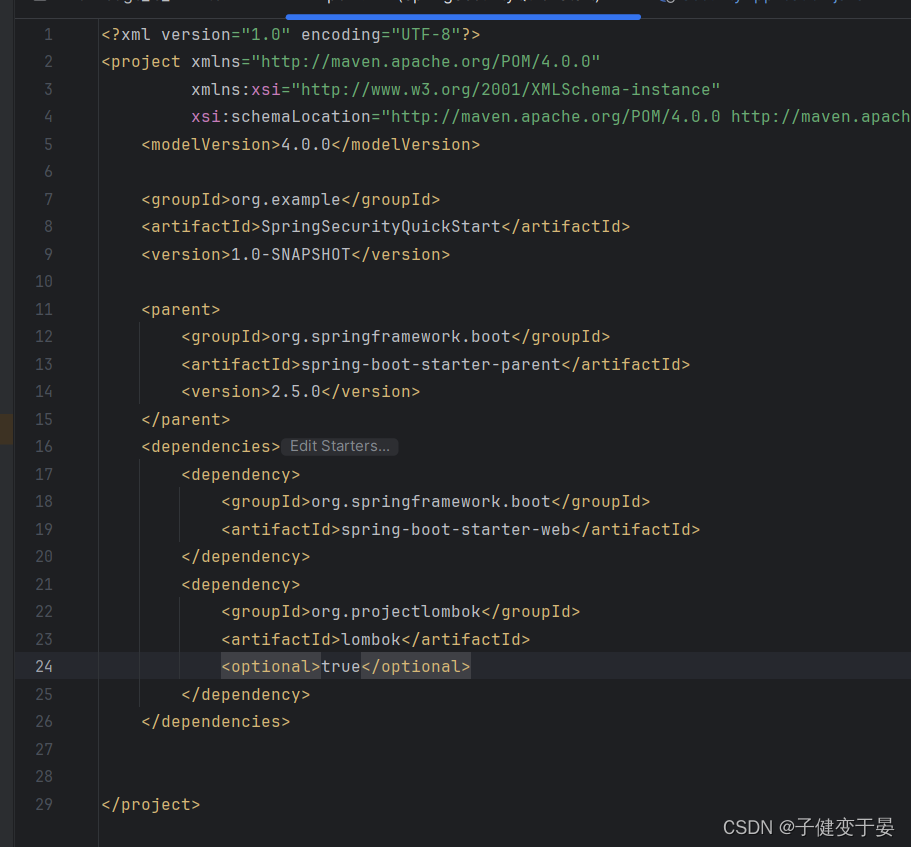
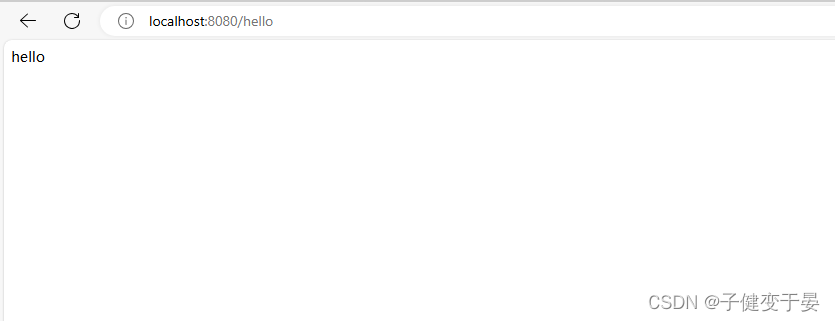
Let's first simply build a SpringBoot project.
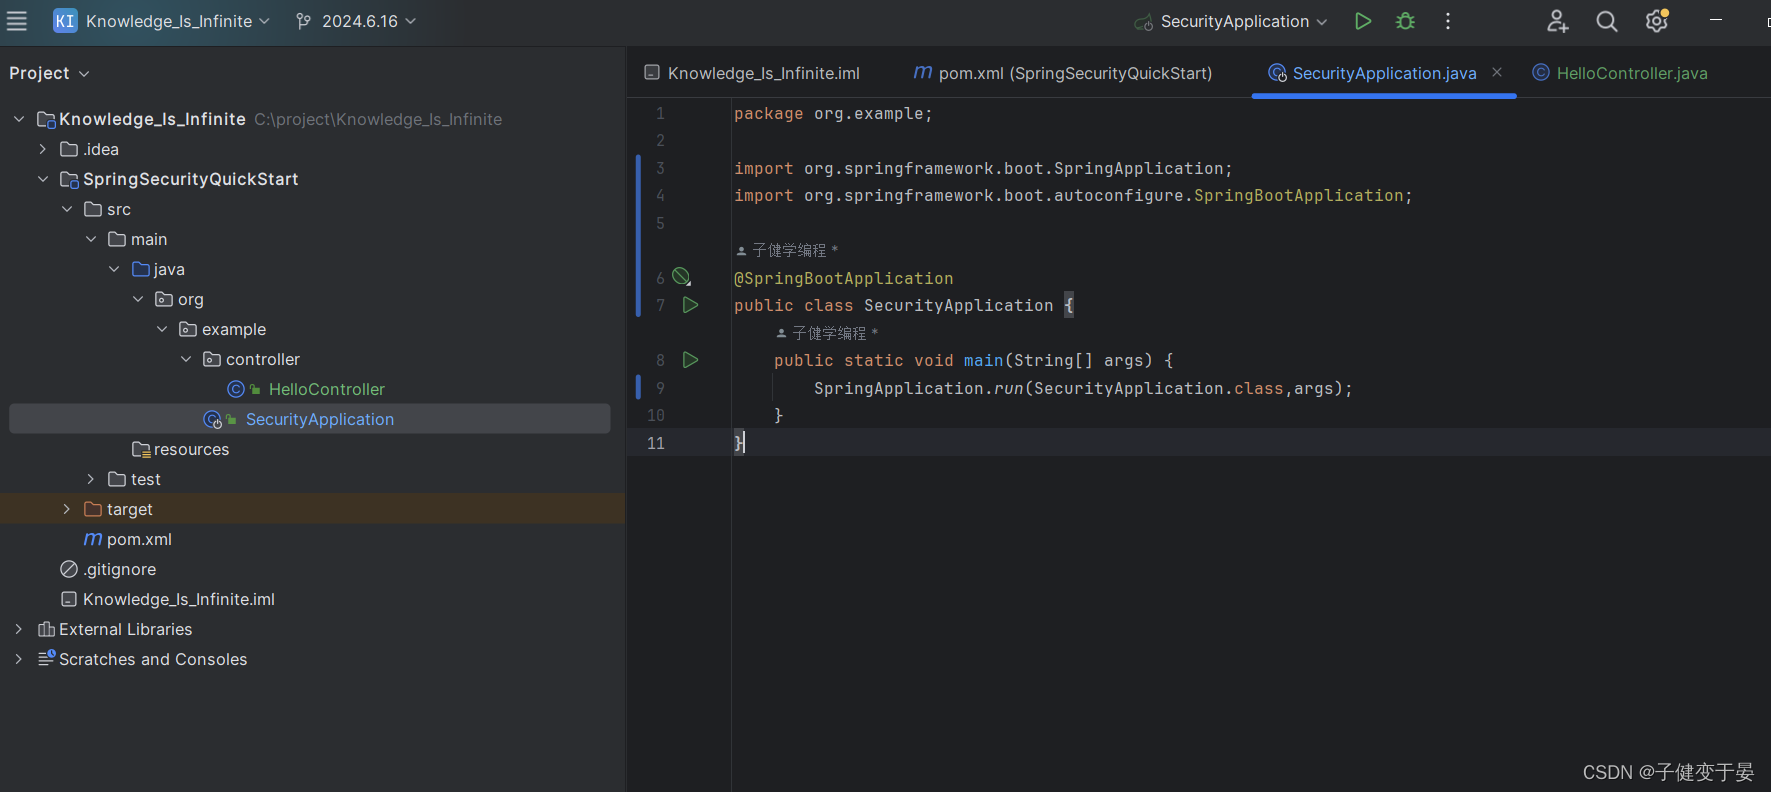
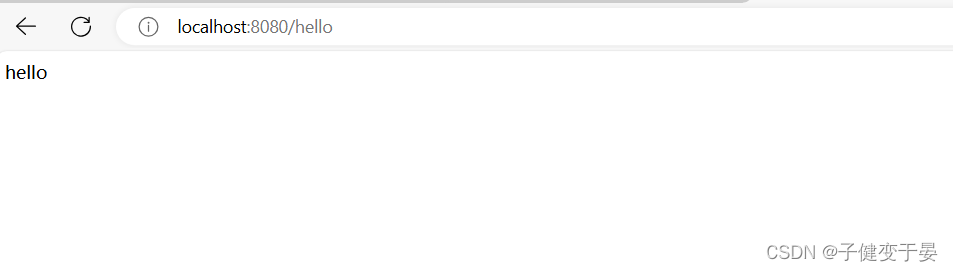
At this time, we access a simple hello interface we wrote to verify whether the build is successful.
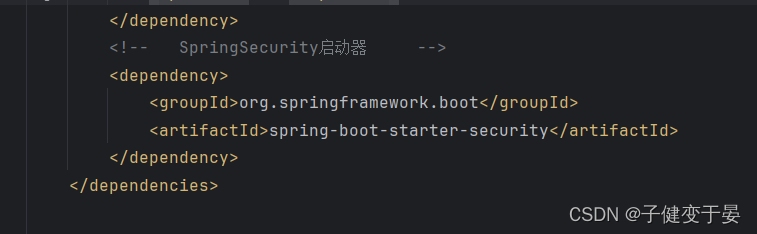
Then introduce SpringSecurity.
At this time, let's take a look at the effect of the access interface.
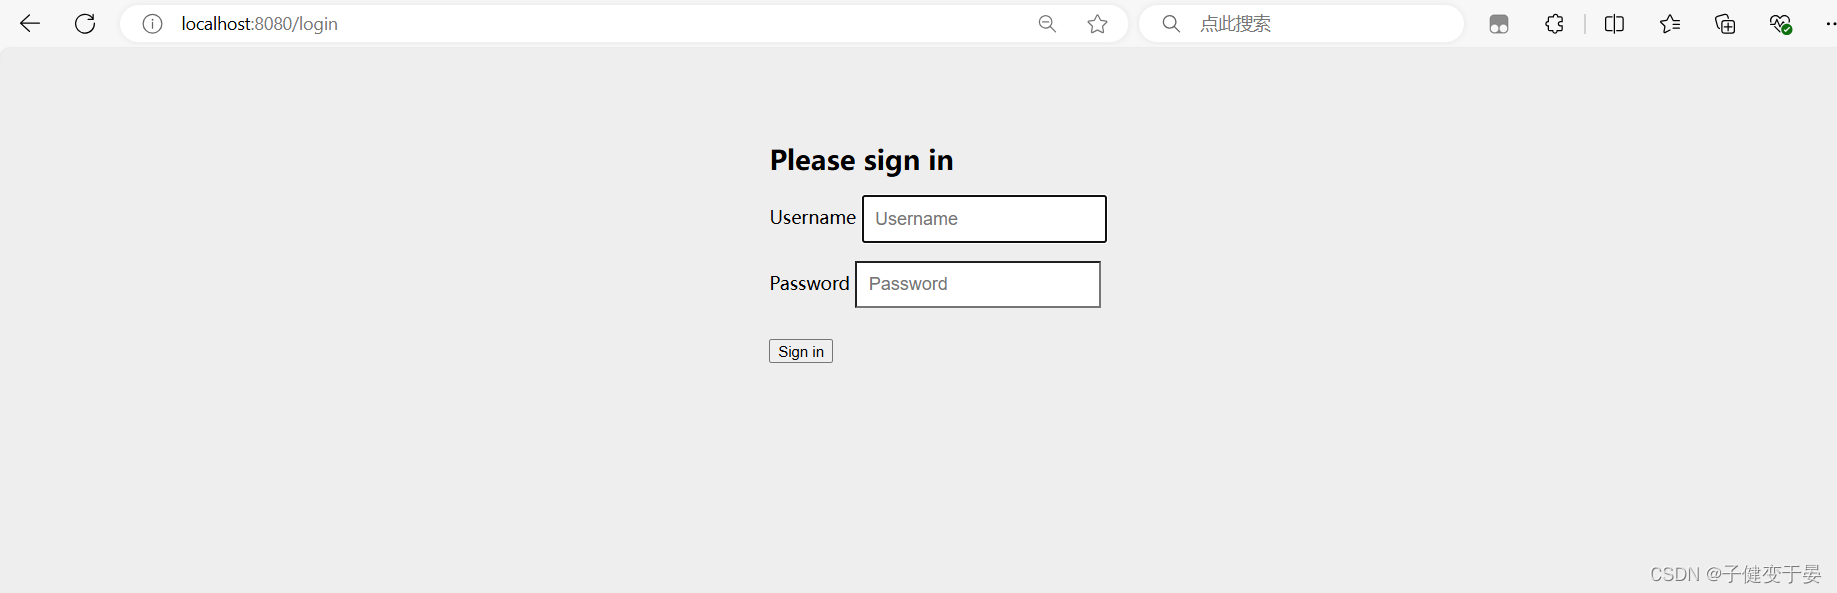
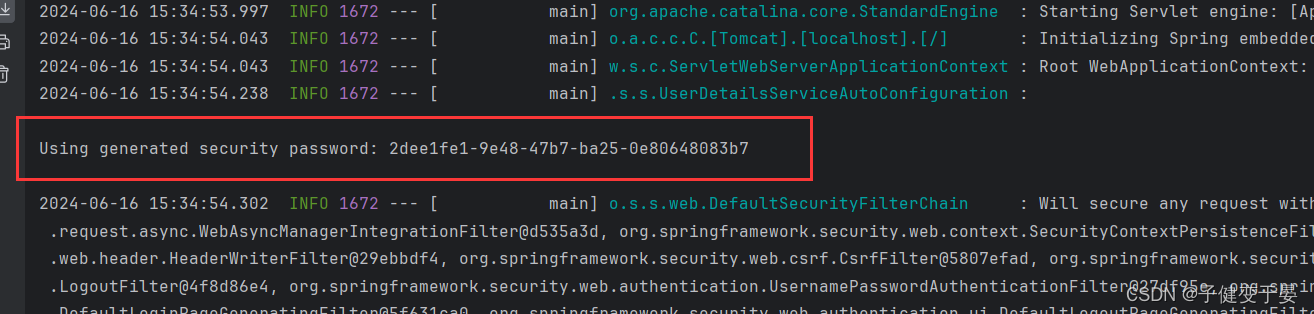
After the introduction of SpringSecurity, the access interface will automatically jump to a login page. The default username is user, and the password will be output to the console. You must log in before you can access the interface.
First of all, we need to understand the login verification process. First, the front-end carries the username and password to access the login interface. After the server gets the username and password, it compares them with the database. If the username/user ID is used correctly, a jwt is generated, and then the jwt is responded to the front-end. After logging in, other requests will carry a token in the request header. Each time the server obtains the token in the request header, it parses it and obtains the UserID. It obtains user-related information based on the username id, and checks the permissions. If there is permission, it responds to the front-end.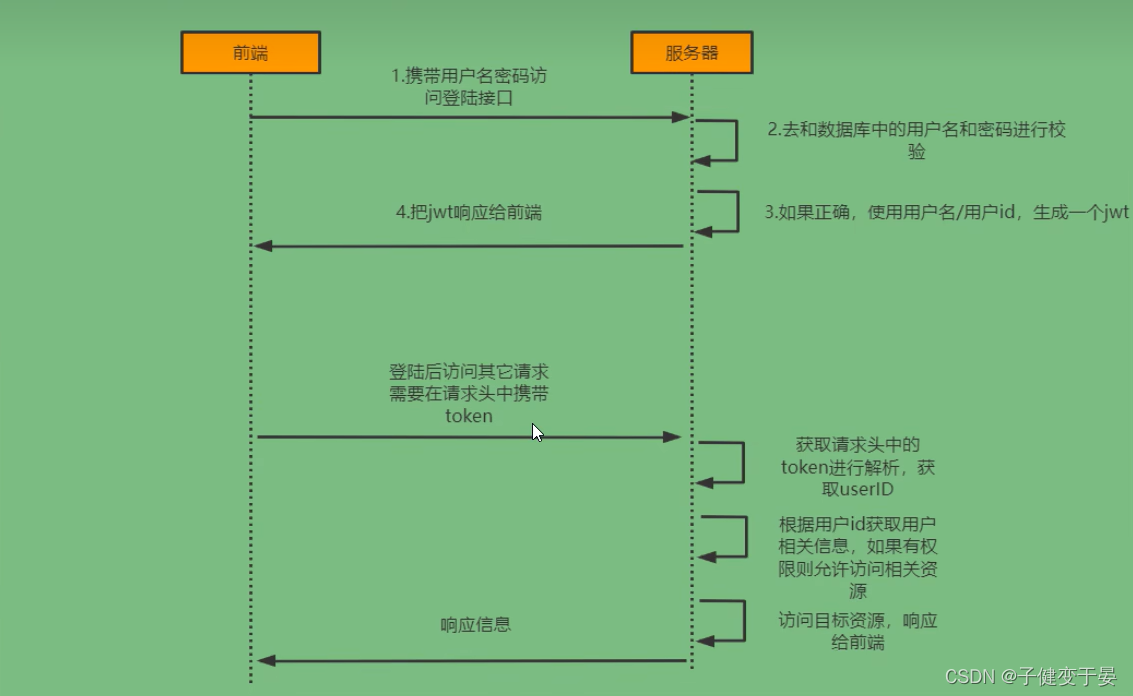
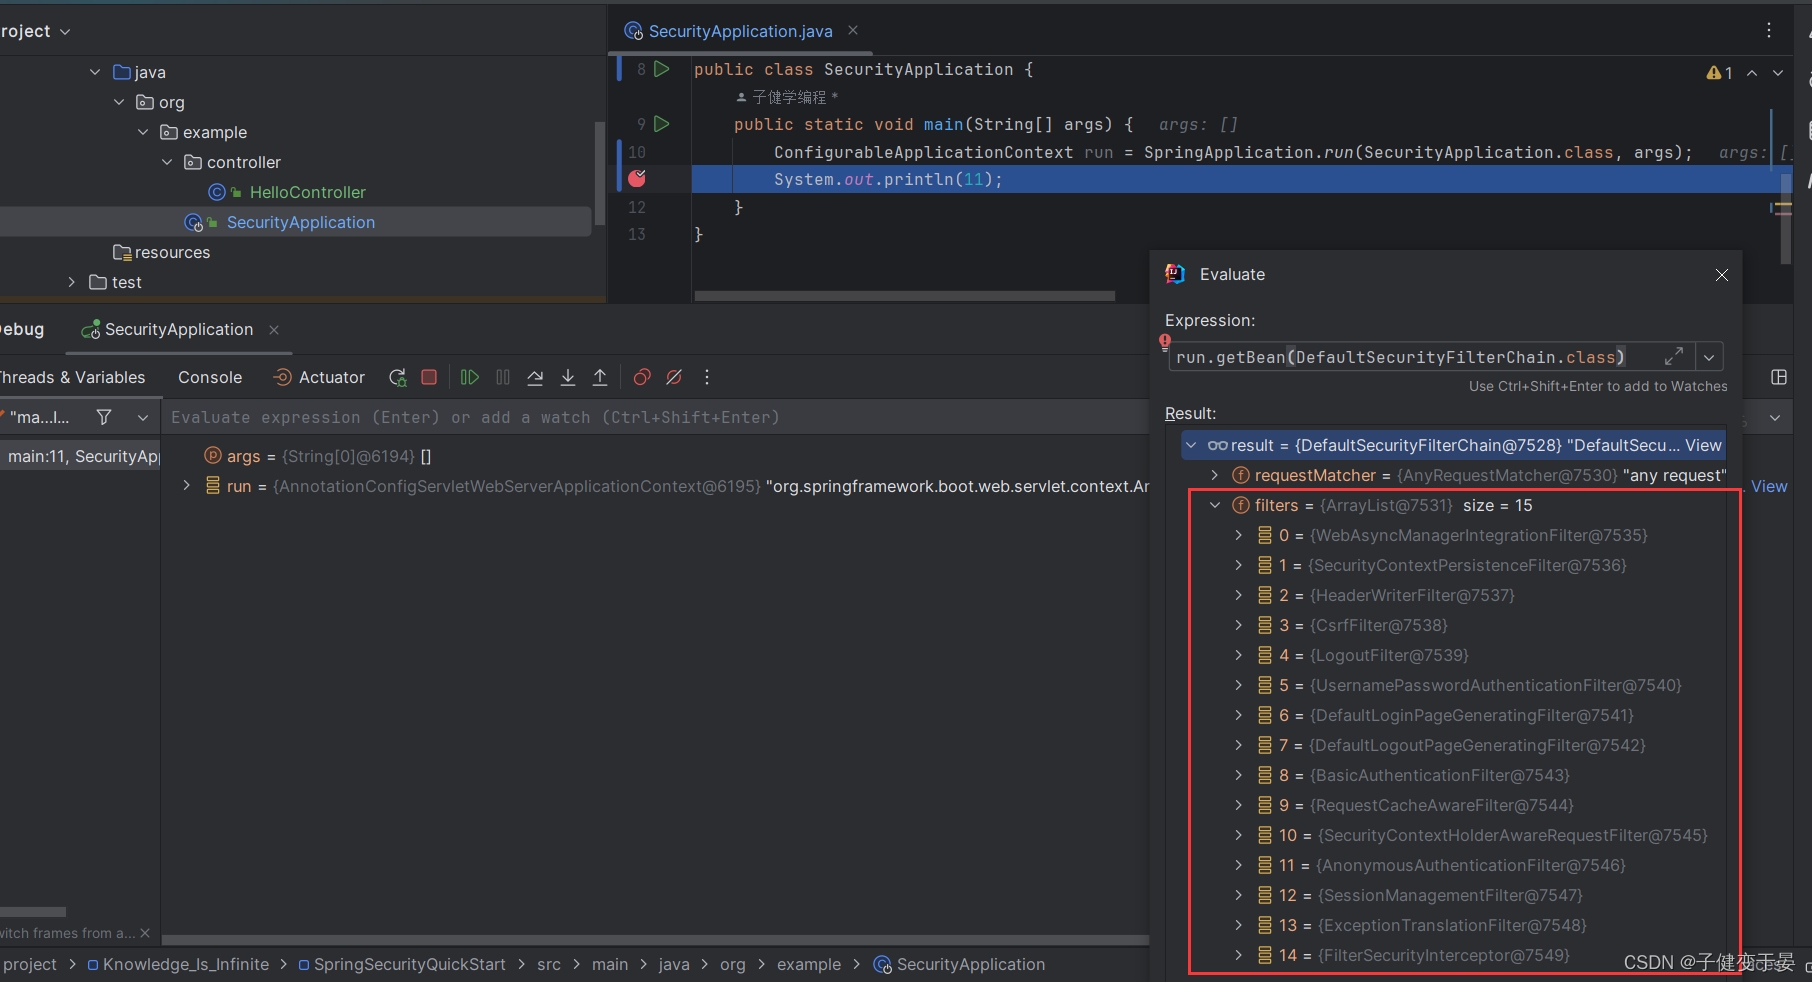
The principle of SpringSecurity is actually a filter chain, which provides filters with various functions. Here we first look at the filters involved in the quick start above.
We can also use Debug to see which filters and their order are in the SpringSecurity filter chain in the current system.
Next, let’s take a look at the analysis of the authentication flowchart.
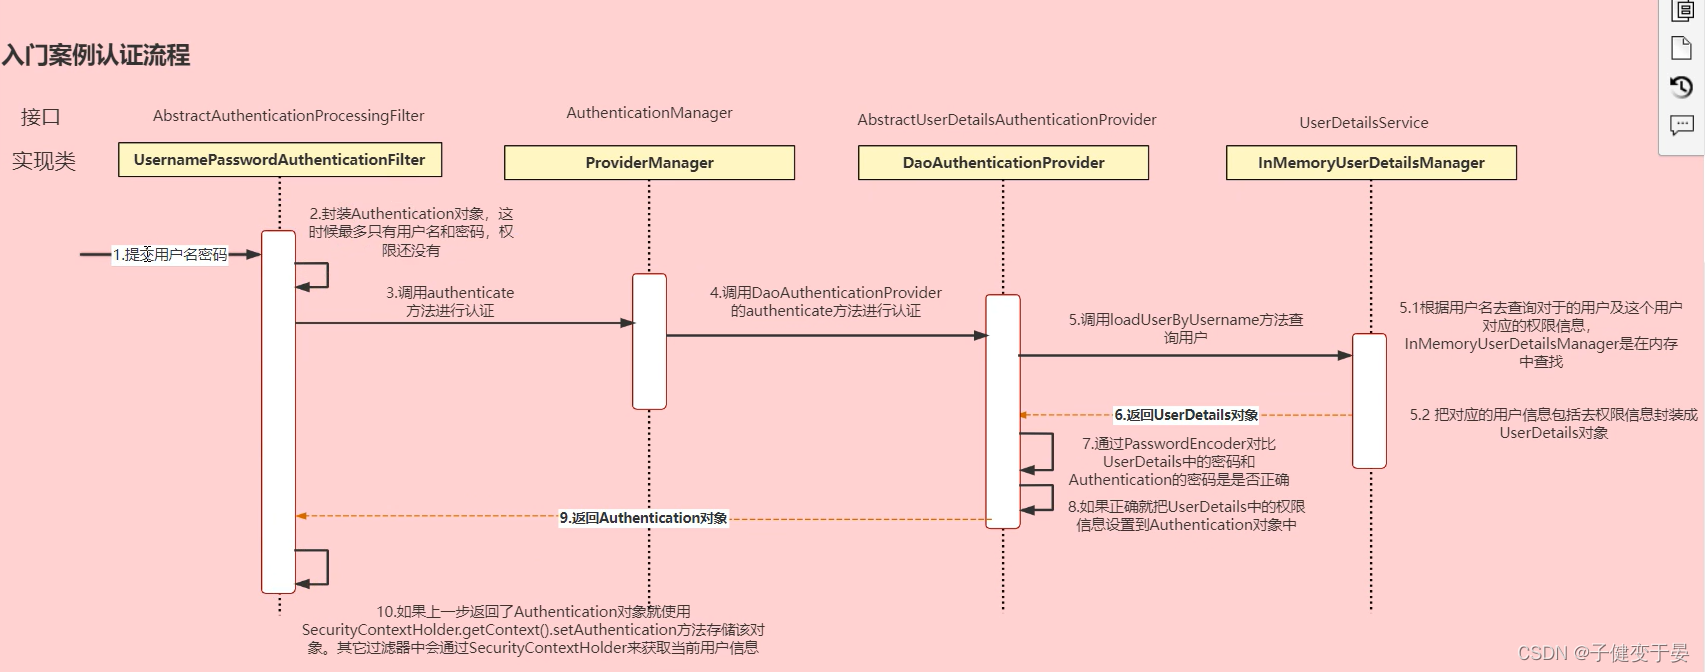
Here we just need to understand the process, in simple terms:
The user submits the username and password, UsernamePasswordAuthenticationFilter encapsulates it into the Authentication object, and calls the authenticate method for authentication, then calls the authenticate method of DaoAuthenticationProvider for authentication, and then calls the loadUserByUserName method to query the user. The query here is to search in the memory, and then encapsulate the corresponding user information into the UserDetails object, and use PasswordEncoder to compare the password in UserDetails and the password in Authentication to see if they are correct. If they are correct, set the permission information in UserDetails to the Authentication object, then return the Authentication object, and finally use the SecurityContextHolder.getContext().setAuthentication method to store the object. Other filters will use SecurityContextHoder to obtain the current user information. (You don't need to remember this section, as long as you can understand it)
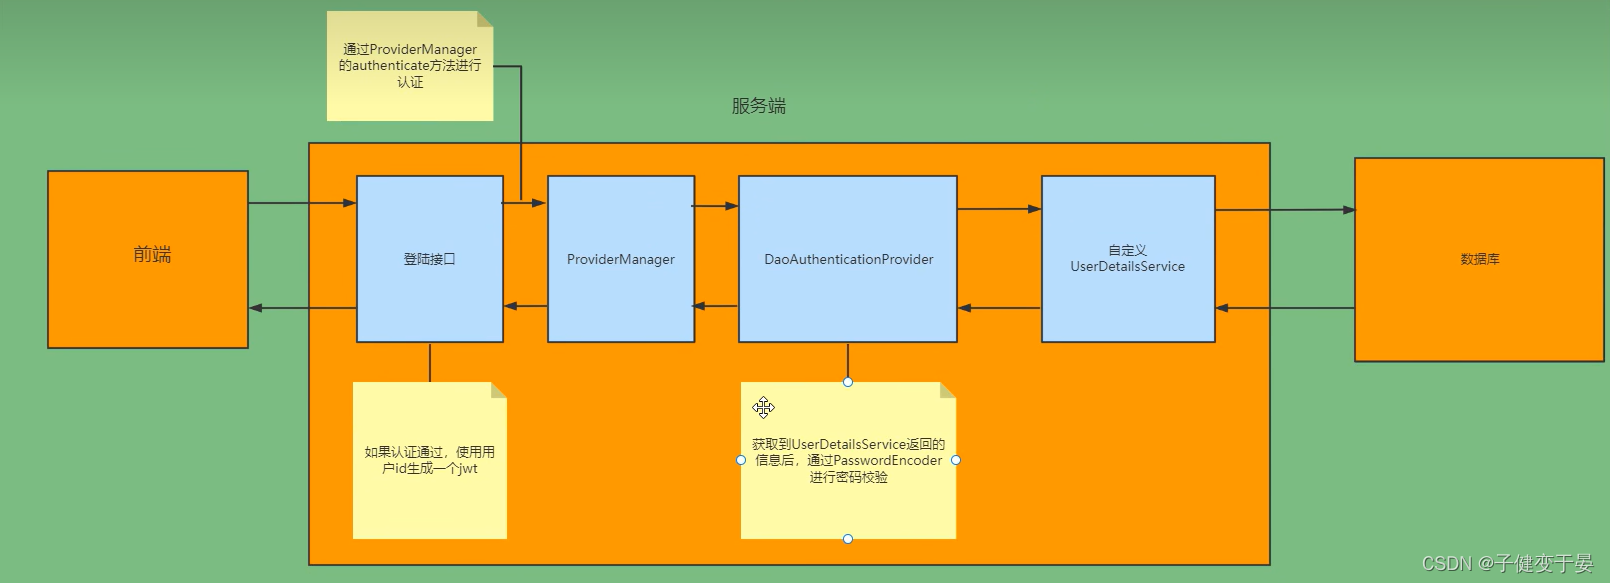
Then we know the process and can modify it. First of all, we must search from the memory instead of from the database (here we need to customize a UserDetailsService implementation class), and we will not use the default username and password. The login interface must be written by ourselves, and there is no need to use the default login page provided by him.
Based on our analysis, we can get a picture like this.
At this time, a jwt is returned to the front end, and other requests made by the front end will carry a token. Then the first step is to verify whether the token is carried, parse the token, get the corresponding userid, and encapsulate it as an Anthentication object and store it in the SecurityContextHolder (so that other filters can get it).
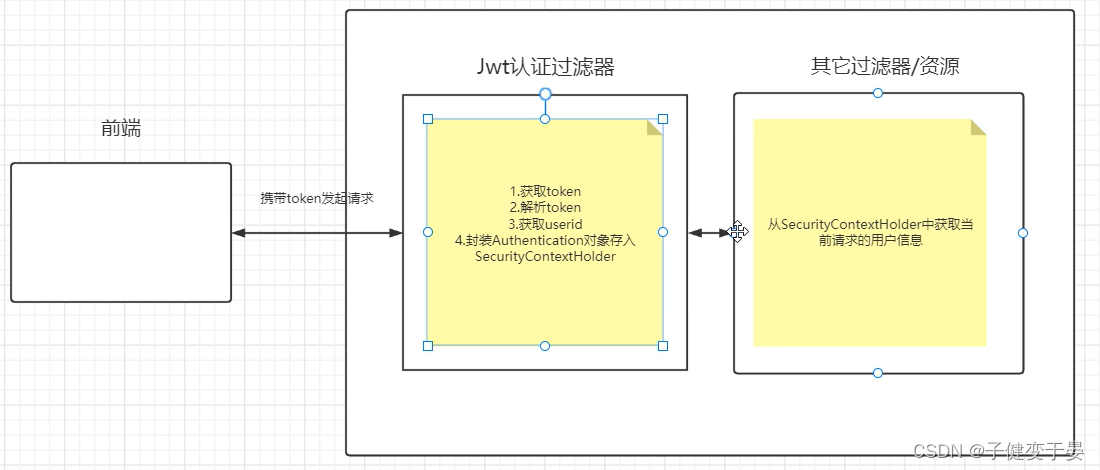
Then there is another question here, how to get the complete user information after getting the userid from the jwt authentication filter?
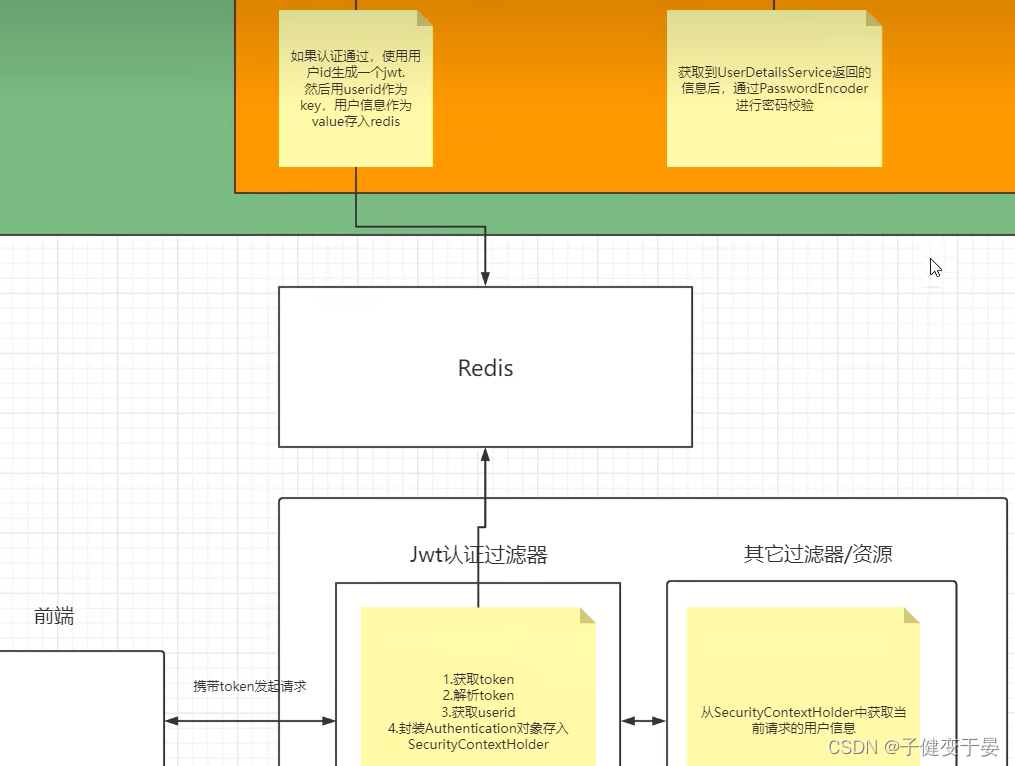
Here we use redis. When the server authenticates by using the user ID to generate jwt for the front end, the user ID is used as the key and the user's information is stored in redis as the value. After that, the complete user information can be obtained from redis through the user ID.
From the preliminary exploration of the above principles, we have also roughly analyzed what we need to do if we want to implement the authentication process with front-end and back-end separation ourselves.
Log in:
a. Custom login interface
Call the ProviderManager method for authentication. If the authentication passes, a jwt is generated.
Store user information in redis
b. Customize UserDetailsService
To query the database in this implementation class
check:
a. Custom jwt authentication filter
Get a token
Parse the token to obtain the userid
Get complete user information from redis
Store in SecurityContextHolder
First you need to add the corresponding dependencies
- <!-- SpringSecurity启动器 -->
- <dependency>
- <groupId>org.springframework.boot</groupId>
- <artifactId>spring-boot-starter-security</artifactId>
- </dependency>
-
- <!-- redis依赖 -->
- <dependency>
- <groupId>org.springframework.boot</groupId>
- <artifactId>spring-boot-starter-data-redis</artifactId>
- </dependency>
- <!-- fastjson依赖 -->
- <dependency>
- <groupId>com.alibaba</groupId>
- <artifactId>fastjson</artifactId>
- <version>1.2.33</version>
- </dependency>
- <!-- jwt依赖 -->
- <dependency>
- <groupId>io.jsonwebtoken</groupId>
- <artifactId>jjwt</artifactId>
- <version>0.9.0</version>
- </dependency>
Next, we need to use Redis and add Redis related configuration
First is the FastJson serializer
- package org.example.utils;
- import com.alibaba.fastjson.JSON;
- import com.alibaba.fastjson.parser.ParserConfig;
- import com.alibaba.fastjson.serializer.SerializerFeature;
- import com.fasterxml.jackson.databind.JavaType;
- import com.fasterxml.jackson.databind.type.TypeFactory;
- import org.springframework.data.redis.serializer.RedisSerializer;
- import org.springframework.data.redis.serializer.SerializationException;
-
- import java.nio.charset.Charset;
-
- /**
- * Redis使用fastjson序列化
- * @param <T>
- */
- public class FastJsonRedisSerializer<T> implements RedisSerializer<T> {
-
- public static final Charset DEFAULT_CHARSET = Charset.forName("UTF-8");
-
- private Class<T> clazz;
-
- static {
- ParserConfig.getGlobalInstance().setAutoTypeSupport(true);
- }
-
- public FastJsonRedisSerializer(Class<T> clazz){
- super();
- this.clazz=clazz;
- }
-
- @Override
- public byte[] serialize(T t) throws SerializationException {
- if (t == null){
- return new byte[0];
- }
- return JSON.toJSONString(t, SerializerFeature.WriteClassName).getBytes(DEFAULT_CHARSET);
- }
-
- @Override
- public T deserialize(byte[] bytes) throws SerializationException {
- if (bytes==null || bytes.length<=0){
- return null;
- }
- String str = new String(bytes,DEFAULT_CHARSET);
-
- return JSON.parseObject(str,clazz);
- }
-
- protected JavaType getJavaType(Class<?> clazz){
- return TypeFactory.defaultInstance().constructType(clazz);
- }
-
- }
Create a RedisConfig and create a serializer in it to solve problems such as garbled characters
- package org.example.config;
- import org.example.utils.FastJsonRedisSerializer;
- import org.springframework.context.annotation.Bean;
- import org.springframework.context.annotation.Configuration;
- import org.springframework.data.redis.connection.RedisConnectionFactory;
- import org.springframework.data.redis.core.RedisTemplate;
- import org.springframework.data.redis.serializer.StringRedisSerializer;
-
- @Configuration
- public class RedisConfig {
- @Bean
- @SuppressWarnings(value = {"unchecked","rawtypes"})
- public RedisTemplate<Object,Object> redisTemplate(RedisConnectionFactory connectionFactory){
- RedisTemplate<Object,Object> template = new RedisTemplate<>();
- template.setConnectionFactory(connectionFactory);
-
- FastJsonRedisSerializer serializer = new FastJsonRedisSerializer(Object.class);
-
- //使用StringRedisSerializer来序列化和反序列化redus的key值
- template.setKeySerializer(new StringRedisSerializer());
- template.setValueSerializer(serializer);
-
- template.afterPropertiesSet();
- return template;
- }
- }
A unified response class is also needed
- package org.example.domain;
- import com.fasterxml.jackson.annotation.JsonInclude;
- @JsonInclude(JsonInclude.Include.NON_NULL)
- public class ResponseResult<T>{
- /**
- * 状态码
- */
- private Integer code;
- /**
- * 提示信息,如果有错误时,前端可以获取该字段进行提示
- */
- private String msg;
- /**
- * 查询到的结果数据
- */
- private T data;
-
- public ResponseResult(Integer code,String msg){
- this.code = code;
- this.msg = msg;
- }
-
- public ResponseResult(Integer code,T data){
- this.code = code;
- this.data = data;
- }
-
- public Integer getCode() {
- return code;
- }
-
- public void setCode(Integer code) {
- this.code = code;
- }
-
- public String getMsg() {
- return msg;
- }
-
- public void setMsg(String msg) {
- this.msg = msg;
- }
-
- public T getData() {
- return data;
- }
-
- public void setData(T data) {
- this.data = data;
- }
-
- public ResponseResult(Integer code,String msg,T data){
- this.code = code;
- this.msg = msg;
- this.data = data;
- }
- }
Then we need jwt tool class to generate jwt and parse jwt
- package org.example.utils;
-
- import io.jsonwebtoken.Claims;
- import io.jsonwebtoken.JwtBuilder;
- import io.jsonwebtoken.Jwts;
- import io.jsonwebtoken.SignatureAlgorithm;
-
- import javax.crypto.SecretKey;
- import javax.crypto.spec.SecretKeySpec;
- import java.util.Base64;
- import java.util.Date;
- import java.util.UUID;
-
- public class JwtUtil {
-
- //有效期为
- public static final Long JWT_TTL = 60*60*1000L; //一个小时
- //设置密钥明文
- public static final String JWT_KEY = "hzj";
-
- public static String getUUID(){
- String token = UUID.randomUUID().toString().replaceAll("-","");
- return token;
- }
-
- /**
- * 生成jwt
- * @param subject token中要存放的数据(json格式)
- * @return
- */
- public static String createJWT(String subject){
- JwtBuilder builder = getJwtBuilder(subject,null,getUUID()); //设置过期时间
- return builder.compact();
- }
-
- /**
- * 生成jwt
- * @param subject token中要存放的数据(json格式)
- * @param ttlMillis token超时时间
- * @return
- */
- public static String createJWT(String subject,Long ttlMillis){
- JwtBuilder builder = getJwtBuilder(subject,ttlMillis,getUUID()); //设置过期时间
- return builder.compact();
- }
-
- private static JwtBuilder getJwtBuilder(String subject,Long ttlMillis,String uuid){
- SignatureAlgorithm signatureAlgorithm = SignatureAlgorithm.HS256;
- SecretKey secretKey = generalkey();
- long nowMillis = System.currentTimeMillis();
- Date now = new Date(nowMillis);
- if(ttlMillis==null){
- ttlMillis=JwtUtil.JWT_TTL;
- }
- long expMillis = nowMillis + ttlMillis;
- Date expDate = new Date(expMillis);
- return Jwts.builder()
- .setId(uuid) //唯一的Id
- .setSubject(subject) //主题 可以是Json数据
- .setIssuer("hzj") //签发者
- .setIssuedAt(now) //签发时间
- .signWith(signatureAlgorithm,secretKey) //使用HS256对称加密算法签名,第二个参数为密钥
- .setExpiration(expDate);
- }
-
- /**
- * 创建token
- * @param id
- * @param subject
- * @param ttlMillis
- * @return
- */
- public static String createJWT(String id,String subject,Long ttlMillis){
- JwtBuilder builder = getJwtBuilder(subject,ttlMillis,id);//设置过期时间
- return builder.compact();
- }
-
- public static void main(String[] args) throws Exception{
- String token =
- "eyJ0eXAiOiJKV1QiLCJhbGciOiJIUzI1NiJ9.eyJleHAiOjE1OTg0MjU5MzIsInVzZX" +
- "JJZCI6MTExLCJ1c2VybmFtZSI6Ik1hcmtaUVAifQ.PTlOdRG7ROVJqPrA0q2ac7rKFzNNFR3lTMyP_8fIw9Q";
- Claims claims = parseJWT(token);
- System.out.println(claims);
- }
-
- /**
- * 生成加密后的密钥secretkey
- * @return
- */
- public static SecretKey generalkey(){
- byte[] encodeedkey = Base64.getDecoder().decode(JwtUtil.JWT_KEY);
- SecretKey key = new SecretKeySpec(encodeedkey,0,encodeedkey.length,"AES");
- return key;
- }
-
- /**
- * 解析
- * @param jwt
- * @return
- * @throws Exception
- */
- public static Claims parseJWT(String jwt) throws Exception{
- SecretKey secretKey = generalkey();
- return Jwts.parser()
- .setSigningKey(secretKey)
- .parseClaimsJws(jwt)
- .getBody();
- }
- }
Define another Redis tool class RedisCache, which makes it easier for us to call redistemplate
- package org.example.utils;
-
-
- import org.springframework.beans.factory.annotation.Autowired;
- import org.springframework.data.redis.core.BoundSetOperations;
- import org.springframework.data.redis.core.HashOperations;
- import org.springframework.data.redis.core.RedisTemplate;
- import org.springframework.data.redis.core.ValueOperations;
- import org.springframework.stereotype.Component;
-
- import java.util.*;
- import java.util.concurrent.TimeUnit;
-
- @SuppressWarnings(value = { "unchecked", "rawtypes" })
- @Component
- public class RedisCache
- {
- @Autowired
- public RedisTemplate redisTemplate;
-
- /**
- * 缓存基本的对象,Integer、String、实体类等
- *
- * @param key 缓存的键值
- * @param value 缓存的值
- */
- public <T> void setCacheObject(final String key, final T value)
- {
- redisTemplate.opsForValue().set(key, value);
- }
-
- /**
- * 缓存基本的对象,Integer、String、实体类等
- *
- * @param key 缓存的键值
- * @param value 缓存的值
- * @param timeout 时间
- * @param timeUnit 时间颗粒度
- */
- public <T> void setCacheObject(final String key, final T value, final Integer timeout, final TimeUnit timeUnit)
- {
- redisTemplate.opsForValue().set(key, value, timeout, timeUnit);
- }
-
- /**
- * 设置有效时间
- *
- * @param key Redis键
- * @param timeout 超时时间
- * @return true=设置成功;false=设置失败
- */
- public boolean expire(final String key, final long timeout)
- {
- return expire(key, timeout, TimeUnit.SECONDS);
- }
-
- /**
- * 设置有效时间
- *
- * @param key Redis键
- * @param timeout 超时时间
- * @param unit 时间单位
- * @return true=设置成功;false=设置失败
- */
- public boolean expire(final String key, final long timeout, final TimeUnit unit)
- {
- return redisTemplate.expire(key, timeout, unit);
- }
-
- /**
- * 获得缓存的基本对象。
- *
- * @param key 缓存键值
- * @return 缓存键值对应的数据
- */
- public <T> T getCacheObject(final String key)
- {
- ValueOperations<String, T> operation = redisTemplate.opsForValue();
- return operation.get(key);
- }
-
- /**
- * 删除单个对象
- *
- * @param key
- */
- public boolean deleteObject(final String key)
- {
- return redisTemplate.delete(key);
- }
-
- /**
- * 删除集合对象
- *
- * @param collection 多个对象
- * @return
- */
- public long deleteObject(final Collection collection)
- {
- return redisTemplate.delete(collection);
- }
-
- /**
- * 缓存List数据
- *
- * @param key 缓存的键值
- * @param dataList 待缓存的List数据
- * @return 缓存的对象
- */
- public <T> long setCacheList(final String key, final List<T> dataList)
- {
- Long count = redisTemplate.opsForList().rightPushAll(key, dataList);
- return count == null ? 0 : count;
- }
-
- /**
- * 获得缓存的list对象
- *
- * @param key 缓存的键值
- * @return 缓存键值对应的数据
- */
- public <T> List<T> getCacheList(final String key)
- {
- return redisTemplate.opsForList().range(key, 0, -1);
- }
-
- /**
- * 缓存Set
- *
- * @param key 缓存键值
- * @param dataSet 缓存的数据
- * @return 缓存数据的对象
- */
- public <T> BoundSetOperations<String, T> setCacheSet(final String key, final Set<T> dataSet)
- {
- BoundSetOperations<String, T> setOperation = redisTemplate.boundSetOps(key);
- Iterator<T> it = dataSet.iterator();
- while (it.hasNext())
- {
- setOperation.add(it.next());
- }
- return setOperation;
- }
-
- /**
- * 获得缓存的set
- *
- * @param key
- * @return
- */
- public <T> Set<T> getCacheSet(final String key)
- {
- return redisTemplate.opsForSet().members(key);
- }
-
- /**
- * 缓存Map
- *
- * @param key
- * @param dataMap
- */
- public <T> void setCacheMap(final String key, final Map<String, T> dataMap)
- {
- if (dataMap != null) {
- redisTemplate.opsForHash().putAll(key, dataMap);
- }
- }
-
- /**
- * 获得缓存的Map
- *
- * @param key
- * @return
- */
- public <T> Map<String, T> getCacheMap(final String key)
- {
- return redisTemplate.opsForHash().entries(key);
- }
-
- /**
- * 往Hash中存入数据
- *
- * @param key Redis键
- * @param hKey Hash键
- * @param value 值
- */
- public <T> void setCacheMapValue(final String key, final String hKey, final T value)
- {
- redisTemplate.opsForHash().put(key, hKey, value);
- }
-
- /**
- * 获取Hash中的数据
- *
- * @param key Redis键
- * @param hKey Hash键
- * @return Hash中的对象
- */
- public <T> T getCacheMapValue(final String key, final String hKey)
- {
- HashOperations<String, String, T> opsForHash = redisTemplate.opsForHash();
- return opsForHash.get(key, hKey);
- }
-
- /**
- * 删除Hash中的数据
- *
- * @param key
- * @param hkey
- */
- public void delCacheMapValue(final String key, final String hkey)
- {
- HashOperations hashOperations = redisTemplate.opsForHash();
- hashOperations.delete(key, hkey);
- }
-
- /**
- * 获取多个Hash中的数据
- *
- * @param key Redis键
- * @param hKeys Hash键集合
- * @return Hash对象集合
- */
- public <T> List<T> getMultiCacheMapValue(final String key, final Collection<Object> hKeys)
- {
- return redisTemplate.opsForHash().multiGet(key, hKeys);
- }
-
- /**
- * 获得缓存的基本对象列表
- *
- * @param pattern 字符串前缀
- * @return 对象列表
- */
- public Collection<String> keys(final String pattern)
- {
- return redisTemplate.keys(pattern);
- }
- }
-
We may also write data to the response, so we also need a tool class WebUtils
- package org.example.utils;
-
- import javax.servlet.http.HttpServletResponse;
- import java.io.IOException;
-
- public class WebUtils {
- /**
- * 将字符串渲染到客户端
- *
- * @param response 渲染对象
- * @param string 待渲染的字符串
- * @return null
- */
- public static String renderString(HttpServletResponse response, String string) {
- try
- {
- response.setStatus(200);
- response.setContentType("application/json");
- response.setCharacterEncoding("utf-8");
- response.getWriter().print(string);
- }
- catch (IOException e)
- {
- e.printStackTrace();
- }
- return null;
- }
- }
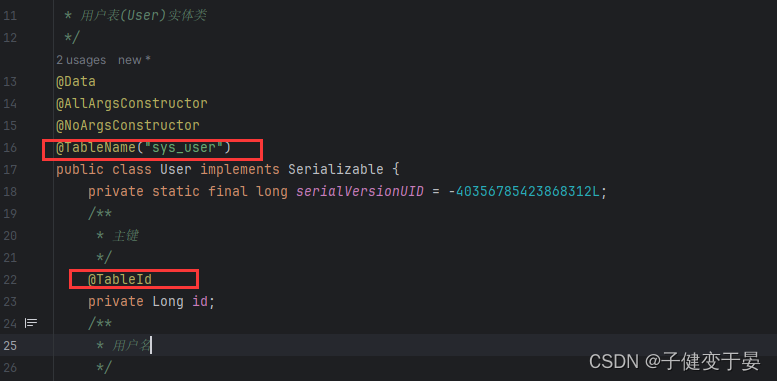
Finally, write the corresponding user entity class
- package org.example.domain;
-
- import lombok.AllArgsConstructor;
- import lombok.Data;
- import lombok.NoArgsConstructor;
- import java.io.Serializable;
- import java.util.Date;
- /**
- * 用户表(User)实体类
- */
- @Data
- @AllArgsConstructor
- @NoArgsConstructor
- public class User implements Serializable {
- private static final long serialVersionUID = -40356785423868312L;
- /**
- * 主键
- */
- private Long id;
- /**
- * 用户名
- */
- private String userName;
- /**
- * 昵称
- */
- private String nickName;
- /**
- * 密码
- */
- private String password;
- /**
- * 账号状态(0正常 1停用)
- */
- private String status;
- /**
- * 邮箱
- */
- private String email;
- /**
- * 手机号
- */
- private String phonenumber;
- /**
- * 用户性别(0男,1女,2未知)
- */
- private String sex;
- /**
- * 头像
- */
- private String avatar;
- /**
- * 用户类型(0管理员,1普通用户)
- */
- private String userType;
- /**
- * 创建人的用户id
- */
- private Long createBy;
- /**
- * 创建时间
- */
- private Date createTime;
- /**
- * 更新人
- */
- private Long updateBy;
- /**
- * 更新时间
- */
- private Date updateTime;
- /**
- * 删除标志(0代表未删除,1代表已删除)
- */
- private Integer delFlag;
- }
-
According to our analysis above, we need to customize a UserDetailsService so that SpringSecuriry can use our UserDetailsService. Our own UserDetailsService can query the username and password from the database.
We first create a database table sys_user.
- CREATE TABLE `sys_user` (
- `id` bigint NOT NULL AUTO_INCREMENT COMMENT '主键',
- `user_name` varchar(64) NOT NULL DEFAULT 'NULL' COMMENT '用户名',
- `nick_name` varchar(64) NOT NULL DEFAULT 'NULL' COMMENT '呢称',
- `password` varchar(64) NOT NULL DEFAULT 'NULL' COMMENT '密码',
- `status` char(1) DEFAULT '0' COMMENT '账号状态(0正常1停用)',
- `email` varchar(64) DEFAULT NULL COMMENT '邮箱',
- `phonenumber` varchar(32) DEFAULT NULL COMMENT '手机号',
- `sex` char(1) DEFAULT NULL COMMENT '用户性别(0男,1女,2未知)',
- `avatar` varchar(128) DEFAULT NULL COMMENT '头像',
- `user_type` char(1) NOT NULL DEFAULT '1' COMMENT '用户类型(O管理员,1普通用户)',
- `create_by` bigint DEFAULT NULL COMMENT '创建人的用户id',
- `create_time` datetime DEFAULT NULL COMMENT '创建时间',
- `update_by` bigint DEFAULT NULL COMMENT '更新人',
- `update_time` datetime DEFAULT NULL COMMENT '更新时间',
- `del_flag` int DEFAULT '0' COMMENT '删除标志(O代表未删除,1代表已删除)',
- PRIMARY KEY (`id`)
- ) ENGINE=InnoDB AUTO_INCREMENT=3 DEFAULT CHARSET=utf8mb4 COLLATE=utf8mb4_0900_ai_ci COMMENT='用户表';
Then introduce myBatisPlus and mysql drivers.
- <dependency>
- <groupId>com.baomidou</groupId>
- <artifactId>mybatis-plus-boot-starter</artifactId>
- <version>3.4.3</version>
- </dependency>
- <dependency>
- <groupId>mysql</groupId>
- <artifactId>mysql-connector-java</artifactId>
- </dependency>
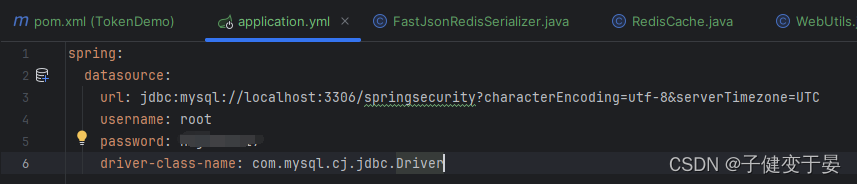
Then configure the database related information.
Then define the mapper interface UserMapper and use mybatisplus to add the corresponding annotations.
- package org.example.mapper;
-
- import com.baomidou.mybatisplus.core.mapper.BaseMapper;
- import org.example.domain.User;
-
- public interface UserMapper extends BaseMapper<User> {
- }
 Then configure component scanning
Finally, test whether mp can be used normally.
Introducing junit

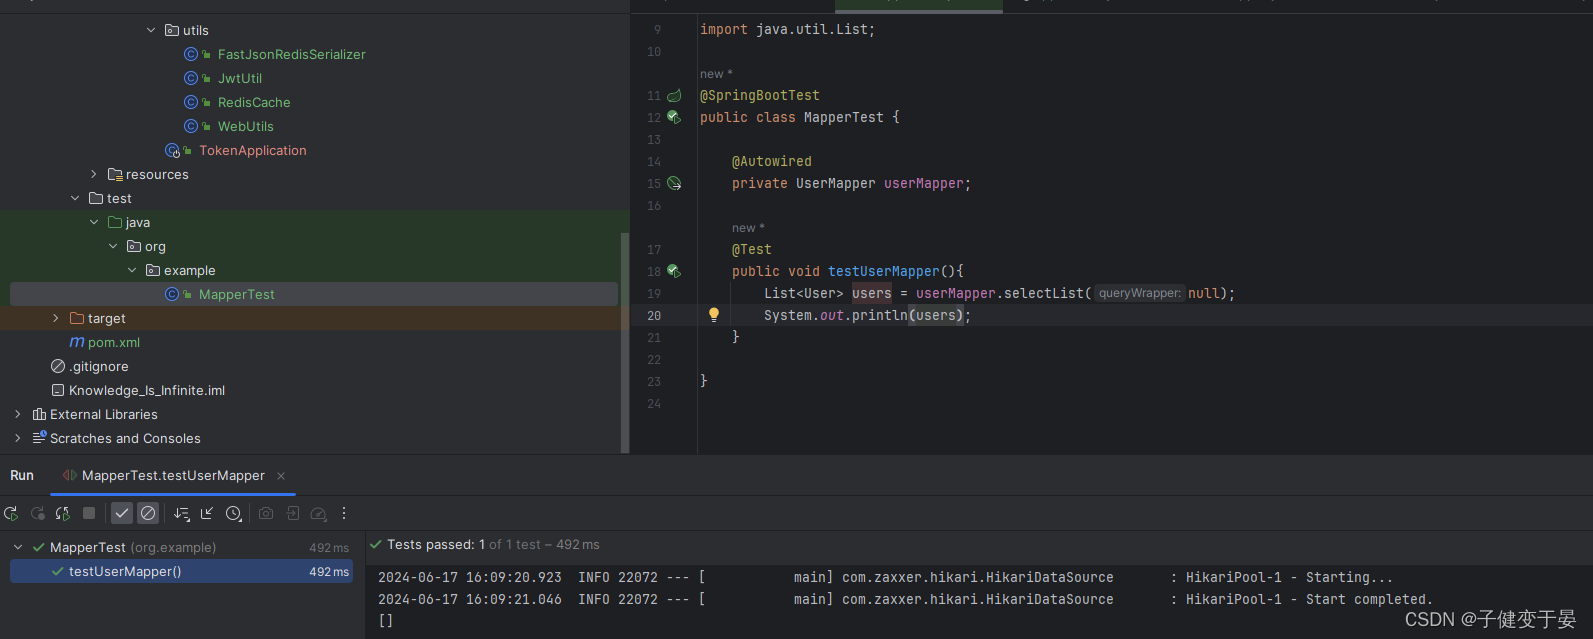
This way it can be used normally.
Next we need to implement the core code.
First, let's customize the UserDetailsService.
- package org.example.service.impl;
- import com.baomidou.mybatisplus.core.conditions.query.LambdaQueryWrapper;
- import org.example.domain.LoginUser;
- import org.example.domain.User;
- import org.example.mapper.UserMapper;
- import org.springframework.beans.factory.annotation.Autowired;
- import org.springframework.security.core.userdetails.UserDetails;
- import org.springframework.security.core.userdetails.UserDetailsService;
- import org.springframework.security.core.userdetails.UsernameNotFoundException;
- import org.springframework.stereotype.Service;
- import java.util.Objects;
- @Service
- public class UserDetailsServiceImpl implements UserDetailsService {
- @Autowired
- private UserMapper userMapper;
- @Override
- public UserDetails loadUserByUsername(String username) throws UsernameNotFoundException {
- //查询用户信息 [InMemoryUserDetailsManager是在内存中查找]
- LambdaQueryWrapper<User> wrapper = new LambdaQueryWrapper<>();
- wrapper.eq(User::getUserName,username);
- User user = userMapper.selectOne(wrapper);
- //如果查询不到数据就抛出异常,给出提示
- if(Objects.isNull(user)){
- throw new RuntimeException("用户名或密码错误!");
- }
-
- //TODO 查询权限信息
-
- //封装为UserDetails对象返回
- return new LoginUser(user);
- }
- }
Here, the user is encapsulated as UserDetails and returned.
- package org.example.domain;
- import lombok.AllArgsConstructor;
- import lombok.Data;
- import lombok.NoArgsConstructor;
- import org.springframework.security.core.GrantedAuthority;
- import org.springframework.security.core.userdetails.UserDetails;
- import java.util.Collection;
- @Data
- @AllArgsConstructor
- @NoArgsConstructor
- public class LoginUser implements UserDetails {
- private User user;
- @Override
- public Collection<? extends GrantedAuthority> getAuthorities() {
- return null;
- }
-
- @Override
- public String getPassword() {
- return user.getPassword();
- }
-
- @Override
- public String getUsername() {
- return user.getUserName();
- }
-
- @Override
- public boolean isAccountNonExpired() {
- return true;
- }
-
- @Override
- public boolean isAccountNonLocked() {
- return true;
- }
-
- @Override
- public boolean isCredentialsNonExpired() {
- return true;
- }
-
- @Override
- public boolean isEnabled() {
- return true;
- }
- }
Finally, there is a point here, that is, we need to test the login and get data from the database. We need to write user data into the table, and if you want the user's password to be transmitted in plain text, you need to add {noop} before the password.
 Here we can log in by entering the username and password in the database.
Here we explain why we need to add {noop} in front of the password, because the default PasswordEncoder requires the password format in the database to be {id}password. It will determine the encryption method of the password based on the id, but we generally do not take this approach, so we need to replace PasswordEncoder.

Next, let’s test it out.
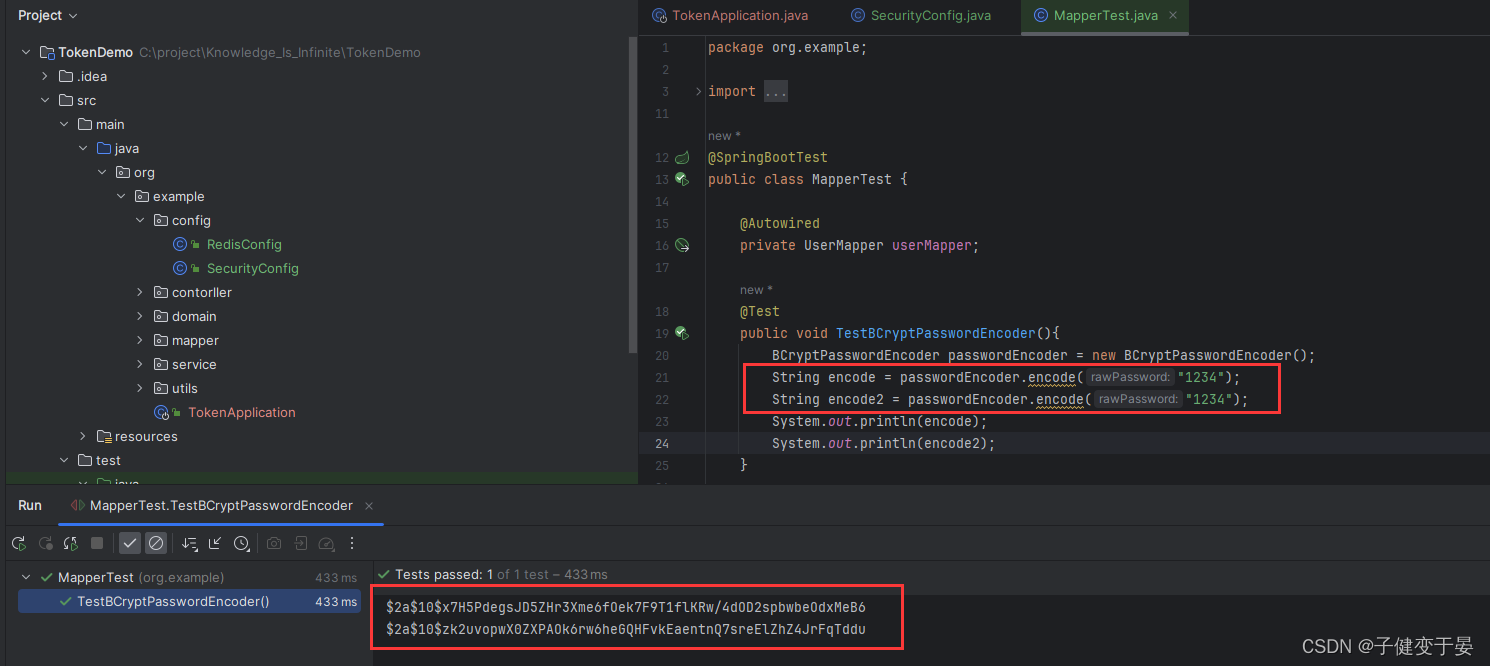
You can see that the original passwords we passed in twice are the same, but we got different results. This is actually related to the salting algorithm. I will write an article about custom encryption later.
After obtaining the encrypted password, you can store the encrypted password in the database, and then you can log in by verifying the plain text password sent from the front end with the encrypted password in the database.
At this time, we started the project to log in, and found that the previous password could no longer be used, because the database should now store the encrypted password stored in the database during the registration phase, not the original password (because I wrote the encrypted password into the database myself without registration).
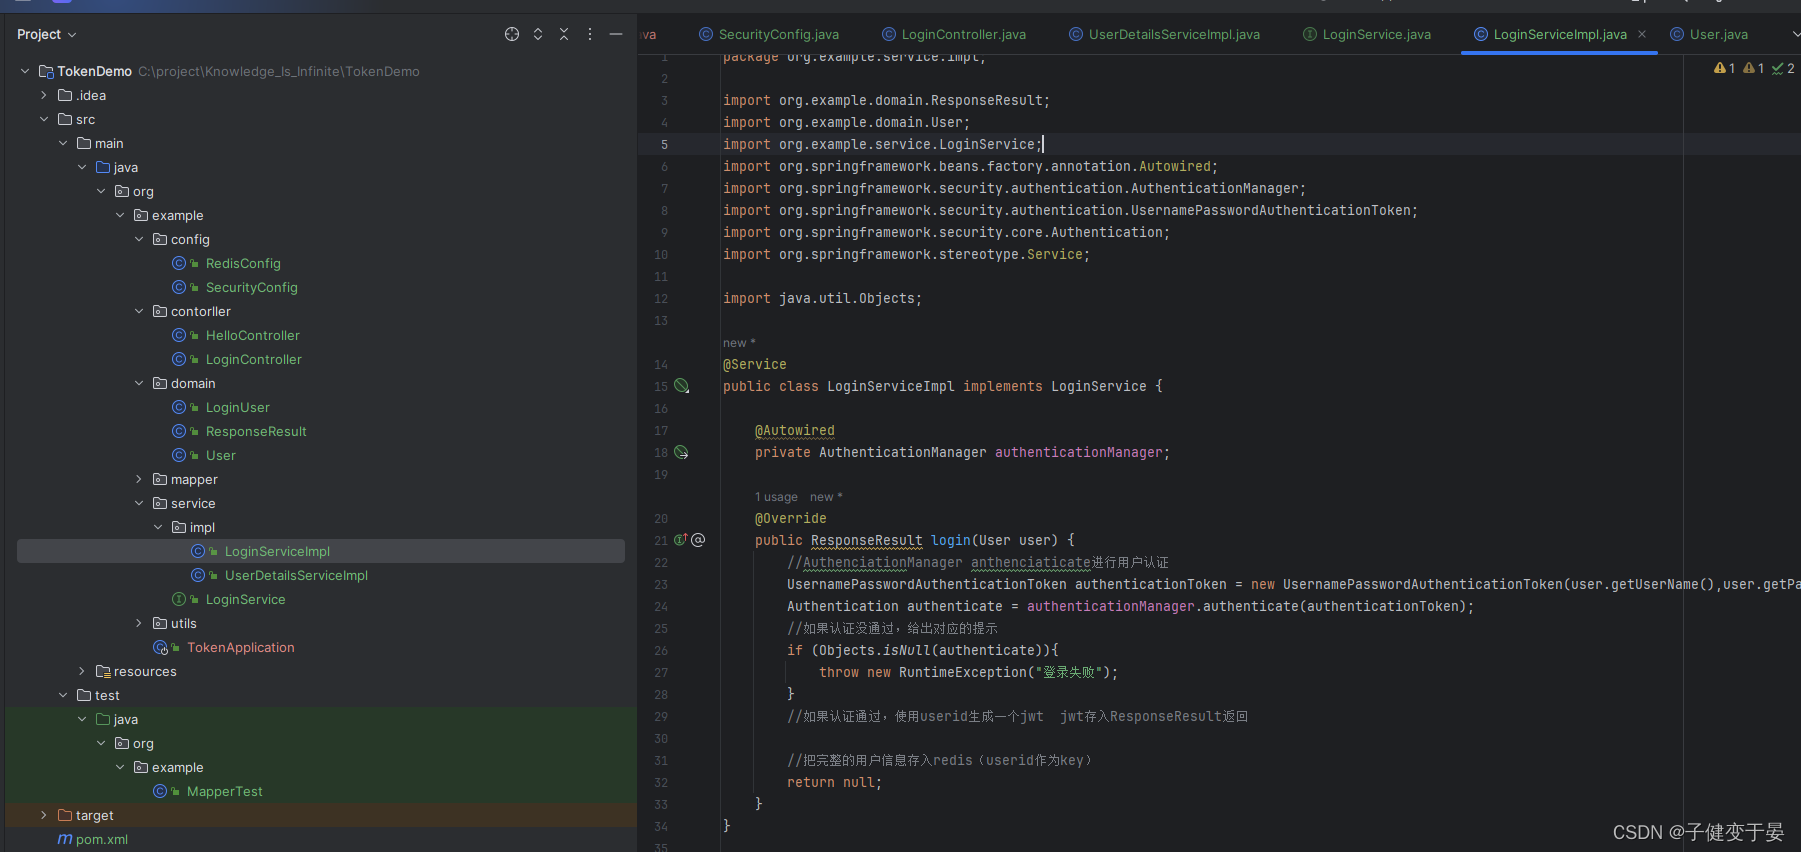
We need to implement a login interface and then let SpringSecuruty release it. If we don't release it, it will be contradictory. In the interface, user authentication is performed through the authenticate method of AuthenticationManager, so we need to configure the AuthenticationManager to be injected into the container in SecurityConfig.
If the authentication is successful, a jwt needs to be generated and put into the response. In order to allow the user to identify the specific user through jwt the next time the user requests, the user information needs to be stored in redis, and the user id can be used as the key.
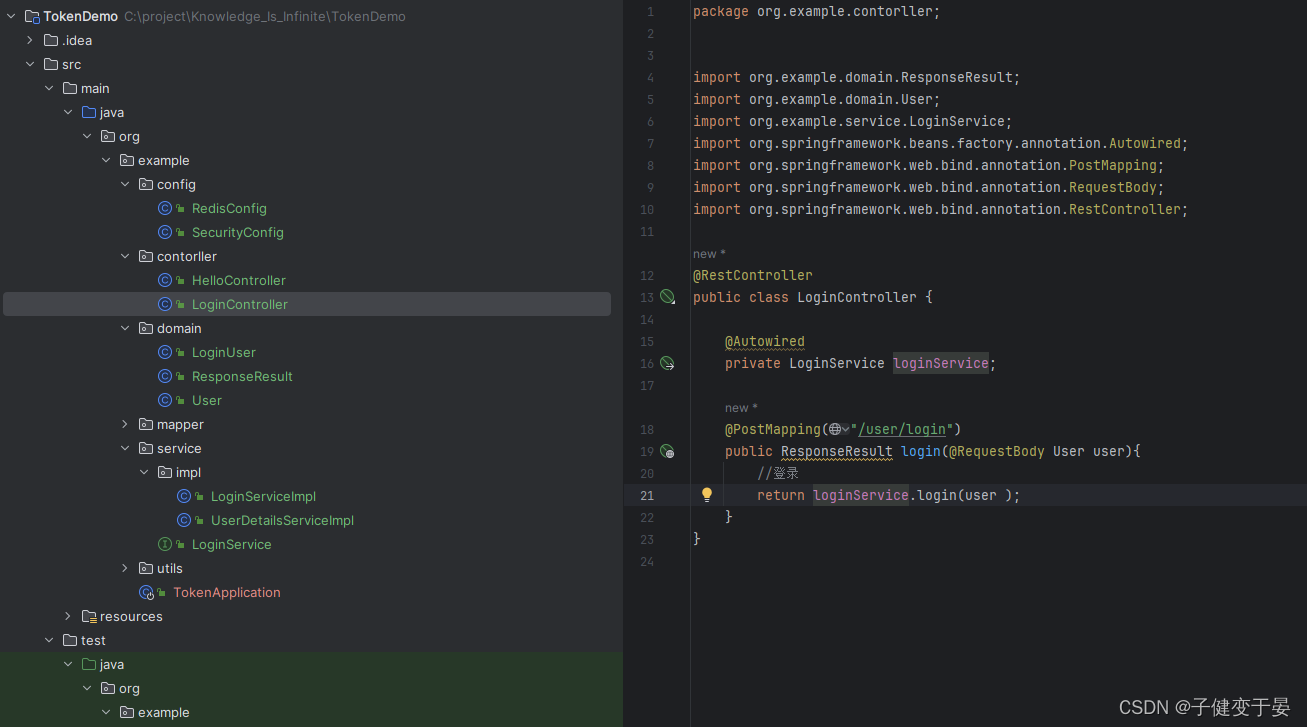
Write LoginController first
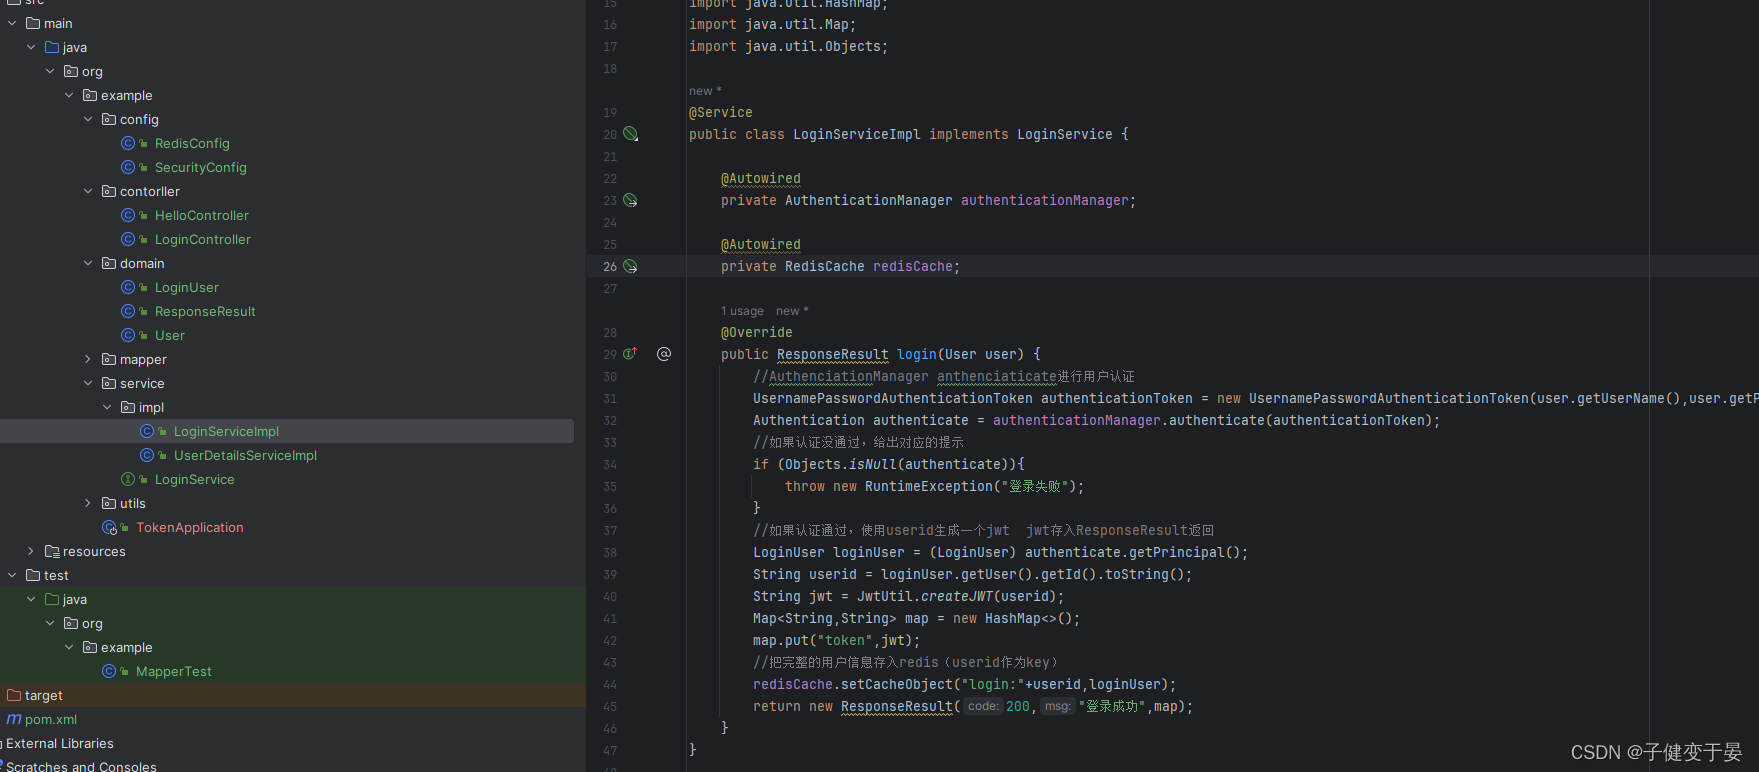
Then write the corresponding Service.
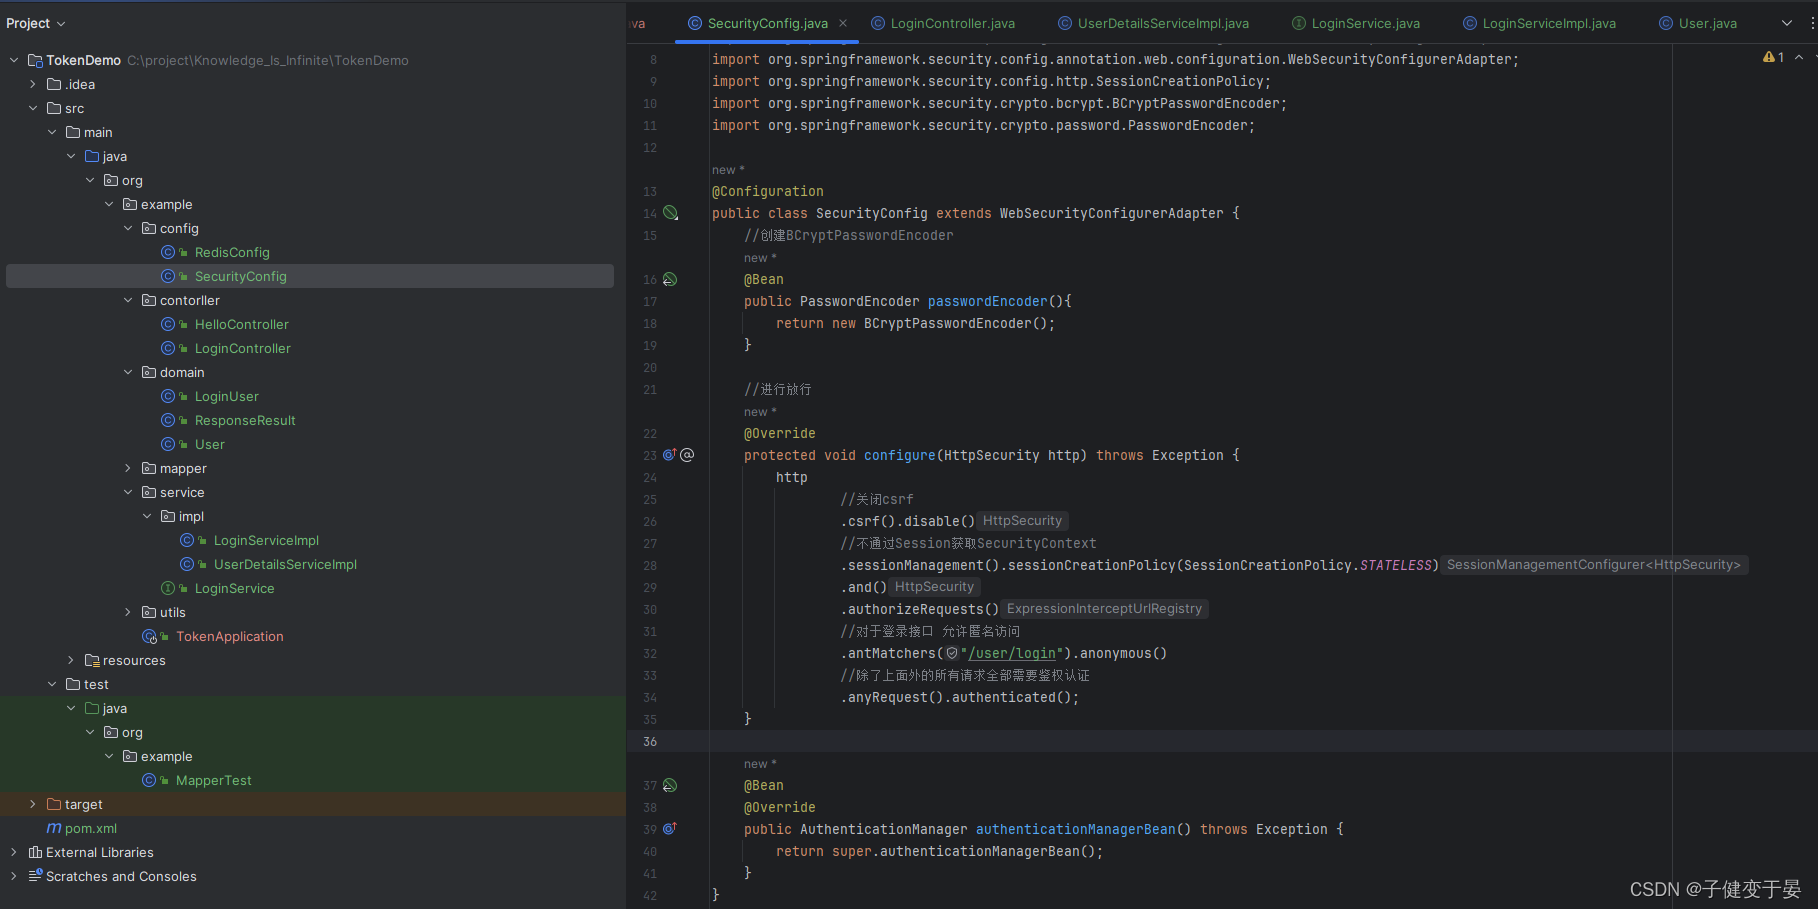
 Inject AuthenticationManager in SecurityConfig and release the login interface.
In the business logic of the service, if authentication fails, a custom exception is returned, but if authentication succeeds, how do we get the corresponding information?
Here we can debug and see the object obtained.


It is found here that the required information can be obtained in Principal.
Then complete the code.
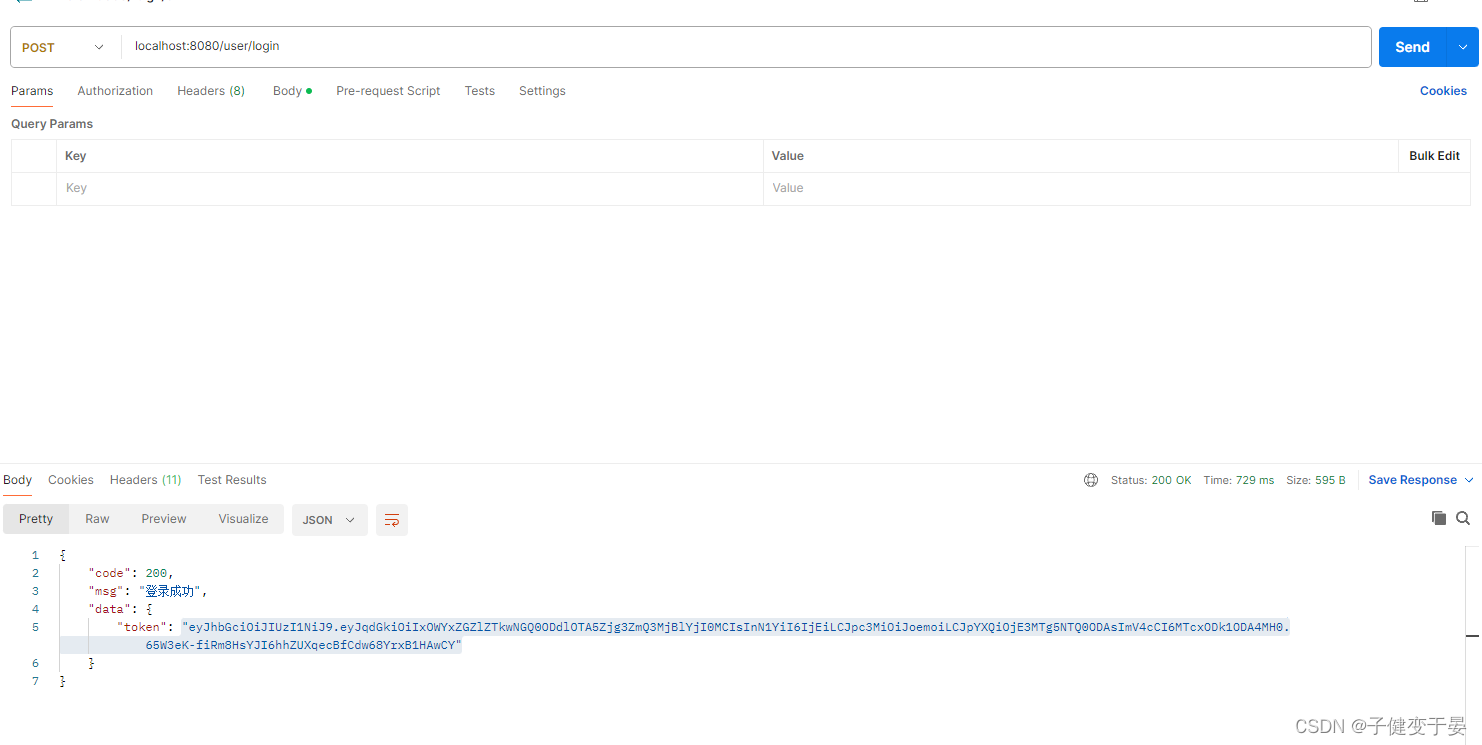
Finally, test it out.
I'll paste the code first.
- @Component
- public class JwtAuthenticationTokenFilter extends OncePerRequestFilter {
-
- @Autowired
- private RedisCache redisCache;
-
- @Override
- protected void doFilterInternal(HttpServletRequest request, HttpServletResponse response, FilterChain filterChain) throws ServletException, IOException {
- //获取token
- String token = request.getHeader("token");
- if (!StringUtils.hasText(token)) {
- //放行
- filterChain.doFilter(request, response); //这里放行是因为还有后续的过滤器会给出对应的异常
- return; //token为空 不执行后续流程
- }
- //解析token
- String userid;
- try {
- Claims claims = JwtUtil.parseJWT(token);
- userid = claims.getSubject();
- } catch (Exception e) {
- e.printStackTrace();
- throw new RuntimeException("token非法!");
- }
- //从redis中获取用户信息
- String redisKey = "login:" + userid;
- LoginUser loginUser = redisCache.getCacheObject(redisKey);
- if (Objects.isNull(loginUser)){
- throw new RuntimeException("用户未登录!");
- }
- //将信息存入SecurityContextHolder(因为过滤器链后面的filter都是从中获取认证信息进行对应放行)
- //TODO 获取权限信息封装到Authentication中
- UsernamePasswordAuthenticationToken authenticationToken =
- new UsernamePasswordAuthenticationToken(loginUser,null,null);
- SecurityContextHolder.getContext().setAuthentication(authenticationToken);
-
- //放行
- filterChain.doFilter(request,response); //此时的放行是携带认证的,不同于上方token为空的放行
- }
- }
First, we get the token from the request header, and then check whether it is empty. If it is empty, we release it directly without going through the subsequent process. Next, we parse the token to get the userid inside, and then get the corresponding user information from redis based on the userid, and finally store it in the SecurityContextHolder, because subsequent filters need to obtain daily authentication information from it, and finally perform analysis operations.
Another point to note is that SecurityContextHolder.getContext().setAuthentication() requires the authentication object to be passed in. When we construct the object, we use three parameters because the third parameter is the key to determining whether to authenticate.
Next we need to configure this filter.
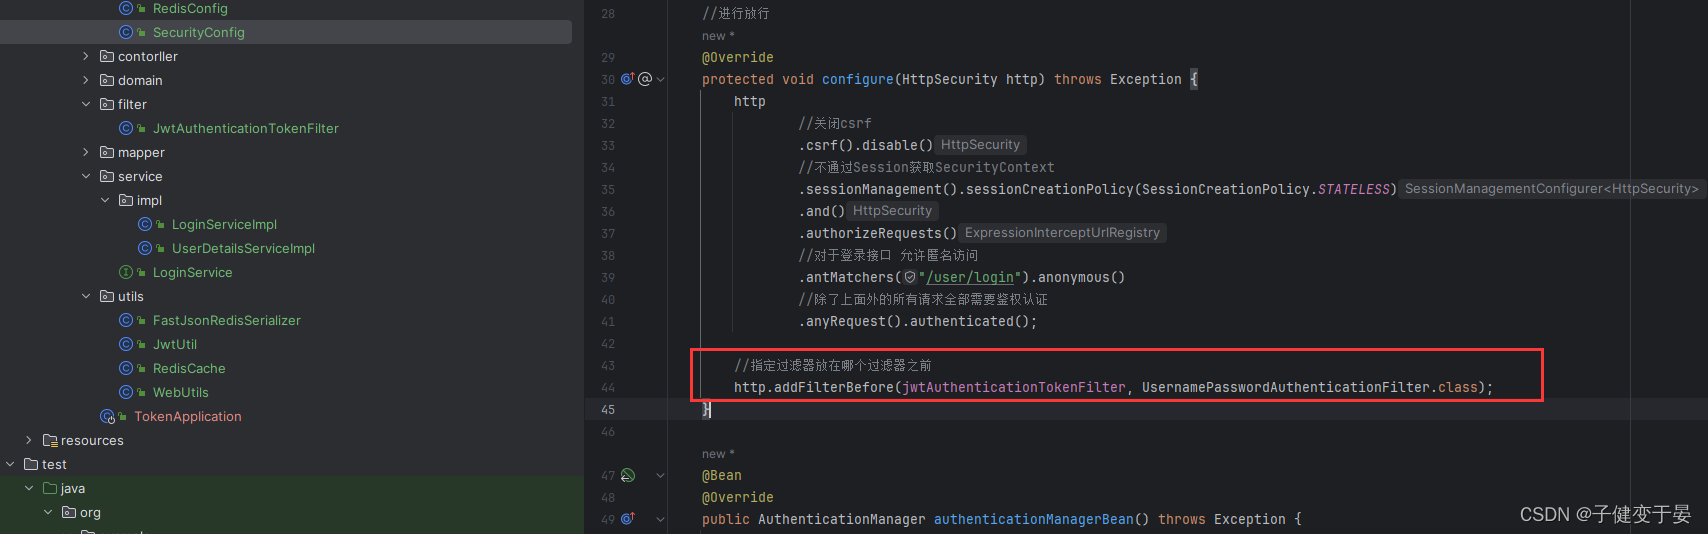
Then we access the user/login interface, which will return a response body with a token. If we access the hello interface again, it will be 403 because there is no token. Therefore, it corresponds to the code above. There is no token release and return does not execute the subsequent process (the release here is because there are other filters that specifically throw exceptions for processing, and return is to prevent it from going through the response process)
At this point, if we put the token generated by user/login into the request header of the hello interface, we can access it normally.

Then the purpose of our set of filters is achieved (get token, parse token, store in SecurityContextHolder)
At this point, it is relatively easy for us to log out. We only need to delete the corresponding data in redis. When we access with token later, we will get the corresponding user information in redis in our custom filter. If we can't get it at this time, it means we are not logged in.


We carry this token to access the /user/logout interface.

Then the logout function is realized.
This article is learned from the up master of station b! ! !

I have devoted myself to the research of technology for more than 30 years. I am proficient in various languages such as Java, Linux, JavaScript, PHP, CSS, etc. I have made many contributions in the field of open source. I have established a developer documentation site to share some problems in technology development for everyone to read.

