
le mie informazioni di contatto
Posta[email protected]
2024-07-12
한어Русский языкEnglishFrançaisIndonesianSanskrit日本語DeutschPortuguêsΕλληνικάespañolItalianoSuomalainenLatina
Sommario
2.1 Processo di verifica dell'accesso
2.2 Esplorazione preliminare del principio
2.3.3.1 Utente di verifica del database
2.3.3.2 Archiviazione crittografata con password
2.3.3.3 Interfaccia di accesso
2.3.3.4 Filtro di autenticazione
Spring Security è un framework di gestione della sicurezza della famiglia Spring Rispetto a Shiro, un altro framework di sicurezza, fornisce funzioni e risorse della comunità più ricche rispetto a Shiro.
In generale, Spring Security è più comunemente usato in progetti su larga scala, mentre Shiro è più comunemente usato in piccoli progetti, perché rispetto a Spring Security, con Shiro è più facile iniziare.
Le applicazioni web generali devono farloCertificazioneEAutorizzare。
L'autenticazione e l'autorizzazione sono le funzioni principali di Spring Security come struttura di sicurezza!
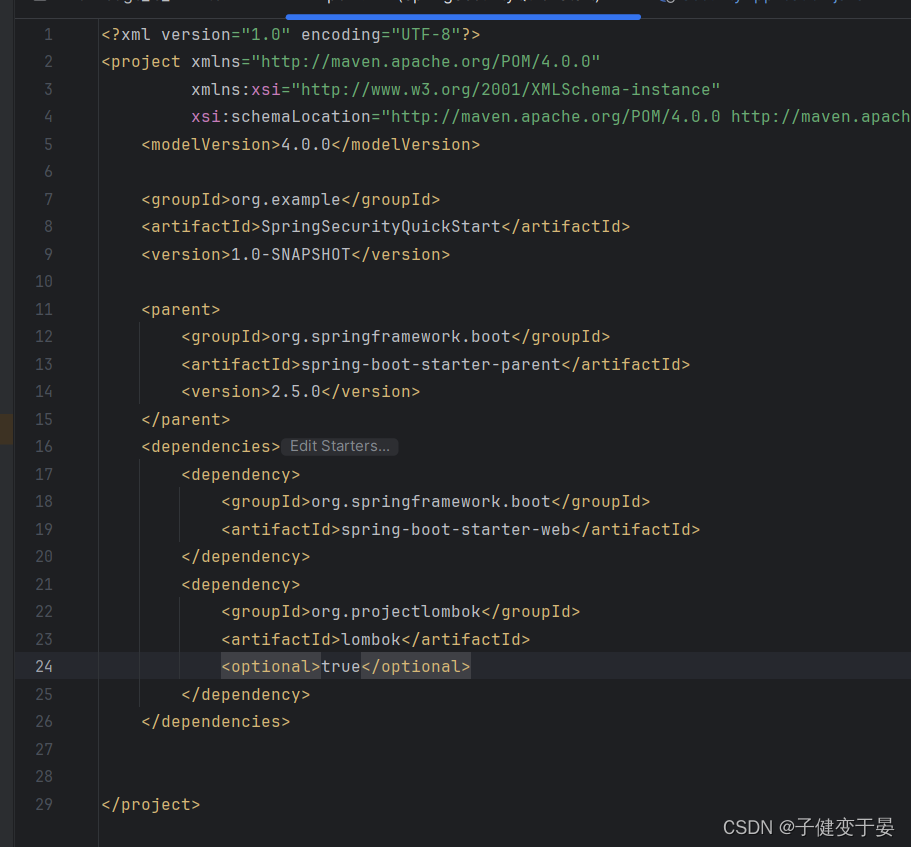
Per prima cosa creiamo semplicemente un progetto SpringBoot.
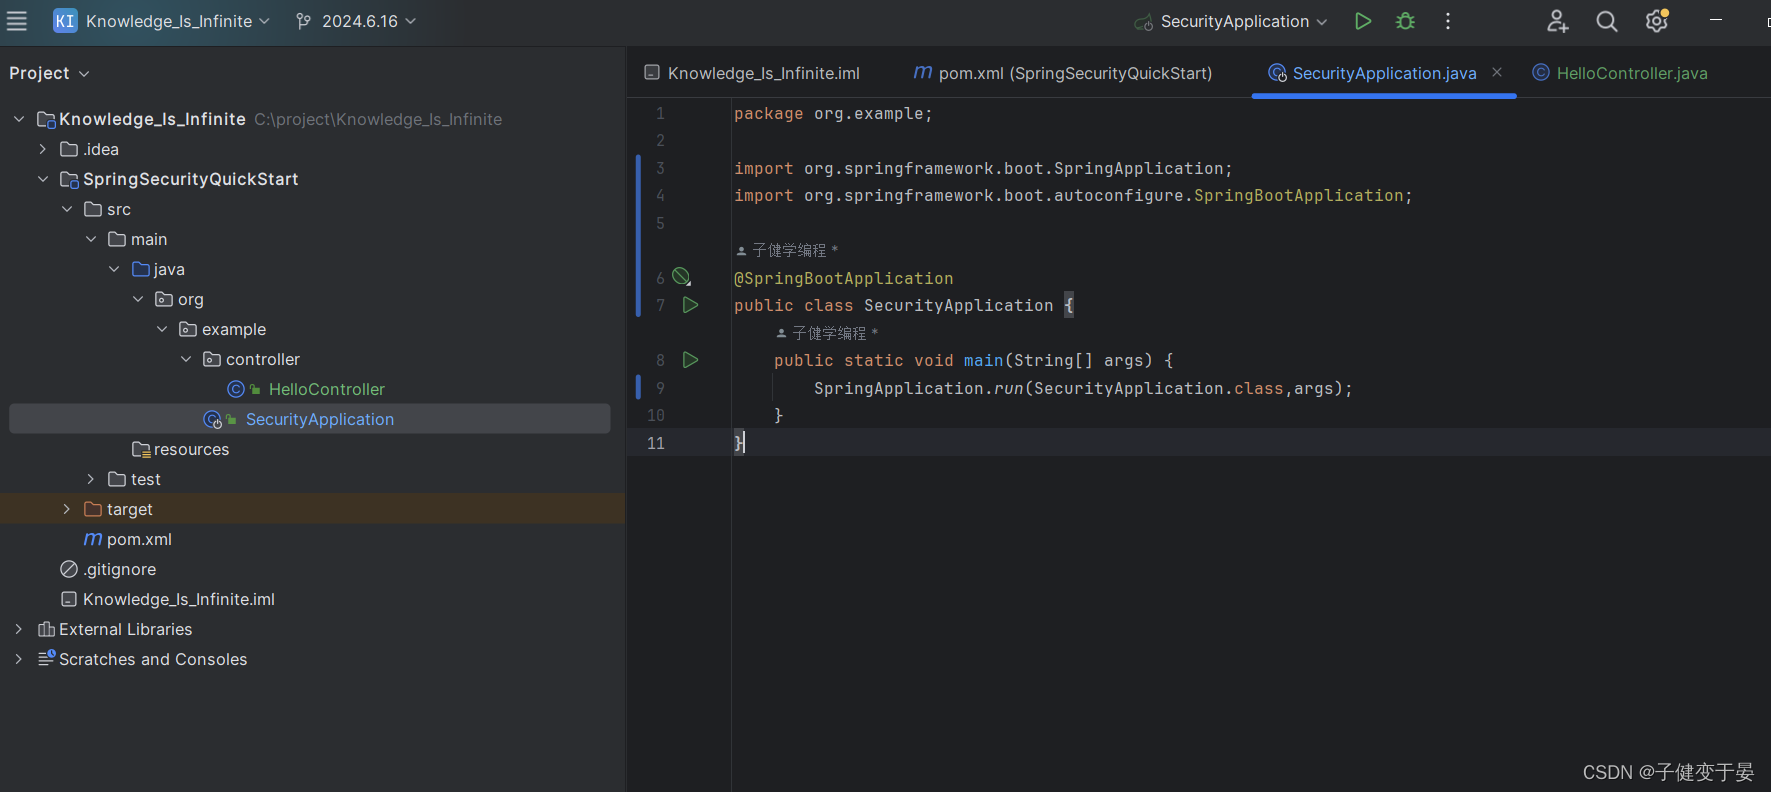
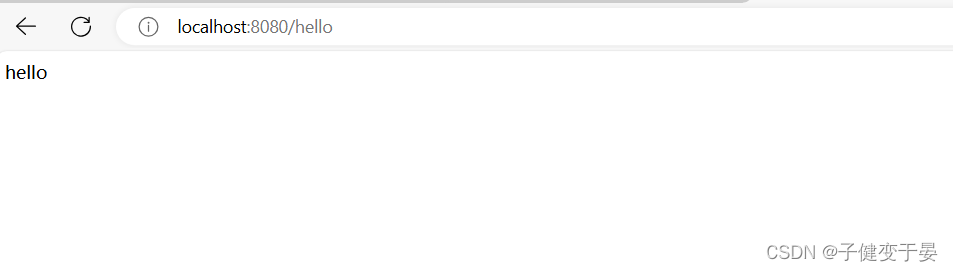
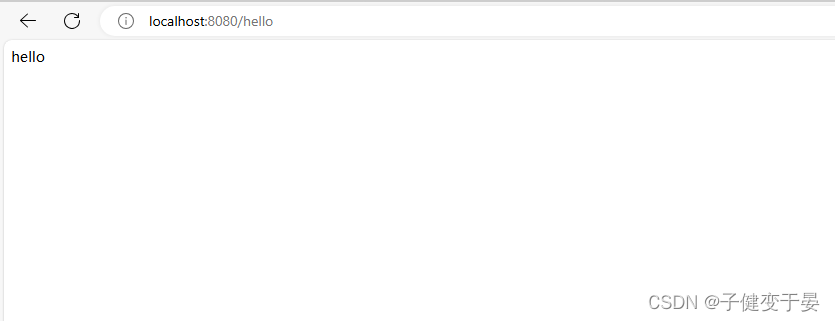
A questo punto, accediamo a una semplice interfaccia di saluto che abbiamo scritto per verificare se la costruzione ha avuto successo.
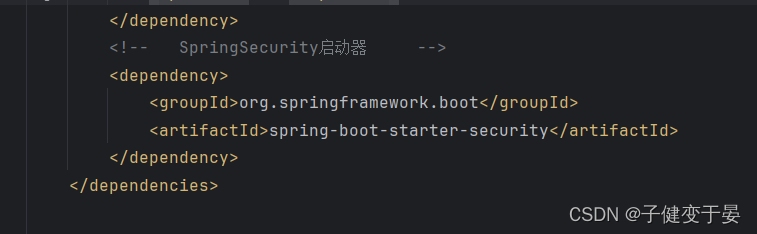
Quindi introdurre SpringSecurity.
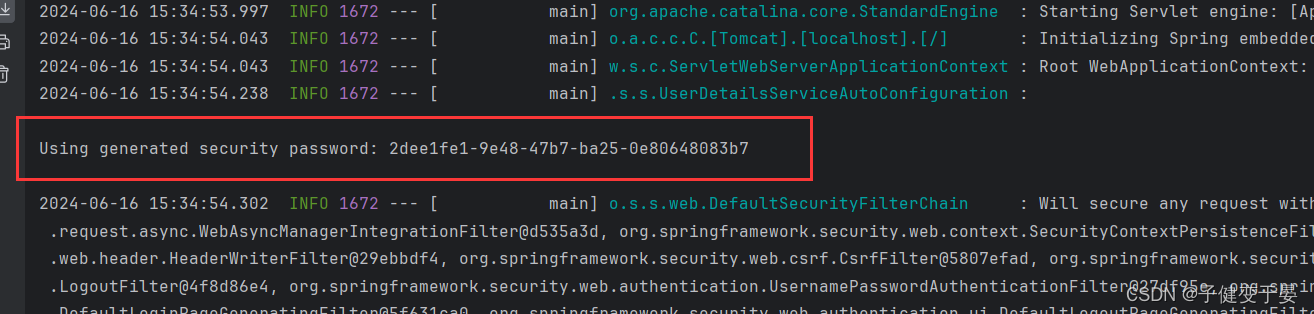
A questo punto, diamo un'occhiata all'effetto dell'interfaccia di accesso.
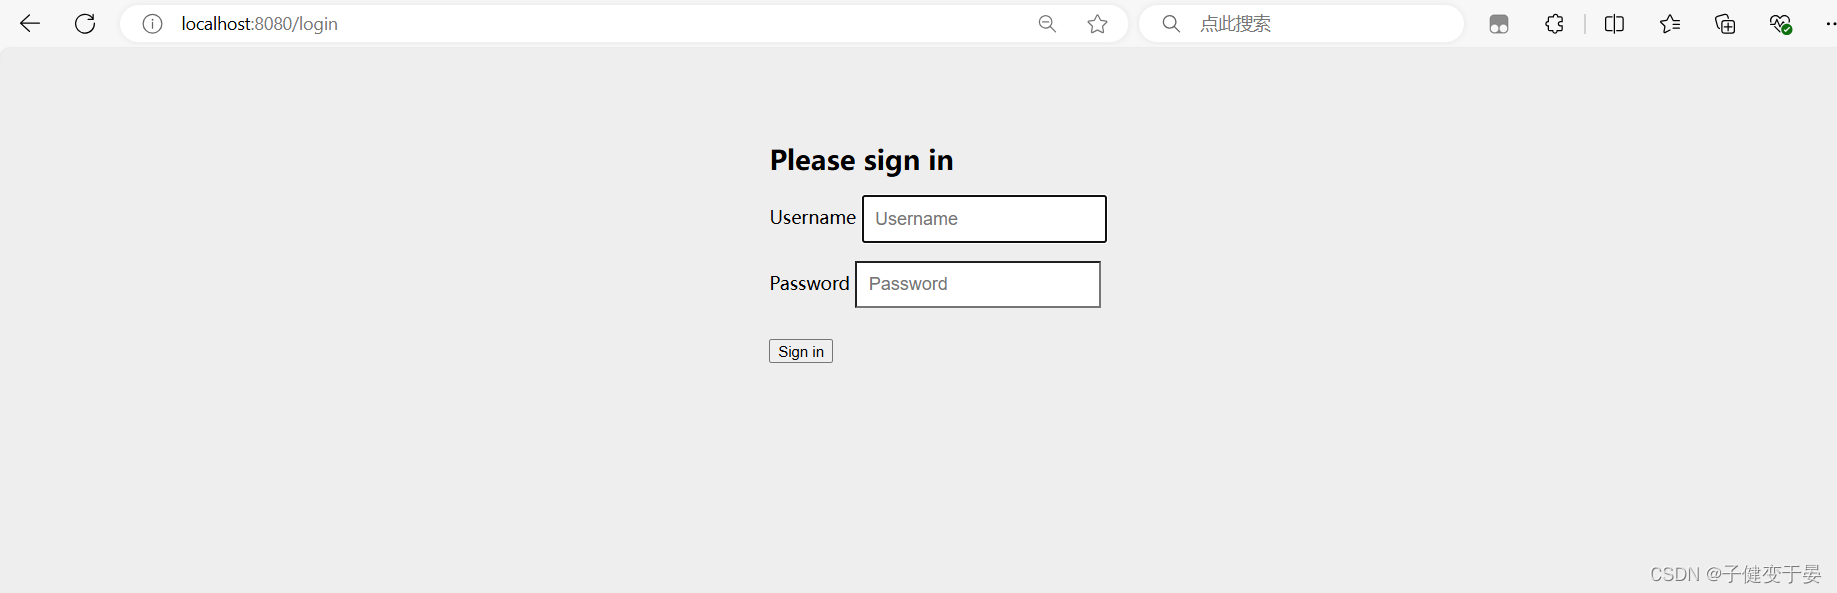
Dopo l'introduzione di SpringSecurity, l'interfaccia di accesso passerà automaticamente a una pagina di accesso. Il nome utente predefinito è user e la password verrà inviata alla console. È necessario effettuare il login per accedere all'interfaccia.
Prima di tutto, dobbiamo comprendere il processo di verifica dell'accesso. Innanzitutto, il front-end trasporta il nome utente e la password per accedere all'interfaccia di accesso. Dopo che il server ha ottenuto il nome utente e la password, li confronta con quelli nel database. Se il nome utente/ID utente viene utilizzato correttamente, viene generato un jwt, quindi Rispondi jwt al front-end e quindi l'accesso ad altre richieste dopo l'accesso porterà il token nell'intestazione della richiesta ogni volta che il server ottiene il token l'intestazione della richiesta per l'analisi, ottiene l'ID utente e ottiene informazioni relative all'utente e autorizzazioni di visualizzazione in base all'ID nome utente, se si dispone dell'autorizzazione, rispondere al front-end.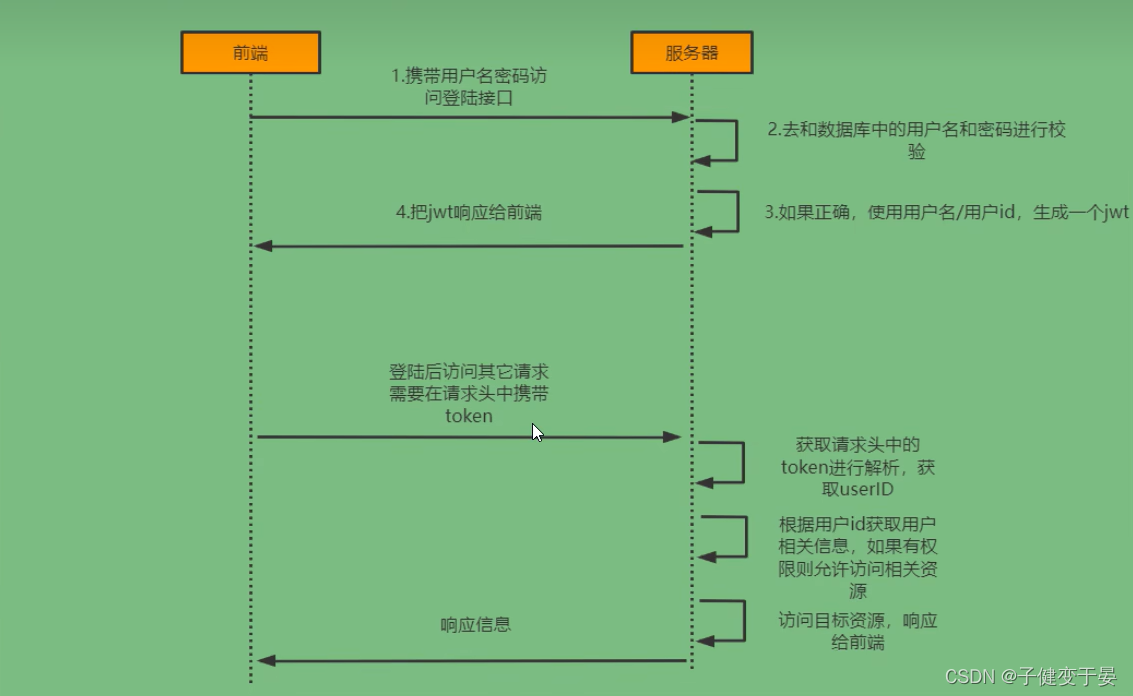
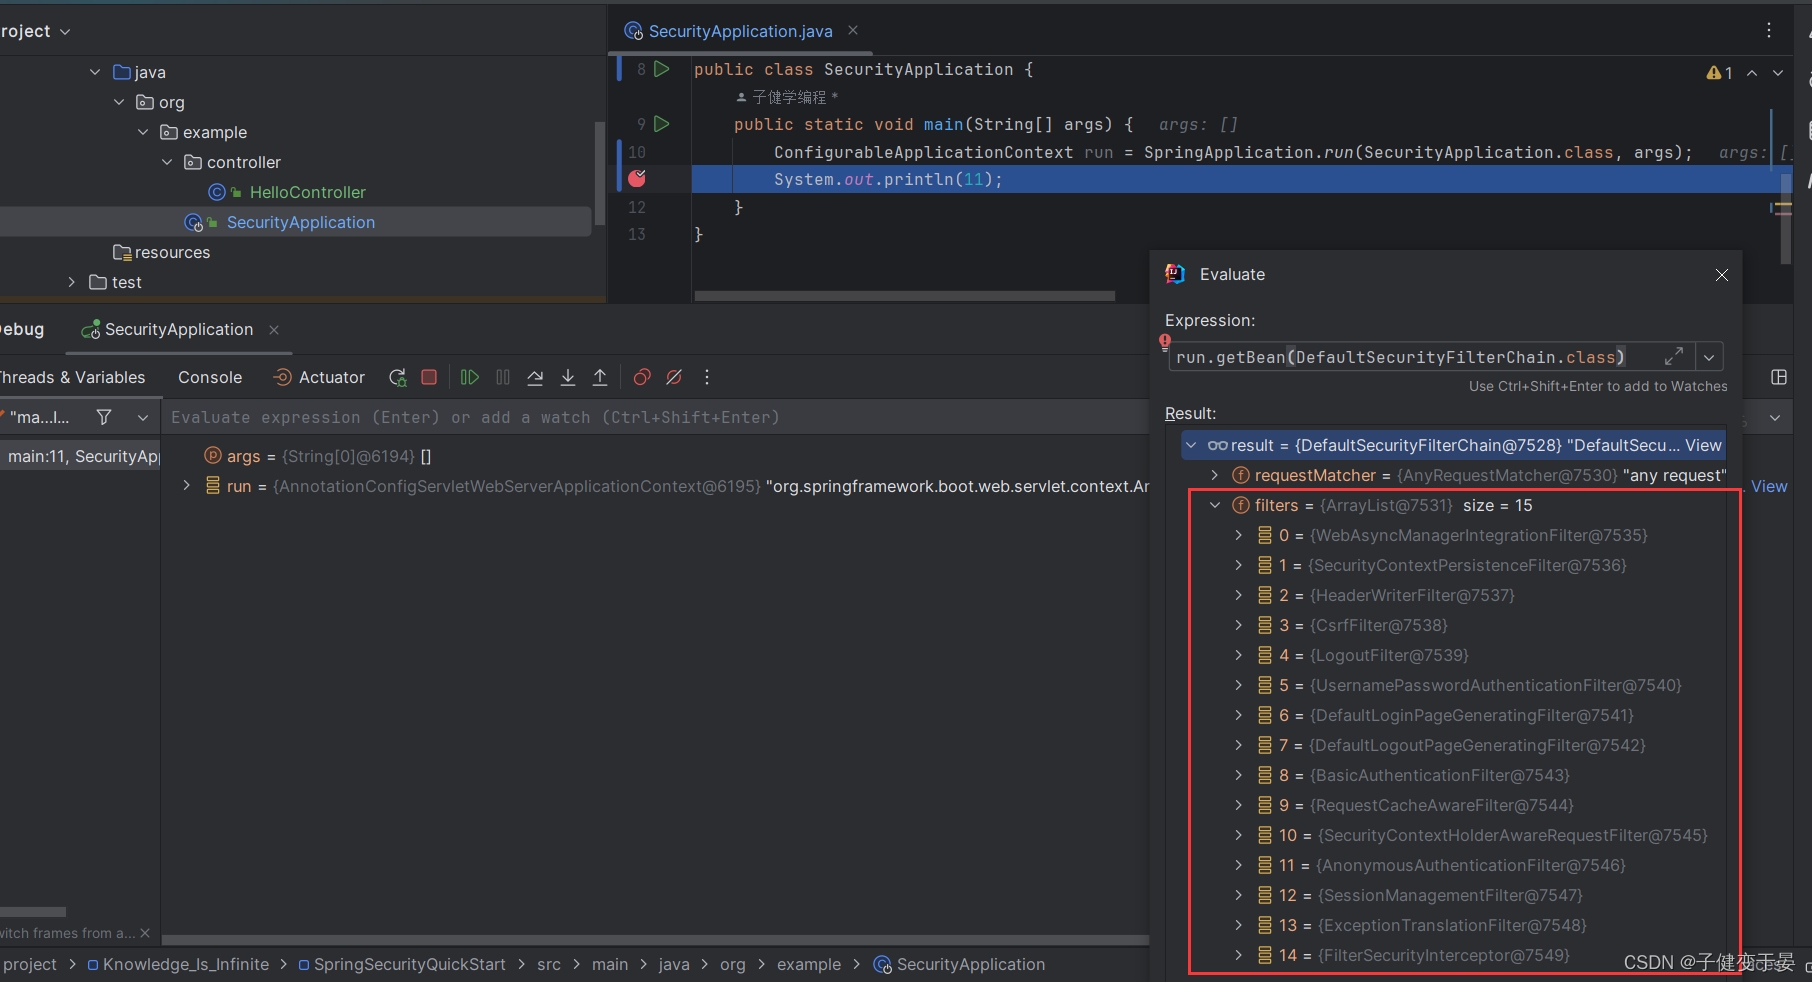
Il principio di SpringSecurity è in realtà una catena di filtri, che fornisce filtri con varie funzioni. Qui esamineremo prima i filtri coinvolti nell'avvio rapido sopra.
Possiamo anche utilizzare Debug per vedere quali filtri si trovano nella catena di filtri SpringSecurity nel sistema corrente e il loro ordine.
Successivamente, diamo un’occhiata all’analisi del diagramma di flusso di autenticazione.
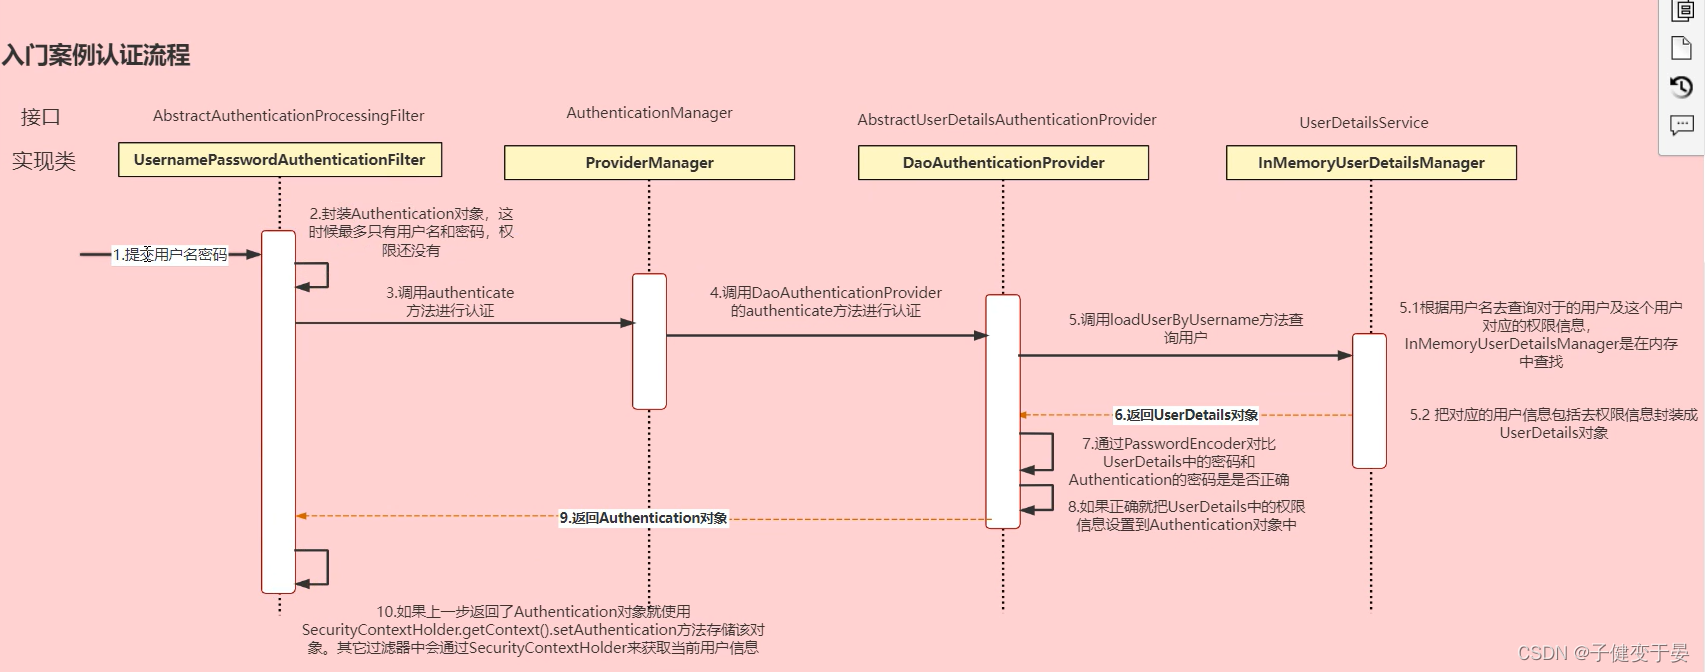
Qui dobbiamo solo essere in grado di comprendere il processo Per dirla semplicemente:
L'utente ha inviato il nome utente e la password, UsernamePasswordAuthenticationFilter lo incapsula come oggetto Authentication e chiama il metodo authenticate per l'autenticazione, quindi chiama il metodo authenticate di DaoAuthenticationProvider per l'autenticazione, quindi chiama il metodo loadUserByUserName per interrogare l'utente qui consiste nel cercare in memoria, quindi incapsulare le informazioni utente corrispondenti in un oggetto UserDetails, utilizzare PasswordEncoder per confrontare la password in UserDetails e la password di autenticazione per verificare se è corretta. Se corretta, impostare le informazioni sull'autorizzazione in UserDetails sull'oggetto Authentication , quindi restituire l'oggetto Authentication e infine utilizzare il metodo SecurityContextHolder.getContext().setAuthentication che memorizza questo oggetto e altri filtri otterranno le informazioni dell'utente corrente tramite SecurityContextHoder. (Non è necessario memorizzare questo paragrafo per capirlo)
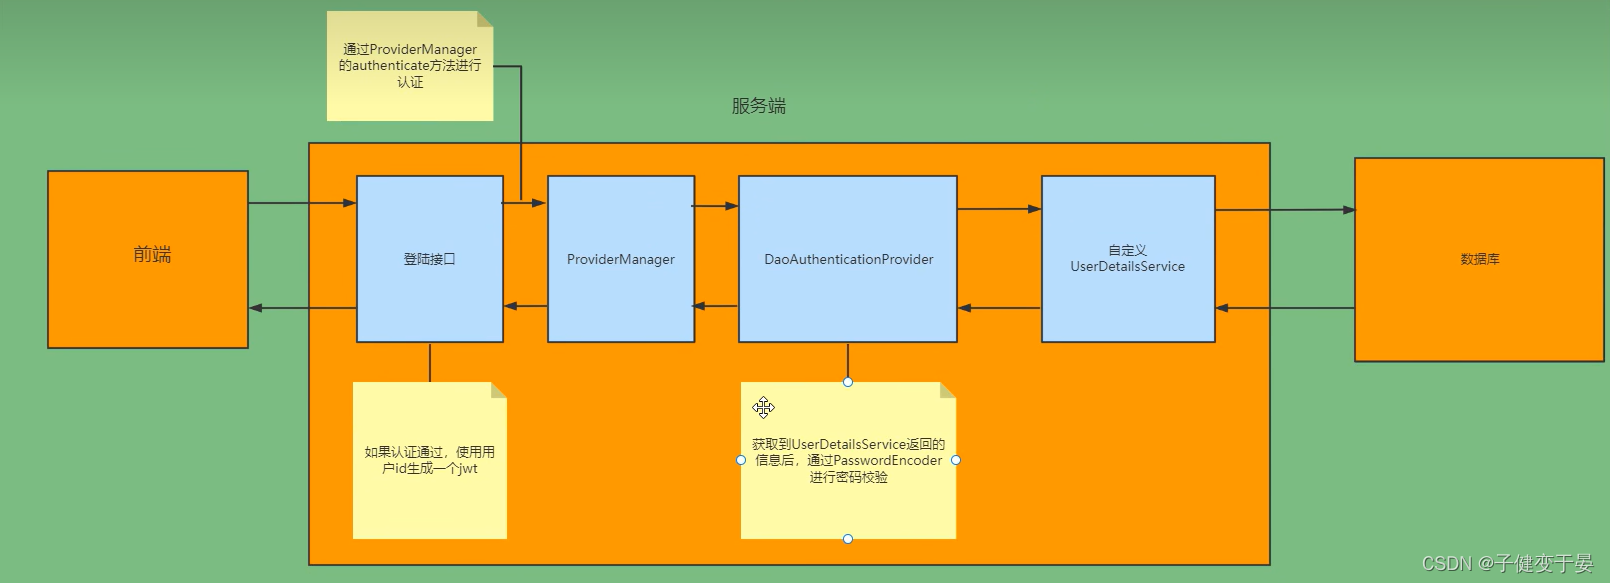
Quindi conosciamo il processo prima di poterlo modificare. Prima di tutto, durante la ricerca dalla memoria, dobbiamo cercare nel database (qui dobbiamo personalizzare una classe di implementazione UserDetailsService) e non utilizzeremo il nome utente e la password predefiniti. e l'interfaccia di accesso deve essere scritta da te e non è necessario utilizzare la pagina di accesso predefinita da lui fornita.
Sulla base della situazione che abbiamo analizzato, possiamo ottenere un quadro del genere.
In questo momento, un jwt viene restituito al front-end e le altre richieste effettuate dal front-end trasporteranno il token. Quindi il nostro primo passo è verificare se il token viene trasportato, analizzarlo, ottenere l'ID utente corrispondente e incapsularlo come oggetto Anthentication viene archiviato in SecurityContextHolder (in modo che altri filtri possano ottenerlo).
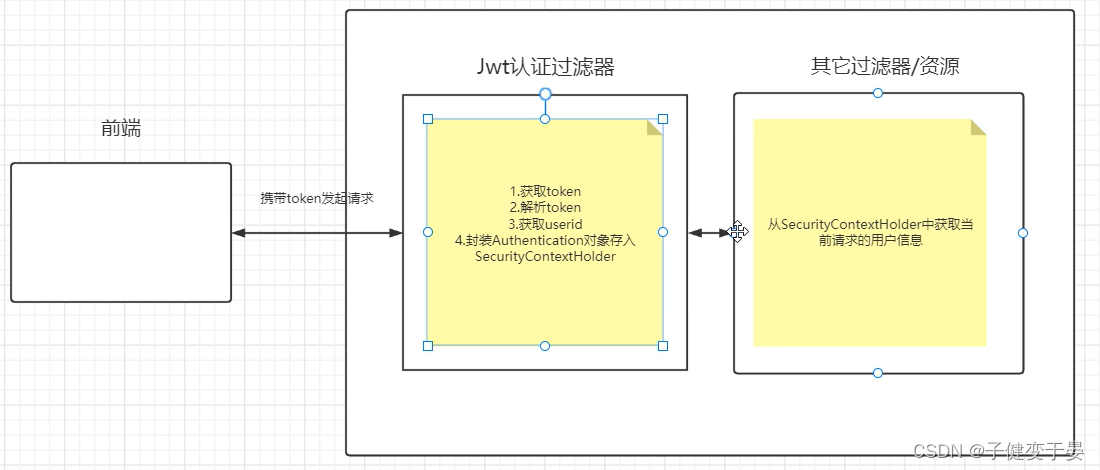
Quindi c'è un'altra domanda qui. Come ottenere informazioni complete sull'utente dopo aver ottenuto l'ID utente dal filtro di autenticazione jwt?
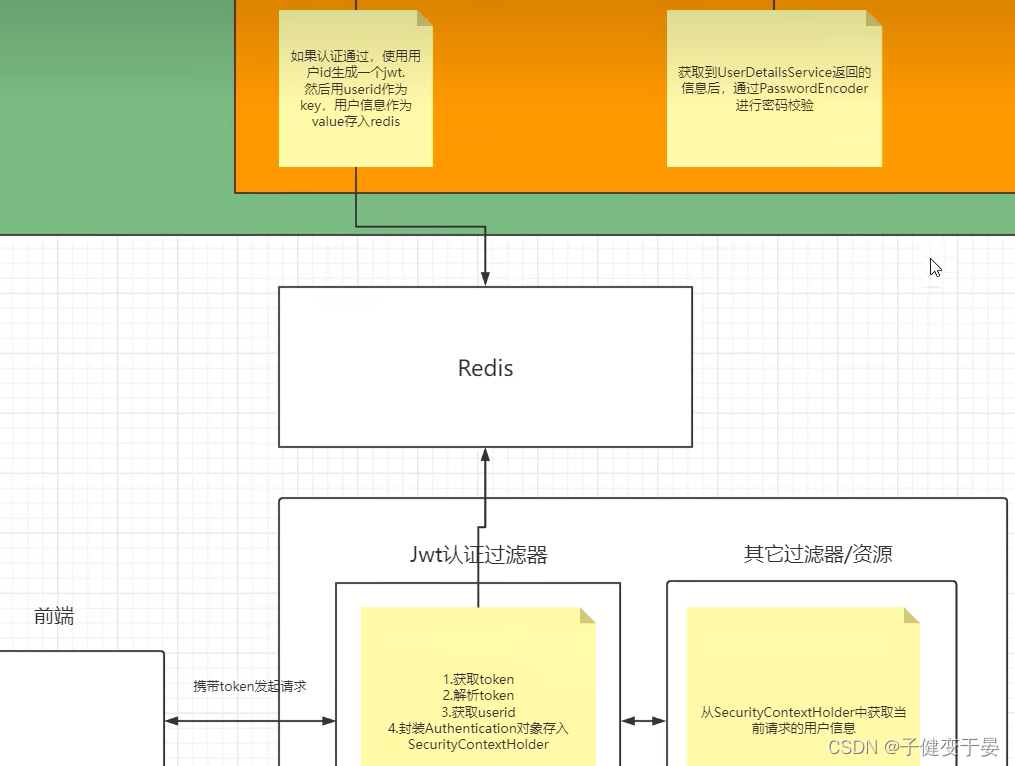
Qui utilizziamo redis. Quando il server esegue l'autenticazione utilizzando l'ID utente per generare jwt al front-end, l'ID utente viene utilizzato come chiave e le informazioni dell'utente vengono archiviate in redis come valore. Successivamente è possibile ottenere le informazioni complete sull'utente da Redis tramite l'ID utente.
Dall'esplorazione preliminare dei principi di cui sopra, abbiamo anche analizzato approssimativamente cosa dobbiamo fare se implementiamo da soli il processo di autenticazione della separazione front-end e back-end.
Login:
a. Interfaccia di accesso personalizzata
Chiama il metodo ProviderManager per l'autenticazione Se l'autenticazione passa, viene generato un jwt.
Archivia le informazioni dell'utente in Redis
b. Personalizza il servizio Dettagli utente
Interrogare il database in questa classe di implementazione
controllo:
a. Personalizza il filtro di autenticazione jwt
Ottieni gettone
Analizzare il token per ottenere il relativo ID utente
Ottieni informazioni utente complete da Redis
Archiviare in SecurityContextHolder
Per prima cosa devi aggiungere le dipendenze corrispondenti
- <!-- SpringSecurity启动器 -->
- <dependency>
- <groupId>org.springframework.boot</groupId>
- <artifactId>spring-boot-starter-security</artifactId>
- </dependency>
-
- <!-- redis依赖 -->
- <dependency>
- <groupId>org.springframework.boot</groupId>
- <artifactId>spring-boot-starter-data-redis</artifactId>
- </dependency>
- <!-- fastjson依赖 -->
- <dependency>
- <groupId>com.alibaba</groupId>
- <artifactId>fastjson</artifactId>
- <version>1.2.33</version>
- </dependency>
- <!-- jwt依赖 -->
- <dependency>
- <groupId>io.jsonwebtoken</groupId>
- <artifactId>jjwt</artifactId>
- <version>0.9.0</version>
- </dependency>
Quindi dobbiamo utilizzare Redis e aggiungere le configurazioni relative a Redis.
Il primo è il serializzatore di FastJson
- package org.example.utils;
- import com.alibaba.fastjson.JSON;
- import com.alibaba.fastjson.parser.ParserConfig;
- import com.alibaba.fastjson.serializer.SerializerFeature;
- import com.fasterxml.jackson.databind.JavaType;
- import com.fasterxml.jackson.databind.type.TypeFactory;
- import org.springframework.data.redis.serializer.RedisSerializer;
- import org.springframework.data.redis.serializer.SerializationException;
-
- import java.nio.charset.Charset;
-
- /**
- * Redis使用fastjson序列化
- * @param <T>
- */
- public class FastJsonRedisSerializer<T> implements RedisSerializer<T> {
-
- public static final Charset DEFAULT_CHARSET = Charset.forName("UTF-8");
-
- private Class<T> clazz;
-
- static {
- ParserConfig.getGlobalInstance().setAutoTypeSupport(true);
- }
-
- public FastJsonRedisSerializer(Class<T> clazz){
- super();
- this.clazz=clazz;
- }
-
- @Override
- public byte[] serialize(T t) throws SerializationException {
- if (t == null){
- return new byte[0];
- }
- return JSON.toJSONString(t, SerializerFeature.WriteClassName).getBytes(DEFAULT_CHARSET);
- }
-
- @Override
- public T deserialize(byte[] bytes) throws SerializationException {
- if (bytes==null || bytes.length<=0){
- return null;
- }
- String str = new String(bytes,DEFAULT_CHARSET);
-
- return JSON.parseObject(str,clazz);
- }
-
- protected JavaType getJavaType(Class<?> clazz){
- return TypeFactory.defaultInstance().constructType(clazz);
- }
-
- }
Crea RedisConfig e crea un serializzatore al suo interno per risolvere problemi come caratteri confusi.
- package org.example.config;
- import org.example.utils.FastJsonRedisSerializer;
- import org.springframework.context.annotation.Bean;
- import org.springframework.context.annotation.Configuration;
- import org.springframework.data.redis.connection.RedisConnectionFactory;
- import org.springframework.data.redis.core.RedisTemplate;
- import org.springframework.data.redis.serializer.StringRedisSerializer;
-
- @Configuration
- public class RedisConfig {
- @Bean
- @SuppressWarnings(value = {"unchecked","rawtypes"})
- public RedisTemplate<Object,Object> redisTemplate(RedisConnectionFactory connectionFactory){
- RedisTemplate<Object,Object> template = new RedisTemplate<>();
- template.setConnectionFactory(connectionFactory);
-
- FastJsonRedisSerializer serializer = new FastJsonRedisSerializer(Object.class);
-
- //使用StringRedisSerializer来序列化和反序列化redus的key值
- template.setKeySerializer(new StringRedisSerializer());
- template.setValueSerializer(serializer);
-
- template.afterPropertiesSet();
- return template;
- }
- }
È inoltre necessario unificare la classe di risposta
- package org.example.domain;
- import com.fasterxml.jackson.annotation.JsonInclude;
- @JsonInclude(JsonInclude.Include.NON_NULL)
- public class ResponseResult<T>{
- /**
- * 状态码
- */
- private Integer code;
- /**
- * 提示信息,如果有错误时,前端可以获取该字段进行提示
- */
- private String msg;
- /**
- * 查询到的结果数据
- */
- private T data;
-
- public ResponseResult(Integer code,String msg){
- this.code = code;
- this.msg = msg;
- }
-
- public ResponseResult(Integer code,T data){
- this.code = code;
- this.data = data;
- }
-
- public Integer getCode() {
- return code;
- }
-
- public void setCode(Integer code) {
- this.code = code;
- }
-
- public String getMsg() {
- return msg;
- }
-
- public void setMsg(String msg) {
- this.msg = msg;
- }
-
- public T getData() {
- return data;
- }
-
- public void setData(T data) {
- this.data = data;
- }
-
- public ResponseResult(Integer code,String msg,T data){
- this.code = code;
- this.msg = msg;
- this.data = data;
- }
- }
Sono necessarie le classi degli strumenti jwt per generare jwt e analizzare jwt.
- package org.example.utils;
-
- import io.jsonwebtoken.Claims;
- import io.jsonwebtoken.JwtBuilder;
- import io.jsonwebtoken.Jwts;
- import io.jsonwebtoken.SignatureAlgorithm;
-
- import javax.crypto.SecretKey;
- import javax.crypto.spec.SecretKeySpec;
- import java.util.Base64;
- import java.util.Date;
- import java.util.UUID;
-
- public class JwtUtil {
-
- //有效期为
- public static final Long JWT_TTL = 60*60*1000L; //一个小时
- //设置密钥明文
- public static final String JWT_KEY = "hzj";
-
- public static String getUUID(){
- String token = UUID.randomUUID().toString().replaceAll("-","");
- return token;
- }
-
- /**
- * 生成jwt
- * @param subject token中要存放的数据(json格式)
- * @return
- */
- public static String createJWT(String subject){
- JwtBuilder builder = getJwtBuilder(subject,null,getUUID()); //设置过期时间
- return builder.compact();
- }
-
- /**
- * 生成jwt
- * @param subject token中要存放的数据(json格式)
- * @param ttlMillis token超时时间
- * @return
- */
- public static String createJWT(String subject,Long ttlMillis){
- JwtBuilder builder = getJwtBuilder(subject,ttlMillis,getUUID()); //设置过期时间
- return builder.compact();
- }
-
- private static JwtBuilder getJwtBuilder(String subject,Long ttlMillis,String uuid){
- SignatureAlgorithm signatureAlgorithm = SignatureAlgorithm.HS256;
- SecretKey secretKey = generalkey();
- long nowMillis = System.currentTimeMillis();
- Date now = new Date(nowMillis);
- if(ttlMillis==null){
- ttlMillis=JwtUtil.JWT_TTL;
- }
- long expMillis = nowMillis + ttlMillis;
- Date expDate = new Date(expMillis);
- return Jwts.builder()
- .setId(uuid) //唯一的Id
- .setSubject(subject) //主题 可以是Json数据
- .setIssuer("hzj") //签发者
- .setIssuedAt(now) //签发时间
- .signWith(signatureAlgorithm,secretKey) //使用HS256对称加密算法签名,第二个参数为密钥
- .setExpiration(expDate);
- }
-
- /**
- * 创建token
- * @param id
- * @param subject
- * @param ttlMillis
- * @return
- */
- public static String createJWT(String id,String subject,Long ttlMillis){
- JwtBuilder builder = getJwtBuilder(subject,ttlMillis,id);//设置过期时间
- return builder.compact();
- }
-
- public static void main(String[] args) throws Exception{
- String token =
- "eyJ0eXAiOiJKV1QiLCJhbGciOiJIUzI1NiJ9.eyJleHAiOjE1OTg0MjU5MzIsInVzZX" +
- "JJZCI6MTExLCJ1c2VybmFtZSI6Ik1hcmtaUVAifQ.PTlOdRG7ROVJqPrA0q2ac7rKFzNNFR3lTMyP_8fIw9Q";
- Claims claims = parseJWT(token);
- System.out.println(claims);
- }
-
- /**
- * 生成加密后的密钥secretkey
- * @return
- */
- public static SecretKey generalkey(){
- byte[] encodeedkey = Base64.getDecoder().decode(JwtUtil.JWT_KEY);
- SecretKey key = new SecretKeySpec(encodeedkey,0,encodeedkey.length,"AES");
- return key;
- }
-
- /**
- * 解析
- * @param jwt
- * @return
- * @throws Exception
- */
- public static Claims parseJWT(String jwt) throws Exception{
- SecretKey secretKey = generalkey();
- return Jwts.parser()
- .setSigningKey(secretKey)
- .parseClaimsJws(jwt)
- .getBody();
- }
- }
Definire un'altra classe dello strumento Redis, RedisCache, che semplifica la chiamata a redistemplate
- package org.example.utils;
-
-
- import org.springframework.beans.factory.annotation.Autowired;
- import org.springframework.data.redis.core.BoundSetOperations;
- import org.springframework.data.redis.core.HashOperations;
- import org.springframework.data.redis.core.RedisTemplate;
- import org.springframework.data.redis.core.ValueOperations;
- import org.springframework.stereotype.Component;
-
- import java.util.*;
- import java.util.concurrent.TimeUnit;
-
- @SuppressWarnings(value = { "unchecked", "rawtypes" })
- @Component
- public class RedisCache
- {
- @Autowired
- public RedisTemplate redisTemplate;
-
- /**
- * 缓存基本的对象,Integer、String、实体类等
- *
- * @param key 缓存的键值
- * @param value 缓存的值
- */
- public <T> void setCacheObject(final String key, final T value)
- {
- redisTemplate.opsForValue().set(key, value);
- }
-
- /**
- * 缓存基本的对象,Integer、String、实体类等
- *
- * @param key 缓存的键值
- * @param value 缓存的值
- * @param timeout 时间
- * @param timeUnit 时间颗粒度
- */
- public <T> void setCacheObject(final String key, final T value, final Integer timeout, final TimeUnit timeUnit)
- {
- redisTemplate.opsForValue().set(key, value, timeout, timeUnit);
- }
-
- /**
- * 设置有效时间
- *
- * @param key Redis键
- * @param timeout 超时时间
- * @return true=设置成功;false=设置失败
- */
- public boolean expire(final String key, final long timeout)
- {
- return expire(key, timeout, TimeUnit.SECONDS);
- }
-
- /**
- * 设置有效时间
- *
- * @param key Redis键
- * @param timeout 超时时间
- * @param unit 时间单位
- * @return true=设置成功;false=设置失败
- */
- public boolean expire(final String key, final long timeout, final TimeUnit unit)
- {
- return redisTemplate.expire(key, timeout, unit);
- }
-
- /**
- * 获得缓存的基本对象。
- *
- * @param key 缓存键值
- * @return 缓存键值对应的数据
- */
- public <T> T getCacheObject(final String key)
- {
- ValueOperations<String, T> operation = redisTemplate.opsForValue();
- return operation.get(key);
- }
-
- /**
- * 删除单个对象
- *
- * @param key
- */
- public boolean deleteObject(final String key)
- {
- return redisTemplate.delete(key);
- }
-
- /**
- * 删除集合对象
- *
- * @param collection 多个对象
- * @return
- */
- public long deleteObject(final Collection collection)
- {
- return redisTemplate.delete(collection);
- }
-
- /**
- * 缓存List数据
- *
- * @param key 缓存的键值
- * @param dataList 待缓存的List数据
- * @return 缓存的对象
- */
- public <T> long setCacheList(final String key, final List<T> dataList)
- {
- Long count = redisTemplate.opsForList().rightPushAll(key, dataList);
- return count == null ? 0 : count;
- }
-
- /**
- * 获得缓存的list对象
- *
- * @param key 缓存的键值
- * @return 缓存键值对应的数据
- */
- public <T> List<T> getCacheList(final String key)
- {
- return redisTemplate.opsForList().range(key, 0, -1);
- }
-
- /**
- * 缓存Set
- *
- * @param key 缓存键值
- * @param dataSet 缓存的数据
- * @return 缓存数据的对象
- */
- public <T> BoundSetOperations<String, T> setCacheSet(final String key, final Set<T> dataSet)
- {
- BoundSetOperations<String, T> setOperation = redisTemplate.boundSetOps(key);
- Iterator<T> it = dataSet.iterator();
- while (it.hasNext())
- {
- setOperation.add(it.next());
- }
- return setOperation;
- }
-
- /**
- * 获得缓存的set
- *
- * @param key
- * @return
- */
- public <T> Set<T> getCacheSet(final String key)
- {
- return redisTemplate.opsForSet().members(key);
- }
-
- /**
- * 缓存Map
- *
- * @param key
- * @param dataMap
- */
- public <T> void setCacheMap(final String key, final Map<String, T> dataMap)
- {
- if (dataMap != null) {
- redisTemplate.opsForHash().putAll(key, dataMap);
- }
- }
-
- /**
- * 获得缓存的Map
- *
- * @param key
- * @return
- */
- public <T> Map<String, T> getCacheMap(final String key)
- {
- return redisTemplate.opsForHash().entries(key);
- }
-
- /**
- * 往Hash中存入数据
- *
- * @param key Redis键
- * @param hKey Hash键
- * @param value 值
- */
- public <T> void setCacheMapValue(final String key, final String hKey, final T value)
- {
- redisTemplate.opsForHash().put(key, hKey, value);
- }
-
- /**
- * 获取Hash中的数据
- *
- * @param key Redis键
- * @param hKey Hash键
- * @return Hash中的对象
- */
- public <T> T getCacheMapValue(final String key, final String hKey)
- {
- HashOperations<String, String, T> opsForHash = redisTemplate.opsForHash();
- return opsForHash.get(key, hKey);
- }
-
- /**
- * 删除Hash中的数据
- *
- * @param key
- * @param hkey
- */
- public void delCacheMapValue(final String key, final String hkey)
- {
- HashOperations hashOperations = redisTemplate.opsForHash();
- hashOperations.delete(key, hkey);
- }
-
- /**
- * 获取多个Hash中的数据
- *
- * @param key Redis键
- * @param hKeys Hash键集合
- * @return Hash对象集合
- */
- public <T> List<T> getMultiCacheMapValue(final String key, final Collection<Object> hKeys)
- {
- return redisTemplate.opsForHash().multiGet(key, hKeys);
- }
-
- /**
- * 获得缓存的基本对象列表
- *
- * @param pattern 字符串前缀
- * @return 对象列表
- */
- public Collection<String> keys(final String pattern)
- {
- return redisTemplate.keys(pattern);
- }
- }
-
Potremmo anche scrivere dati nella risposta, quindi abbiamo bisogno anche di una classe di strumenti WebUtils
- package org.example.utils;
-
- import javax.servlet.http.HttpServletResponse;
- import java.io.IOException;
-
- public class WebUtils {
- /**
- * 将字符串渲染到客户端
- *
- * @param response 渲染对象
- * @param string 待渲染的字符串
- * @return null
- */
- public static String renderString(HttpServletResponse response, String string) {
- try
- {
- response.setStatus(200);
- response.setContentType("application/json");
- response.setCharacterEncoding("utf-8");
- response.getWriter().print(string);
- }
- catch (IOException e)
- {
- e.printStackTrace();
- }
- return null;
- }
- }
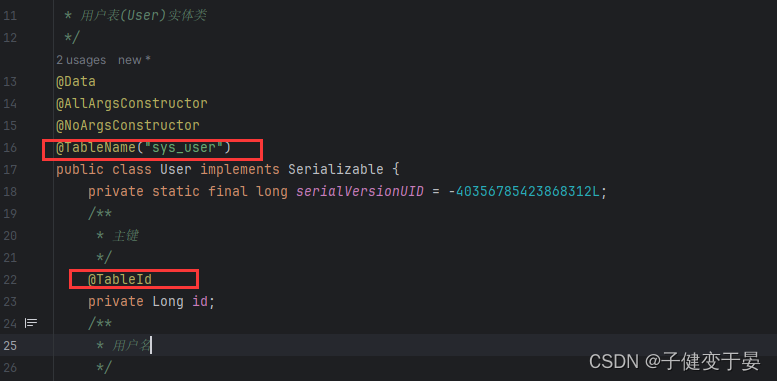
Infine scrivi la classe dell'entità utente corrispondente
- package org.example.domain;
-
- import lombok.AllArgsConstructor;
- import lombok.Data;
- import lombok.NoArgsConstructor;
- import java.io.Serializable;
- import java.util.Date;
- /**
- * 用户表(User)实体类
- */
- @Data
- @AllArgsConstructor
- @NoArgsConstructor
- public class User implements Serializable {
- private static final long serialVersionUID = -40356785423868312L;
- /**
- * 主键
- */
- private Long id;
- /**
- * 用户名
- */
- private String userName;
- /**
- * 昵称
- */
- private String nickName;
- /**
- * 密码
- */
- private String password;
- /**
- * 账号状态(0正常 1停用)
- */
- private String status;
- /**
- * 邮箱
- */
- private String email;
- /**
- * 手机号
- */
- private String phonenumber;
- /**
- * 用户性别(0男,1女,2未知)
- */
- private String sex;
- /**
- * 头像
- */
- private String avatar;
- /**
- * 用户类型(0管理员,1普通用户)
- */
- private String userType;
- /**
- * 创建人的用户id
- */
- private Long createBy;
- /**
- * 创建时间
- */
- private Date createTime;
- /**
- * 更新人
- */
- private Long updateBy;
- /**
- * 更新时间
- */
- private Date updateTime;
- /**
- * 删除标志(0代表未删除,1代表已删除)
- */
- private Integer delFlag;
- }
-
Secondo la nostra analisi di cui sopra, dobbiamo personalizzare un UserDetailsService per consentire a SpringSecuriry di utilizzare il nostro UserDetailsService. Il nostro UserDetailsService può interrogare il nome utente e la password dal database.
Per prima cosa creiamo una tabella di database sys_user.
- CREATE TABLE `sys_user` (
- `id` bigint NOT NULL AUTO_INCREMENT COMMENT '主键',
- `user_name` varchar(64) NOT NULL DEFAULT 'NULL' COMMENT '用户名',
- `nick_name` varchar(64) NOT NULL DEFAULT 'NULL' COMMENT '呢称',
- `password` varchar(64) NOT NULL DEFAULT 'NULL' COMMENT '密码',
- `status` char(1) DEFAULT '0' COMMENT '账号状态(0正常1停用)',
- `email` varchar(64) DEFAULT NULL COMMENT '邮箱',
- `phonenumber` varchar(32) DEFAULT NULL COMMENT '手机号',
- `sex` char(1) DEFAULT NULL COMMENT '用户性别(0男,1女,2未知)',
- `avatar` varchar(128) DEFAULT NULL COMMENT '头像',
- `user_type` char(1) NOT NULL DEFAULT '1' COMMENT '用户类型(O管理员,1普通用户)',
- `create_by` bigint DEFAULT NULL COMMENT '创建人的用户id',
- `create_time` datetime DEFAULT NULL COMMENT '创建时间',
- `update_by` bigint DEFAULT NULL COMMENT '更新人',
- `update_time` datetime DEFAULT NULL COMMENT '更新时间',
- `del_flag` int DEFAULT '0' COMMENT '删除标志(O代表未删除,1代表已删除)',
- PRIMARY KEY (`id`)
- ) ENGINE=InnoDB AUTO_INCREMENT=3 DEFAULT CHARSET=utf8mb4 COLLATE=utf8mb4_0900_ai_ci COMMENT='用户表';
Quindi introdurre myBatisPlus e i driver mysql.
- <dependency>
- <groupId>com.baomidou</groupId>
- <artifactId>mybatis-plus-boot-starter</artifactId>
- <version>3.4.3</version>
- </dependency>
- <dependency>
- <groupId>mysql</groupId>
- <artifactId>mysql-connector-java</artifactId>
- </dependency>
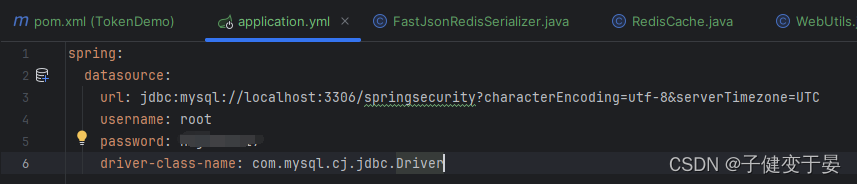
Quindi configurare le informazioni rilevanti del database.
Quindi definisci l'interfaccia del mappatore UserMapper e usa mybatisplus per aggiungere le annotazioni corrispondenti.
- package org.example.mapper;
-
- import com.baomidou.mybatisplus.core.mapper.BaseMapper;
- import org.example.domain.User;
-
- public interface UserMapper extends BaseMapper<User> {
- }
 Quindi configurare la scansione dei componenti
Infine, verifica se mp può essere utilizzato normalmente.
Presentare Junit

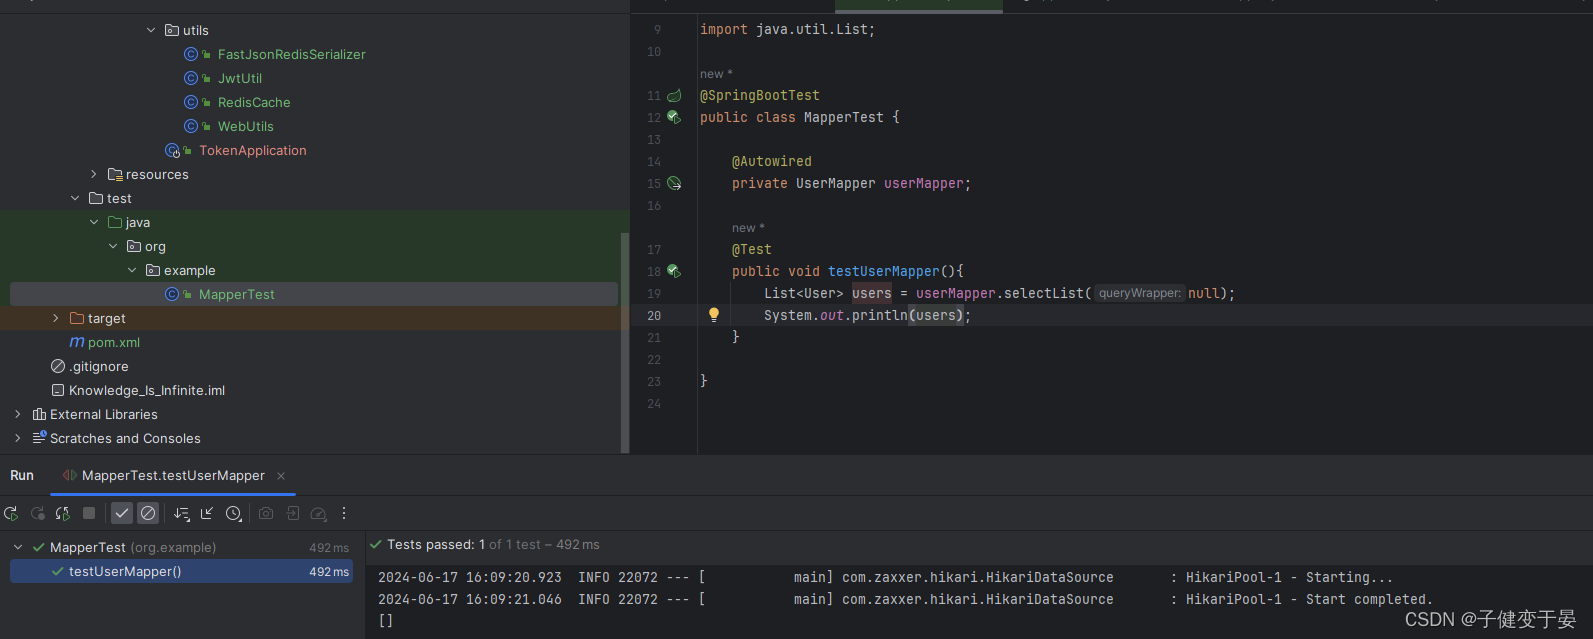
In questo modo può essere utilizzato normalmente.
Successivamente dobbiamo implementare il codice principale.
Innanzitutto, personalizziamo UserDetailsService.
- package org.example.service.impl;
- import com.baomidou.mybatisplus.core.conditions.query.LambdaQueryWrapper;
- import org.example.domain.LoginUser;
- import org.example.domain.User;
- import org.example.mapper.UserMapper;
- import org.springframework.beans.factory.annotation.Autowired;
- import org.springframework.security.core.userdetails.UserDetails;
- import org.springframework.security.core.userdetails.UserDetailsService;
- import org.springframework.security.core.userdetails.UsernameNotFoundException;
- import org.springframework.stereotype.Service;
- import java.util.Objects;
- @Service
- public class UserDetailsServiceImpl implements UserDetailsService {
- @Autowired
- private UserMapper userMapper;
- @Override
- public UserDetails loadUserByUsername(String username) throws UsernameNotFoundException {
- //查询用户信息 [InMemoryUserDetailsManager是在内存中查找]
- LambdaQueryWrapper<User> wrapper = new LambdaQueryWrapper<>();
- wrapper.eq(User::getUserName,username);
- User user = userMapper.selectOne(wrapper);
- //如果查询不到数据就抛出异常,给出提示
- if(Objects.isNull(user)){
- throw new RuntimeException("用户名或密码错误!");
- }
-
- //TODO 查询权限信息
-
- //封装为UserDetails对象返回
- return new LoginUser(user);
- }
- }
Qui l'utente viene incapsulato come UserDetails e restituito.
- package org.example.domain;
- import lombok.AllArgsConstructor;
- import lombok.Data;
- import lombok.NoArgsConstructor;
- import org.springframework.security.core.GrantedAuthority;
- import org.springframework.security.core.userdetails.UserDetails;
- import java.util.Collection;
- @Data
- @AllArgsConstructor
- @NoArgsConstructor
- public class LoginUser implements UserDetails {
- private User user;
- @Override
- public Collection<? extends GrantedAuthority> getAuthorities() {
- return null;
- }
-
- @Override
- public String getPassword() {
- return user.getPassword();
- }
-
- @Override
- public String getUsername() {
- return user.getUserName();
- }
-
- @Override
- public boolean isAccountNonExpired() {
- return true;
- }
-
- @Override
- public boolean isAccountNonLocked() {
- return true;
- }
-
- @Override
- public boolean isCredentialsNonExpired() {
- return true;
- }
-
- @Override
- public boolean isEnabled() {
- return true;
- }
- }
Infine, c'è un punto qui, ovvero dobbiamo eseguire un test di accesso per ottenere i dati dal database. Dobbiamo scrivere i dati dell'utente nella tabella e, se desideriamo, che la password dell'utente venga trasmessa in chiaro , devi aggiungere {noop} prima della password.
 Qui è possibile inserire il nome utente e la password nel database per accedere.
Parliamo del motivo per cui {noop} viene aggiunto davanti alla password, poiché il PasswordEncoder predefinito richiede che il formato della password nel database sia {id}password. Determinerà il metodo di crittografia della password in base all'ID, ma generalmente non adottare questo metodo, quindi PasswordEncoder deve essere sostituito.

Successivamente lo testeremo e vedremo.
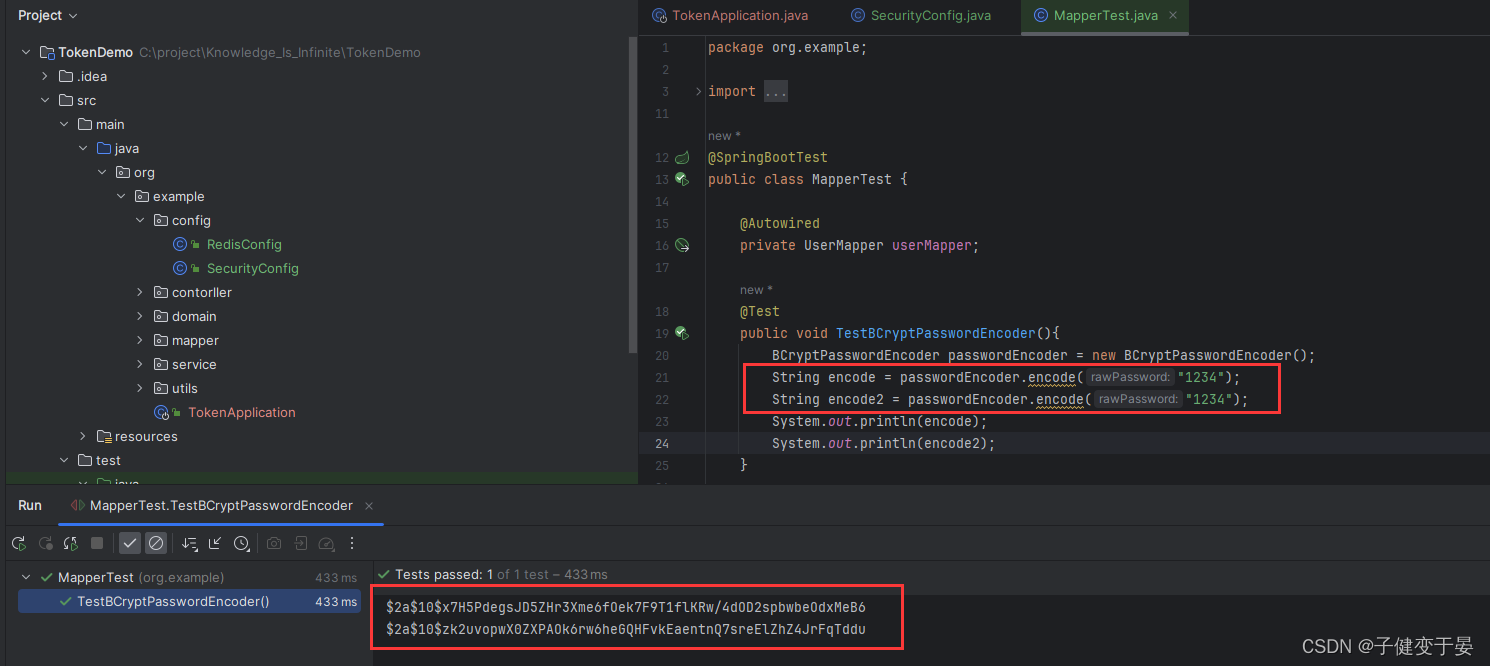
Puoi vedere che le due password originali che abbiamo passato qui sono le stesse, ma abbiamo ottenuto risultati diversi. Questo è in realtà correlato all'algoritmo di salting. In seguito scriverò anche un articolo sulla crittografia personalizzata.
Dopo aver ottenuto la password crittografata, è possibile archiviare la password crittografata nel database, quindi è possibile accedere verificando la password in testo normale passata dal front-end con la password crittografata nel database.
A questo punto, abbiamo avviato il progetto di accesso e abbiamo scoperto che non potevamo più accedere con la password precedente, perché il database dovrebbe memorizzare la password crittografata memorizzata nel database durante la fase di registrazione, non la password originale (perché io non mi sono registrato, crittograferò la password) La password viene scritta da sola nel database).
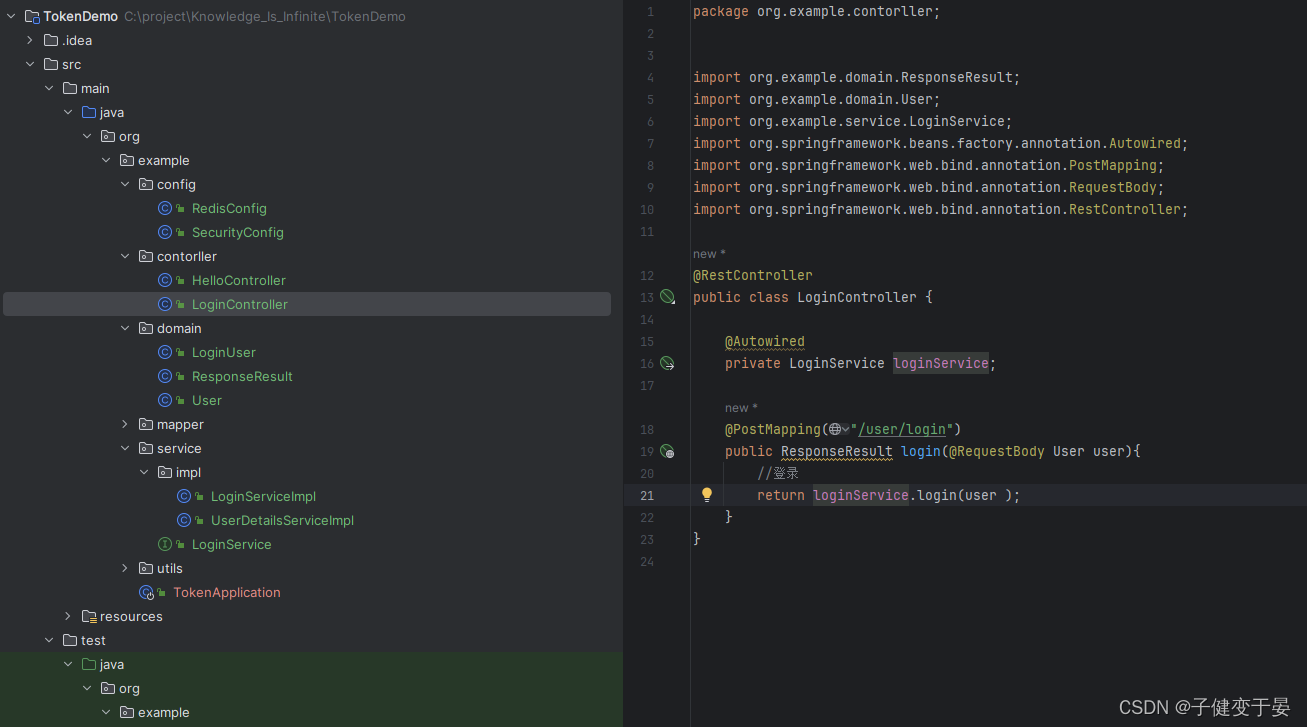
Dobbiamo implementare un'interfaccia di accesso e quindi lasciare che SpringSecuruty lo consenta. Se non è consentito, sarà contraddittorio Nell'interfaccia, l'autenticazione dell'utente viene eseguita tramite il metodo di autenticazione di AuthenticationManager, quindi dobbiamo configurare AuthenticationManager da iniettare. nel contenitore in SecurityConfig.
Se l'autenticazione ha esito positivo, è necessario generare un jwt e inserirlo nella risposta. Affinché l'utente possa identificare l'utente specifico tramite jwt quando effettua la richiesta successiva, le informazioni dell'utente devono essere archiviate in Redis e l'utente. L'ID può essere utilizzato come chiave.
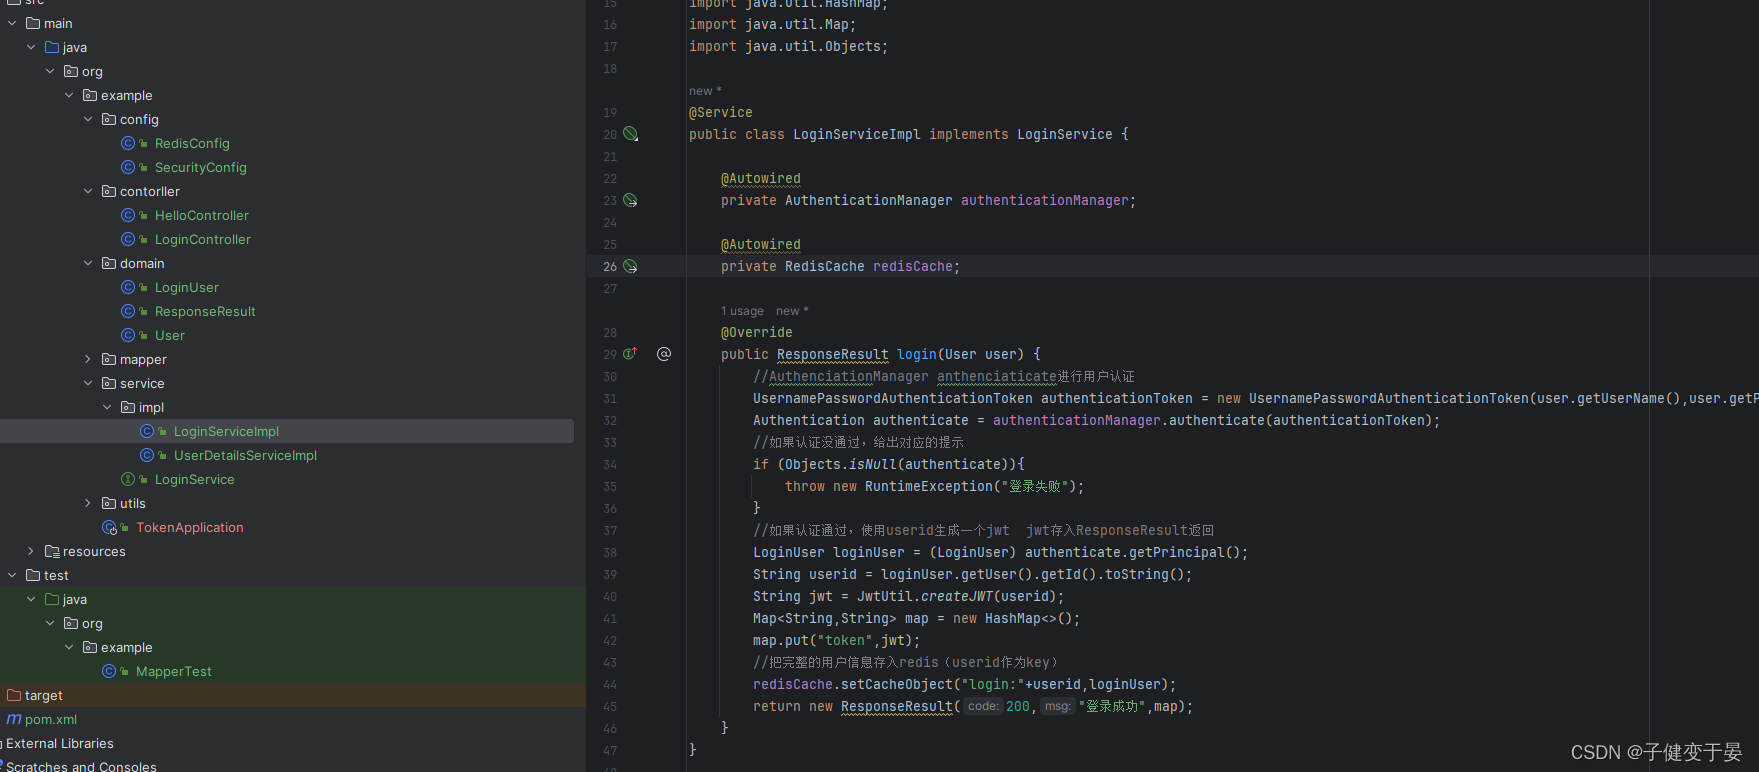
Scrivi prima LoginController
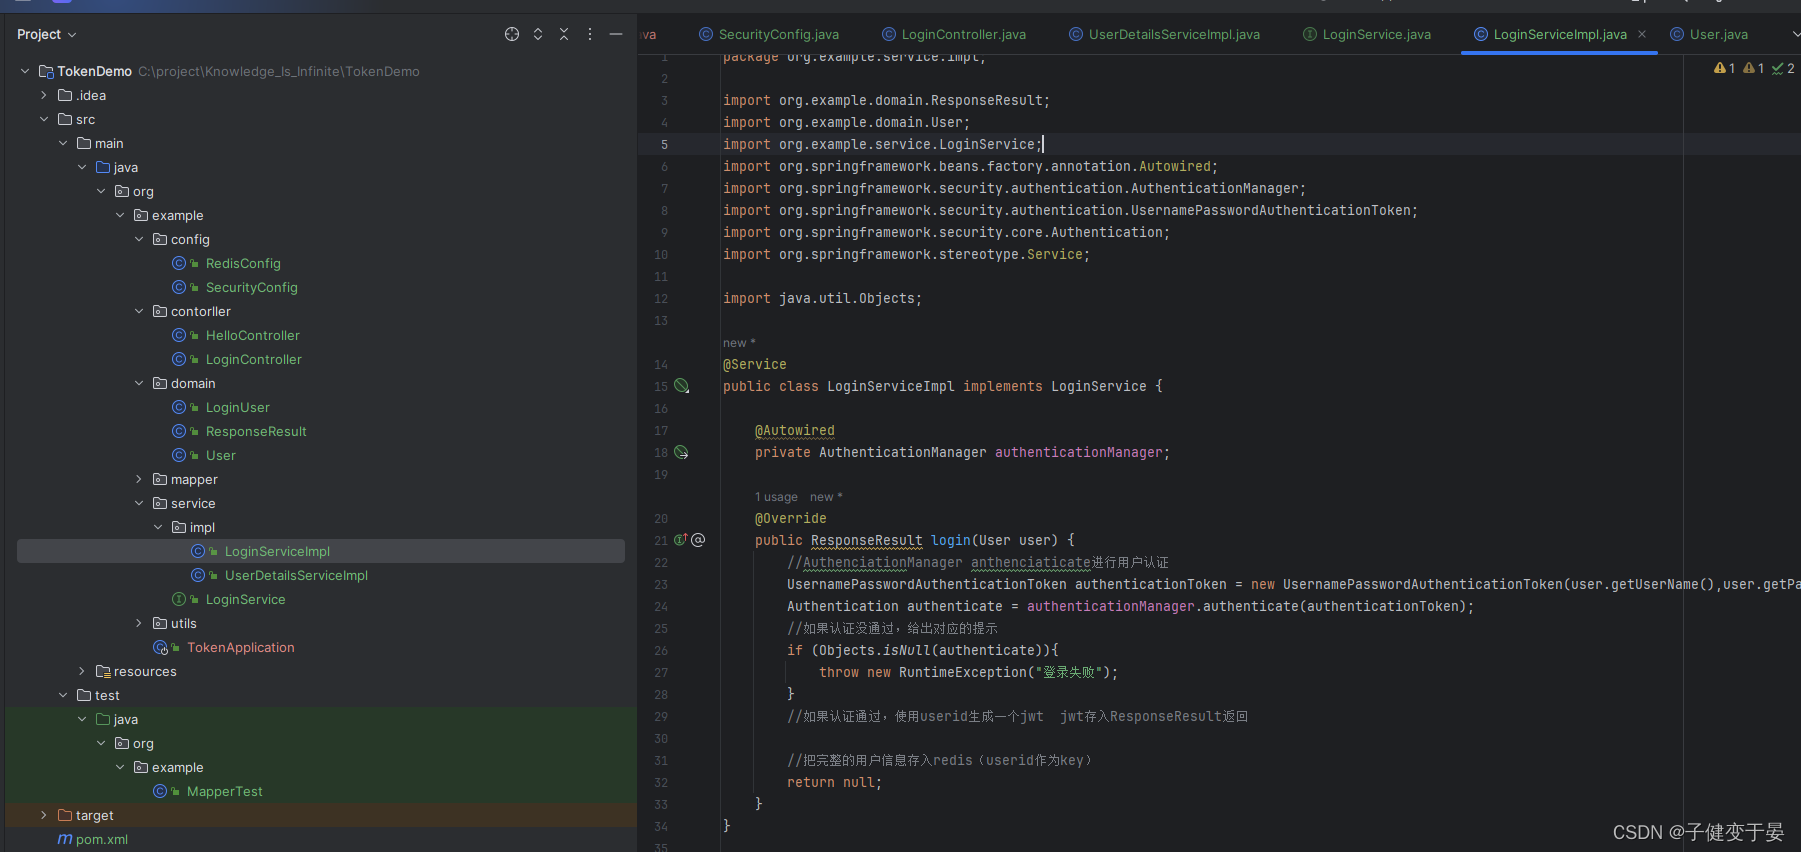
Quindi scrivere il servizio corrispondente.
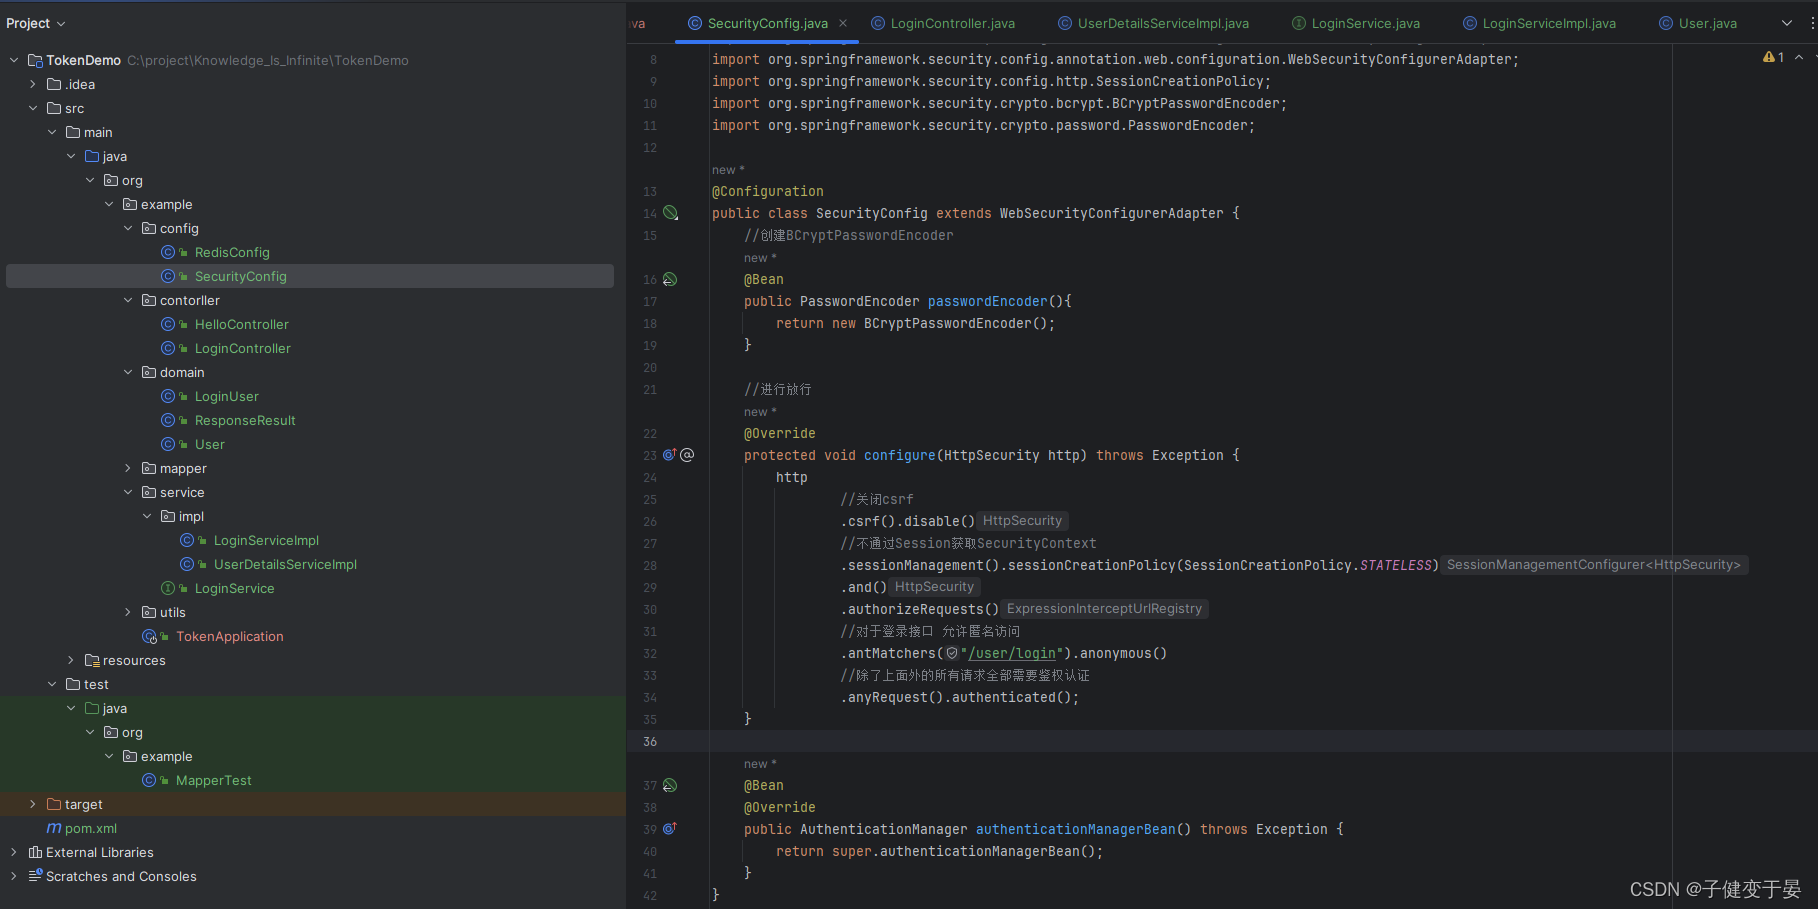
 Iniettare AuthenticationManager in SecurityConfig e rilasciare l'interfaccia di accesso.
Nella logica aziendale del servizio, se l'autenticazione fallisce, verrà restituita un'eccezione personalizzata, ma se l'autenticazione ha esito positivo, come otteniamo le informazioni corrispondenti.
Qui possiamo eseguire il debug e vedere gli oggetti ottenuti.


Qui si trova che le informazioni necessarie corrispondenti possono essere ottenute nel Committente.
Quindi completa il codice.
Infine, provalo.
Incollerò prima il codice.
- @Component
- public class JwtAuthenticationTokenFilter extends OncePerRequestFilter {
-
- @Autowired
- private RedisCache redisCache;
-
- @Override
- protected void doFilterInternal(HttpServletRequest request, HttpServletResponse response, FilterChain filterChain) throws ServletException, IOException {
- //获取token
- String token = request.getHeader("token");
- if (!StringUtils.hasText(token)) {
- //放行
- filterChain.doFilter(request, response); //这里放行是因为还有后续的过滤器会给出对应的异常
- return; //token为空 不执行后续流程
- }
- //解析token
- String userid;
- try {
- Claims claims = JwtUtil.parseJWT(token);
- userid = claims.getSubject();
- } catch (Exception e) {
- e.printStackTrace();
- throw new RuntimeException("token非法!");
- }
- //从redis中获取用户信息
- String redisKey = "login:" + userid;
- LoginUser loginUser = redisCache.getCacheObject(redisKey);
- if (Objects.isNull(loginUser)){
- throw new RuntimeException("用户未登录!");
- }
- //将信息存入SecurityContextHolder(因为过滤器链后面的filter都是从中获取认证信息进行对应放行)
- //TODO 获取权限信息封装到Authentication中
- UsernamePasswordAuthenticationToken authenticationToken =
- new UsernamePasswordAuthenticationToken(loginUser,null,null);
- SecurityContextHolder.getContext().setAuthentication(authenticationToken);
-
- //放行
- filterChain.doFilter(request,response); //此时的放行是携带认证的,不同于上方token为空的放行
- }
- }
Prima di tutto, per ottenere il token qui, otteniamo il token corrispondente dall'intestazione della richiesta, quindi controlliamo che sia vuoto, lo rilasceremo direttamente senza passare attraverso il processo di follow-up analizzerà il token, otterrà l'ID utente all'interno, quindi utilizzerà l'ID utente in base a Ottieni le informazioni utente corrispondenti da redis e infine lo memorizzerà in SecurityContextHolder, poiché i filtri successivi devono ottenere da esso le informazioni di autenticazione giornaliera e infine eseguire operazioni di analisi.
Un altro punto che richiede attenzione è che SecurityContextHolder.getContext().setAuthentication() deve passare l'oggetto di autenticazione, quando costruiamo l'oggetto, utilizziamo tre parametri, perché il terzo parametro è la chiave per determinare se autenticarsi o meno.
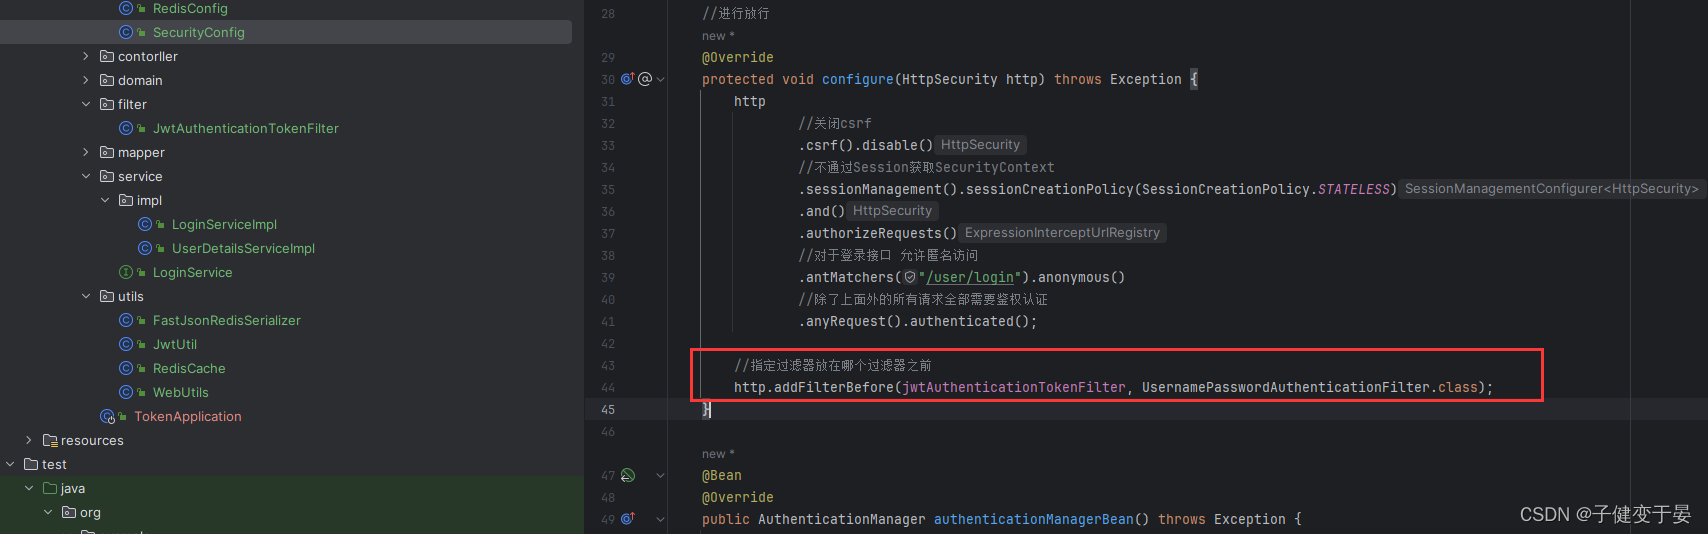
Successivamente dobbiamo configurare questo filtro.
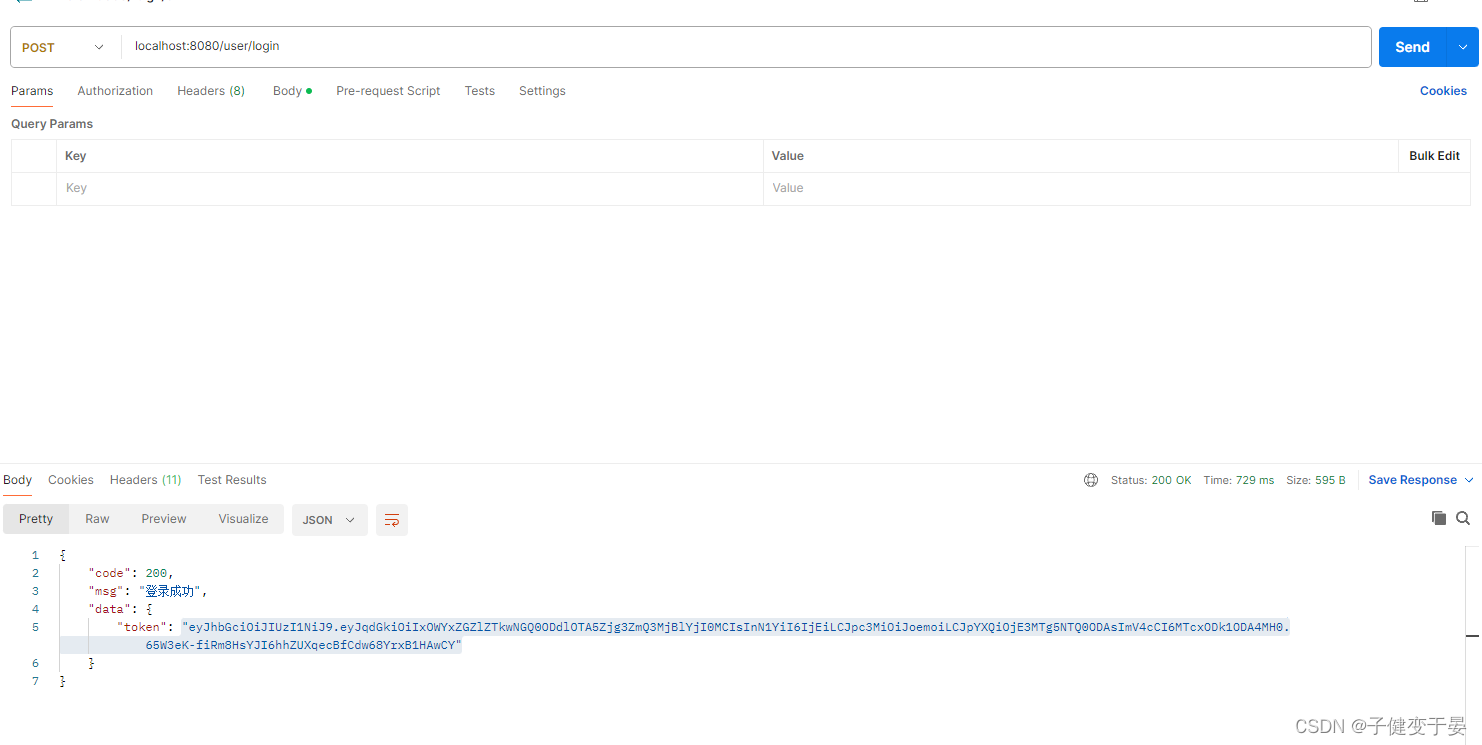
Quindi quando accediamo all'interfaccia utente/login, ci verrà restituito un corpo della risposta con un token. Quando accediamo nuovamente all'interfaccia hello, sarà 403. Poiché non contiene un token, corrisponde al codice sopra. Senza un token, il corpo della risposta verrà rilasciato e il ritorno non eseguirà il processo successivo (il rilascio qui è perché ci sono altri filtri che lanciano specificamente eccezioni per l'elaborazione successiva e il ritorno serve per impedire che passi attraverso la risposta. processi)
In questo momento, se inseriamo il token generato da user/login nell'intestazione della richiesta dell'interfaccia hello, possiamo accedervi normalmente.

Quindi lo scopo del nostro set di filtri è stato raggiunto (ottenimento di token, analisi dei token e memorizzazione in SecurityContextHolder)
A questo punto è più semplice per noi disconnetterci. Dobbiamo solo eliminare i dati corrispondenti in Redis. Quando porteremo il token per l'accesso in un secondo momento, le informazioni utente corrispondenti in Redis verranno ottenute nel nostro filtro personalizzato non riesci a ottenerlo significa che non sei loggato.


Portiamo questo token per accedere all'interfaccia /user/logout.

Quindi viene implementata la funzione di logout.
Questo articolo è stato appreso dal terzo aggiornamento della stazione b! ! !

Si dedica alla ricerca tecnologica da più di 30 anni ed è esperto in vari linguaggi come Java, Linux, Javascript, php, css, ecc. Ha dato numerosi contributi nel campo dell'open source stazione di documentazione per gli sviluppatori per condividere alcuni problemi nello sviluppo della tecnologia per riferimento futuro

Posta[email protected]