2024-07-12
한어Русский языкEnglishFrançaisIndonesianSanskrit日本語DeutschPortuguêsΕλληνικάespañolItalianoSuomalainenLatina
Table of contents
1 Browser's Same Origin Policy
1.1 Overview of Same-Origin Policy
2 What are the restrictions on cross-domain
2.3 Limit Ajax data acquisition
4CORS solves Ajax cross-domain problem
4.2CORS solves simple cross-domain requests
4.3 Simple and complex requests
4.4CORS solves complex cross-domain requests
4.5 Quickly complete configuration with the cors library
5JSONP solves cross-domain issues
6Configure proxy to solve cross-domain
6.1 Configure your own proxy server
6.2 Use Nginx to build a proxy server
6.3 Build a server with scaffolding
Code address git clone https://gitee.com/childe-jia/cross-domain-test.git
The same-origin policy is a policy followed by browsers to ensure resource security, which imposes some restrictions on access to resources.
W3C's description of the same-origin policy:Same origin policy。
1. Components of a source

2 In the table below, only the two sources in the last row are the same.
| Source 1 | Source 2 | Is it homologous? |
| http://www.xyz.com/home | https://www.xyz.com/home | ⛔ Non-homologous ️ |
| http://www.xyz.com/home | http://mail.xyz.com/home | ⛔ Non-homologous |
| http://www.xyz.com:8080/home | http://www.xyz.com:8090/home | ⛔ Non-homologous |
| http://www.xyz.com:8080/home | http://www.xyz.com:8080/search | ✅Same source︎ |
3 Same-origin requests

4 Non-same-origin requests
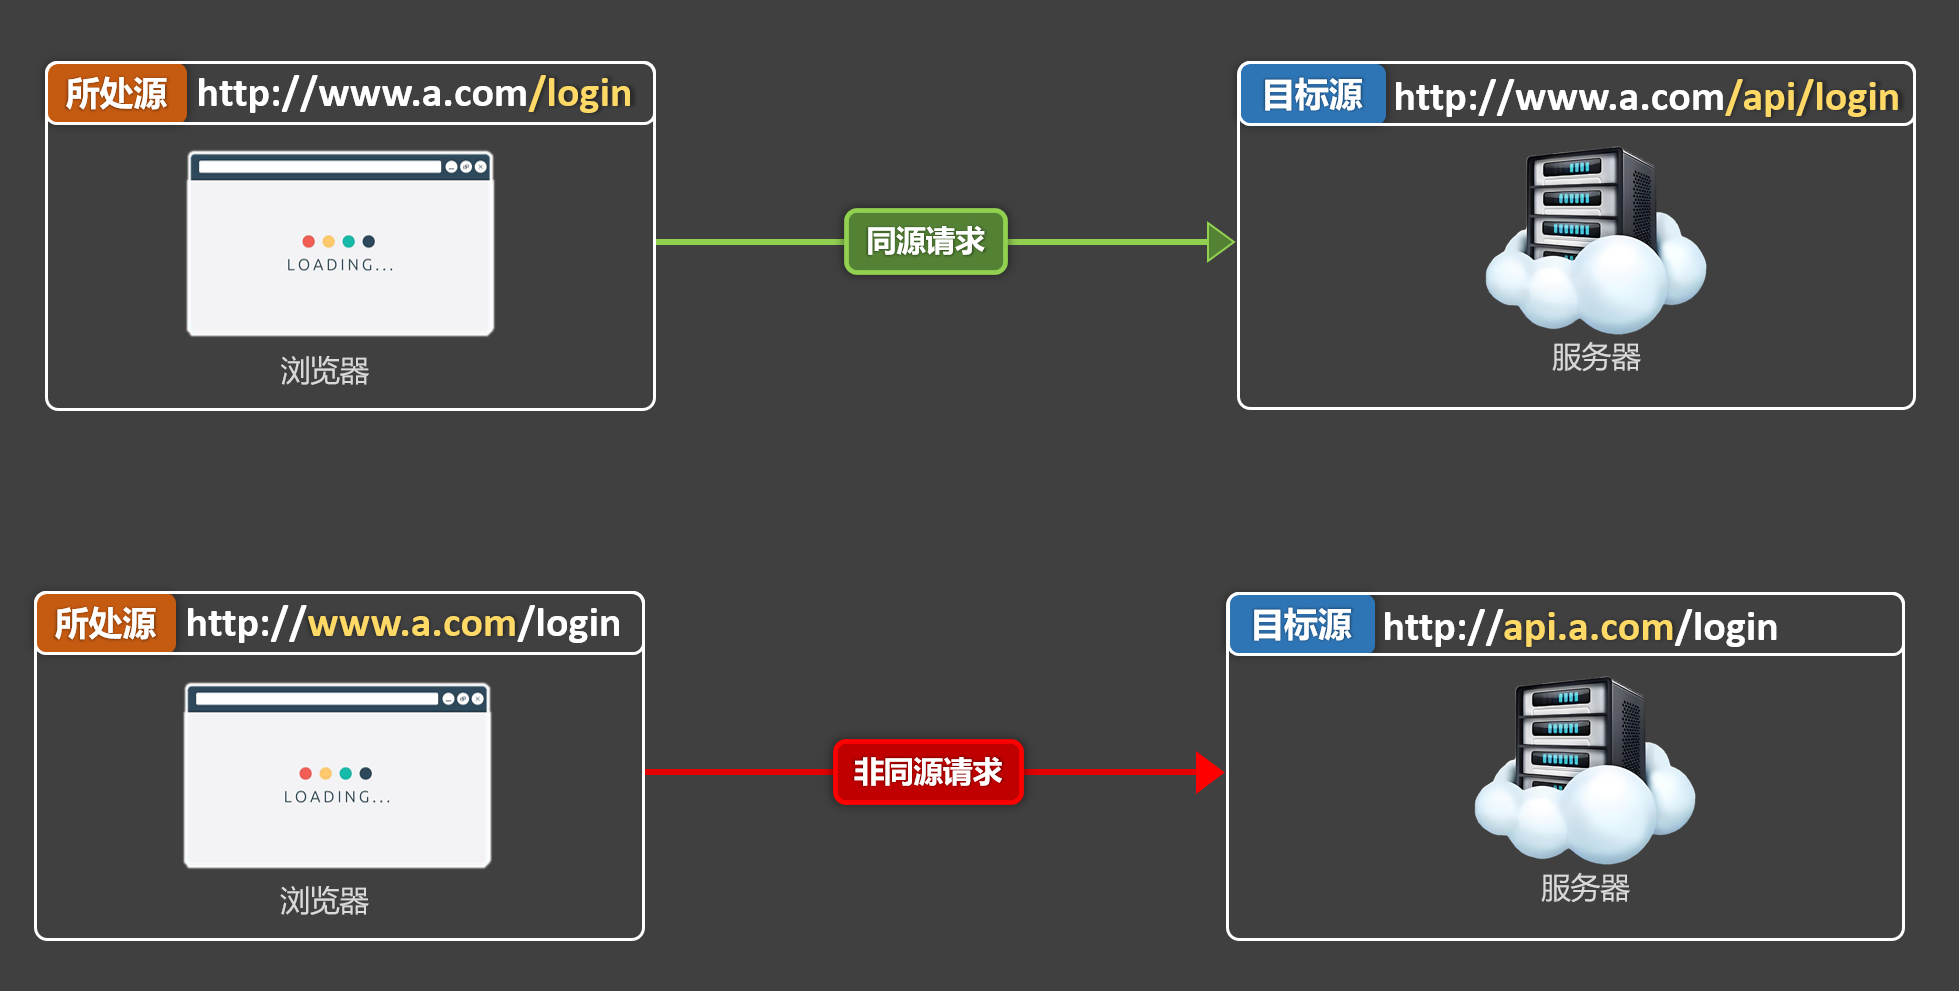
5 Summary: The "source" and "target source" are inconsistent, which is "non-same source", also known as "heterogeneous source" or "cross-domain"
For example, if there are two sources: "Source A" and "Source B", and they are "non-same-origin", then the browser will have the following restrictions:
Scripts from "Source A" cannot access the DOM of "Source B".
- <!-- <iframe id="framePage" src="./demo.html"></iframe> -->
- <iframe id="framePage" src="https://www.baidu.com"></iframe>
-
- <script type="text/javascript" >
- function showDOM(){
- const framePage = document.getElementById('framePage')
- console.log(framePage.contentWindow.document) //同源的可以获取,非同源的无法获取
- }
- </script>
Source A cannot access the cookies of Source B
- <iframe id="baidu" src="http://www.baidu.com" width="500" height="300"></iframe>
-
- <script type="text/javascript" >
- // 访问的是当前源的cookie,并不是baidu的cookie
- console.log(document.cookie)
- </script>
"Source A" can send requests to "Source B", but cannot obtain the response data from "Source B".
- const url = 'https://www.toutiao.com/hot-event/hot-board/?origin=toutiao_pc'
- let result = await fetch(url)
- let data = await result.json();
- console.log(data)
Note: Among the above limitations, the browser's limitation on Ajax data acquisition is the most influential one and is often encountered in actual development.
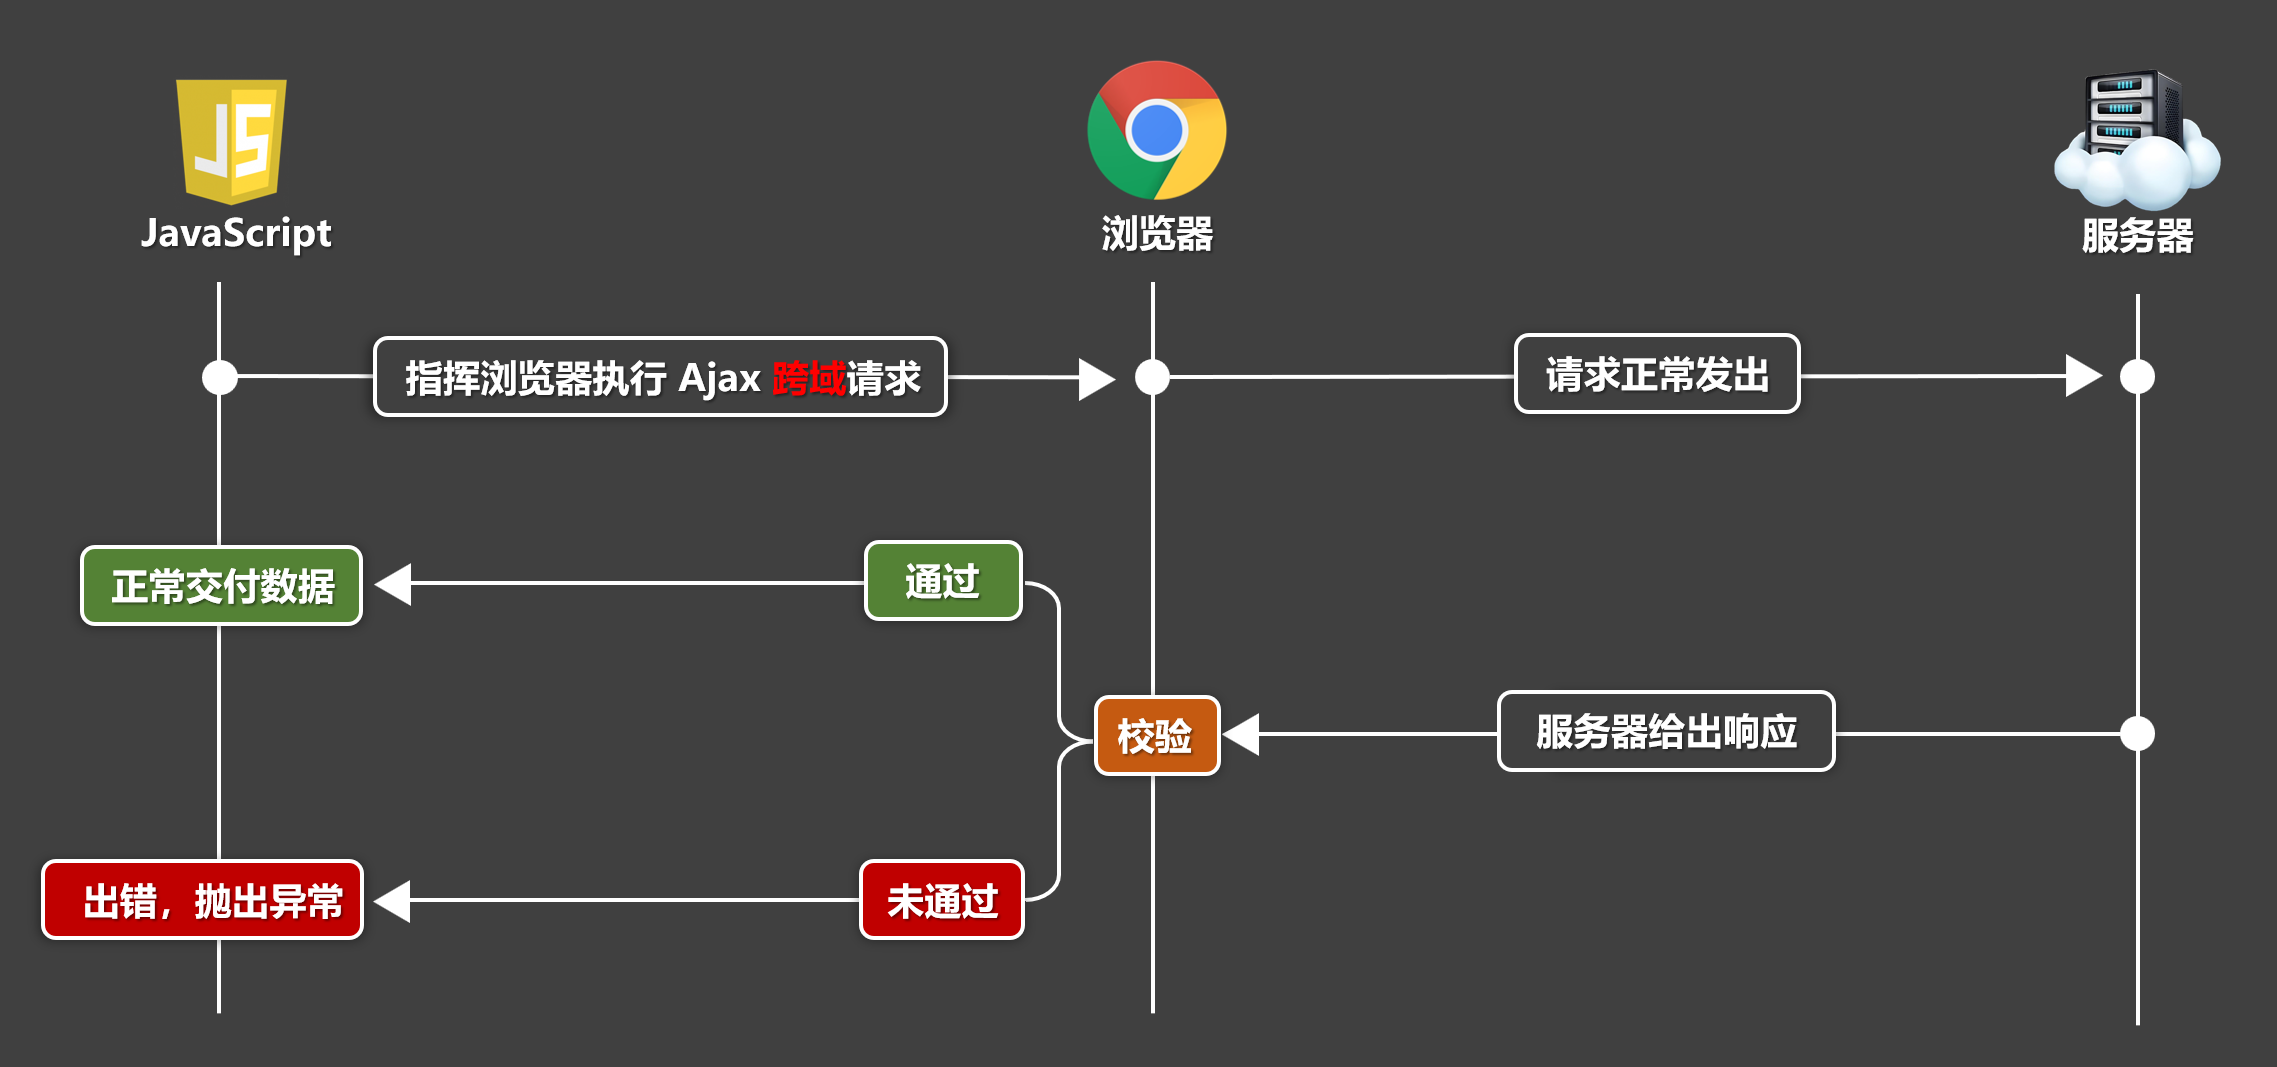
CORS stands for Cross-Origin Resource Sharing, which is a set of specifications for controlling browsers to verify cross-origin requests. The server adds specific response headers to control browser verification in accordance with the CORS specification. The general rules are as follows:
●If the server explicitly rejects cross-domain requests or does not indicate so, the browser verification will fail.
●If the server explicitly allows cross-domain requests, the browser verification will pass.
Note: Using CORS is the most orthodox way to solve cross-domain problems, and requires the server to be "our own".
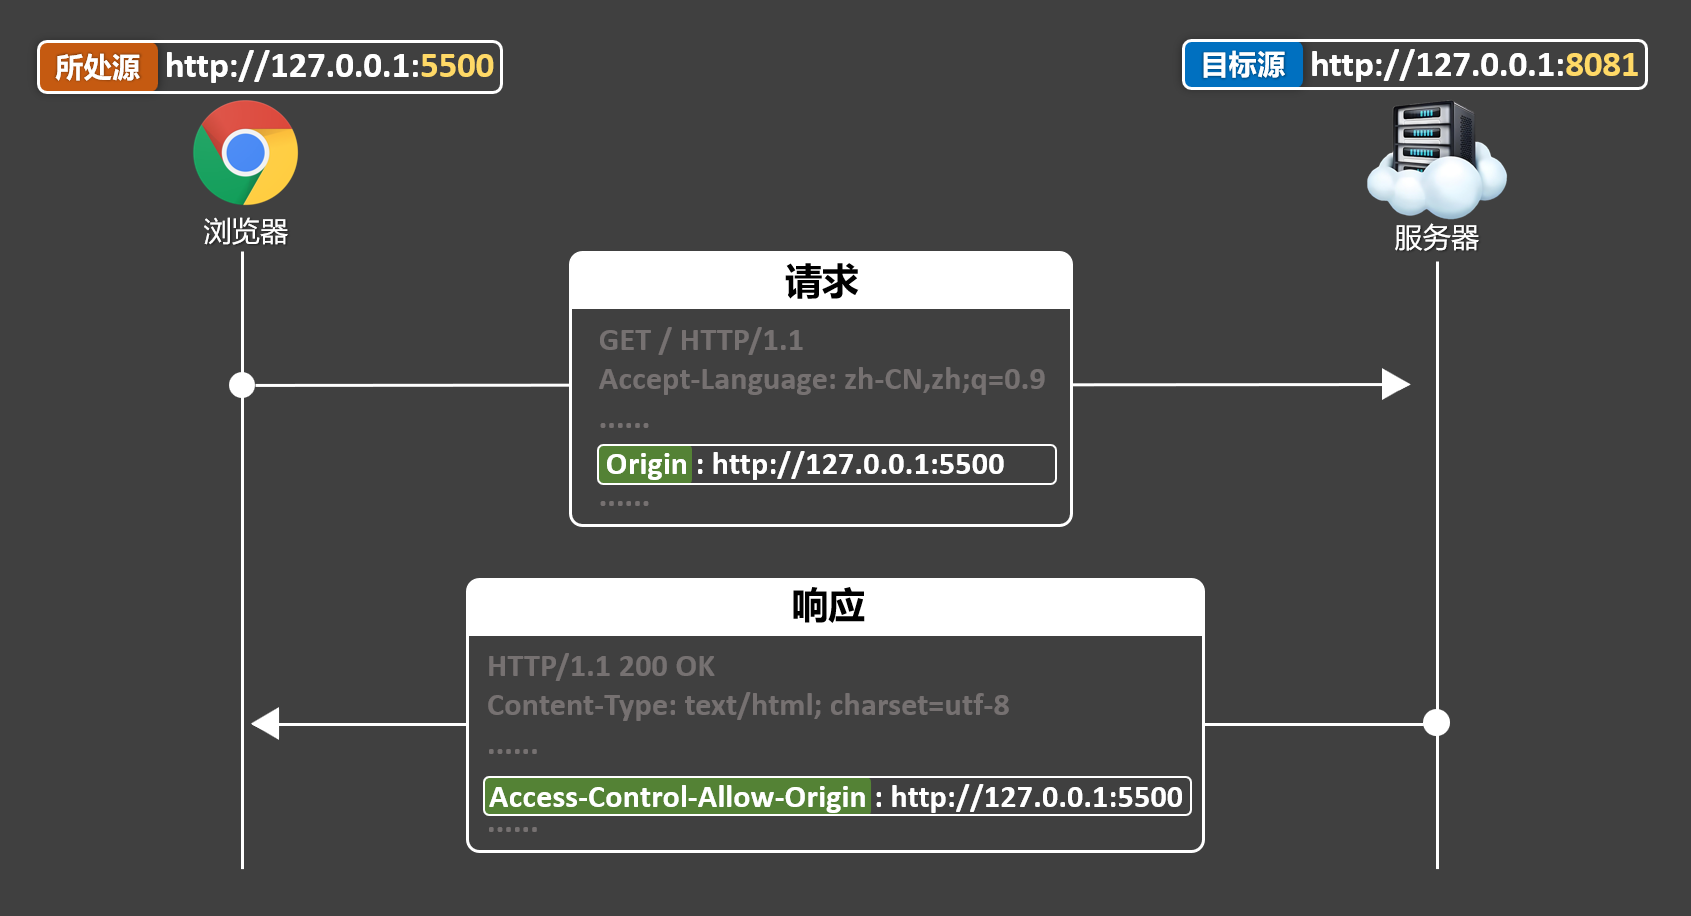
The overall idea is: when the server responds, it adds the Access-Control-Allow-Origin response header to explicitly allow a certain source to initiate a cross-domain request, and then the browser passes it directly during verification.
The core code of the server (taking the express framework as an example):
- // 处理跨域中间件
- function corsMiddleWare(req,res,next){
- // 允许 http://127.0.0.1:5500 这个源发起跨域请求
- // res.setHeader('Access-Control-Allow-Origin','http://127.0.0.1:5500')
-
- // 允许所有源发起跨域请求
- res.setHeader('Access-Control-Allow-Origin','*')
- next()
- }
-
- // 配置路由并使用中间件
- app.get('/',corsMiddleWare,(req,res)=>{
- res.send('hello!')
- })
CORS divides requests into two categories: ① simple requests and ② complex requests.
| Simple request | Complex Requests |
| ✅Request method: GET, HEAD, POST | 1 is either a simple request or a complex request. |
| ✅The request header field must comply with《CORS Security Specification》 | |
| ✅The value of Content-Type in the request header can only be the following three: |
About preflight request:
| Request Header | meaning |
| Origin | The source of the request |
| Access-Control-Request-Method | The actual HTTP method requested |
| Access-Control-Request-Headers | Custom headers used in the actual request (if any) |
1 Step 1: The server passes the browser's pre-check request, and the server needs to return the following response header:
| Response Headers | meaning |
| Access-Control-Allow-Origin | Allowed Origins |
| Access-Control-Allow-Methods | Allowed methods |
| Access-Control-Allow-Headers | Allowed custom headers |
| Access-Control-Max-Age | Preflight request result cache time (optional) |
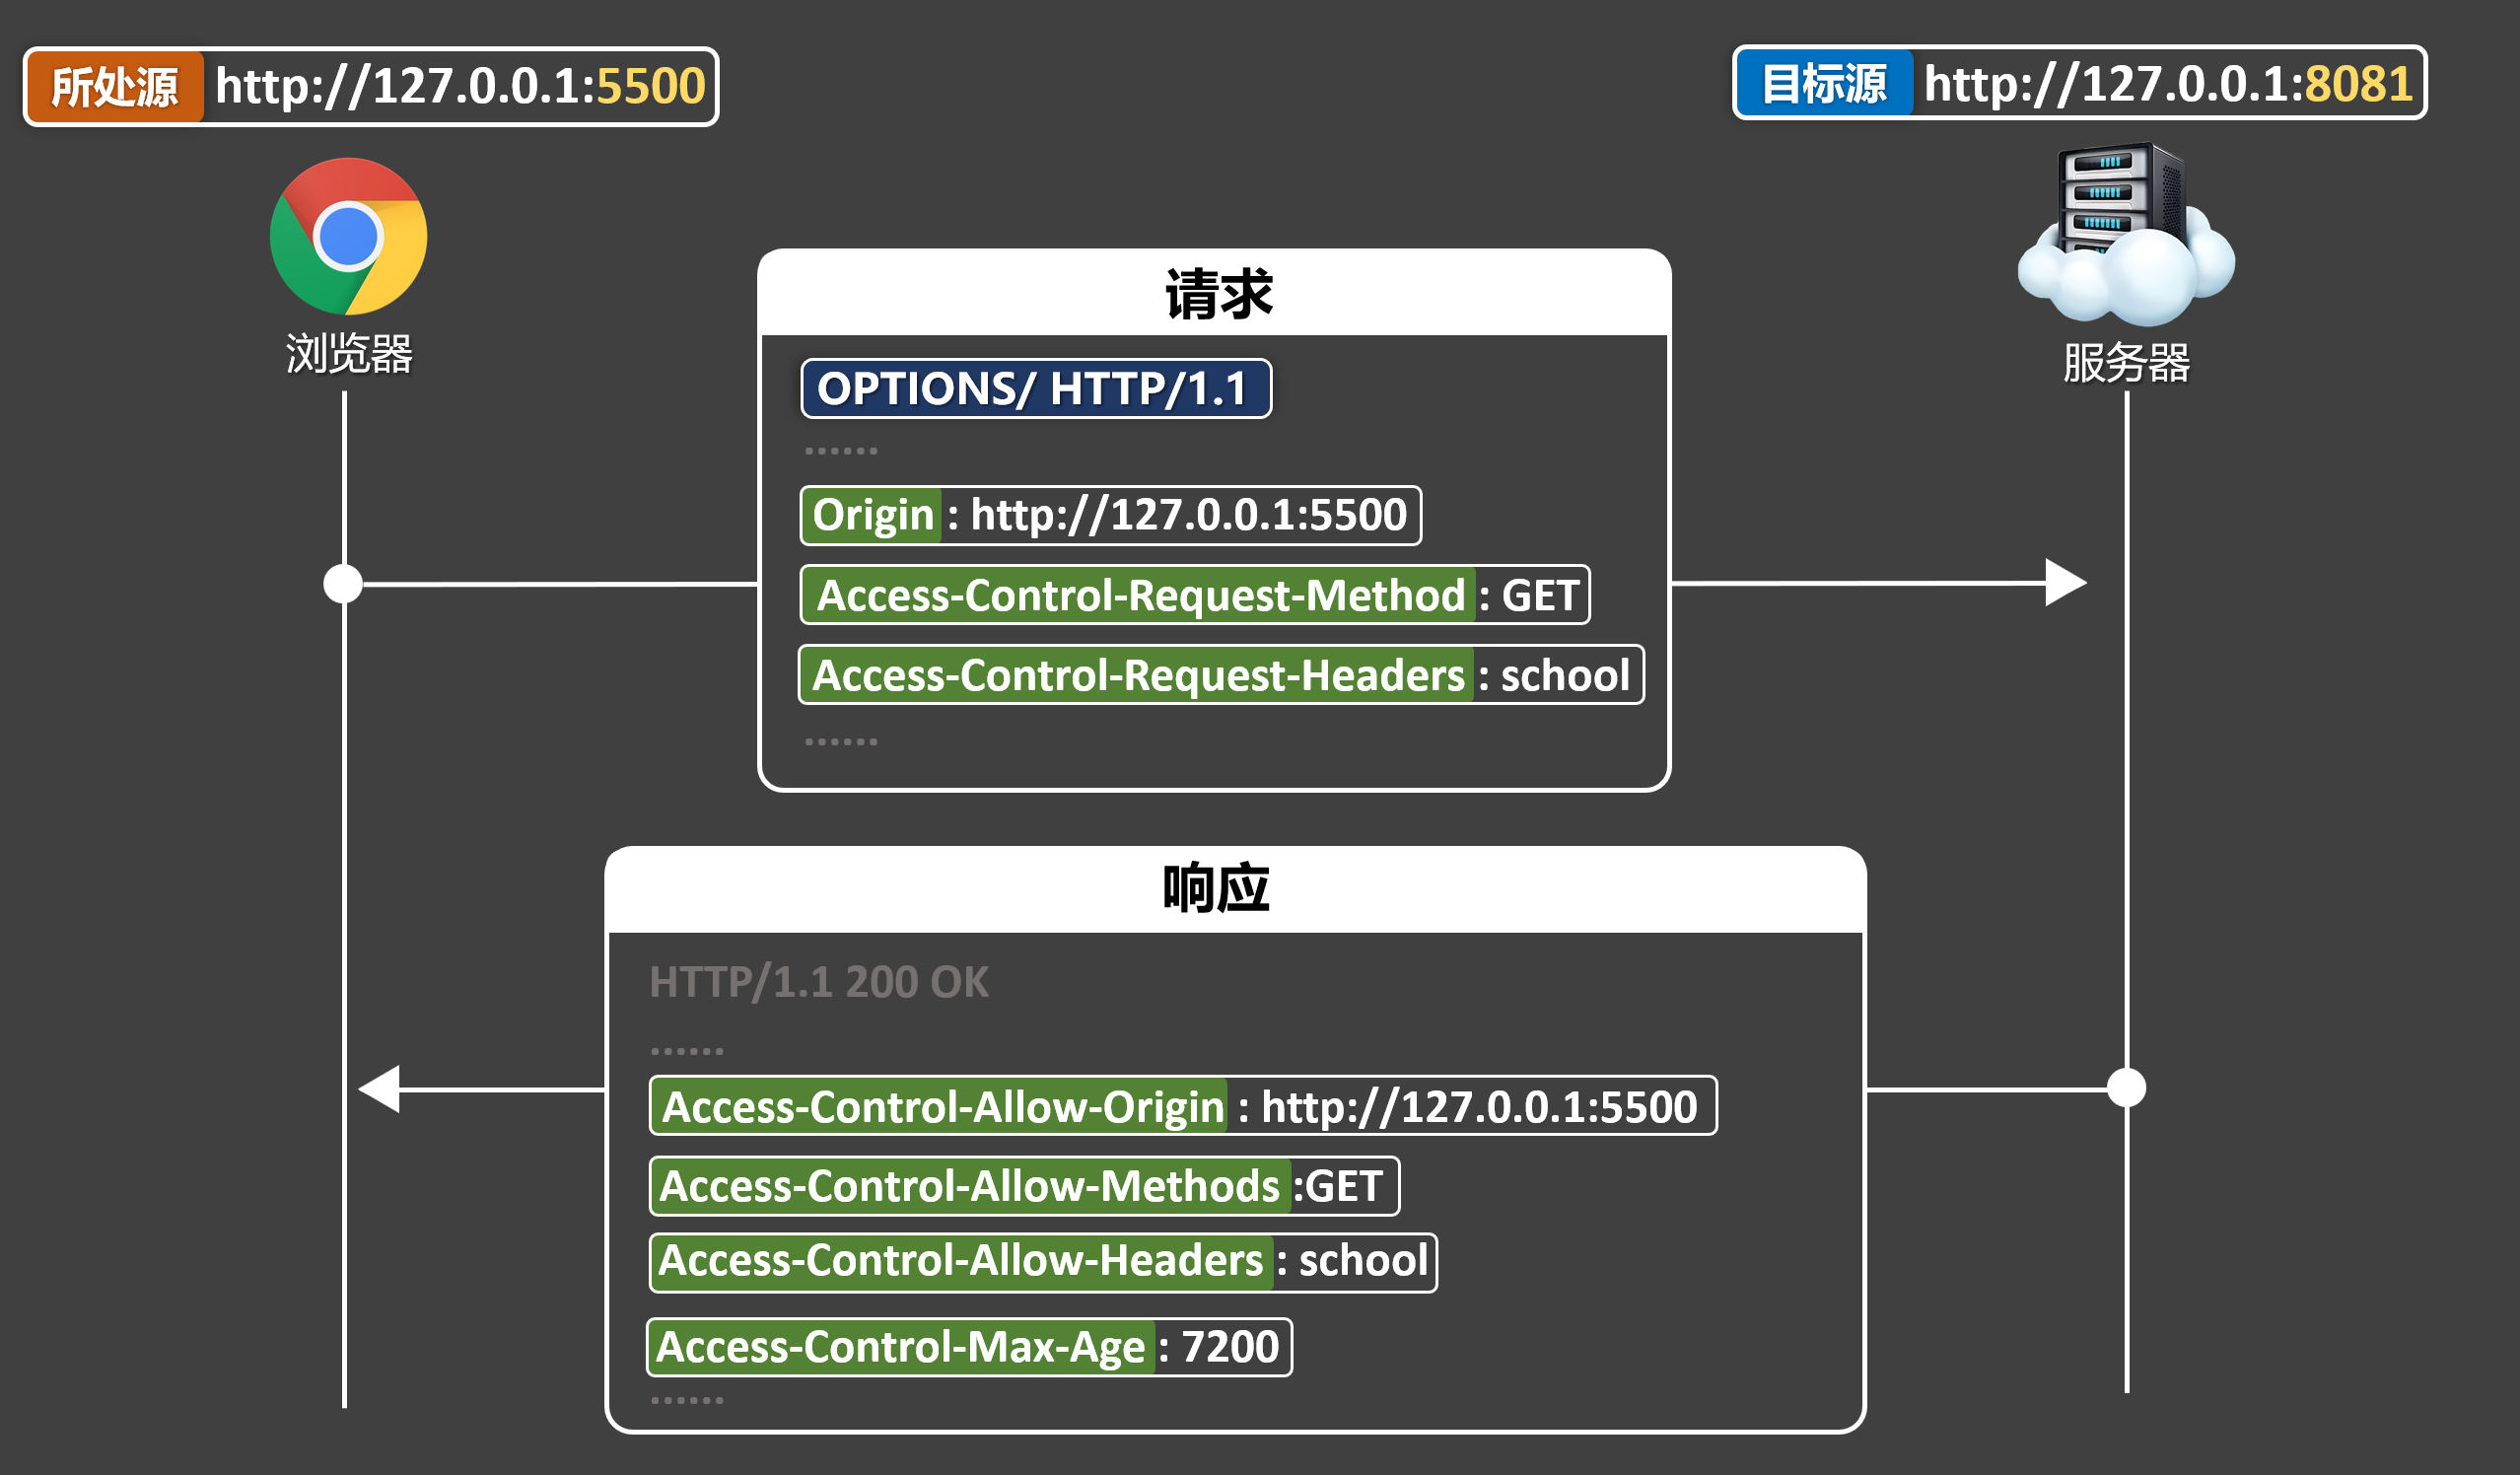
2 Step 2: Process the actual cross-domain request (same as processing a simple cross-domain request)
Server core code:
- // 处理预检请求
- app.options('/students', (req, res) => {
- // 设置允许的跨域请求源
- res.setHeader('Access-Control-Allow-Origin', 'http://127.0.0.1:5500')
- // 设置允许的请求方法
- res.setHeader('Access-Control-Allow-Methods', 'GET')
- // 设置允许的请求头
- res.setHeader('Access-Control-Allow-Headers', 'school')
- // 设置预检请求的缓存时间(可选)
- res.setHeader('Access-Control-Max-Age', 7200)
- // 发送响应
- res.send()
- })
-
- // 处理实际请求
- app.get('/students', (req, res) => {
- // 设置允许的跨域请求源
- res.setHeader('Access-Control-Allow-Origin', 'http://127.0.0.1:5500')
- // 随便设置一个自定义响应头
- res.setHeader('abc',123)
- // 设置允许暴露给客户端的响应头
- res.setHeader('Access-Control-Expose-Headers', 'abc')
- // 打印请求日志
- console.log('有人请求/students了')
- // 发送响应数据
- res.send(students)
- })
In the above configuration, you need to configure the response header yourself, or you need to manually encapsulate the middleware yourself. With the help of the cors library, you can complete the configuration more conveniently.
●Install cors
npm i cors●Simple configuration of cors
app.use(cors())●Fully configure cors
- // cors中间件配置
- const corsOptions = {
- origin: 'http://127.0.0.1:5500', // 允许的源
- methods: ['GET', 'POST', 'PUT', 'DELETE', 'HEAD', 'OPTIONS'], // 允许的方法
- allowedHeaders: ['school'], // 允许的自定义头
- exposedHeaders: ['abc'], // 要暴露的响应头
- optionsSuccessStatus: 200 // 预检请求成功的状态码
- };
-
- app.use(cors(corsOptions)); // 使用cors中间件
By default, js cannot access the response headers set by the backend, so the backend needs to be exposed
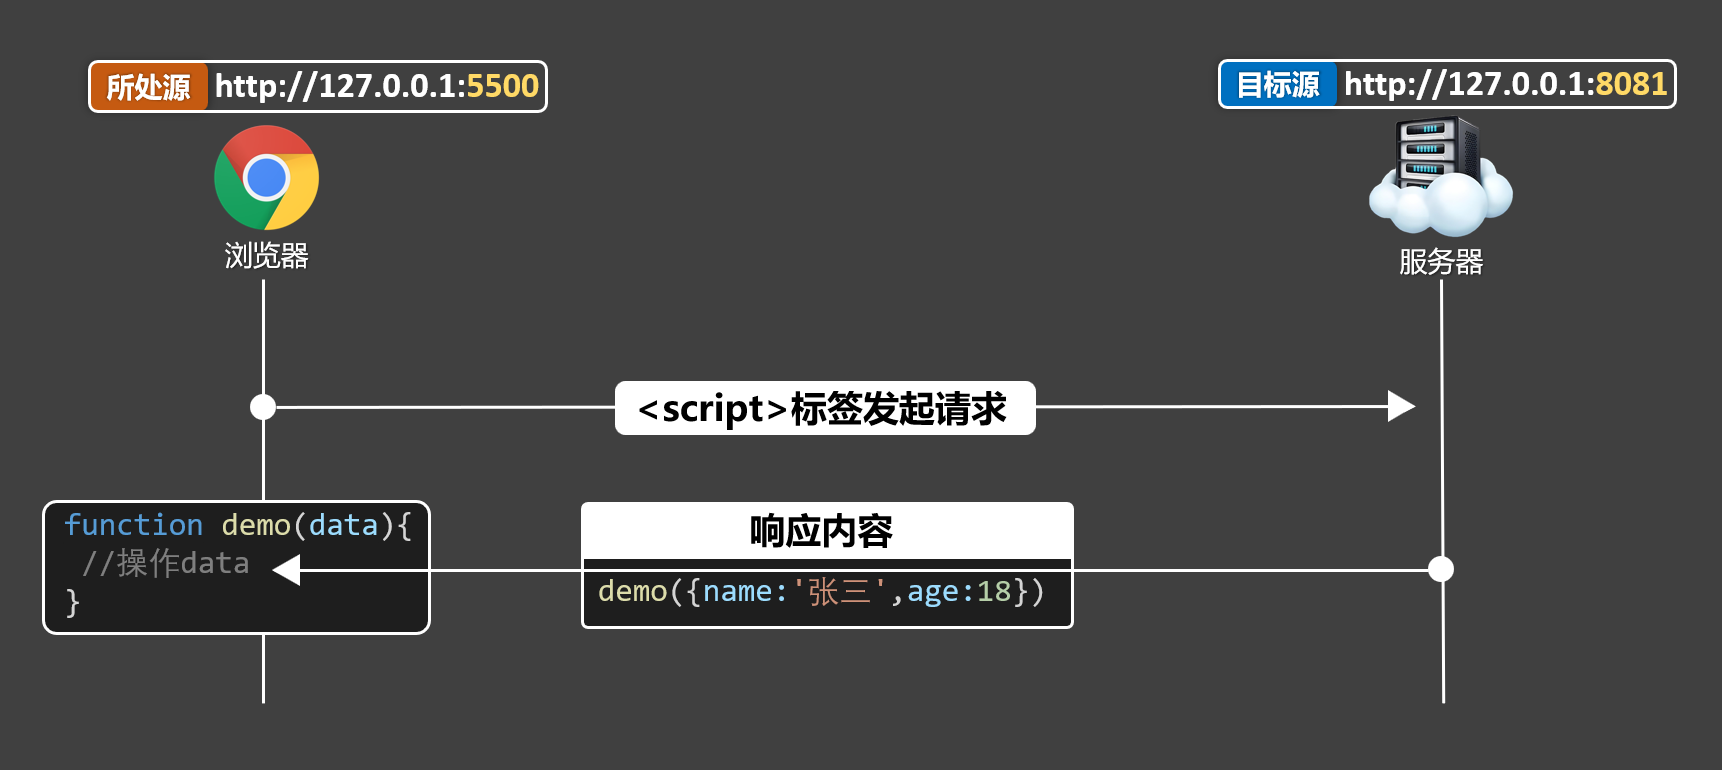
1JSONP Overview: JSONP is a protocol that uses<script>标签可以跨域加载脚本,且不受严格限制的特性,可以说是程序员智慧的结晶,早期一些浏览器不支持 CORS 的时,可以靠 JSONP 解决跨域。
2Basic process:
3 diagrams:
4 Code Example:
- <button onclick="getTeachers()">获取数据</button>
-
- <script type="text/javascript" >
- function callback(data){
- console.log(data)
- }
-
- function getTeachers(url){
- // 创建script元素
- const script = document.createElement('script')
- // 指定script的src属性
- script.src= 'http://127.0.0.1:8081/teachers'
- // 将script元素添加到body中触发脚本加载
- document.body.appendChild(script)
- // script标签加载完毕后移除该标签
- script.onload = ()=>{
- script.remove()
- }
- }
- </script>
5. jQuery encapsulated jsonp
?callback=?' is a fixed format and will be automatically parsed
- $.getJSON('http://127.0.0.1:8081/teachers?callback=?',(data)=>{
- console.log(data)
- })
There is no cross-domain problem between servers. You need to use express to start static resources to ensure that your server and the page are under the same origin.
- // 启动静态资源 让服务器跟页面同一个源
- app.use(express.static("./public"));
Configure proxy with http-proxy-middleware
- const { createProxyMiddleware } = require('http-proxy-middleware');
-
- app.use('/api',createProxyMiddleware({
- target:'https://www.toutiao.com',
- changeOrigin:true,
- pathRewrite:{
- '^/api':''
- }
advantage:
shortcoming:
scenes to be used:
The overall idea is to let nginx play two roles: a static content server and a proxy server.
Modify the nginx configuration as follows. Note that the root directory of nginx should not be the C drive.
- # 配置nginx根目录
- location / {
- root D:dist;
- index index.html index.htm;
- }
-
- # 配置代理
- location /dev/ {
- # 设置代理目标
- proxy_pass http://sph-h5-api.atguigu.cn/;
- }
2 Modify the front-end project so that all requests are forwarded to /dev and then repackaged
- const request = axios.create({
- baseURL:'/dev',
- timeout:10000
- })
Then you can directly access the nginx server. For example, if nginx is running on port 8099, access
http://localhost:8099Then you will encounter the refresh 404 problem, add nginx configuration to solve it
-
- # 配置nginx根目录
- location / {
- root D:dist;
- index index.html index.htm;
- try_files $uri $uri/ /index.html; # 解决刷新404
- }
- # 配置代理
- location /dev/ {
- # 设置代理目标
- proxy_pass http://sph-h5-api.atguigu.cn/;
- }
Adding these two "/" removes dev

1. Use the vue.config.js file to configure the proxy:
Create a vue.config.js file in the root directory of the Vue project and add the following code:
- module.exports = {
- devServer: {
- proxy: {
- '/api': {
- target: 'http://api.example.com',
- changeOrigin: true,
- pathRewrite: {
- '^/api': ''
- }
- }
- }
- }
- }
In the above code, we usedevServerConfiguration items to configure the proxy server.proxyProperties are used to configure the proxy rules./apiIndicates the interface path that needs to be proxied.targetThe property represents the target server address of the proxy.changeOriginThe property indicates whether to change the source address of the request.pathRewriteProperty is used to rewrite the request path.
advantage:
shortcoming:
scenes to be used:

I have devoted myself to the research of technology for more than 30 years. I am proficient in various languages such as Java, Linux, JavaScript, PHP, CSS, etc. I have made many contributions in the field of open source. I have established a developer documentation site to share some problems in technology development for everyone to read.

