2024-07-08
한어Русский языкEnglishFrançaisIndonesianSanskrit日本語DeutschPortuguêsΕλληνικάespañolItalianoSuomalainenLatina
文章是实时更新,写了就会更。
文章是黑马视频的笔记,如果要自己学可以点及下面的链接:
https://www.bilibili.com/video/BV1pf421B71v/
In order to meet the diverse development needs, Ruyi provides multiple versions
RuoYi-Vue (SpringBoot Vue's single project)
RuoYi-Cloud (microservice version of SpringCloud Vue project)
RuoYi-App (Uniapp Vue mobile version)
RuoYi-APP does not provide a backend, but can be adapted to RuoYi-Vue and RuoYi-Cloud
RuoYi-other (if based on third-party version)
This notebook uses RuoYi-Vue
| technology | Version |
|---|---|
| JDK | 1.8 and above |
| Mysql | 5.7 and above |
| Redis | 3.0 and above |
| Node | 12 and above |
https://gitee.com/y_project/RuoYi-Vue
sqlFolder, which contains two sql scripts, execute [contains 30 tables]项目的启动类在ruoyi-admin模块中的RuoYiApplication中
The front-end that comes with the back-end project is the Vue2 version. Now we all use Vue3, so we can delete it directly.
https://gitee.com/zi-ning/RuoYi-Vue3
npm install
npm run dev
Now we need a course management module. The front-end page of this module needs a conditional query box, a data display box, a course addition box, and a course modification box.
#SQL示例
CREATE TABLE courses(
    id              INT AUTO_INCREMENT PRIMARY KEY,
    code            VARCHAR(50)    NOT NULL,
    discipline      VARCHAR(100)   NOT NULL,
    course_name     VARCHAR(255)   NOT NULL,
    price           DECIMAL(10, 2) NOT NULL,
    target_audience VARCHAR(255),
    description     TEXT,
    created_at      TIMESTAMP DEFAULT CURRENT_TIMESTAMP,
    updated_at      TIMESTAMP DEFAULT CURRENT_TIMESTAMP ON UPDATE CURRENT_TIMESTAMP
);
这一步是通过手动配置,从而生成对应的代码
Start the front-end and back-end projects and enter the front-end page
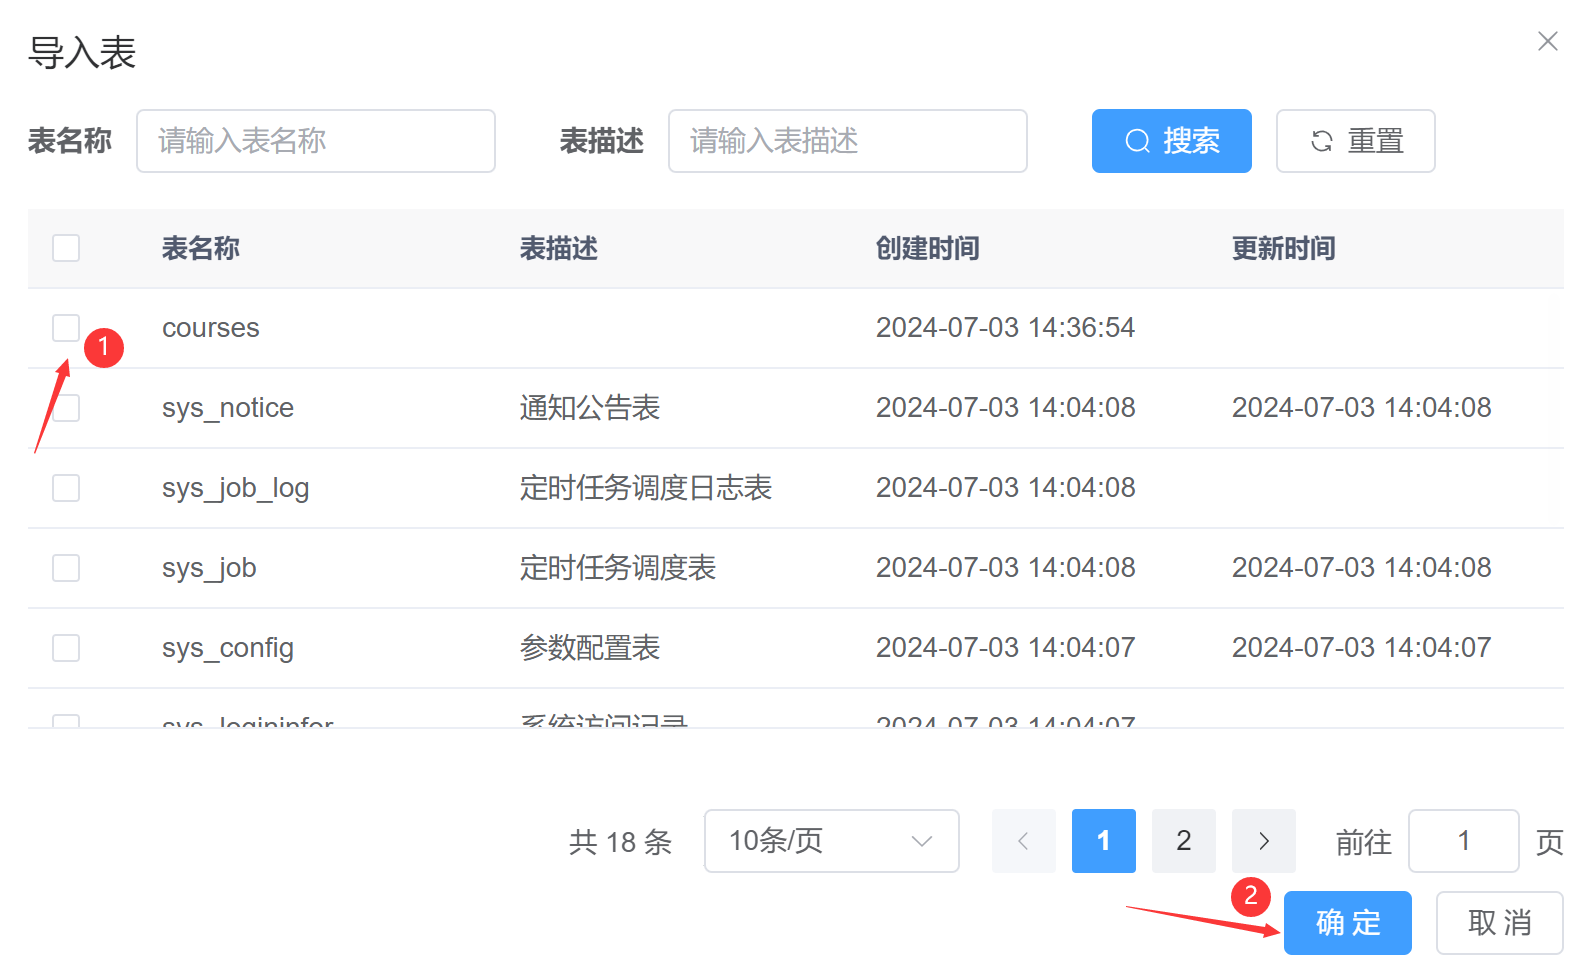
Select System Tools - Code Generation - Import
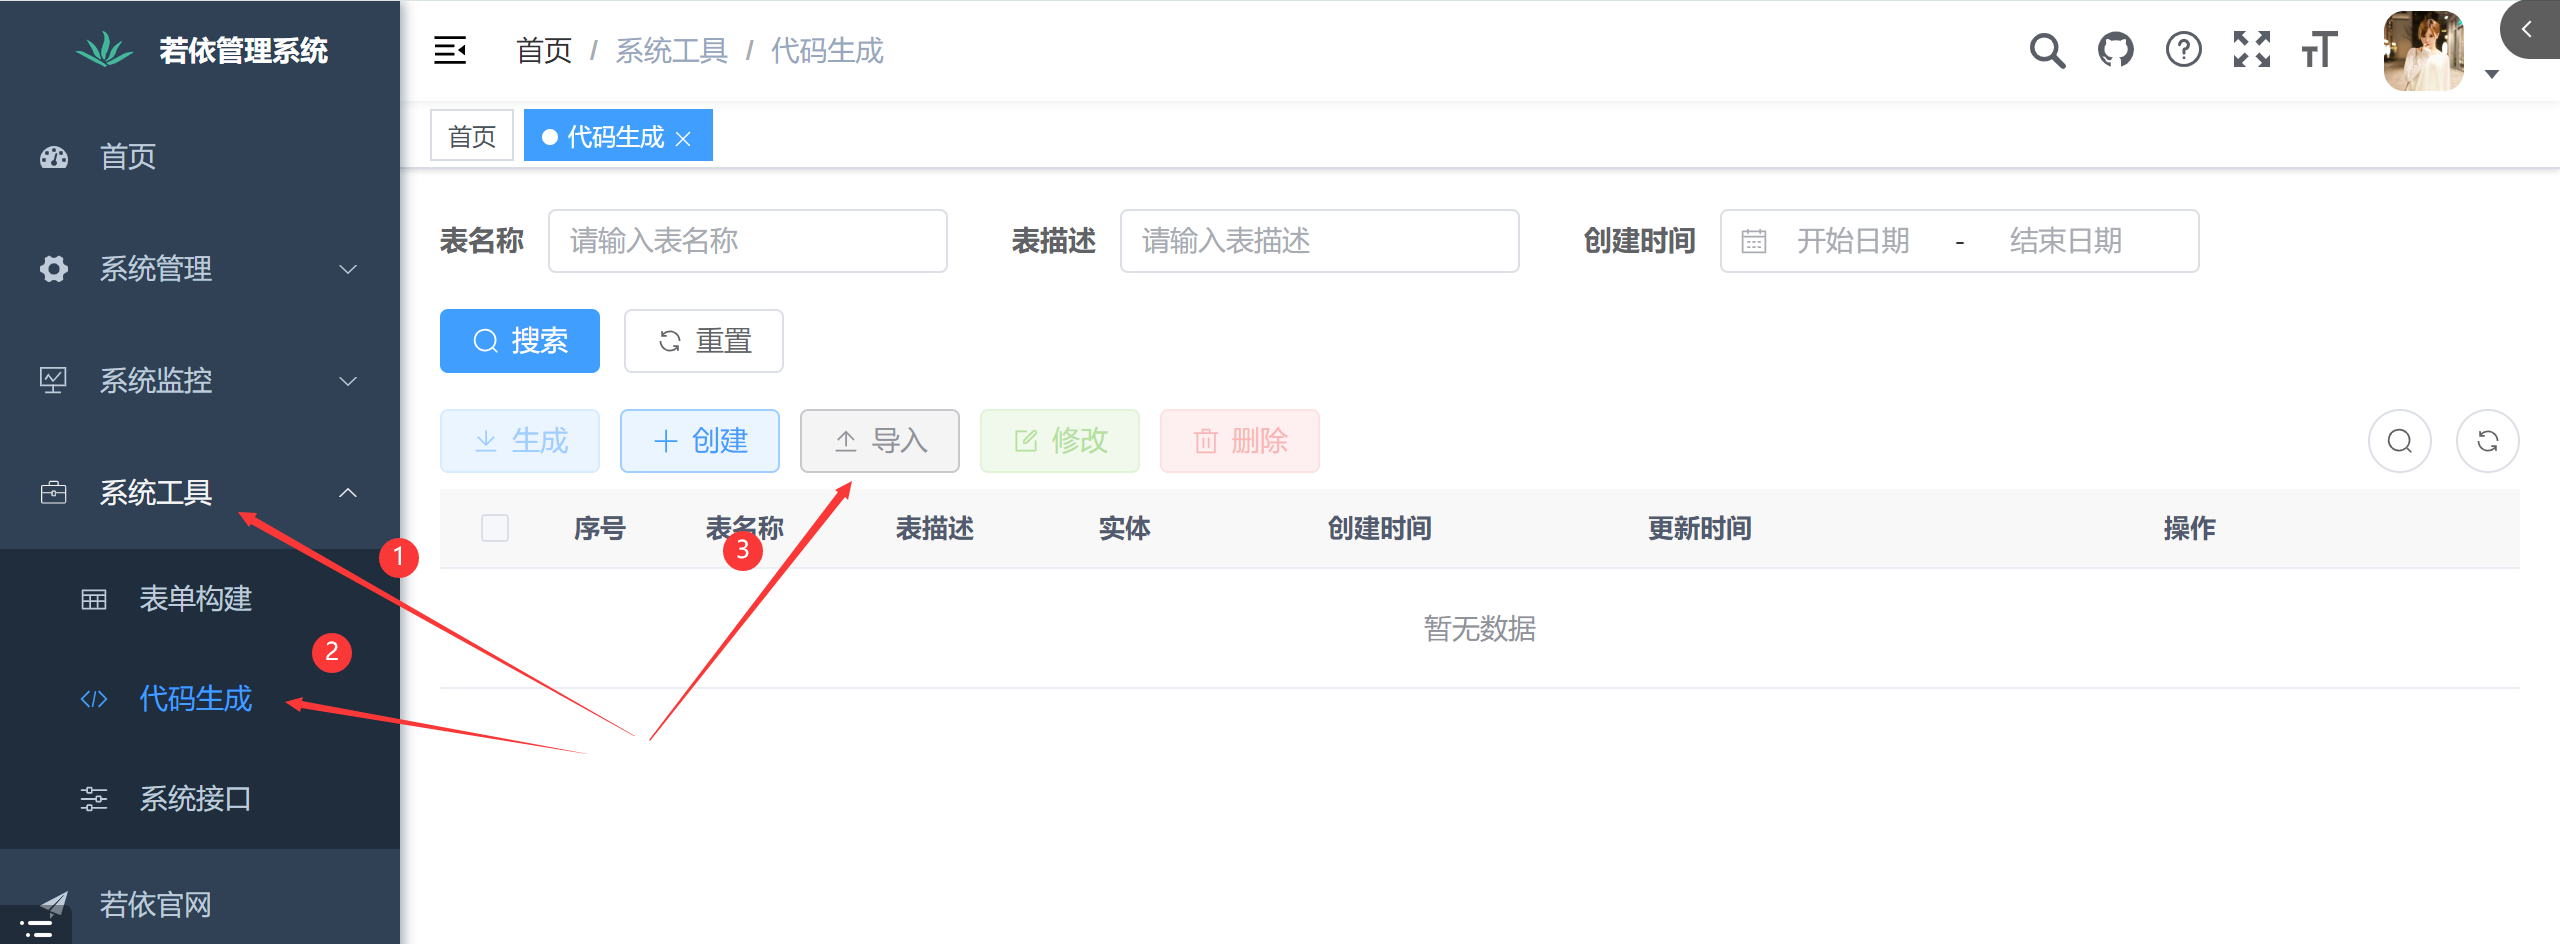
Select the table you just created and click OK [this will hand over the form to the code generator for management]
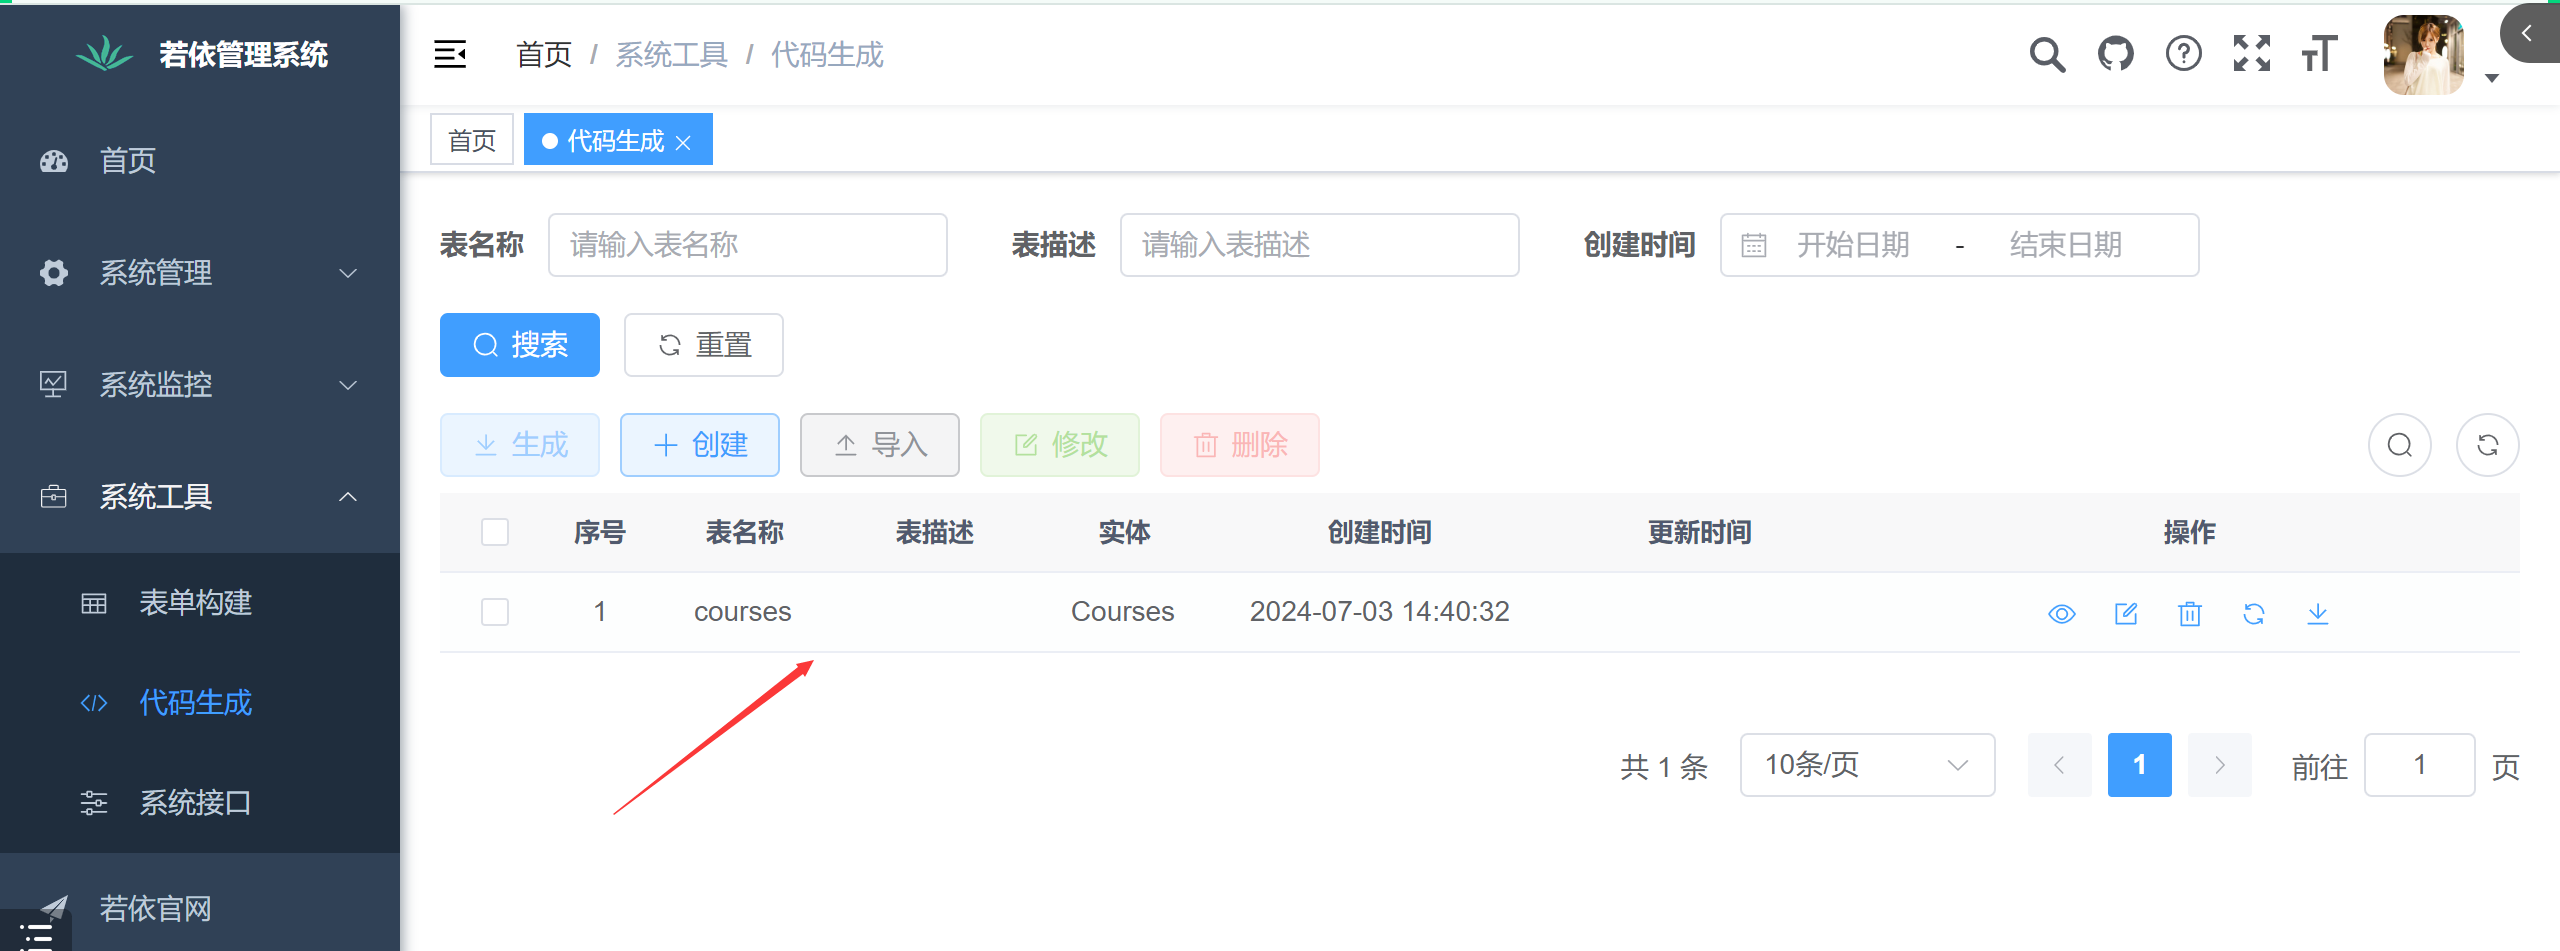
Click the edit button behind the corresponding form [you can view basic information, field information, generation information, etc.]
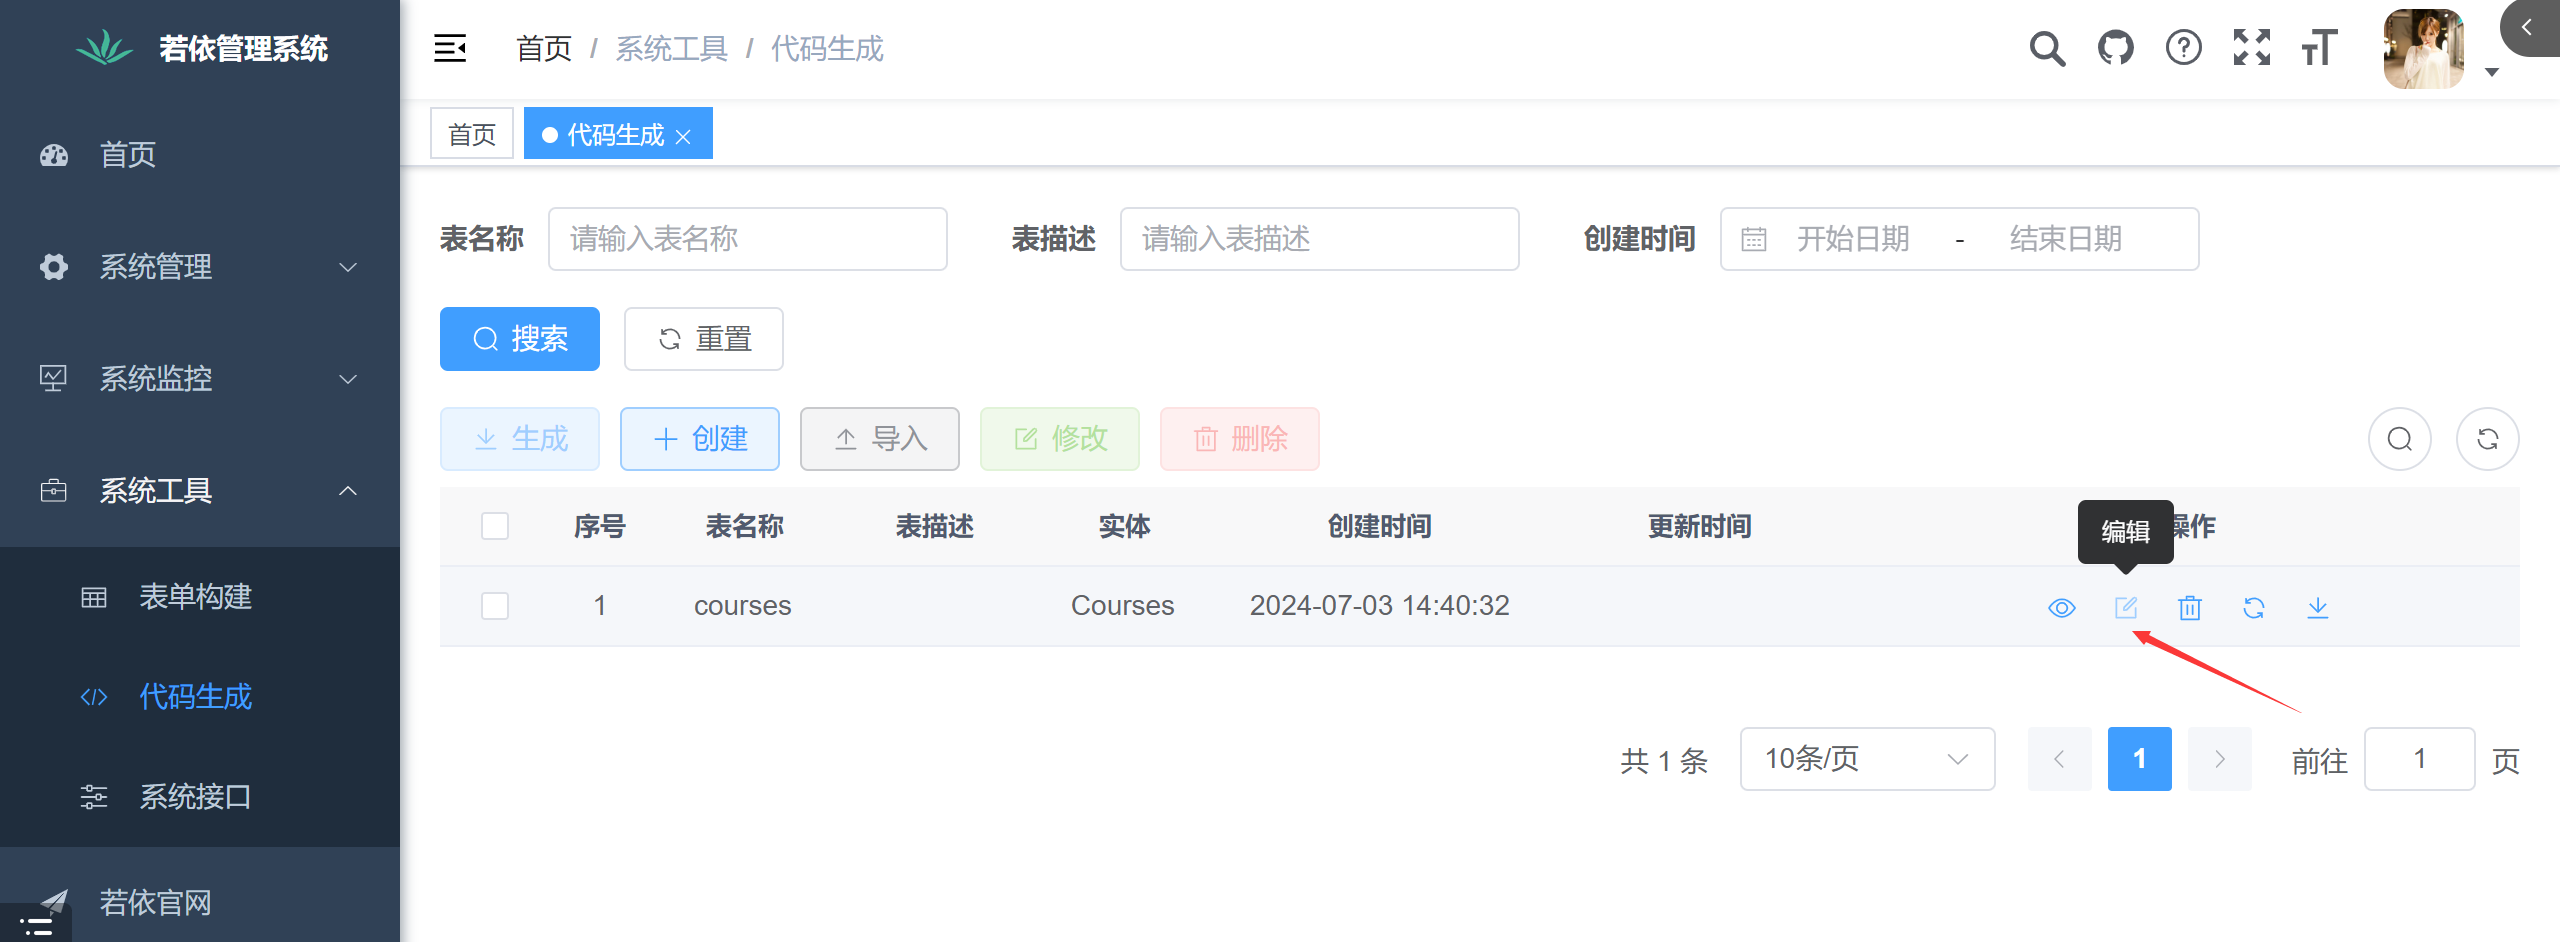
Click Basic Information: Modify the entity class name and author name here
这里设置的实体类名称就是后面他自动生成的实体类名

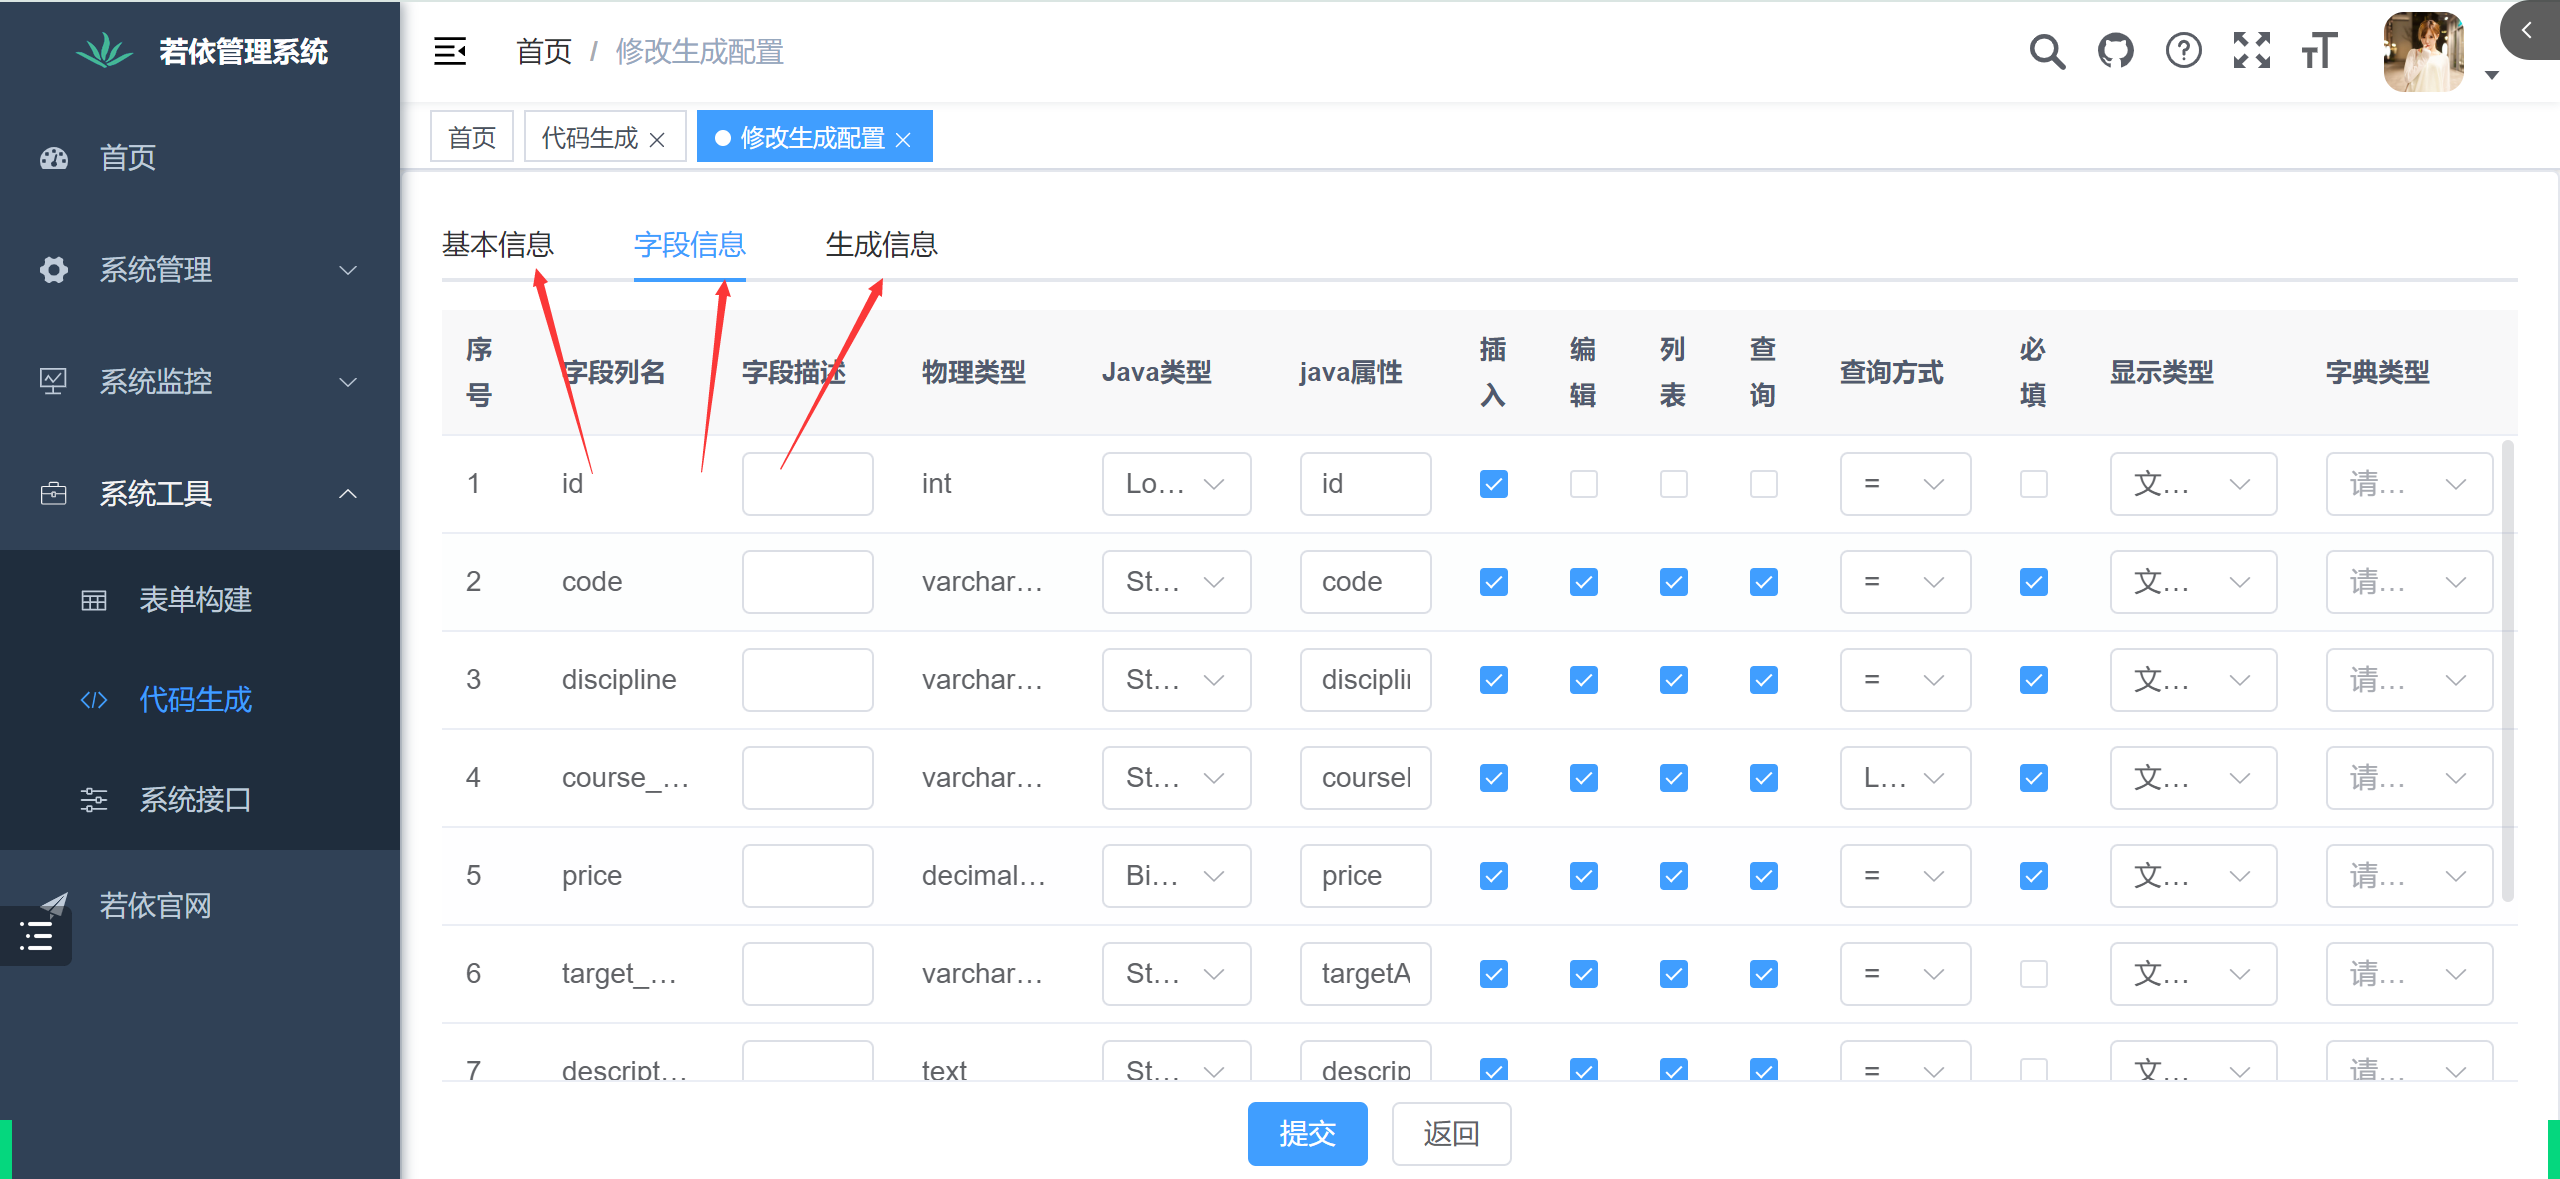
Click Field Information: Here you need to modify the field description, Java type, Java attribute, add, delete, and modify check box, query box, query method, and display type.
1.字段描述:就用于将来展示的列名
2.java类型:一般不用修改,检查一遍即可
3.java属性:就是用来生成后面的实体类,注意驼峰命名
4.增删改勾选框:一般是结合页面原型,如果页面中需要增删改某个字段,就勾上
5.查询框:就是将来的条件查询,勾了就会在上面显示一个选择框
6.查询方式:如果是等值就用=,如果是模糊就用like
7.必填框:如果是必须输入就勾上
8.显示类型:默认是文本框由用户输入,后面可以改成下拉框等
Click to generate information: modify relevant information
1.包路径
2.生成模块名
3.生成业务名
4.生成功能名
5.生成方式
6.上级菜单:生成的页面在哪个模块下,默认在系统工具下
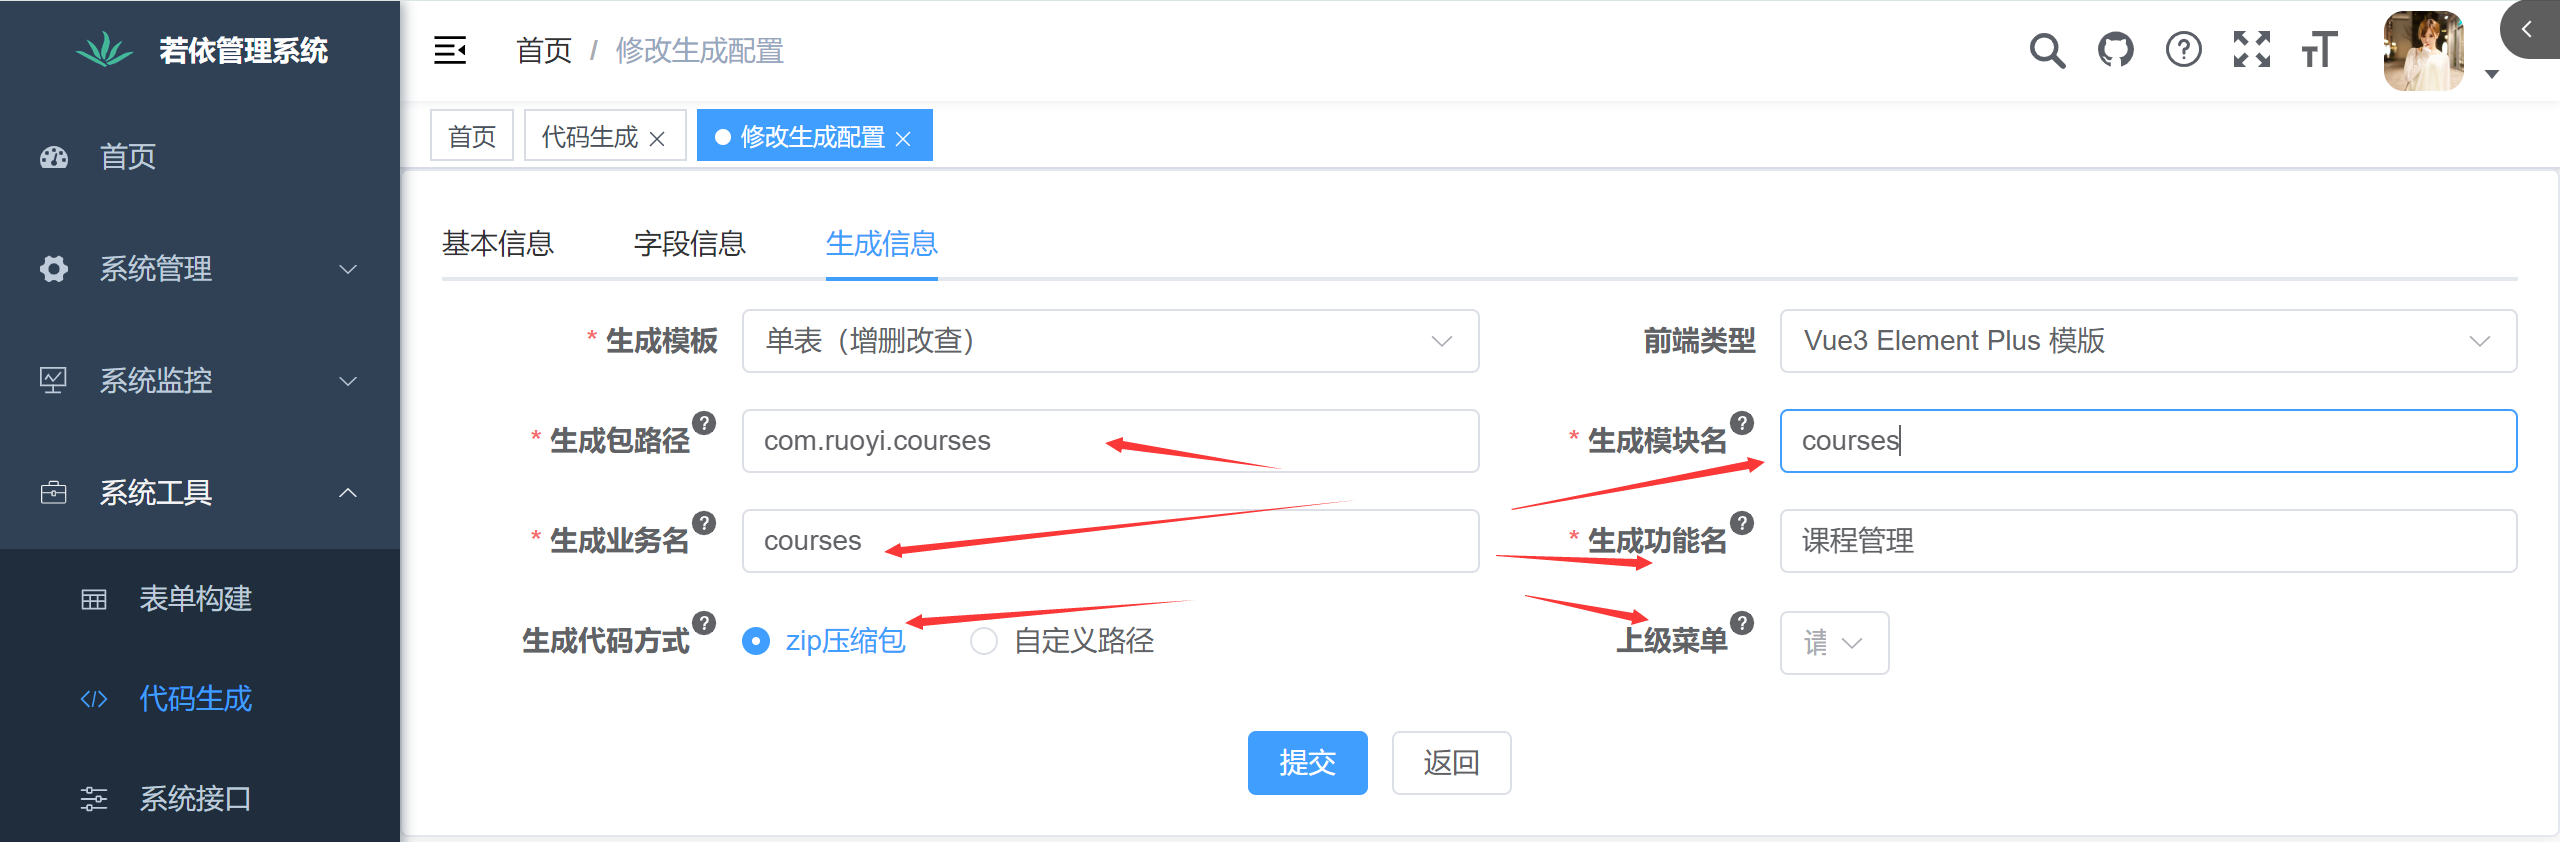
Click Submit
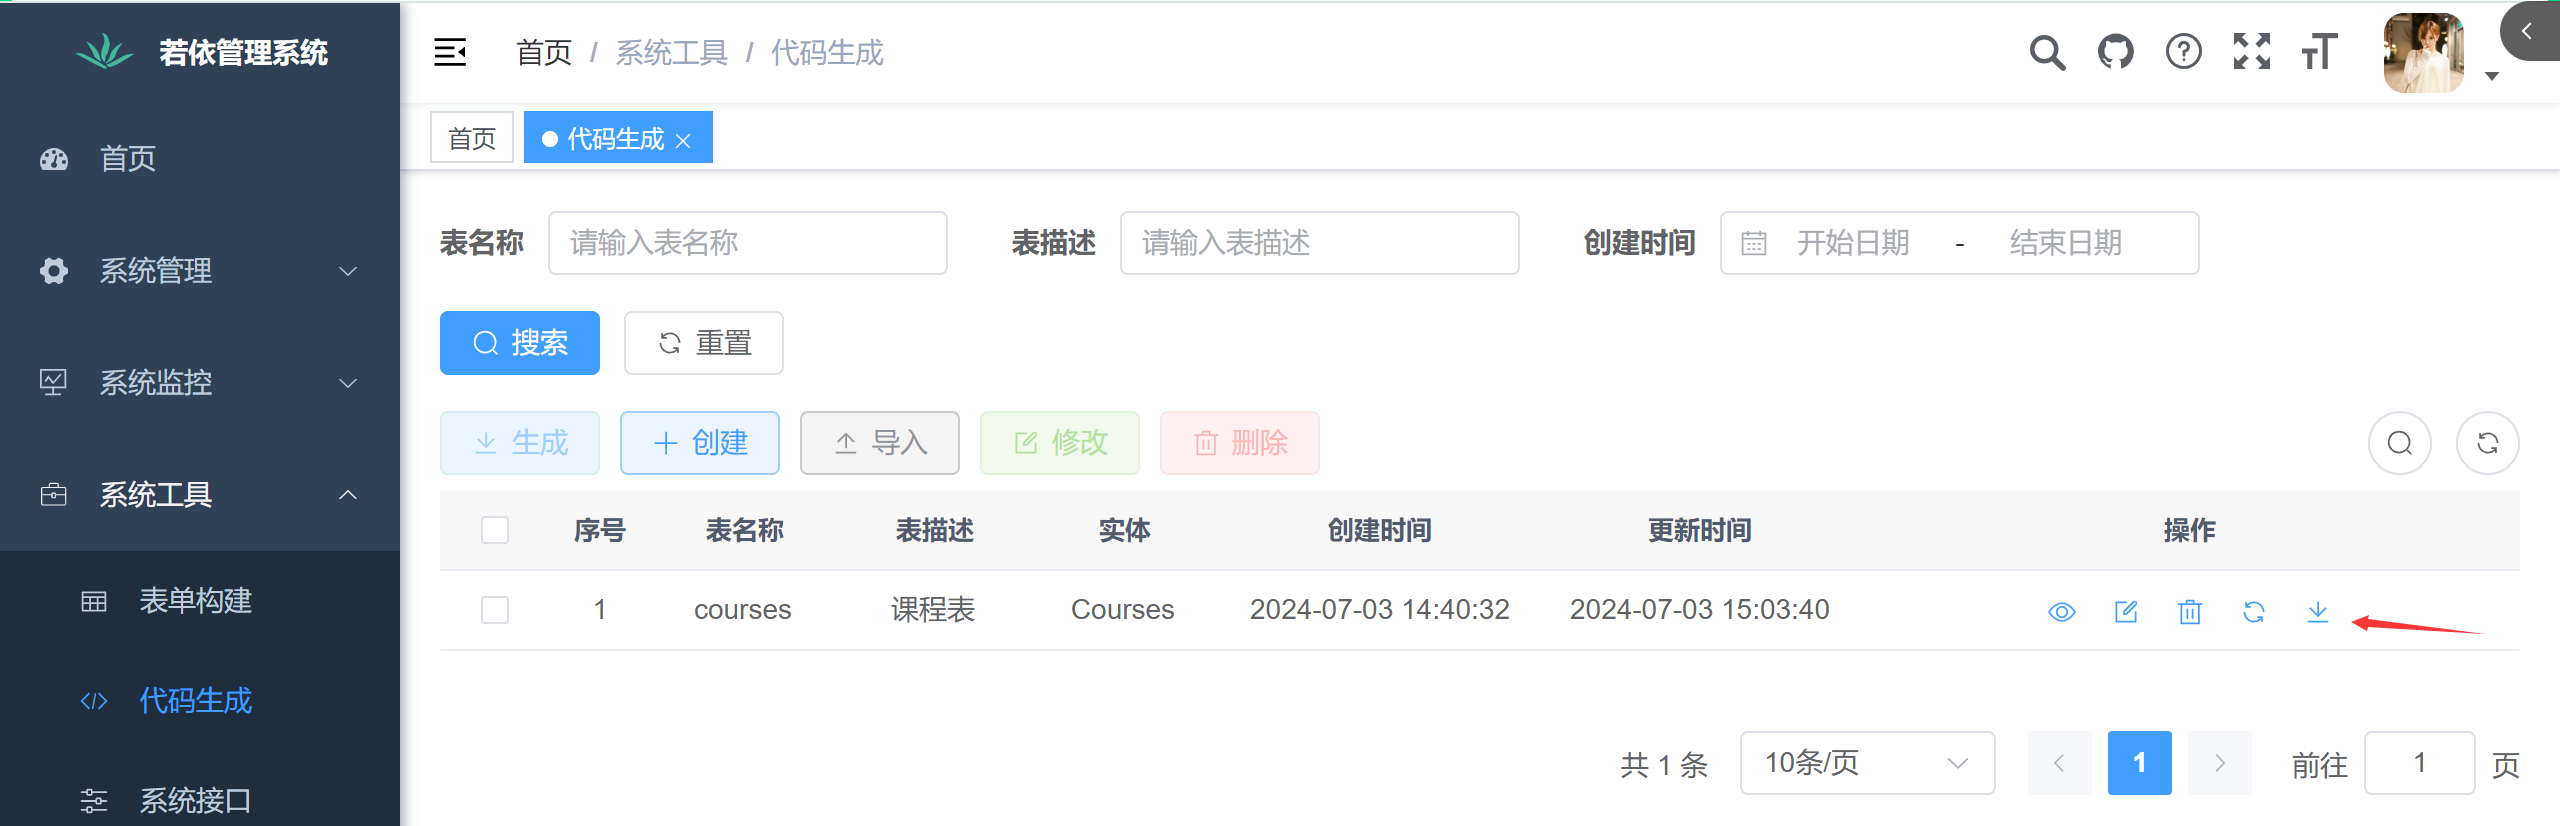
上一步配置完成之后,会生成三部分信息:前后端代码以及动态菜单【前端根据动态菜单动态显示页面】,导入项目就可以了
Click the Download button on the right
Import the downloaded dynamic menu SQL
这一步不会新生成一个表,而是插入数据到sys_menu表中
Import the front-end code [including API and views pages]
Import java code into the admin module [three-tier architecture code and mybatis mapping file]
什么是权限控制:不同权限的用户登录相同的系统,可以访问的页面不同
若依提供的权限管理模块:用户管理、角色管理、菜单管理、部门管理、岗位管理
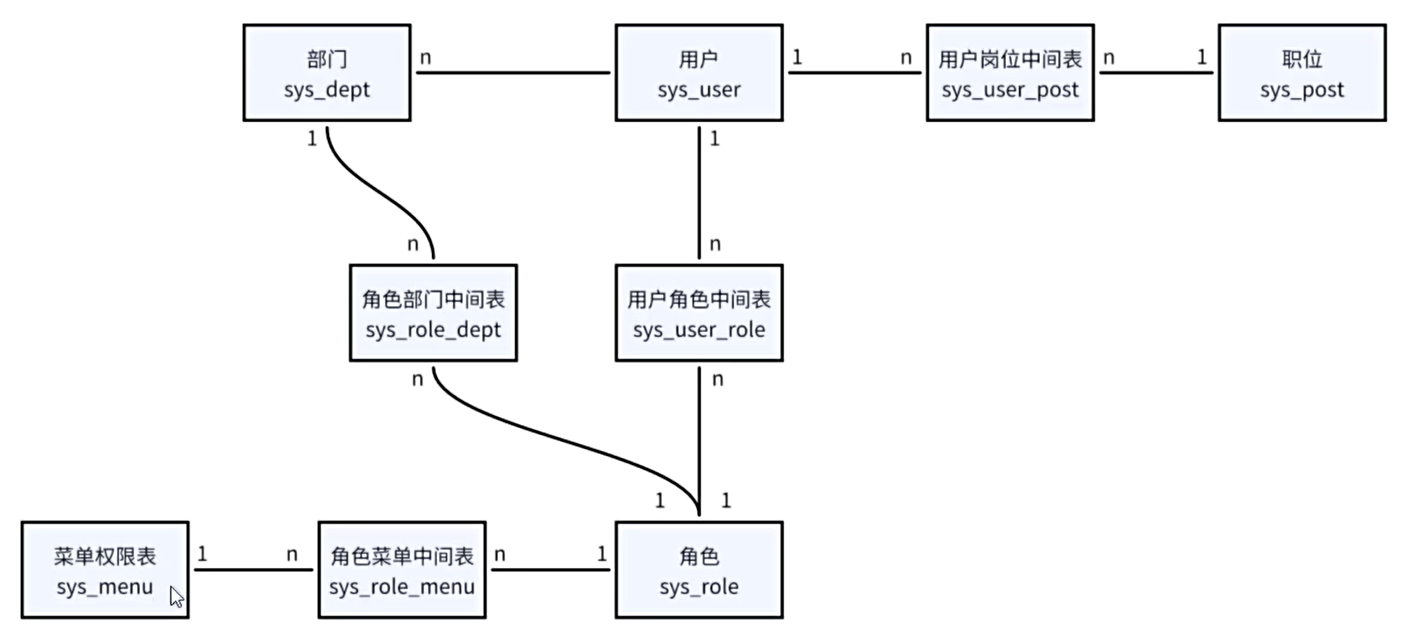
RBAC is a widely used access control model.RoleTo manageuserofMenu Permissions
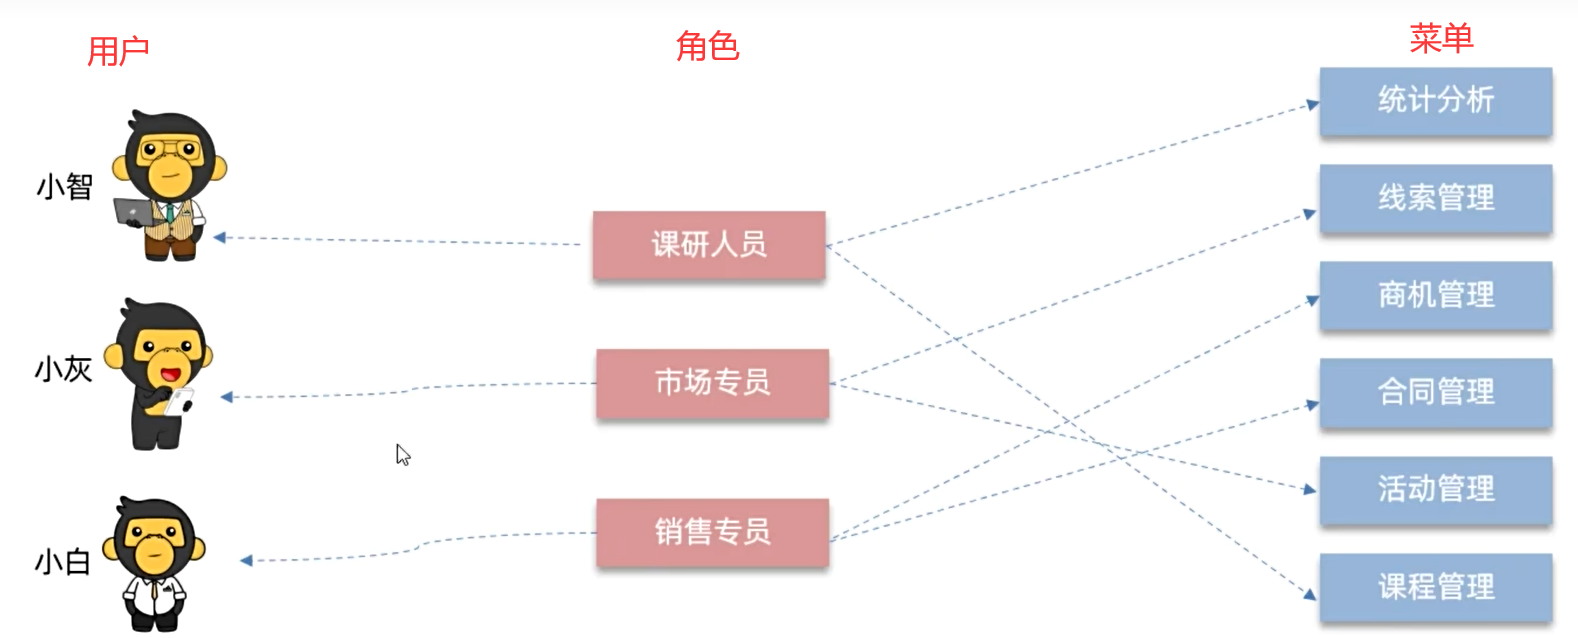
To achieve the above relationship, five tables are needed: user table, role table, menu table, user role table, role menu table
At the same time, Ruyi provides position and department modules to achieve more refined permission management
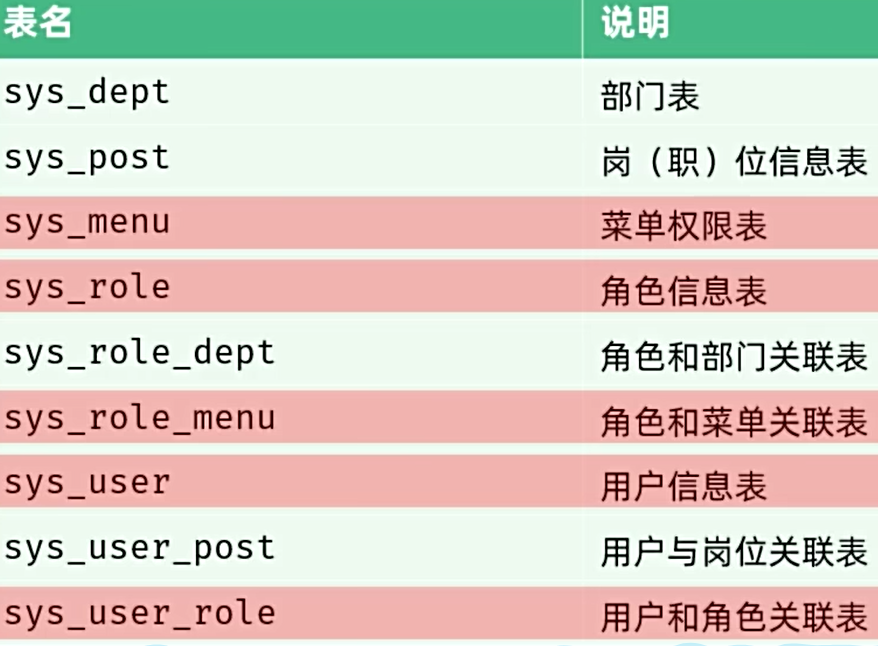
The table relationships are as follows:
为什么要有数据字典?
前端页面中的一些表单选项可能在不同表单中都会出现,而单独编写后,后期如果要修改会很麻烦,因此使用数据字典统一管理这些字段

若依内置的数据字典包括:性别、状态等
功能包括:字典类型管理、字典数据管理
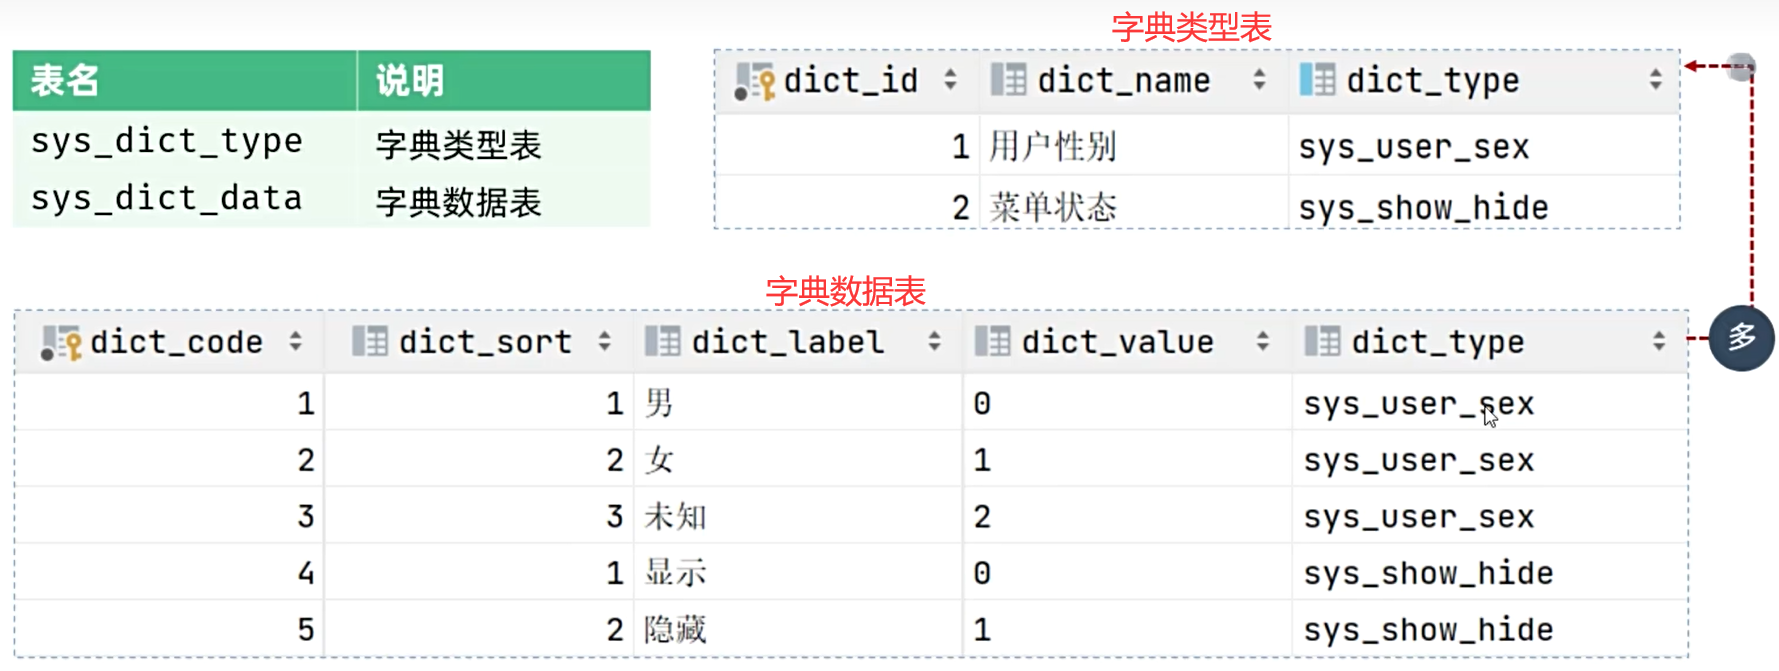
说明:
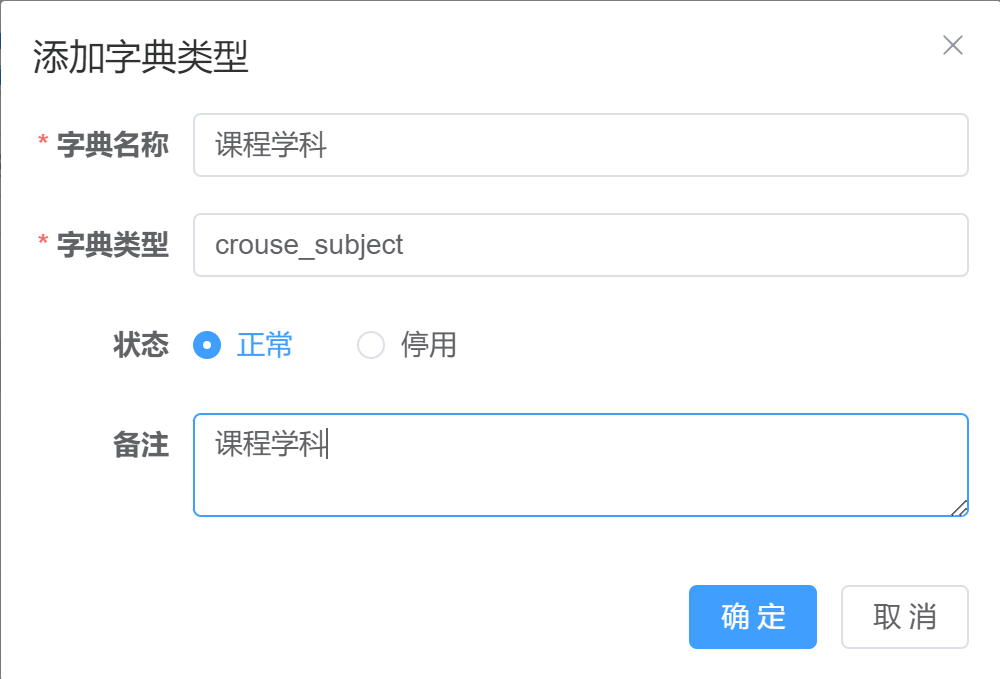
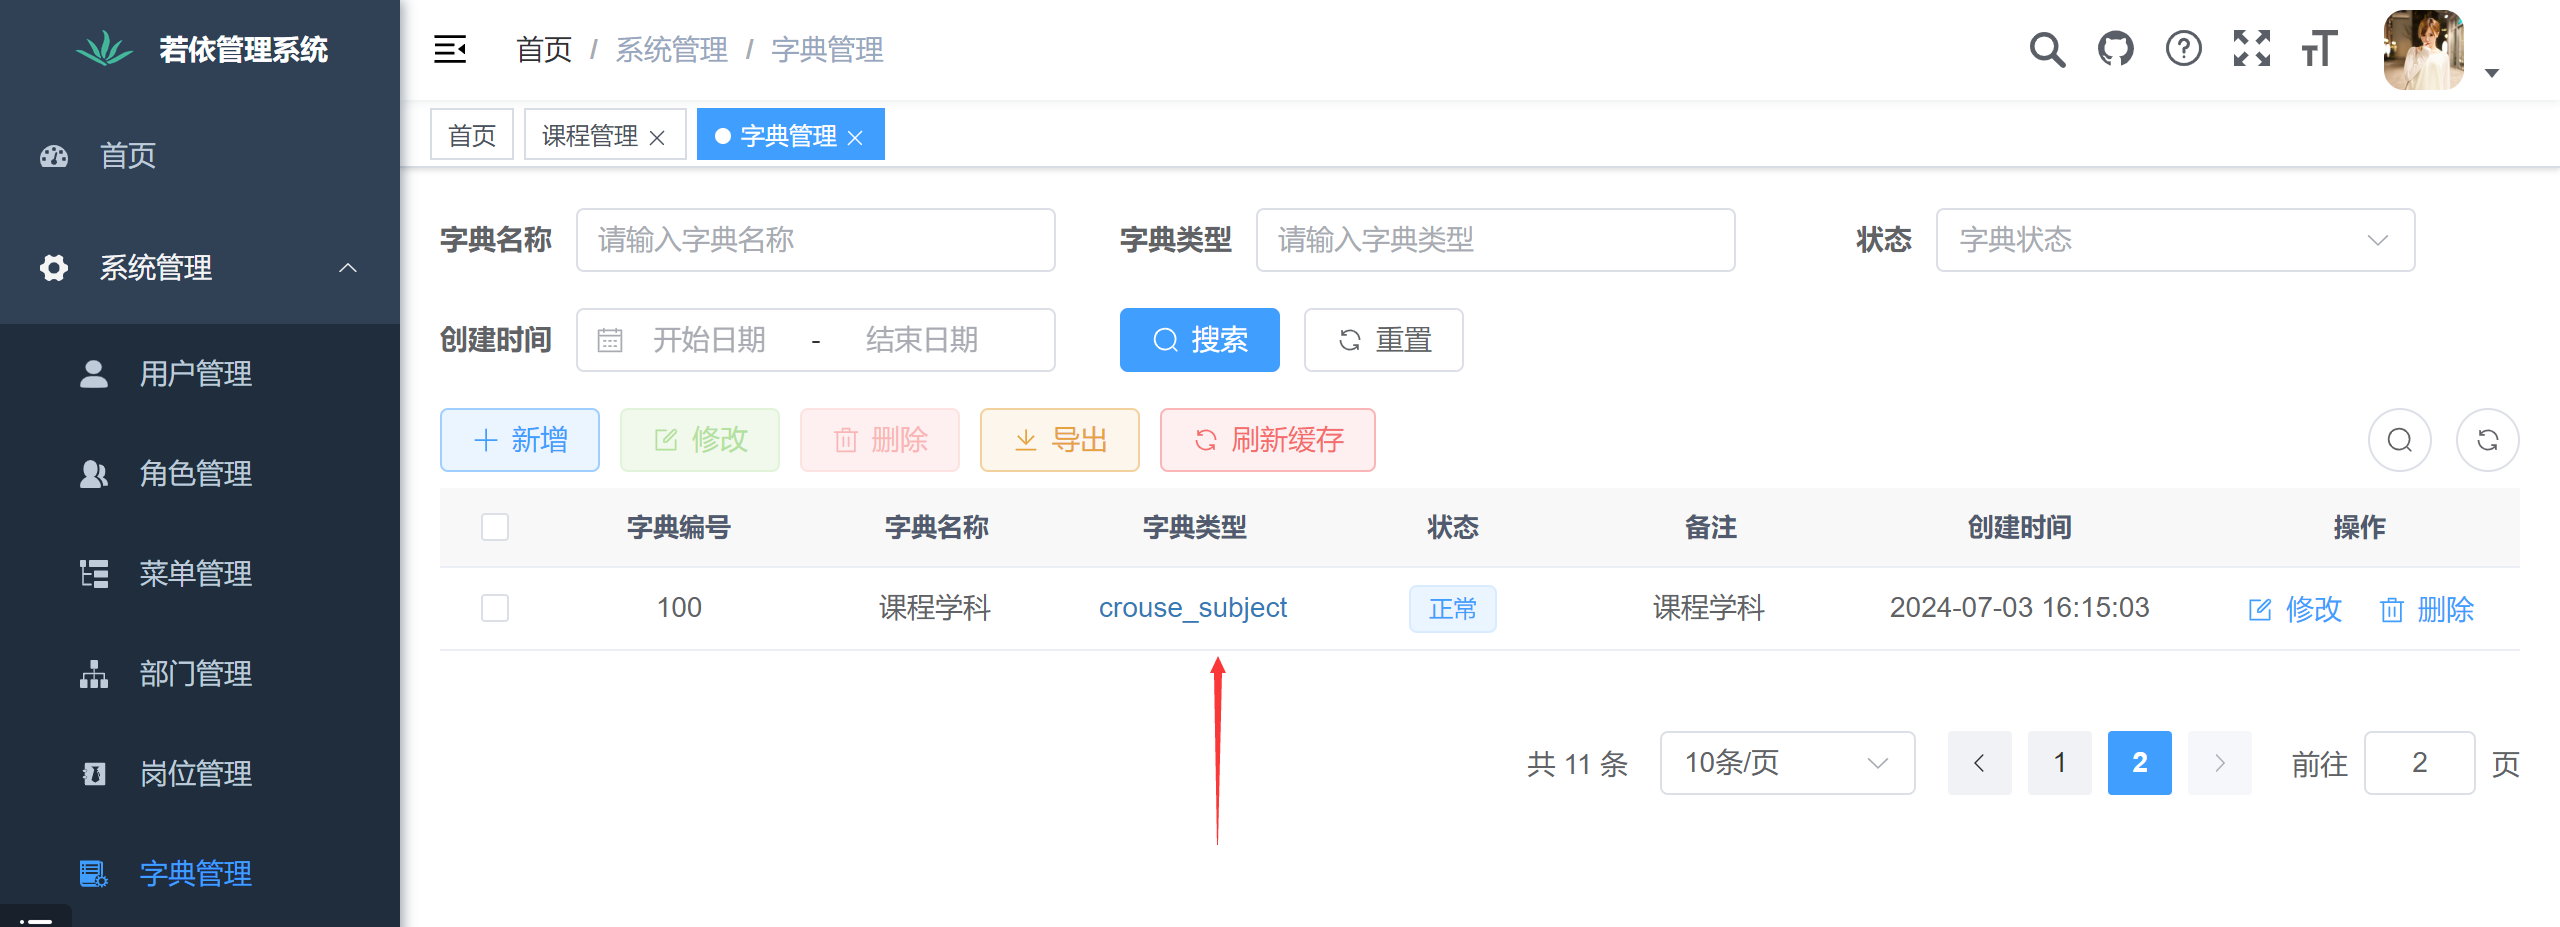
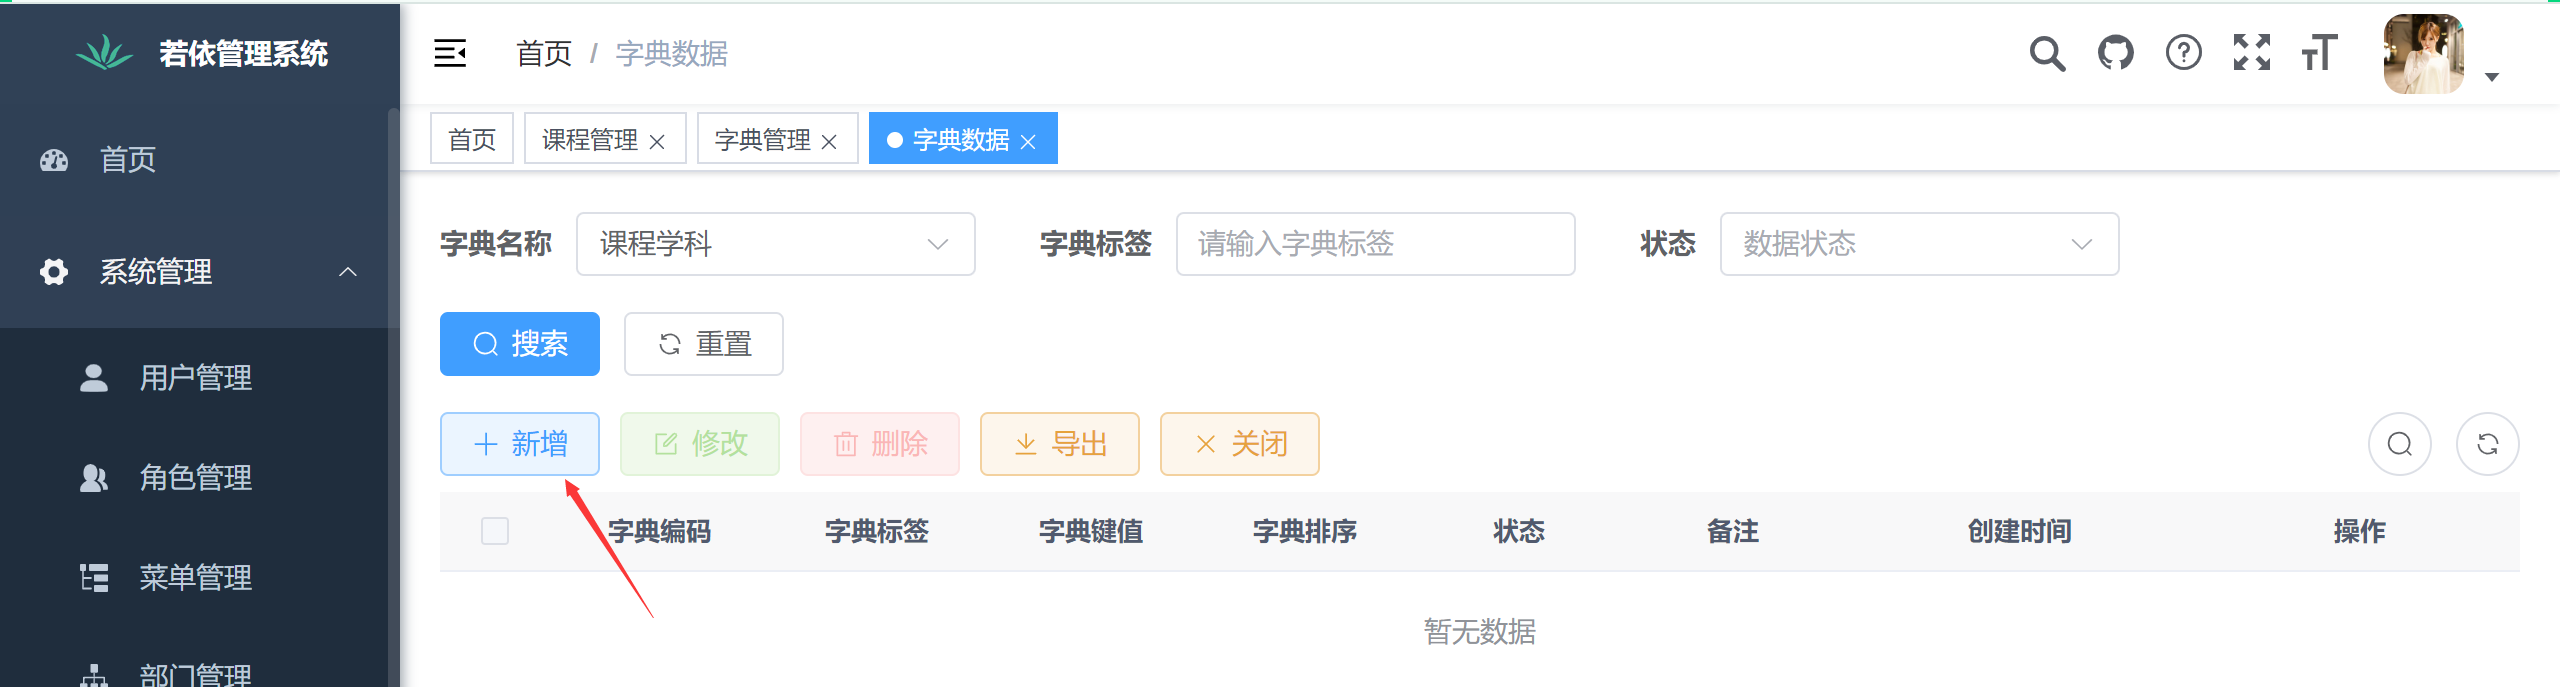
字典类型用于存储一类字典的统称,例如我有一个下拉框供用户选择城市,那么这类就可以命名为城市,然后字典数据表中存储具体的城市名,由外键指定属于哪一类字典
Change the subject management fields in the introductory case to data dictionary maintenance

I have devoted myself to the research of technology for more than 30 years. I am proficient in various languages such as Java, Linux, JavaScript, PHP, CSS, etc. I have made many contributions in the field of open source. I have established a developer documentation site to share some problems in technology development for everyone to read.