2024-07-12
한어Русский языкEnglishFrançaisIndonesianSanskrit日本語DeutschPortuguêsΕλληνικάespañolItalianoSuomalainenLatina
Author: Xingzhu, the operator of the operation and maintenance skills With the rapid development of artificial intelligence, machine learning, and AI large model technology, our demand for computing resources is also rising. In particular, for AI large models that need to process large-scale data and complex algorithms, the use of GPU resources has become crucial. For operation and maintenance engineers, mastering how to manage and configure GPU resources on Kubernetes clusters, as well as how to efficiently deploy applications that rely on these resources, has become an indispensable skill.
Today, I will lead you to have a deep understanding of how to use the powerful Kubernetes ecosystem and tools on the KubeSphere platform to manage GPU resources and deploy applications. The following are the three core topics that this article will explore:
By reading this article, you will gain the knowledge and skills to manage GPU resources on Kubernetes, helping you to make full use of GPU resources in a cloud-native environment and promote the rapid development of AI applications.
KubeSphere Best Practice "2024" The experimental environment hardware configuration and software information of the series of documents are as follows:
Actual server configuration (the architecture is a 1:1 replica of a small-scale production environment, with slightly different configurations)
| CPU name | IP | CPU | Memory | system disk | Data disk | use |
|---|---|---|---|---|---|---|
| ksp-registry | 192.168.9.90 | 4 | 8 | 40 | 200 | Harbor Mirror Repository |
| ksp-control-1 | 192.168.9.91 | 4 | 8 | 40 | 100 | KubeSphere/k8s-control-plane |
| ksp-control-2 | 192.168.9.92 | 4 | 8 | 40 | 100 | KubeSphere/k8s-control-plane |
| ksp-control-3 | 192.168.9.93 | 4 | 8 | 40 | 100 | KubeSphere/k8s-control-plane |
| ksp-worker-1 | 192.168.9.94 | 4 | 16 | 40 | 100 | k8s-worker/CI |
| ksp-worker-2 | 192.168.9.95 | 4 | 16 | 40 | 100 | k8s-worker |
| ksp-worker-3 | 192.168.9.96 | 4 | 16 | 40 | 100 | k8s-worker |
| ksp-storage-1 | 192.168.9.97 | 4 | 8 | 40 | 300+ | ElasticSearch/Ceph/Longhorn/NFS/ |
| ksp-storage-2 | 192.168.9.98 | 4 | 8 | 40 | 300+ | ElasticSearch//Ceph/Longhorn |
| ksp-storage-3 | 192.168.9.99 | 4 | 8 | 40 | 300+ | ElasticSearch//Ceph/Longhorn |
| ksp-gpu-worker-1 | 192.168.9.101 | 4 | 16 | 40 | 100 | k8s-worker(GPU NVIDIA Tesla M40 24G) |
| ksp-gpu-worker-2 | 192.168.9.102 | 4 | 16 | 40 | 100 | k8s-worker(GPU NVIDIA Tesla P100 16G) |
| ksp-gateway-1 | 192.168.9.103 | 2 | 4 | 40 | Self-built application service proxy gateway/VIP: 192.168.9.100 | |
| ksp-gateway-2 | 192.168.9.104 | 2 | 4 | 40 | Self-built application service proxy gateway/VIP: 192.168.9.100 | |
| ksp-mid | 192.168.9.105 | 4 | 8 | 40 | 100 | Service nodes deployed outside the k8s cluster (Gitlab, etc.) |
| total | 15 | 56 | 152 | 600 | 2000 |
Software version information related to the actual combat environment
Due to resource and cost constraints, I don't have a high-end physical host and graphics card to do the experiment. I can only add two virtual machines equipped with entry-level GPU graphics cards as Worker nodes for the cluster.
Although these graphics cards are not as good as high-end models in performance, they are sufficient for most learning and development tasks. With limited resources, such a configuration provides me with valuable practical opportunities to explore the management and scheduling strategies of GPU resources in Kubernetes clusters.
Please refer to Kubernetes cluster node openEuler 22.03 LTS SP3 system initialization guide, complete the operating system initialization configuration.
The initial configuration guide does not cover tasks related to operating system upgrades. When initializing the system in an environment with Internet access, be sure to upgrade the operating system and then restart the node.
Next, we use KubeKey to add the newly added GPU node to the existing Kubernetes cluster. Refer to the official documentation. The whole process is relatively simple and only requires two steps.
On the Control-1 node, switch to the kubekey directory for deployment and modify the original cluster configuration file. The name we use in practice is ksp-v341-v1288.yaml, please modify according to the actual situation.
Main modifications:
The modified example is as follows:
apiVersion: kubekey.kubesphere.io/v1alpha2
kind: Cluster
metadata:
  name: opsxlab
spec:
  hosts:
  ......(保持不变)
  - {name: ksp-gpu-worker-1, address: 192.168.9.101, internalAddress: 192.168.9.101, user: root, password: "OpsXlab@2024"}
  - {name: ksp-gpu-worker-2, address: 192.168.9.102, internalAddress: 192.168.9.102, user: root, password: "OpsXlab@2024"}
  roleGroups:
    ......(保持不变)
    worker:
    ......(保持不变)
    - ksp-gpu-worker-1
    - ksp-gpu-worker-2

# 下面的内容保持不变Before adding nodes, let's confirm the node information of the current cluster.
$ kubectl get nodes -o wide
NAME            STATUS   ROLES           AGE   VERSION   INTERNAL-IP    EXTERNAL-IP   OS-IMAGE                    KERNEL-VERSION                       CONTAINER-RUNTIME
ksp-control-1   Ready    control-plane   24h   v1.28.8   192.168.9.91   <none>        openEuler 22.03 (LTS-SP3)   5.10.0-182.0.0.95.oe2203sp3.x86_64   containerd://1.7.13
ksp-control-2   Ready    control-plane   24h   v1.28.8   192.168.9.92   <none>        openEuler 22.03 (LTS-SP3)   5.10.0-182.0.0.95.oe2203sp3.x86_64   containerd://1.7.13
ksp-control-3   Ready    control-plane   24h   v1.28.8   192.168.9.93   <none>        openEuler 22.03 (LTS-SP3)   5.10.0-182.0.0.95.oe2203sp3.x86_64   containerd://1.7.13
ksp-worker-1    Ready    worker          24h   v1.28.8   192.168.9.94   <none>        openEuler 22.03 (LTS-SP3)   5.10.0-182.0.0.95.oe2203sp3.x86_64   containerd://1.7.13
ksp-worker-2    Ready    worker          24h   v1.28.8   192.168.9.95   <none>        openEuler 22.03 (LTS-SP3)   5.10.0-182.0.0.95.oe2203sp3.x86_64   containerd://1.7.13
ksp-worker-3 Ready worker 24h v1.28.8 192.168.9.96 <none> openEuler 22.03 (LTS-SP3) 5.10.0-182.0.0.95.oe2203sp3.x86_64 containerd://1.7.13Next, we execute the following command to use the modified configuration file to add the newly added Worker node to the cluster.
export KKZONE=cn
./kk add nodes -f ksp-v341-v1288.yamlAfter the above command is executed, KubeKey will first check whether the dependencies and other configurations of the deployed Kubernetes meet the requirements. After passing the check, the system will prompt you to confirm the installation. Enter yes And press ENTER to continue with the deployment.
It takes about 5 minutes to complete the deployment, depending on the network speed, machine configuration, and the number of nodes added.
Once the deployment is complete, you should see output similar to the following on your terminal.
......
19:29:26 CST [AutoRenewCertsModule] Generate k8s certs renew script
19:29:27 CST success: [ksp-control-2]
19:29:27 CST success: [ksp-control-1]
19:29:27 CST success: [ksp-control-3]
19:29:27 CST [AutoRenewCertsModule] Generate k8s certs renew service
19:29:29 CST success: [ksp-control-3]
19:29:29 CST success: [ksp-control-2]
19:29:29 CST success: [ksp-control-1]
19:29:29 CST [AutoRenewCertsModule] Generate k8s certs renew timer
19:29:30 CST success: [ksp-control-2]
19:29:30 CST success: [ksp-control-1]
19:29:30 CST success: [ksp-control-3]
19:29:30 CST [AutoRenewCertsModule] Enable k8s certs renew service
19:29:30 CST success: [ksp-control-3]
19:29:30 CST success: [ksp-control-2]
19:29:30 CST success: [ksp-control-1]
19:29:30 CST Pipeline[AddNodesPipeline] execute successfullyWe open the browser and access the IP address and port of the Control-1 node 30880, log in to the login page of the KubeSphere management console.
Enter the cluster management interface, click the "Node" menu on the left, and click "Cluster Node" to view detailed information about the available nodes in the Kubernetes cluster.
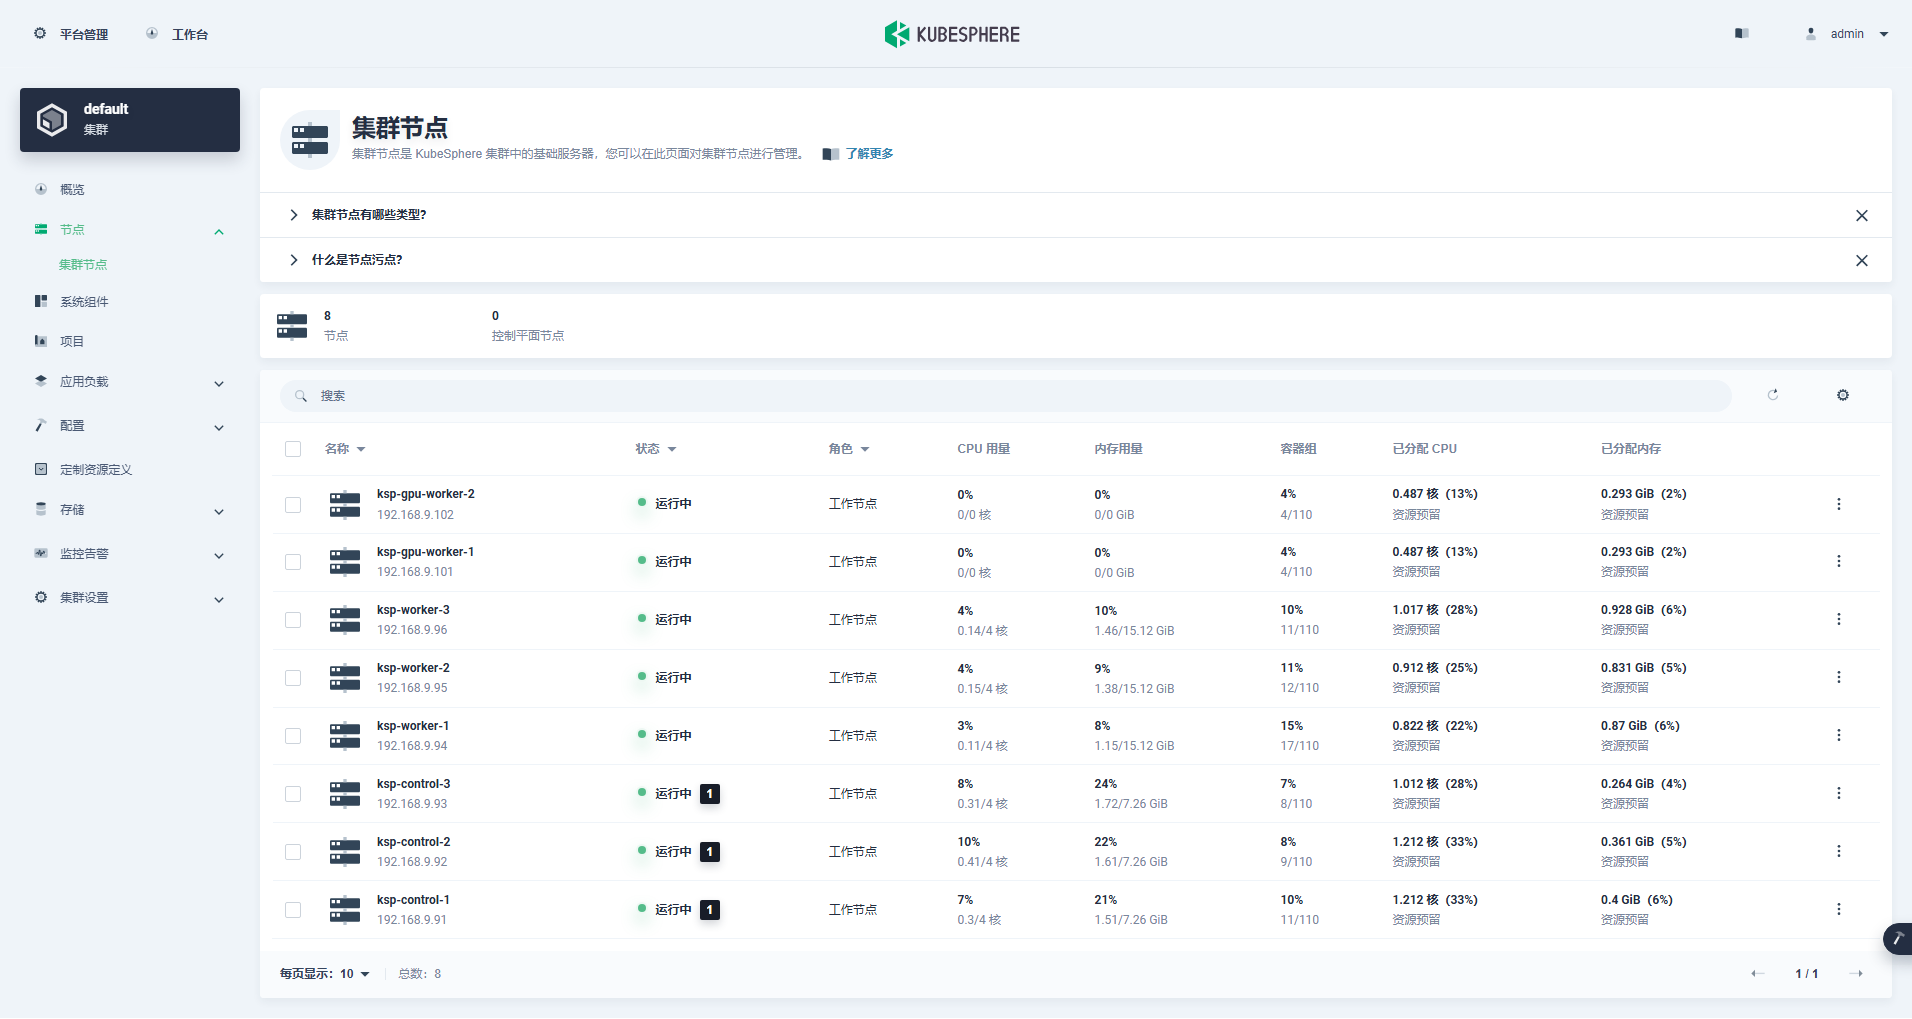
Run the kubectl command on the Control-1 node to obtain the node information of the Kubernetes cluster.
kubectl get nodes -o wideThe output shows that the current Kubernetes cluster has 8 nodes, and displays the name, status, role, lifetime, Kubernetes version number, internal IP, operating system type, kernel version, and container runtime of each node in detail.
$ kubectl get nodes -o wide
NAME               STATUS     ROLES           AGE   VERSION   INTERNAL-IP     EXTERNAL-IP   OS-IMAGE                    KERNEL-VERSION                        CONTAINER-RUNTIME
ksp-control-1      Ready      control-plane   25h   v1.28.8   192.168.9.91    <none>        openEuler 22.03 (LTS-SP3)   5.10.0-182.0.0.95.oe2203sp3.x86_64    containerd://1.7.13
ksp-control-2      Ready      control-plane   25h   v1.28.8   192.168.9.92    <none>        openEuler 22.03 (LTS-SP3)   5.10.0-182.0.0.95.oe2203sp3.x86_64    containerd://1.7.13
ksp-control-3      Ready      control-plane   25h   v1.28.8   192.168.9.93    <none>        openEuler 22.03 (LTS-SP3)   5.10.0-182.0.0.95.oe2203sp3.x86_64    containerd://1.7.13
ksp-gpu-worker-1   Ready      worker          59m   v1.28.8   192.168.9.101   <none>        openEuler 22.03 (LTS-SP3)   5.10.0-199.0.0.112.oe2203sp3.x86_64   containerd://1.7.13
ksp-gpu-worker-2   Ready      worker          59m   v1.28.8   192.168.9.102   <none>        openEuler 22.03 (LTS-SP3)   5.10.0-199.0.0.112.oe2203sp3.x86_64   containerd://1.7.13
ksp-worker-1       Ready      worker          25h   v1.28.8   192.168.9.94    <none>        openEuler 22.03 (LTS-SP3)   5.10.0-182.0.0.95.oe2203sp3.x86_64    containerd://1.7.13
ksp-worker-2       Ready      worker          25h   v1.28.8   192.168.9.95    <none>        openEuler 22.03 (LTS-SP3)   5.10.0-182.0.0.95.oe2203sp3.x86_64    containerd://1.7.13
ksp-worker-3 Ready worker 25h v1.28.8 192.168.9.96 <none> openEuler 22.03 (LTS-SP3) 5.10.0-182.0.0.95.oe2203sp3.x86_64 containerd://1.7.13So far, we have completed the task of using Kubekey to add 2 Worker nodes to the existing Kubernetes cluster consisting of 3 Master nodes and 3 Worker nodes.
Next, we install the NVIDIA GPU Operator officially produced by NVIDIA to enable K8s to schedule Pods to use GPU resources.
NVIDIA GPU Operator supports automatic installation of graphics card drivers, but only CentOS 7, 8 and Ubuntu 20.04, 22.04 and other versions do not support openEuler, so the graphics card driver needs to be installed manually.
Please refer to KubeSphere Best Practice: openEuler 22.03 LTS SP3 Install NVIDIA graphics driver, complete the graphics card driver installation.
Node Feature Discovery (NFD) detects feature checks.
$ kubectl get nodes -o json | jq '.items[].metadata.labels | keys | any(startswith("feature.node.kubernetes.io"))'The above command execution results are true, illustrate NFD Already running in the cluster. If NFD is already running in the cluster, you must disable the deployment of NFD when installing the Operator.
illustrate: By default, NFD is not installed and configured in a K8s cluster deployed using KubeSphere.
helm repo add nvidia https://helm.ngc.nvidia.com/nvidia && helm repo updateUse the default configuration file, disable the automatic installation of graphics card drivers, and install GPU Operator.
helm install -n gpu-operator --create-namespace gpu-operator nvidia/gpu-operator --set driver.enabled=falseNote: Since the image to be installed is relatively large, a timeout may occur during the initial installation. Please check whether your image has been successfully pulled! You can consider using offline installation to solve this problem.
helm install -f gpu-operator-values.yaml -n gpu-operator --create-namespace gpu-operator nvidia/gpu-operator --set driver.enabled=falseThe output of correct execution is as follows:
$ helm install -n gpu-operator --create-namespace gpu-operator nvidia/gpu-operator --set driver.enabled=false
NAME: gpu-operator
LAST DEPLOYED: Tue Jul  2 21:40:29 2024
NAMESPACE: gpu-operator
STATUS: deployed
REVISION: 1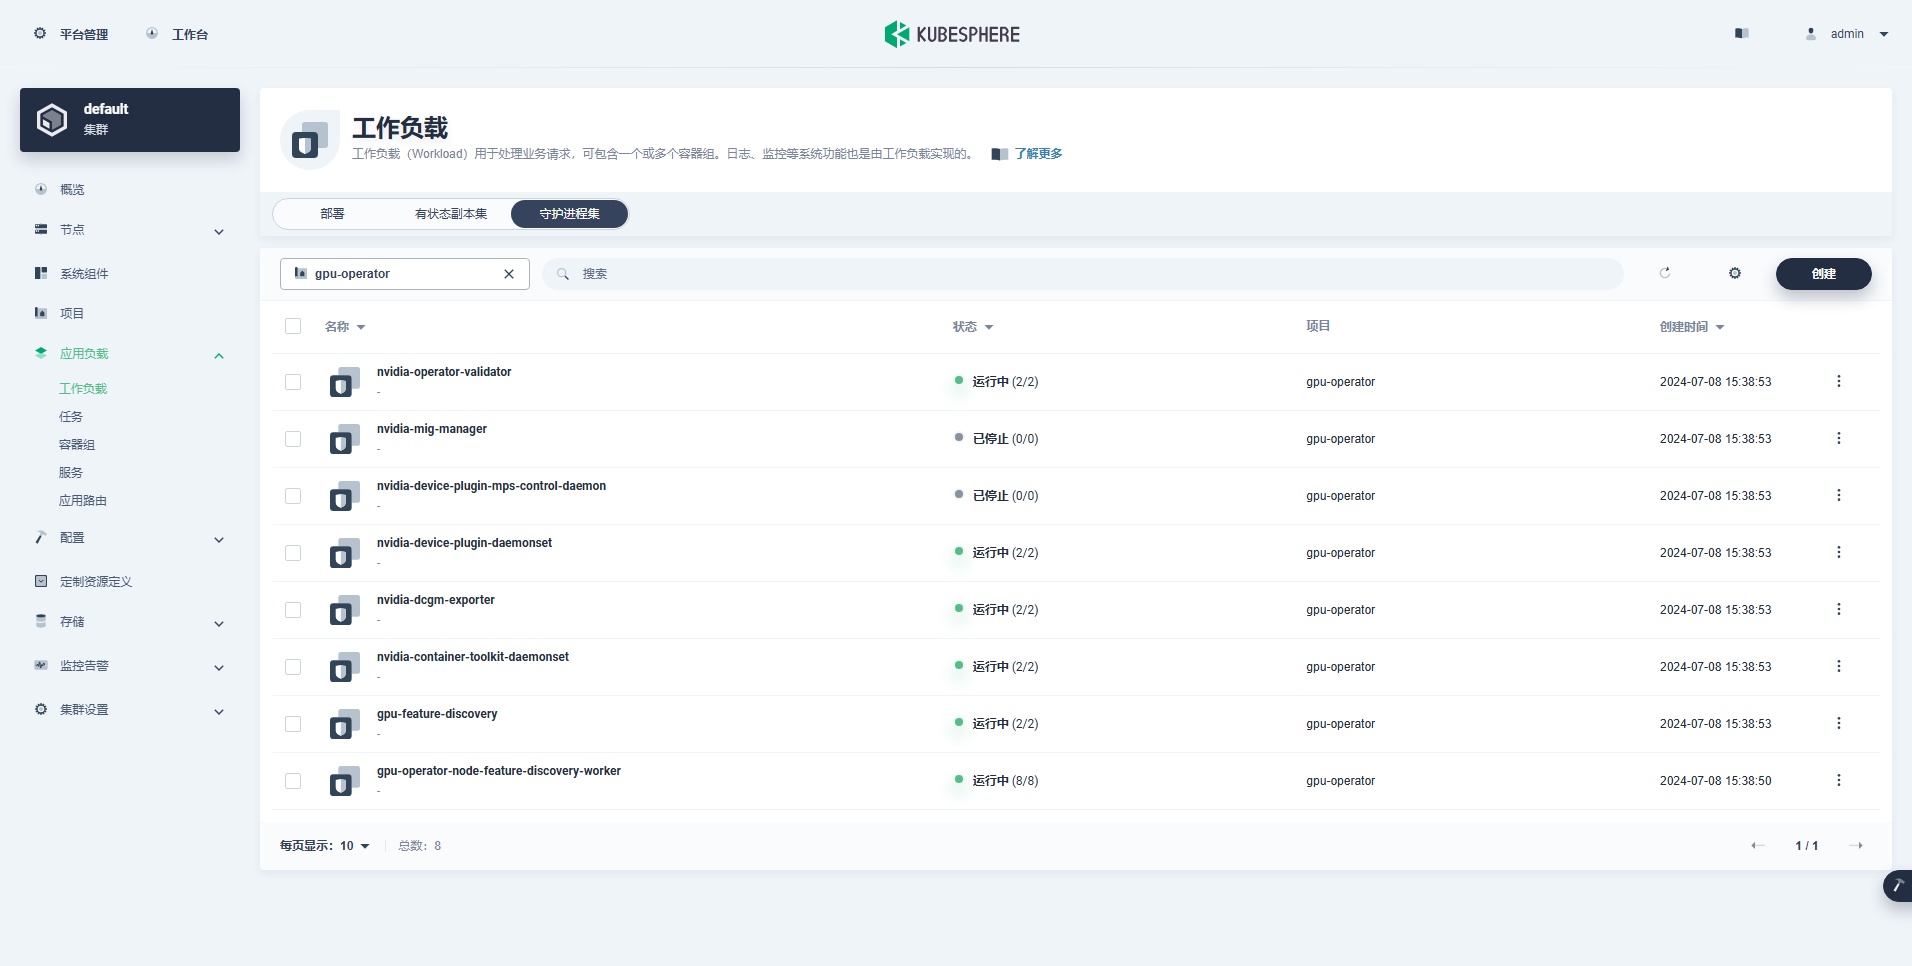
TEST SUITE: NoneAfter executing the command to install GPU Operator, please wait patiently for all images to be successfully pulled and all Pods to be in the Running state.
$ kubectl get pods -n gpu-operator
NAME                                                          READY   STATUS      RESTARTS   AGE
gpu-feature-discovery-czdf5                                   1/1     Running     0          15m
gpu-feature-discovery-q9qlm                                   1/1     Running     0          15m
gpu-operator-67c68ddccf-x29pm                                 1/1     Running     0          15m
gpu-operator-node-feature-discovery-gc-57457b6d8f-zjqhr       1/1     Running     0          15m
gpu-operator-node-feature-discovery-master-5fb74ff754-fzbzm   1/1     Running     0          15m
gpu-operator-node-feature-discovery-worker-68459              1/1     Running     0          15m
gpu-operator-node-feature-discovery-worker-74ps5              1/1     Running     0          15m
gpu-operator-node-feature-discovery-worker-dpmg9              1/1     Running     0          15m
gpu-operator-node-feature-discovery-worker-jvk4t              1/1     Running     0          15m
gpu-operator-node-feature-discovery-worker-k5kwq              1/1     Running     0          15m
gpu-operator-node-feature-discovery-worker-ll4bk              1/1     Running     0          15m
gpu-operator-node-feature-discovery-worker-p4q5q              1/1     Running     0          15m
gpu-operator-node-feature-discovery-worker-rmk99              1/1     Running     0          15m
nvidia-container-toolkit-daemonset-9zcnj                      1/1     Running     0          15m
nvidia-container-toolkit-daemonset-kcz9g                      1/1     Running     0          15m
nvidia-cuda-validator-l8vjb                                   0/1     Completed   0          14m
nvidia-cuda-validator-svn2p                                   0/1     Completed   0          13m
nvidia-dcgm-exporter-9lq4c                                    1/1     Running     0          15m
nvidia-dcgm-exporter-qhmkg                                    1/1     Running     0          15m
nvidia-device-plugin-daemonset-7rvfm                          1/1     Running     0          15m
nvidia-device-plugin-daemonset-86gx2                          1/1     Running     0          15m
nvidia-operator-validator-csr2z                               1/1     Running     0          15m
nvidia-operator-validator-svlc4 1/1 Running 0 15m$ kubectl describe node ksp-gpu-worker-1 | grep "^Capacity" -A 7
Capacity:
cpu: 4
ephemeral-storage: 35852924Ki
hugepages-1Gi: 0
hugepages-2Mi: 0
memory: 15858668Ki
nvidia.com/gpu: 1
pods: 110illustrate: Focus
nvidia.com/gpu:The value of the field.
The workload that was created successfully is as follows:

After the GPU Operator is correctly installed, use the CUDA base image to test whether K8s can correctly create a Pod that uses GPU resources.
vi cuda-ubuntu.yamlapiVersion: v1
kind: Pod
metadata:
name: cuda-ubuntu2204
spec:
restartPolicy: OnFailure
containers:
- name: cuda-ubuntu2204
image: "nvcr.io/nvidia/cuda:12.4.0-base-ubuntu22.04"
resources:
limits:
nvidia.com/gpu: 1
command: ["nvidia-smi"]kubectl apply -f cuda-ubuntu.yamlFrom the results, we can see that the pod is created on the ksp-gpu-worker-2 node (The graphics card model of this node is Tesla P100-PCIE-16GB)。
$ kubectl get pods -o wide
NAME                      READY   STATUS      RESTARTS   AGE   IP             NODE               NOMINATED NODE   READINESS GATES
cuda-ubuntu2204           0/1     Completed   0          73s   10.233.99.15   ksp-gpu-worker-2   <none>           <none>
ollama-79688d46b8-vxmhg 1/1 Running 0 47m 10.233.72.17 ksp-gpu-worker-1 <none> <none>kubectl logs pod/cuda-ubuntu2204The output of correct execution is as follows:
$ kubectl logs pod/cuda-ubuntu2204
Mon Jul  8 11:10:59 2024
+-----------------------------------------------------------------------------------------+
| NVIDIA-SMI 550.54.15              Driver Version: 550.54.15      CUDA Version: 12.4     |
|-----------------------------------------+------------------------+----------------------+
| GPU  Name                 Persistence-M | Bus-Id          Disp.A | Volatile Uncorr. ECC |
| Fan  Temp   Perf          Pwr:Usage/Cap |           Memory-Usage | GPU-Util  Compute M. |
|                                         |                        |               MIG M. |
|=========================================+========================+======================|
|   0  Tesla P100-PCIE-16GB           Off |   00000000:00:10.0 Off |                    0 |
| N/A   40C    P0             26W /  250W |       0MiB /  16384MiB |      0%      Default |
|                                         |                        |                  N/A |
+-----------------------------------------+------------------------+----------------------+

+-----------------------------------------------------------------------------------------+
| Processes:                                                                              |
|  GPU   GI   CI        PID   Type   Process name                              GPU Memory |
|        ID   ID                                                               Usage      |
|=========================================================================================|
|  No running processes found                                                             |
+-----------------------------------------------------------------------------------------+kubectl apply -f cuda-ubuntu.yamlImplement a simple CUDA example for adding two vectors.
vi cuda-vectoradd.yamlapiVersion: v1
kind: Pod
metadata:
name: cuda-vectoradd
spec:
restartPolicy: OnFailure
containers:
- name: cuda-vectoradd
image: "nvcr.io/nvidia/k8s/cuda-sample:vectoradd-cuda11.7.1-ubuntu20.04"
resources:
limits:
nvidia.com/gpu: 1$ kubectl apply -f cuda-vectoradd.yamlThe Pod is created successfully and will run after startup vectorAdd command and exit.
$ kubectl logs pod/cuda-vectoraddThe output of correct execution is as follows:
[Vector addition of 50000 elements]
Copy input data from the host memory to the CUDA device
CUDA kernel launch with 196 blocks of 256 threads
Copy output data from the CUDA device to the host memory
Test PASSED
Donekubectl delete -f cuda-vectoradd.yamlThe above verification test proves that Pod resources using GPU can be created on the K8s cluster. Next, we will use KubeSphere to create a large model management tool Ollama in the K8s cluster based on actual usage needs.
This example is a simple test. The storage option is hostPath Mode, please replace it with storage class or other types of persistent storage in actual use.
vi deploy-ollama.yamlkind: Deployment
apiVersion: apps/v1
metadata:
name: ollama
namespace: default
labels:
app: ollama
spec:
replicas: 1
selector:
matchLabels:
app: ollama
template:
metadata:
labels:
app: ollama
spec:
volumes:
- name: ollama-models
hostPath:
path: /data/openebs/local/ollama
type: ''
- name: host-time
hostPath:
path: /etc/localtime
type: ''
containers:
- name: ollama
image: 'ollama/ollama:latest'
ports:
- name: http-11434
containerPort: 11434
protocol: TCP
resources:
limits:
nvidia.com/gpu: '1'
requests:
nvidia.com/gpu: '1'
volumeMounts:
- name: ollama-models
mountPath: /root/.ollama
- name: host-time
readOnly: true
mountPath: /etc/localtime
imagePullPolicy: IfNotPresent
restartPolicy: Always
---
kind: Service
apiVersion: v1
metadata:
name: ollama
namespace: default
labels:
app: ollama
spec:
ports:
- name: http-11434
protocol: TCP
port: 11434
targetPort: 11434
nodePort: 31434
selector:
app: ollama
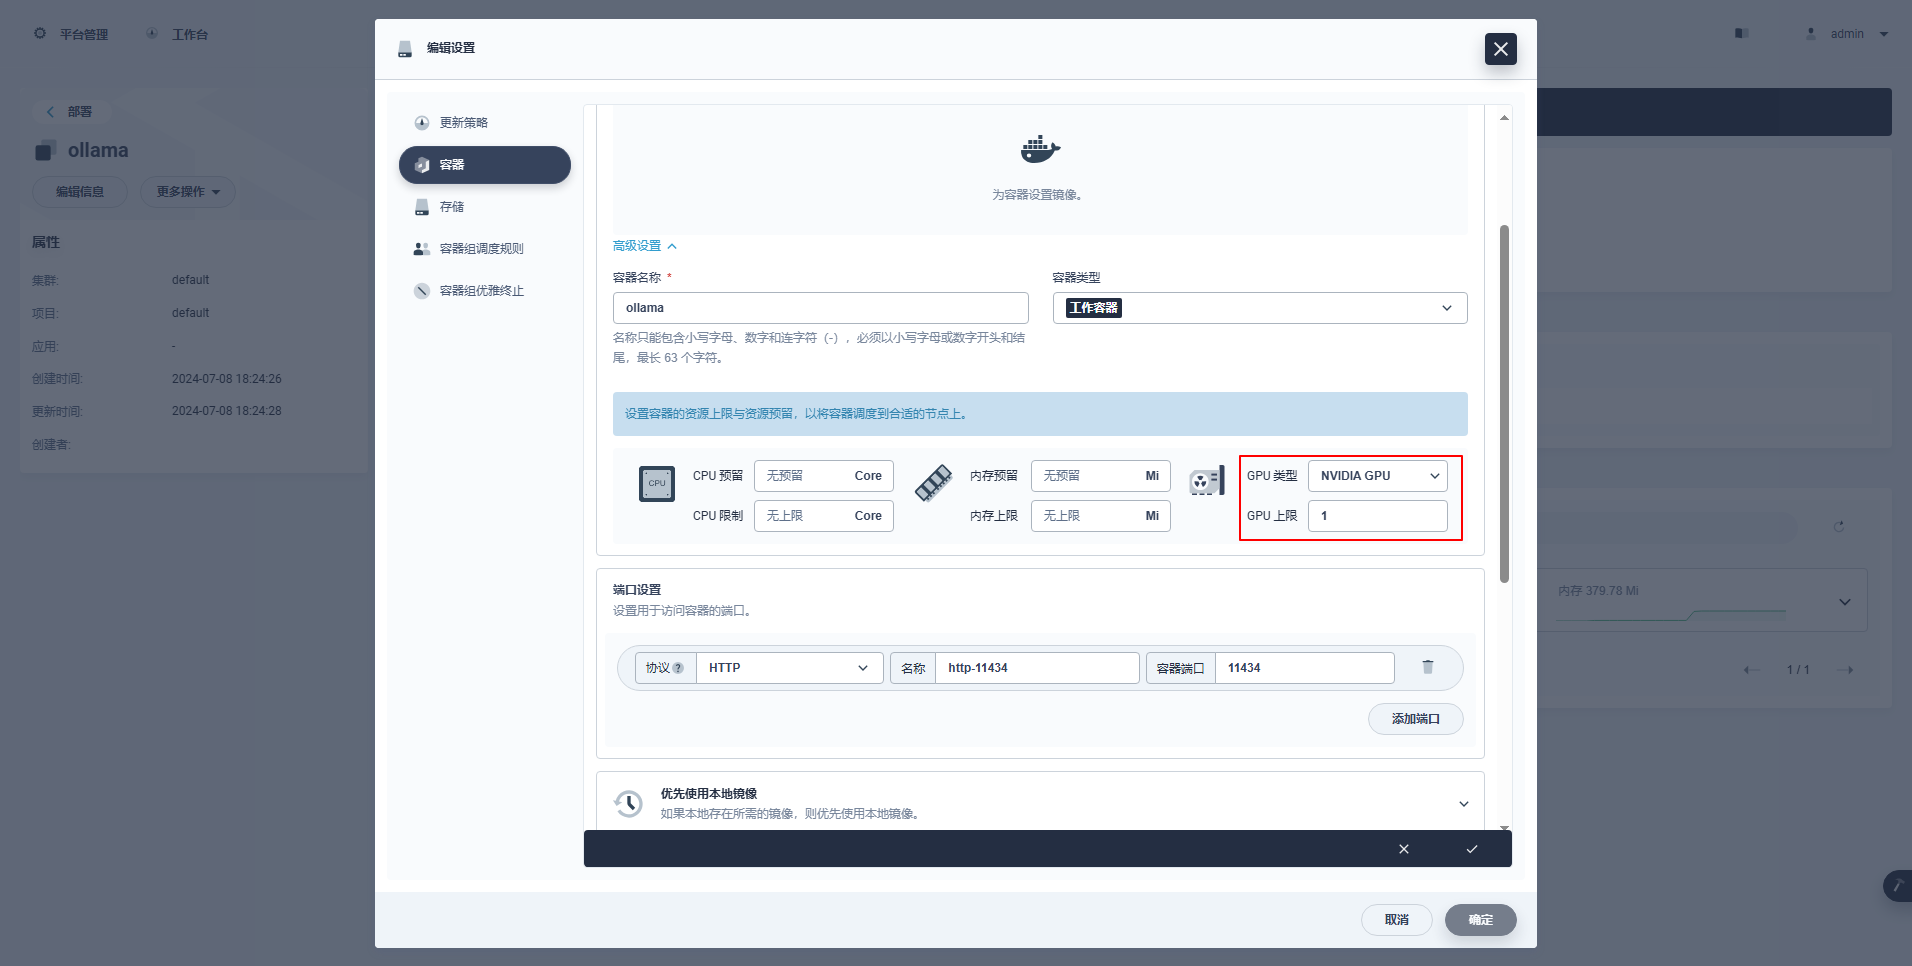
type: NodePortSpecial Instructions: The management console of KubeSphere supports graphical configuration of Deployment and other resources to use GPU resources. The configuration examples are as follows. Interested friends can study them on their own.
kubectl apply -f deploy-ollama.yamlFrom the results, we can see that the pod is created on the ksp-gpu-worker-1 node (The graphics card model of this node is Tesla M40 24GB)。
$ kubectl get pods -o wide
NAME                      READY   STATUS    RESTARTS   AGE   IP             NODE               NOMINATED NODE   READINESS GATES
k 1/1 Running 0 12s 10.233.72.17 ksp-gpu-worker-1 <none> <none>[root@ksp-control-1 ~]# kubectl logs ollama-79688d46b8-vxmhg
2024/07/08 18:24:27 routes.go:1064: INFO server config env="map[CUDA_VISIBLE_DEVICES: GPU_DEVICE_ORDINAL: HIP_VISIBLE_DEVICES: HSA_OVERRIDE_GFX_VERSION: OLLAMA_DEBUG:false OLLAMA_FLASH_ATTENTION:false OLLAMA_HOST:http://0.0.0.0:11434 OLLAMA_INTEL_GPU:false OLLAMA_KEEP_ALIVE: OLLAMA_LLM_LIBRARY: OLLAMA_MAX_LOADED_MODELS:1 OLLAMA_MAX_QUEUE:512 OLLAMA_MAX_VRAM:0 OLLAMA_MODELS:/root/.ollama/models OLLAMA_NOHISTORY:false OLLAMA_NOPRUNE:false OLLAMA_NUM_PARALLEL:1 OLLAMA_ORIGINS:[http://localhost https://localhost http://localhost:* https://localhost:* http://127.0.0.1 https://127.0.0.1 http://127.0.0.1:* https://127.0.0.1:* http://0.0.0.0 https://0.0.0.0 http://0.0.0.0:* https://0.0.0.0:* app://* file://* tauri://*] OLLAMA_RUNNERS_DIR: OLLAMA_SCHED_SPREAD:false OLLAMA_TMPDIR: ROCR_VISIBLE_DEVICES:]"
time=2024-07-08T18:24:27.829+08:00 level=INFO source=images.go:730 msg="total blobs: 5"
time=2024-07-08T18:24:27.829+08:00 level=INFO source=images.go:737 msg="total unused blobs removed: 0"
time=2024-07-08T18:24:27.830+08:00 level=INFO source=routes.go:1111 msg="Listening on [::]:11434 (version 0.1.48)"
time=2024-07-08T18:24:27.830+08:00 level=INFO source=payload.go:30 msg="extracting embedded files" dir=/tmp/ollama2414166698/runners
time=2024-07-08T18:24:32.454+08:00 level=INFO source=payload.go:44 msg="Dynamic LLM libraries [cpu cpu_avx cpu_avx2 cuda_v11 rocm_v60101]"
time=2024-07-08T18:24:32.567+08:00 level=INFO source=types.go:98 msg="inference compute" id=GPU-9e48dc13-f8f1-c6bb-860f-c82c96df22a4 library=cuda compute=5.2 driver=12.4 name="Tesla M40 24GB" total="22.4 GiB" available="22.3 GiB"In order to save time, this example uses the Alibaba open source qwen2 1.5b small-size model as the test model.
kubectl exec -it ollama-79688d46b8-vxmhg -- ollama pull qwen2:1.5bThe output of correct execution is as follows:
[root@ksp-control-1 ~]# kubectl exec -it ollama-79688d46b8-vxmhg -- ollama pull qwen2:1.5b
pulling manifest
pulling 405b56374e02... 100% ▕█████████████████████████████████████████████████████▏ 934 MB
pulling 62fbfd9ed093... 100% ▕█████████████████████████████████████████████████████▏  182 B
pulling c156170b718e... 100% ▕█████████████████████████████████████████████████████▏  11 KB
pulling f02dd72bb242... 100% ▕█████████████████████████████████████████████████████▏   59 B
pulling c9f5e9ffbc5f... 100% ▕█████████████████████████████████████████████████████▏  485 B
verifying sha256 digest
writing manifest
removing any unused layers
successexist ksp-gpu-worker-1 The node executes the following view command
$ ls -R /data/openebs/local/ollama/
/data/openebs/local/ollama/:
id_ed25519  id_ed25519.pub  models

/data/openebs/local/ollama/models:
blobs  manifests

/data/openebs/local/ollama/models/blobs:
sha256-405b56374e02b21122ae1469db646be0617c02928fd78e246723ebbb98dbca3e
sha256-62fbfd9ed093d6e5ac83190c86eec5369317919f4b149598d2dbb38900e9faef
sha256-c156170b718ec29139d3653d40ed1986fd92fb7e0959b5c71f3c48f62e6636f4
sha256-c9f5e9ffbc5f14febb85d242942bd3d674a8e4c762aaab034ec88d6ba839b596
sha256-f02dd72bb2423204352eabc5637b44d79d17f109fdb510a7c51455892aa2d216

/data/openebs/local/ollama/models/manifests:
registry.ollama.ai

/data/openebs/local/ollama/models/manifests/registry.ollama.ai:
library

/data/openebs/local/ollama/models/manifests/registry.ollama.ai/library:
qwen2

/data/openebs/local/ollama/models/manifests/registry.ollama.ai/library/qwen2:
1.5bcurl http://192.168.9.91:31434/api/chat -d '{
"model": "qwen2:1.5b",
"messages": [
{ "role": "user", "content": "用20个字,介绍你自己" }
]
}'$ curl http://192.168.9.91:31434/api/chat -d '{
"model": "qwen2:1.5b",
"messages": [
{ "role": "user", "content": "用20个字,介绍你自己" }
]
}'
{"model":"qwen2:1.5b","created_at":"2024-07-08T09:54:48.011798927Z","message":{"role":"assistant","content":"我"},"done":false}
{"model":"qwen2:1.5b","created_at":"2024-07-08T09:54:48.035291669Z","message":{"role":"assistant","content":"是一个"},"done":false}
{"model":"qwen2:1.5b","created_at":"2024-07-08T09:54:48.06360233Z","message":{"role":"assistant","content":"人工智能"},"done":false}
{"model":"qwen2:1.5b","created_at":"2024-07-08T09:54:48.092411266Z","message":{"role":"assistant","content":"助手"},"done":false}
{"model":"qwen2:1.5b","created_at":"2024-07-08T09:54:48.12016935Z","message":{"role":"assistant","content":","},"done":false}
{"model":"qwen2:1.5b","created_at":"2024-07-08T09:54:48.144921623Z","message":{"role":"assistant","content":"专注于"},"done":false}
{"model":"qwen2:1.5b","created_at":"2024-07-08T09:54:48.169803961Z","message":{"role":"assistant","content":"提供"},"done":false}
{"model":"qwen2:1.5b","created_at":"2024-07-08T09:54:48.194796364Z","message":{"role":"assistant","content":"信息"},"done":false}
{"model":"qwen2:1.5b","created_at":"2024-07-08T09:54:48.21978104Z","message":{"role":"assistant","content":"和"},"done":false}
{"model":"qwen2:1.5b","created_at":"2024-07-08T09:54:48.244976103Z","message":{"role":"assistant","content":"帮助"},"done":false}
{"model":"qwen2:1.5b","created_at":"2024-07-08T09:54:48.270233992Z","message":{"role":"assistant","content":"。"},"done":false}
{"model":"qwen2:1.5b","created_at":"2024-07-08T09:54:48.29548561Z","message":{"role":"assistant","content":""},"done_reason":"stop","done":true,"total_duration":454377627,"load_duration":1535754,"prompt_eval_duration":36172000,"eval_count":12,"eval_duration":287565000}$ kubectl describe node ksp-gpu-worker-1 | grep "Allocated resources" -A 9
Allocated resources:
(Total limits may be over 100 percent, i.e., overcommitted.)
Resource Requests Limits
-------- -------- ------
cpu 487m (13%) 2 (55%)
memory 315115520 (2%) 800Mi (5%)
ephemeral-storage 0 (0%) 0 (0%)
hugepages-1Gi 0 (0%) 0 (0%)
hugepages-2Mi 0 (0%) 0 (0%)
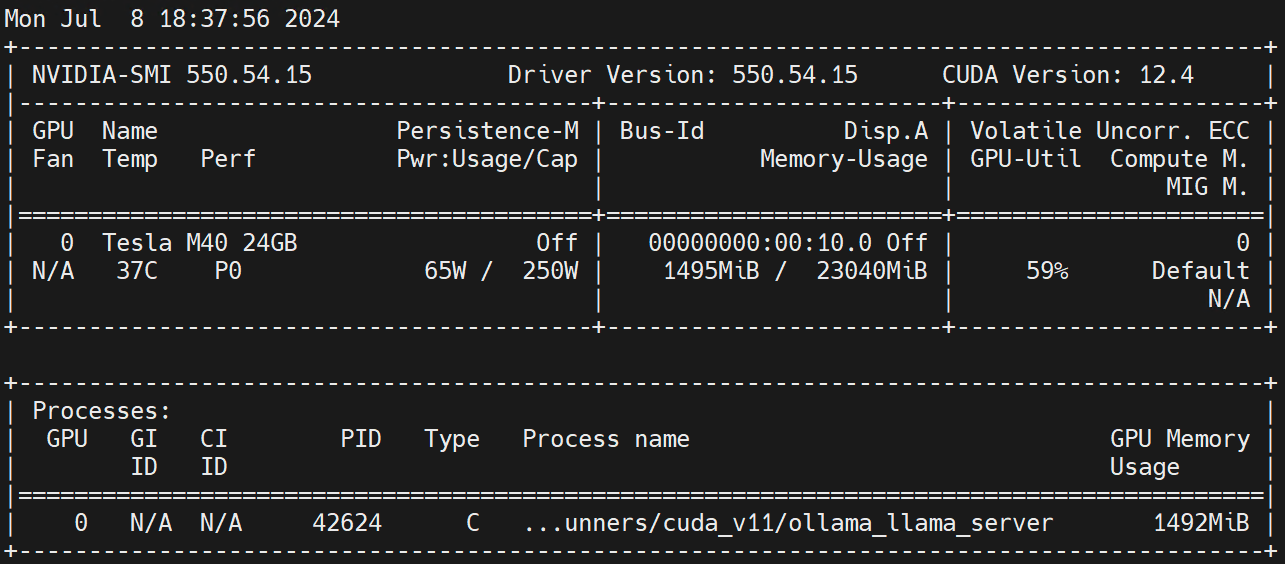
nvidia.com/gpu 1 1Execute on the Worker node nvidia-smi -l Observe GPU usage.
Disclaimer:
This article is provided by the blog one article multiple post platform OpenWrite release!

I have devoted myself to the research of technology for more than 30 years. I am proficient in various languages such as Java, Linux, JavaScript, PHP, CSS, etc. I have made many contributions in the field of open source. I have established a developer documentation site to share some problems in technology development for everyone to read.

