
내 연락처 정보
우편메소피아@프로톤메일.com
2024-07-12
한어Русский языкEnglishFrançaisIndonesianSanskrit日本語DeutschPortuguêsΕλληνικάespañolItalianoSuomalainenLatina
작성자: 운영 및 유지 관리 Youshu Star Master 인공 지능, 기계 학습 및 AI 대형 모델 기술의 급속한 발전으로 컴퓨팅 리소스에 대한 수요도 증가하고 있습니다. 특히 대규모 데이터와 복잡한 알고리즘을 처리해야 하는 대규모 AI 모델의 경우 GPU 리소스 사용이 중요해집니다. 운영 및 유지 관리 엔지니어에게는 Kubernetes 클러스터에서 GPU 리소스를 관리 및 구성하는 방법과 이러한 리소스에 의존하는 애플리케이션을 효율적으로 배포하는 방법을 숙지하는 것이 필수적인 기술이 되었습니다.
오늘은 Kubernetes의 강력한 생태계와 도구를 사용하여 KubeSphere 플랫폼에서 GPU 리소스 관리 및 애플리케이션 배포를 달성하는 방법에 대해 심층적으로 이해할 수 있도록 안내하겠습니다. 이 기사에서 살펴볼 세 가지 핵심 주제는 다음과 같습니다.
이 기사를 읽으면 Kubernetes에서 GPU 리소스를 관리하는 데 필요한 지식과 기술을 습득하여 클라우드 네이티브 환경에서 GPU 리소스를 최대한 활용하고 AI 애플리케이션의 신속한 개발을 촉진하는 데 도움이 됩니다.
KubeSphere 모범 사례 '2024' 일련의 문서에 대한 실험 환경 하드웨어 구성 및 소프트웨어 정보는 다음과 같습니다.
실제 서버 구성 (소규모 프로덕션 환경의 아키텍처 1:1 복제본, 구성이 약간 다름)
| CPU 이름 | 아이피(IP) | CPU | 메모리 | 시스템 디스크 | 데이터 디스크 | 사용 |
|---|---|---|---|---|---|---|
| ksp-레지스트리 | 192.168.9.90 | 4 | 8 | 40 | 200 | 항구 거울 창고 |
| ksp-컨트롤-1 | 192.168.9.91 | 4 | 8 | 40 | 100 | KubeSphere/k8s-제어-평면 |
| ksp-컨트롤-2 | 192.168.9.92 | 4 | 8 | 40 | 100 | KubeSphere/k8s-제어-평면 |
| ksp-컨트롤-3 | 192.168.9.93 | 4 | 8 | 40 | 100 | KubeSphere/k8s-제어-평면 |
| ksp-워커-1 | 192.168.9.94 | 4 | 16 | 40 | 100 | k8s-워커/CI |
| ksp-워커-2 | 192.168.9.95 | 4 | 16 | 40 | 100 | k8s-워커 |
| ksp-워커-3 | 192.168.9.96 | 4 | 16 | 40 | 100 | k8s-워커 |
| ksp-저장소-1 | 192.168.9.97 | 4 | 8 | 40 | 300+ | ElasticSearch/Ceph/Longhorn/NFS/ |
| ksp-스토리지-2 | 192.168.9.98 | 4 | 8 | 40 | 300+ | ElasticSearch//Ceph/Longhorn |
| ksp-스토리지-3 | 192.168.9.99 | 4 | 8 | 40 | 300+ | ElasticSearch//Ceph/Longhorn |
| ksp-gpu-worker-1 | 192.168.9.101 | 4 | 16 | 40 | 100 | k8s-worker(GPU NVIDIA Tesla M40 24G) |
| ksp-gpu-worker-2 | 192.168.9.102 | 4 | 16 | 40 | 100 | k8s-worker(GPU NVIDIA Tesla P100 16G) |
| ksp-게이트웨이-1 | 192.168.9.103 | 2 | 4 | 40 | 자체 구축된 애플리케이션 서비스 프록시 게이트웨이/VIP: 192.168.9.100 | |
| ksp-게이트웨이-2 | 192.168.9.104 | 2 | 4 | 40 | 자체 구축된 애플리케이션 서비스 프록시 게이트웨이/VIP: 192.168.9.100 | |
| ksp-미드 | 192.168.9.105 | 4 | 8 | 40 | 100 | k8s 클러스터 외부에 배포된 서비스 노드(Gitlab 등) |
| 총 | 15 | 56 | 152 | 600 | 2000 |
실제 전투 환경에는 소프트웨어 버전 정보가 포함됩니다.
리소스 및 비용 제약으로 인해 실험할 고급형 물리적 호스트와 그래픽 카드가 없습니다. 보급형 GPU 그래픽 카드가 장착된 가상 머신 두 개만 클러스터의 작업자 노드로 추가할 수 있습니다.
이러한 그래픽 카드는 고급 모델만큼 강력하지는 않지만 대부분의 학습 및 개발 작업에는 충분합니다. 제한된 리소스로 이러한 구성은 Kubernetes 클러스터 관리 및 GPU 리소스를 심층적으로 탐색할 수 있는 귀중한 실습 기회를 제공합니다. 스케줄링 전략.
참고하세요 Kubernetes 클러스터 노드 openEuler 22.03 LTS SP3 시스템 초기화 가이드, 운영 체제 초기화 구성을 완료합니다.
초기 구성 가이드에는 운영 체제 업그레이드 작업이 포함되어 있지 않습니다. 인터넷에 액세스할 수 있는 환경에서 시스템을 초기화하는 경우 운영 체제를 업그레이드한 다음 노드를 다시 시작해야 합니다.
다음으로 KubeKey를 사용하여 새로 추가된 GPU 노드를 기존 Kubernetes 클러스터에 추가합니다. 전체 프로세스는 비교적 간단하며 두 단계만 필요합니다.
Control-1 노드에서 배포용 kubekey 디렉터리로 전환하고 원본 클러스터 구성 파일을 수정합니다. 실제 전투에서 사용한 이름은 다음과 같습니다. ksp-v341-v1288.yaml, 실제 상황에 따라 수정하십시오.
주요 수정 사항:
수정된 예는 다음과 같습니다.
apiVersion: kubekey.kubesphere.io/v1alpha2
kind: Cluster
metadata:
  name: opsxlab
spec:
  hosts:
  ......(保持不变)
  - {name: ksp-gpu-worker-1, address: 192.168.9.101, internalAddress: 192.168.9.101, user: root, password: "OpsXlab@2024"}
  - {name: ksp-gpu-worker-2, address: 192.168.9.102, internalAddress: 192.168.9.102, user: root, password: "OpsXlab@2024"}
  roleGroups:
    ......(保持不变)
    worker:
    ......(保持不变)
    - ksp-gpu-worker-1
    - ksp-gpu-worker-2

# 下面的内容保持不变노드를 추가하기 전에 현재 클러스터의 노드 정보를 확인해보자.
$ kubectl get nodes -o wide
NAME            STATUS   ROLES           AGE   VERSION   INTERNAL-IP    EXTERNAL-IP   OS-IMAGE                    KERNEL-VERSION                       CONTAINER-RUNTIME
ksp-control-1   Ready    control-plane   24h   v1.28.8   192.168.9.91   <none>        openEuler 22.03 (LTS-SP3)   5.10.0-182.0.0.95.oe2203sp3.x86_64   containerd://1.7.13
ksp-control-2   Ready    control-plane   24h   v1.28.8   192.168.9.92   <none>        openEuler 22.03 (LTS-SP3)   5.10.0-182.0.0.95.oe2203sp3.x86_64   containerd://1.7.13
ksp-control-3   Ready    control-plane   24h   v1.28.8   192.168.9.93   <none>        openEuler 22.03 (LTS-SP3)   5.10.0-182.0.0.95.oe2203sp3.x86_64   containerd://1.7.13
ksp-worker-1    Ready    worker          24h   v1.28.8   192.168.9.94   <none>        openEuler 22.03 (LTS-SP3)   5.10.0-182.0.0.95.oe2203sp3.x86_64   containerd://1.7.13
ksp-worker-2    Ready    worker          24h   v1.28.8   192.168.9.95   <none>        openEuler 22.03 (LTS-SP3)   5.10.0-182.0.0.95.oe2203sp3.x86_64   containerd://1.7.13
ksp-worker-3 Ready worker 24h v1.28.8 192.168.9.96 <none> openEuler 22.03 (LTS-SP3) 5.10.0-182.0.0.95.oe2203sp3.x86_64 containerd://1.7.13다음으로, 다음 명령을 실행하고 수정된 구성 파일을 사용하여 클러스터에 새 작업자 노드를 추가합니다.
export KKZONE=cn
./kk add nodes -f ksp-v341-v1288.yaml위 명령이 실행된 후 KubeKey는 먼저 Kubernetes 배포를 위한 종속성 및 기타 구성이 요구 사항을 충족하는지 확인합니다. 검사를 통과하면 설치를 확인하라는 메시지가 표시됩니다.입력하다예 배포를 계속하려면 Enter 키를 누르세요.
배포를 완료하는 데 약 5분 정도 소요됩니다. 구체적인 시간은 네트워크 속도, 머신 구성, 추가된 노드 수에 따라 다릅니다.
배포가 완료되면 터미널에 다음과 유사한 출력이 표시됩니다.
......
19:29:26 CST [AutoRenewCertsModule] Generate k8s certs renew script
19:29:27 CST success: [ksp-control-2]
19:29:27 CST success: [ksp-control-1]
19:29:27 CST success: [ksp-control-3]
19:29:27 CST [AutoRenewCertsModule] Generate k8s certs renew service
19:29:29 CST success: [ksp-control-3]
19:29:29 CST success: [ksp-control-2]
19:29:29 CST success: [ksp-control-1]
19:29:29 CST [AutoRenewCertsModule] Generate k8s certs renew timer
19:29:30 CST success: [ksp-control-2]
19:29:30 CST success: [ksp-control-1]
19:29:30 CST success: [ksp-control-3]
19:29:30 CST [AutoRenewCertsModule] Enable k8s certs renew service
19:29:30 CST success: [ksp-control-3]
19:29:30 CST success: [ksp-control-2]
19:29:30 CST success: [ksp-control-1]
19:29:30 CST Pipeline[AddNodesPipeline] execute successfully브라우저를 열고 Control-1 노드의 IP 주소와 포트에 액세스합니다. 30880, KubeSphere 관리 콘솔의 로그인 페이지에 로그인합니다.
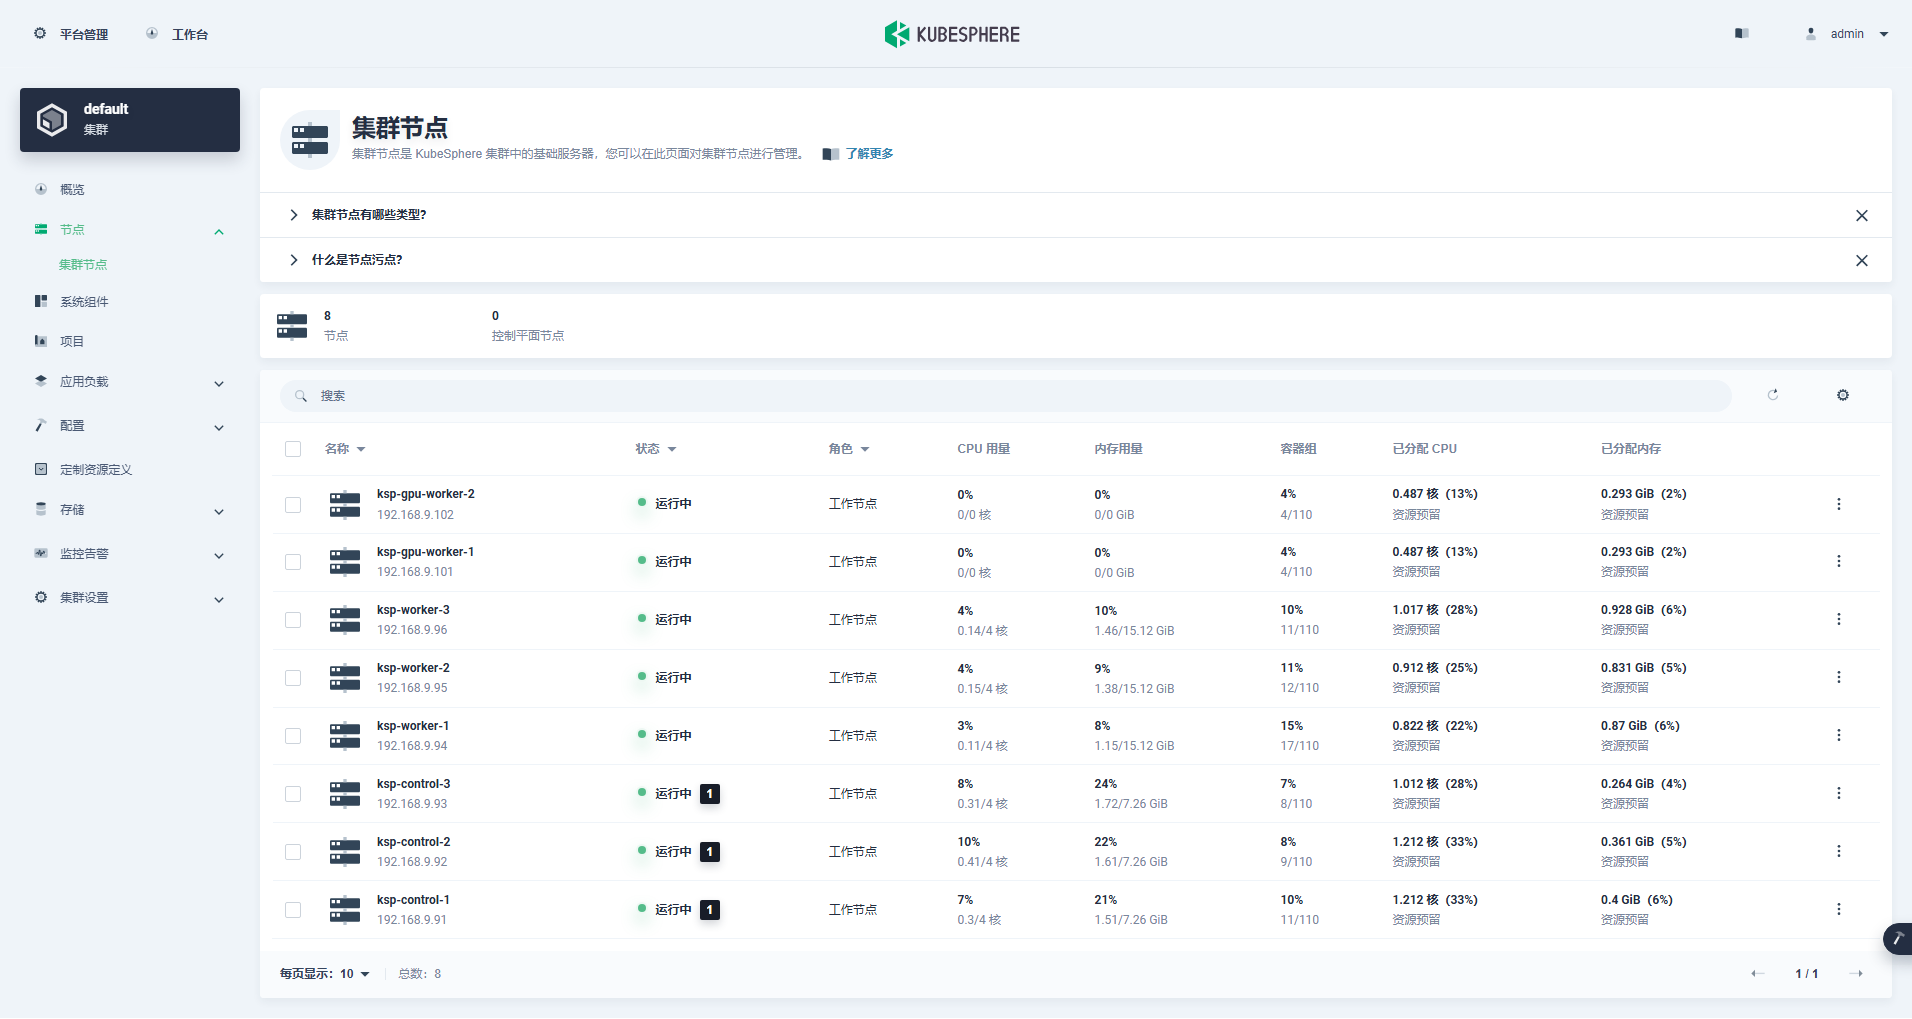
클러스터 관리 인터페이스에 들어가서 왼쪽의 "노드" 메뉴를 클릭한 후 "클러스터 노드"를 클릭하면 쿠버네티스 클러스터의 사용 가능한 노드에 대한 자세한 정보를 볼 수 있습니다.
Control-1 노드에서 kubectl 명령을 실행하여 Kubernetes 클러스터의 노드 정보를 가져옵니다.
kubectl get nodes -o wide출력에서 볼 수 있듯이 현재 Kubernetes 클러스터에는 8개의 노드가 있으며 각 노드의 이름, 상태, 역할, 생존 시간, Kubernetes 버전 번호, 내부 IP, 운영 체제 유형, 커널 버전 및 컨테이너 런타임이 자세히 표시됩니다. . 및 기타 정보.
$ kubectl get nodes -o wide
NAME               STATUS     ROLES           AGE   VERSION   INTERNAL-IP     EXTERNAL-IP   OS-IMAGE                    KERNEL-VERSION                        CONTAINER-RUNTIME
ksp-control-1      Ready      control-plane   25h   v1.28.8   192.168.9.91    <none>        openEuler 22.03 (LTS-SP3)   5.10.0-182.0.0.95.oe2203sp3.x86_64    containerd://1.7.13
ksp-control-2      Ready      control-plane   25h   v1.28.8   192.168.9.92    <none>        openEuler 22.03 (LTS-SP3)   5.10.0-182.0.0.95.oe2203sp3.x86_64    containerd://1.7.13
ksp-control-3      Ready      control-plane   25h   v1.28.8   192.168.9.93    <none>        openEuler 22.03 (LTS-SP3)   5.10.0-182.0.0.95.oe2203sp3.x86_64    containerd://1.7.13
ksp-gpu-worker-1   Ready      worker          59m   v1.28.8   192.168.9.101   <none>        openEuler 22.03 (LTS-SP3)   5.10.0-199.0.0.112.oe2203sp3.x86_64   containerd://1.7.13
ksp-gpu-worker-2   Ready      worker          59m   v1.28.8   192.168.9.102   <none>        openEuler 22.03 (LTS-SP3)   5.10.0-199.0.0.112.oe2203sp3.x86_64   containerd://1.7.13
ksp-worker-1       Ready      worker          25h   v1.28.8   192.168.9.94    <none>        openEuler 22.03 (LTS-SP3)   5.10.0-182.0.0.95.oe2203sp3.x86_64    containerd://1.7.13
ksp-worker-2       Ready      worker          25h   v1.28.8   192.168.9.95    <none>        openEuler 22.03 (LTS-SP3)   5.10.0-182.0.0.95.oe2203sp3.x86_64    containerd://1.7.13
ksp-worker-3 Ready worker 25h v1.28.8 192.168.9.96 <none> openEuler 22.03 (LTS-SP3) 5.10.0-182.0.0.95.oe2203sp3.x86_64 containerd://1.7.13이제 마스터 노드 3개와 워커 노드 3개로 구성된 기존 Kubernetes 클러스터에 작업자 노드 2개를 추가하기 위해 Kubekey를 사용하는 작업을 모두 완료했습니다.
다음으로, GPU 리소스를 사용하도록 K8s 스케줄링 포드를 실현하기 위해 NVIDIA에서 공식적으로 제작한 NVIDIA GPU Operator를 설치합니다.
NVIDIA GPU Operator는 그래픽 드라이버 자동 설치를 지원하지만 CentOS 7, 8과 Ubuntu 20.04, 22.04 및 기타 버전만 openEuler를 지원하지 않으므로 그래픽 드라이버를 수동으로 설치해야 합니다.
참고하세요 KubeSphere의 모범 사례: openEuler 22.03 LTS SP3은 NVIDIA 그래픽 카드 드라이버를 설치합니다., 그래픽 카드 드라이버 설치를 완료하세요.
NFD(Node Feature Discovery)는 기능 검사를 감지합니다.
$ kubectl get nodes -o json | jq '.items[].metadata.labels | keys | any(startswith("feature.node.kubernetes.io"))'위 명령의 실행 결과는 다음과 같습니다. true, 설명하다 NFD 이미 클러스터에서 실행 중입니다. 클러스터에서 NFD가 이미 실행 중인 경우 Operator를 설치할 때 NFD 배포를 비활성화해야 합니다.
설명하다: KubeSphere를 사용하여 배포된 K8s 클러스터는 기본적으로 NFD를 설치 및 구성하지 않습니다.
helm repo add nvidia https://helm.ngc.nvidia.com/nvidia && helm repo update기본 구성 파일을 사용하고, 그래픽 카드 드라이버 자동 설치를 비활성화하고, GPU Operator를 설치합니다.
helm install -n gpu-operator --create-namespace gpu-operator nvidia/gpu-operator --set driver.enabled=false참고: 설치된 이미지가 상대적으로 크기 때문에 초기 설치 시 시간 초과가 발생할 수 있습니다. 이미지를 성공적으로 가져왔는지 확인하세요! 이러한 유형의 문제를 해결하려면 오프라인 설치를 고려할 수 있습니다.
helm install -f gpu-operator-values.yaml -n gpu-operator --create-namespace gpu-operator nvidia/gpu-operator --set driver.enabled=false올바른 실행의 출력 결과는 다음과 같습니다.
$ helm install -n gpu-operator --create-namespace gpu-operator nvidia/gpu-operator --set driver.enabled=false
NAME: gpu-operator
LAST DEPLOYED: Tue Jul  2 21:40:29 2024
NAMESPACE: gpu-operator
STATUS: deployed
REVISION: 1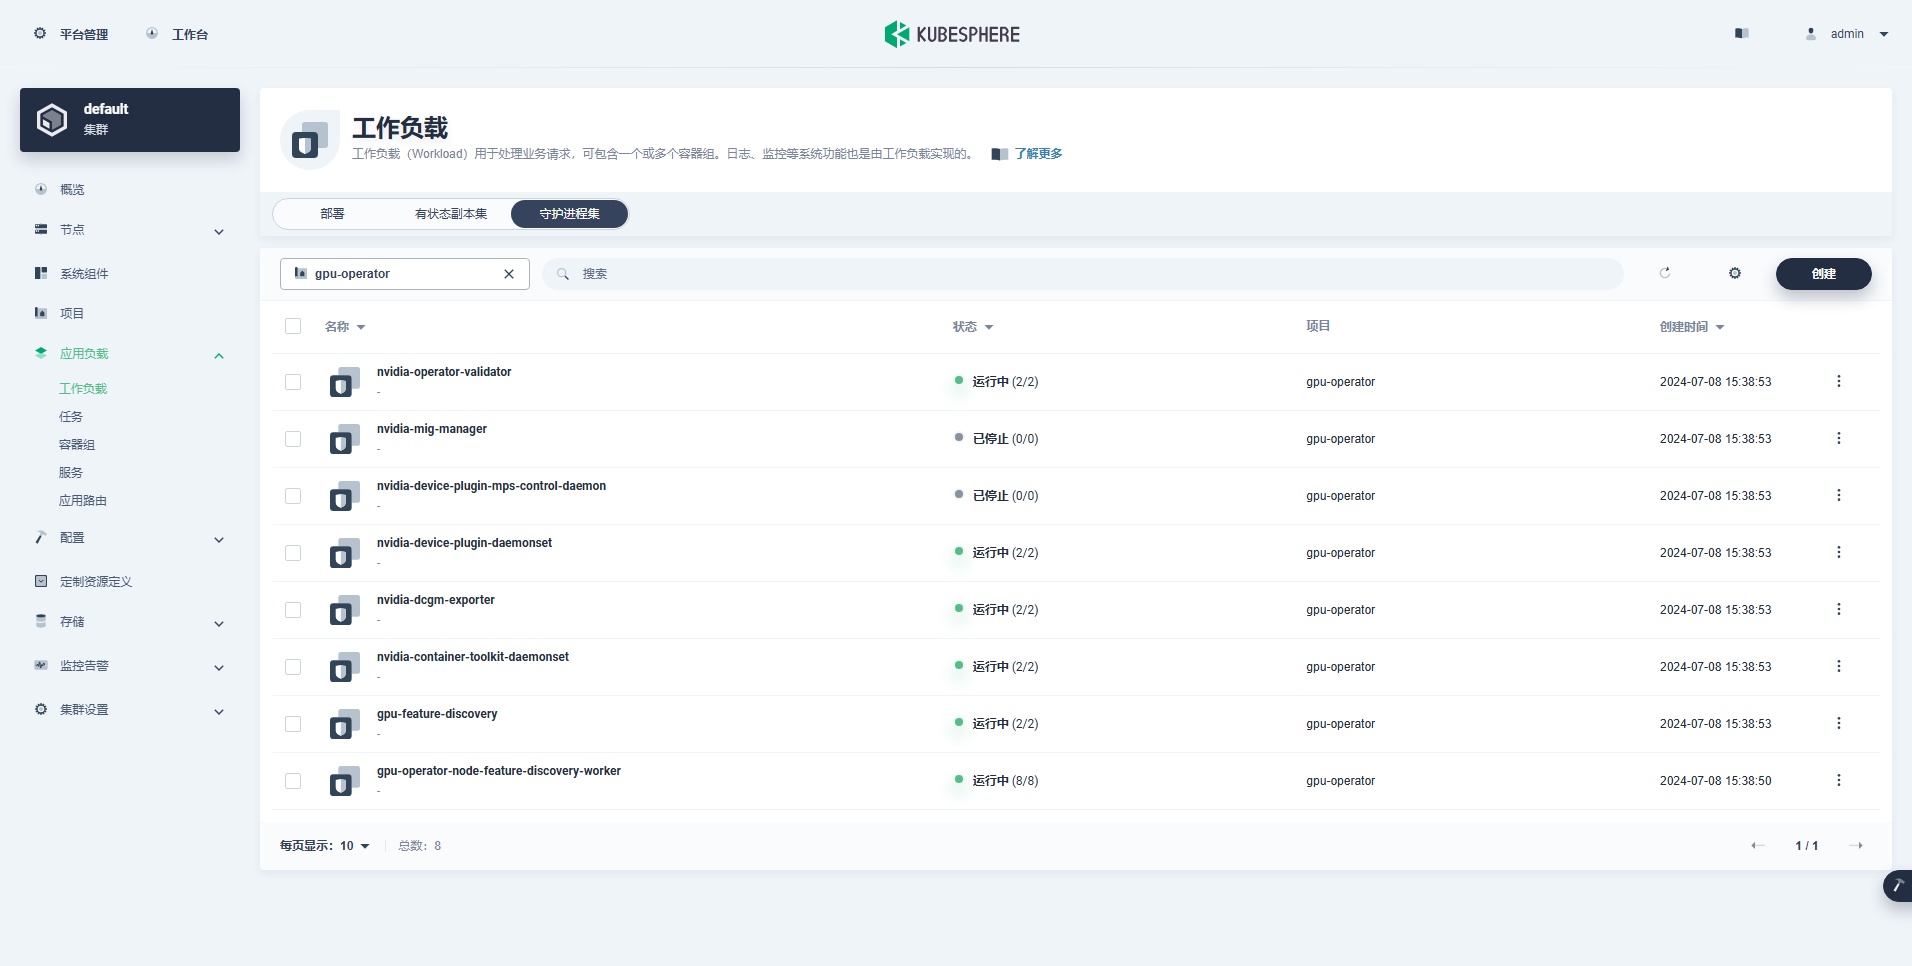
TEST SUITE: NoneGPU Operator를 설치하는 명령을 실행한 후 모든 이미지를 성공적으로 가져오고 모든 Pod가 Running 상태가 될 때까지 참을성 있게 기다려 주십시오.
$ kubectl get pods -n gpu-operator
NAME                                                          READY   STATUS      RESTARTS   AGE
gpu-feature-discovery-czdf5                                   1/1     Running     0          15m
gpu-feature-discovery-q9qlm                                   1/1     Running     0          15m
gpu-operator-67c68ddccf-x29pm                                 1/1     Running     0          15m
gpu-operator-node-feature-discovery-gc-57457b6d8f-zjqhr       1/1     Running     0          15m
gpu-operator-node-feature-discovery-master-5fb74ff754-fzbzm   1/1     Running     0          15m
gpu-operator-node-feature-discovery-worker-68459              1/1     Running     0          15m
gpu-operator-node-feature-discovery-worker-74ps5              1/1     Running     0          15m
gpu-operator-node-feature-discovery-worker-dpmg9              1/1     Running     0          15m
gpu-operator-node-feature-discovery-worker-jvk4t              1/1     Running     0          15m
gpu-operator-node-feature-discovery-worker-k5kwq              1/1     Running     0          15m
gpu-operator-node-feature-discovery-worker-ll4bk              1/1     Running     0          15m
gpu-operator-node-feature-discovery-worker-p4q5q              1/1     Running     0          15m
gpu-operator-node-feature-discovery-worker-rmk99              1/1     Running     0          15m
nvidia-container-toolkit-daemonset-9zcnj                      1/1     Running     0          15m
nvidia-container-toolkit-daemonset-kcz9g                      1/1     Running     0          15m
nvidia-cuda-validator-l8vjb                                   0/1     Completed   0          14m
nvidia-cuda-validator-svn2p                                   0/1     Completed   0          13m
nvidia-dcgm-exporter-9lq4c                                    1/1     Running     0          15m
nvidia-dcgm-exporter-qhmkg                                    1/1     Running     0          15m
nvidia-device-plugin-daemonset-7rvfm                          1/1     Running     0          15m
nvidia-device-plugin-daemonset-86gx2                          1/1     Running     0          15m
nvidia-operator-validator-csr2z                               1/1     Running     0          15m
nvidia-operator-validator-svlc4 1/1 Running 0 15m$ kubectl describe node ksp-gpu-worker-1 | grep "^Capacity" -A 7
Capacity:
cpu: 4
ephemeral-storage: 35852924Ki
hugepages-1Gi: 0
hugepages-2Mi: 0
memory: 15858668Ki
nvidia.com/gpu: 1
pods: 110설명하다: 집중하다
nvidia.com/gpu:필드의 값입니다.
성공적으로 생성된 워크로드는 다음과 같습니다.

GPU Operator가 올바르게 설치된 후 CUDA 기본 이미지를 사용하여 K8이 GPU 리소스를 사용하는 Pod를 올바르게 생성할 수 있는지 테스트합니다.
vi cuda-ubuntu.yamlapiVersion: v1
kind: Pod
metadata:
name: cuda-ubuntu2204
spec:
restartPolicy: OnFailure
containers:
- name: cuda-ubuntu2204
image: "nvcr.io/nvidia/cuda:12.4.0-base-ubuntu22.04"
resources:
limits:
nvidia.com/gpu: 1
command: ["nvidia-smi"]kubectl apply -f cuda-ubuntu.yaml결과를 보면 ksp-gpu-worker-2 노드에 Pod가 생성된 것을 확인할 수 있습니다(노드 그래픽 카드 모델 Tesla P100-PCIE-16GB)。
$ kubectl get pods -o wide
NAME                      READY   STATUS      RESTARTS   AGE   IP             NODE               NOMINATED NODE   READINESS GATES
cuda-ubuntu2204           0/1     Completed   0          73s   10.233.99.15   ksp-gpu-worker-2   <none>           <none>
ollama-79688d46b8-vxmhg 1/1 Running 0 47m 10.233.72.17 ksp-gpu-worker-1 <none> <none>kubectl logs pod/cuda-ubuntu2204올바른 실행의 출력 결과는 다음과 같습니다.
$ kubectl logs pod/cuda-ubuntu2204
Mon Jul  8 11:10:59 2024
+-----------------------------------------------------------------------------------------+
| NVIDIA-SMI 550.54.15              Driver Version: 550.54.15      CUDA Version: 12.4     |
|-----------------------------------------+------------------------+----------------------+
| GPU  Name                 Persistence-M | Bus-Id          Disp.A | Volatile Uncorr. ECC |
| Fan  Temp   Perf          Pwr:Usage/Cap |           Memory-Usage | GPU-Util  Compute M. |
|                                         |                        |               MIG M. |
|=========================================+========================+======================|
|   0  Tesla P100-PCIE-16GB           Off |   00000000:00:10.0 Off |                    0 |
| N/A   40C    P0             26W /  250W |       0MiB /  16384MiB |      0%      Default |
|                                         |                        |                  N/A |
+-----------------------------------------+------------------------+----------------------+

+-----------------------------------------------------------------------------------------+
| Processes:                                                                              |
|  GPU   GI   CI        PID   Type   Process name                              GPU Memory |
|        ID   ID                                                               Usage      |
|=========================================================================================|
|  No running processes found                                                             |
+-----------------------------------------------------------------------------------------+kubectl apply -f cuda-ubuntu.yaml두 개의 벡터를 추가하는 간단한 CUDA 예제를 구현하십시오.
vi cuda-vectoradd.yamlapiVersion: v1
kind: Pod
metadata:
name: cuda-vectoradd
spec:
restartPolicy: OnFailure
containers:
- name: cuda-vectoradd
image: "nvcr.io/nvidia/k8s/cuda-sample:vectoradd-cuda11.7.1-ubuntu20.04"
resources:
limits:
nvidia.com/gpu: 1$ kubectl apply -f cuda-vectoradd.yamlPod가 성공적으로 생성되었으며 시작 후 실행됩니다. vectorAdd 명령을 내리고 종료합니다.
$ kubectl logs pod/cuda-vectoradd올바른 실행의 출력 결과는 다음과 같습니다.
[Vector addition of 50000 elements]
Copy input data from the host memory to the CUDA device
CUDA kernel launch with 196 blocks of 256 threads
Copy output data from the CUDA device to the host memory
Test PASSED
Donekubectl delete -f cuda-vectoradd.yaml위의 검증 테스트를 통해 K8s 클러스터에서 GPU를 사용하는 Pod 리소스를 생성할 수 있음이 입증되었습니다. 다음으로 KubeSphere를 사용하여 실제 사용 요구 사항을 기반으로 K8s 클러스터에 대규모 모델 관리 도구 Ollama를 생성합니다.
이 예시는 간단한 테스트이며, 스토리지를 선택했습니다. 호스트 경로 모드를 실제 사용 시에는 스토리지 클래스나 다른 유형의 영구 스토리지로 교체하세요.
vi deploy-ollama.yamlkind: Deployment
apiVersion: apps/v1
metadata:
name: ollama
namespace: default
labels:
app: ollama
spec:
replicas: 1
selector:
matchLabels:
app: ollama
template:
metadata:
labels:
app: ollama
spec:
volumes:
- name: ollama-models
hostPath:
path: /data/openebs/local/ollama
type: ''
- name: host-time
hostPath:
path: /etc/localtime
type: ''
containers:
- name: ollama
image: 'ollama/ollama:latest'
ports:
- name: http-11434
containerPort: 11434
protocol: TCP
resources:
limits:
nvidia.com/gpu: '1'
requests:
nvidia.com/gpu: '1'
volumeMounts:
- name: ollama-models
mountPath: /root/.ollama
- name: host-time
readOnly: true
mountPath: /etc/localtime
imagePullPolicy: IfNotPresent
restartPolicy: Always
---
kind: Service
apiVersion: v1
metadata:
name: ollama
namespace: default
labels:
app: ollama
spec:
ports:
- name: http-11434
protocol: TCP
port: 11434
targetPort: 11434
nodePort: 31434
selector:
app: ollama
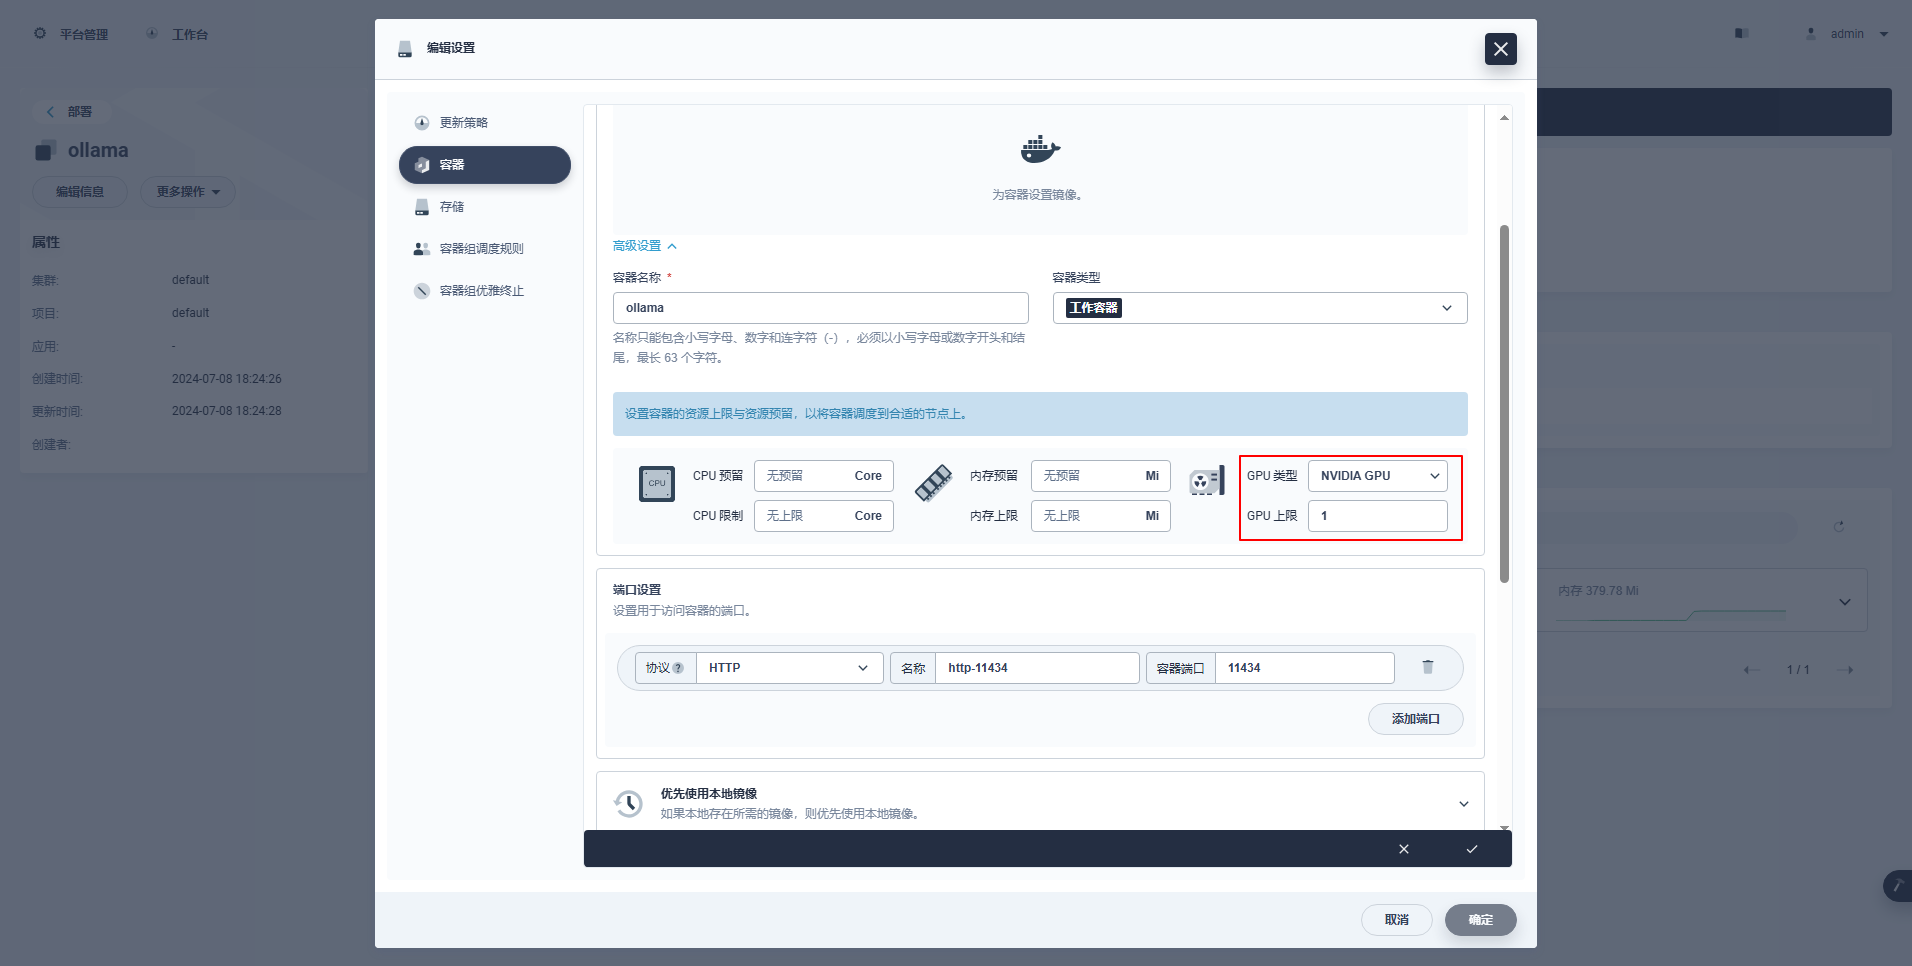
type: NodePort특별 지시: KubeSphere의 관리 콘솔은 GPU 리소스를 사용할 수 있도록 배포 및 기타 리소스의 그래픽 구성을 지원합니다. 관심 있는 친구가 스스로 학습할 수 있는 구성 예는 다음과 같습니다.
kubectl apply -f deploy-ollama.yaml결과를 보면 ksp-gpu-worker-1 노드에 Pod가 생성된 것을 확인할 수 있습니다(노드 그래픽 카드 모델 Tesla M40 24GB)。
$ kubectl get pods -o wide
NAME                      READY   STATUS    RESTARTS   AGE   IP             NODE               NOMINATED NODE   READINESS GATES
k 1/1 Running 0 12s 10.233.72.17 ksp-gpu-worker-1 <none> <none>[root@ksp-control-1 ~]# kubectl logs ollama-79688d46b8-vxmhg
2024/07/08 18:24:27 routes.go:1064: INFO server config env="map[CUDA_VISIBLE_DEVICES: GPU_DEVICE_ORDINAL: HIP_VISIBLE_DEVICES: HSA_OVERRIDE_GFX_VERSION: OLLAMA_DEBUG:false OLLAMA_FLASH_ATTENTION:false OLLAMA_HOST:http://0.0.0.0:11434 OLLAMA_INTEL_GPU:false OLLAMA_KEEP_ALIVE: OLLAMA_LLM_LIBRARY: OLLAMA_MAX_LOADED_MODELS:1 OLLAMA_MAX_QUEUE:512 OLLAMA_MAX_VRAM:0 OLLAMA_MODELS:/root/.ollama/models OLLAMA_NOHISTORY:false OLLAMA_NOPRUNE:false OLLAMA_NUM_PARALLEL:1 OLLAMA_ORIGINS:[http://localhost https://localhost http://localhost:* https://localhost:* http://127.0.0.1 https://127.0.0.1 http://127.0.0.1:* https://127.0.0.1:* http://0.0.0.0 https://0.0.0.0 http://0.0.0.0:* https://0.0.0.0:* app://* file://* tauri://*] OLLAMA_RUNNERS_DIR: OLLAMA_SCHED_SPREAD:false OLLAMA_TMPDIR: ROCR_VISIBLE_DEVICES:]"
time=2024-07-08T18:24:27.829+08:00 level=INFO source=images.go:730 msg="total blobs: 5"
time=2024-07-08T18:24:27.829+08:00 level=INFO source=images.go:737 msg="total unused blobs removed: 0"
time=2024-07-08T18:24:27.830+08:00 level=INFO source=routes.go:1111 msg="Listening on [::]:11434 (version 0.1.48)"
time=2024-07-08T18:24:27.830+08:00 level=INFO source=payload.go:30 msg="extracting embedded files" dir=/tmp/ollama2414166698/runners
time=2024-07-08T18:24:32.454+08:00 level=INFO source=payload.go:44 msg="Dynamic LLM libraries [cpu cpu_avx cpu_avx2 cuda_v11 rocm_v60101]"
time=2024-07-08T18:24:32.567+08:00 level=INFO source=types.go:98 msg="inference compute" id=GPU-9e48dc13-f8f1-c6bb-860f-c82c96df22a4 library=cuda compute=5.2 driver=12.4 name="Tesla M40 24GB" total="22.4 GiB" available="22.3 GiB"시간을 절약하기 위해 이 예에서는 Alibaba의 오픈 소스 qwen2 1.5b 소형 모델을 테스트 모델로 사용합니다.
kubectl exec -it ollama-79688d46b8-vxmhg -- ollama pull qwen2:1.5b올바른 실행의 출력 결과는 다음과 같습니다.
[root@ksp-control-1 ~]# kubectl exec -it ollama-79688d46b8-vxmhg -- ollama pull qwen2:1.5b
pulling manifest
pulling 405b56374e02... 100% ▕█████████████████████████████████████████████████████▏ 934 MB
pulling 62fbfd9ed093... 100% ▕█████████████████████████████████████████████████████▏  182 B
pulling c156170b718e... 100% ▕█████████████████████████████████████████████████████▏  11 KB
pulling f02dd72bb242... 100% ▕█████████████████████████████████████████████████████▏   59 B
pulling c9f5e9ffbc5f... 100% ▕█████████████████████████████████████████████████████▏  485 B
verifying sha256 digest
writing manifest
removing any unused layers
success존재하다 ksp-gpu-worker-1 노드는 다음 보기 명령을 실행합니다.
$ ls -R /data/openebs/local/ollama/
/data/openebs/local/ollama/:
id_ed25519  id_ed25519.pub  models

/data/openebs/local/ollama/models:
blobs  manifests

/data/openebs/local/ollama/models/blobs:
sha256-405b56374e02b21122ae1469db646be0617c02928fd78e246723ebbb98dbca3e
sha256-62fbfd9ed093d6e5ac83190c86eec5369317919f4b149598d2dbb38900e9faef
sha256-c156170b718ec29139d3653d40ed1986fd92fb7e0959b5c71f3c48f62e6636f4
sha256-c9f5e9ffbc5f14febb85d242942bd3d674a8e4c762aaab034ec88d6ba839b596
sha256-f02dd72bb2423204352eabc5637b44d79d17f109fdb510a7c51455892aa2d216

/data/openebs/local/ollama/models/manifests:
registry.ollama.ai

/data/openebs/local/ollama/models/manifests/registry.ollama.ai:
library

/data/openebs/local/ollama/models/manifests/registry.ollama.ai/library:
qwen2

/data/openebs/local/ollama/models/manifests/registry.ollama.ai/library/qwen2:
1.5bcurl http://192.168.9.91:31434/api/chat -d '{
"model": "qwen2:1.5b",
"messages": [
{ "role": "user", "content": "用20个字,介绍你自己" }
]
}'$ curl http://192.168.9.91:31434/api/chat -d '{
"model": "qwen2:1.5b",
"messages": [
{ "role": "user", "content": "用20个字,介绍你自己" }
]
}'
{"model":"qwen2:1.5b","created_at":"2024-07-08T09:54:48.011798927Z","message":{"role":"assistant","content":"我"},"done":false}
{"model":"qwen2:1.5b","created_at":"2024-07-08T09:54:48.035291669Z","message":{"role":"assistant","content":"是一个"},"done":false}
{"model":"qwen2:1.5b","created_at":"2024-07-08T09:54:48.06360233Z","message":{"role":"assistant","content":"人工智能"},"done":false}
{"model":"qwen2:1.5b","created_at":"2024-07-08T09:54:48.092411266Z","message":{"role":"assistant","content":"助手"},"done":false}
{"model":"qwen2:1.5b","created_at":"2024-07-08T09:54:48.12016935Z","message":{"role":"assistant","content":","},"done":false}
{"model":"qwen2:1.5b","created_at":"2024-07-08T09:54:48.144921623Z","message":{"role":"assistant","content":"专注于"},"done":false}
{"model":"qwen2:1.5b","created_at":"2024-07-08T09:54:48.169803961Z","message":{"role":"assistant","content":"提供"},"done":false}
{"model":"qwen2:1.5b","created_at":"2024-07-08T09:54:48.194796364Z","message":{"role":"assistant","content":"信息"},"done":false}
{"model":"qwen2:1.5b","created_at":"2024-07-08T09:54:48.21978104Z","message":{"role":"assistant","content":"和"},"done":false}
{"model":"qwen2:1.5b","created_at":"2024-07-08T09:54:48.244976103Z","message":{"role":"assistant","content":"帮助"},"done":false}
{"model":"qwen2:1.5b","created_at":"2024-07-08T09:54:48.270233992Z","message":{"role":"assistant","content":"。"},"done":false}
{"model":"qwen2:1.5b","created_at":"2024-07-08T09:54:48.29548561Z","message":{"role":"assistant","content":""},"done_reason":"stop","done":true,"total_duration":454377627,"load_duration":1535754,"prompt_eval_duration":36172000,"eval_count":12,"eval_duration":287565000}$ kubectl describe node ksp-gpu-worker-1 | grep "Allocated resources" -A 9
Allocated resources:
(Total limits may be over 100 percent, i.e., overcommitted.)
Resource Requests Limits
-------- -------- ------
cpu 487m (13%) 2 (55%)
memory 315115520 (2%) 800Mi (5%)
ephemeral-storage 0 (0%) 0 (0%)
hugepages-1Gi 0 (0%) 0 (0%)
hugepages-2Mi 0 (0%) 0 (0%)
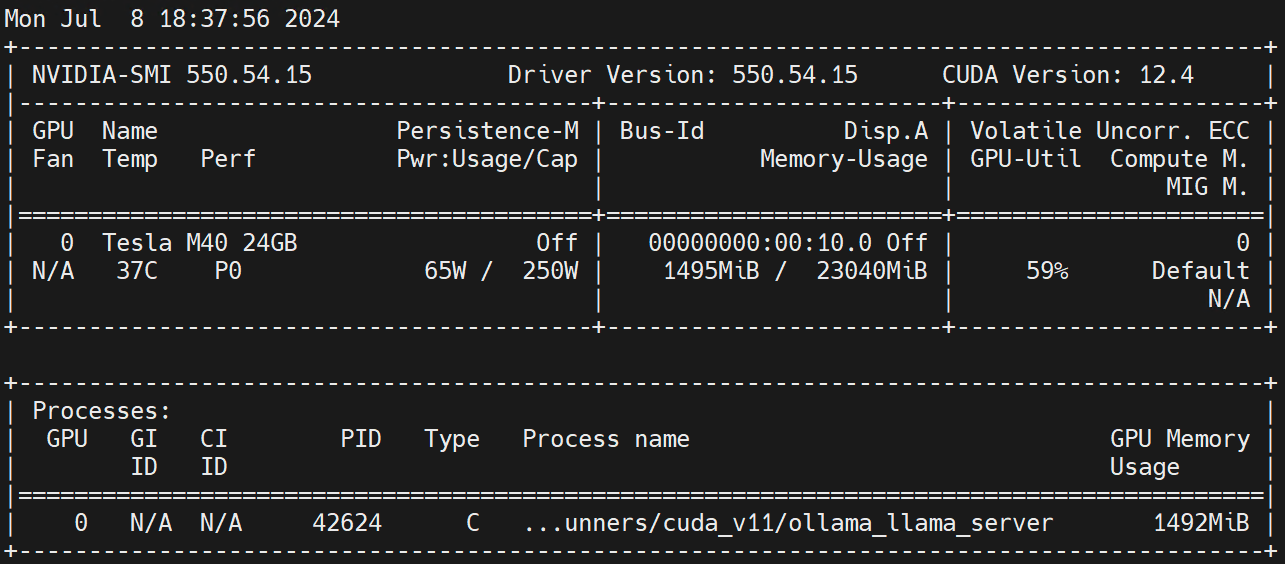
nvidia.com/gpu 1 1작업자 노드에서 실행 nvidia-smi -l GPU 사용량을 관찰하세요.
부인 성명:
이 글은 블로그 원포스트 다중출판플랫폼에 게재되었습니다. 오픈라이트 풀어 주다!

그는 30년 이상 기술 연구에 전념해 왔으며, java, linux, javascript, php, css 등 다양한 언어에 능숙하며, 오픈 소스 분야에서 많은 공헌을 했습니다. 나중에 참조할 수 있도록 기술 개발의 일부 문제를 공유하는 개발자 문서 스테이션입니다.

우편메소피아@프로톤메일.com